background image

E-25

English

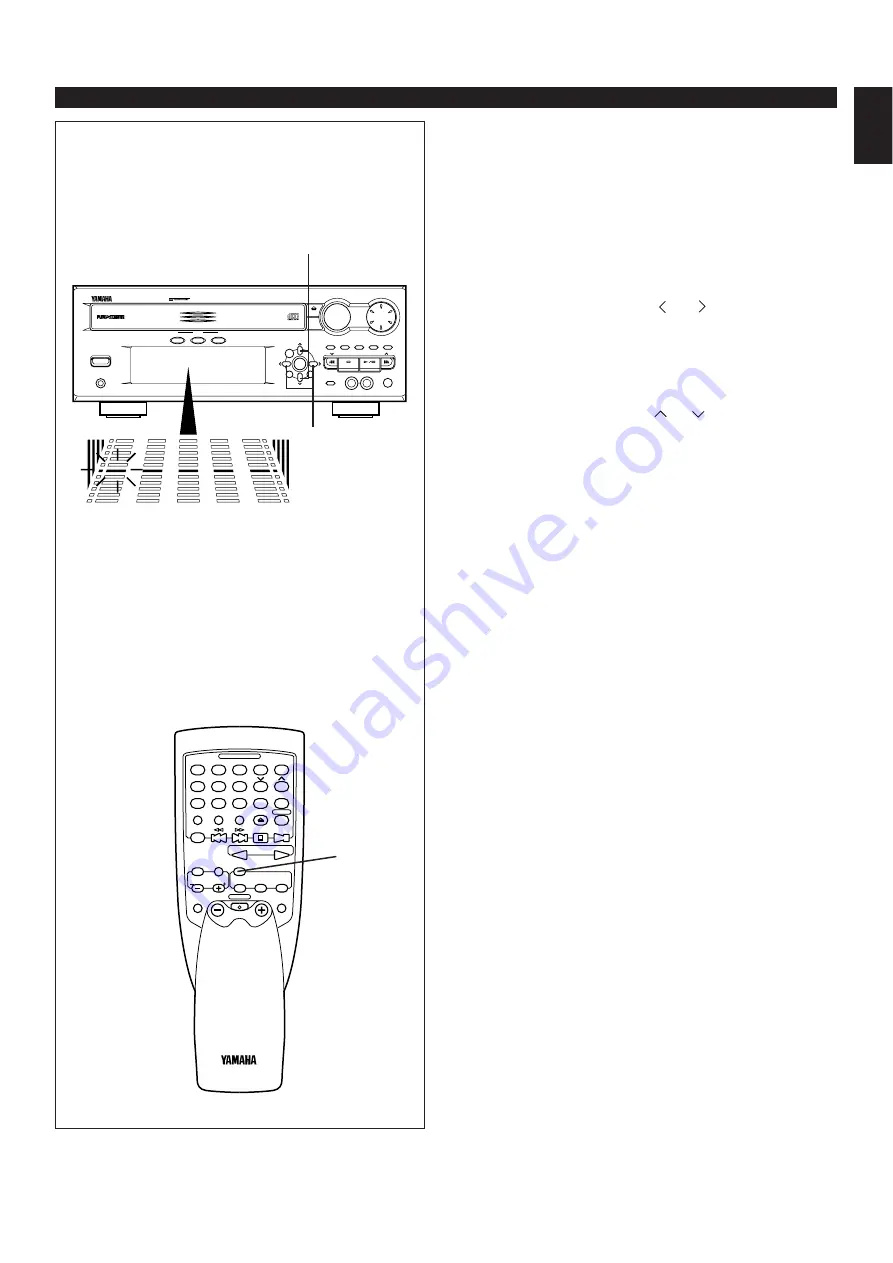
Adjusting the graphic equalizer
for your desired sound taste

The 5 band graphic equalizer allows you to adjust the level
for each frequency band.
* Make adjustment by monitoring the equalizer level

indicators on the display.

1

Play back a source. (For source playback, refer to the
sections beginning on page 13.)

2

Press the equalizer control 

or 

button once or

more to select the frequency band to which you will adjust
the level.
* The selected frequency band is shown on the display.
* The scale bar of the selected frequency band on the 

graphic equalizer level indicators will flash.

3

Press the equalizer control

or 

button once or more

to adjust the level.

4

In the same way, make adjustment for other frequency
band.

Note
If the KARAOKE (including L R, L ONRY and R ONLY)
program is selected, cancel it or select another sound
field program.

Turning the equalizer to “flat” (the
state with no equalization applied)

By one of the following methods, the settings of preset
graphic equalizer mode (MUSIC) and sound field program
(PROGRAM) are turned off and the equalizer pattern is
turned to “flat”.

Press the FLAT button on the remote control transmitter.
* Pressing the FLAT button once more will restore the

state before the equalizer was turned to “flat”.

Press the MUSIC button and the PROGRAM button on the
front panel at the same time.
* There is no way to restore the state before the equalizer

was turned to “flat”.

USING GRAPHIC EQUALIZER

100 350

1K 3.5K 10K

CD CHANGER RECEIVER EMX–100CD

PHONES

POWER

DISC

1

2

3

PROGRAM

ECHO

ECHO

MUSIC

USER

MEMORY

INPUT SELECTOR

VCR/LD-TV/CD/TUNER/TAPE•MD/AUX

VOLUME

RANDOM

DISPLAY

MIC

MIN

MAX

MIC MIXING

REPEAT

TIME

MEMORY

AUTO/MAN'L

HOUR

PRESET/TUNING/BAND

A/B/C/D/E

MIN

TIME ADJ

TIMER

OPEN/
CLOSE

DISC
CHANGE

1

1

2

2

3

3

4

4

5

5

TIME

A

DISC SKIP

PROG

B

C

D

+

I0

E

OPEN/CLOSE

RANDOM

REPEAT

MODE

6

6

7

7

8

8

9

0

CD

PRESET

TUNER

STOP

INPUT

PLAY/PAUSE

LEVEL

MUSIC

TEST

FLAT

CENTER/REAR

/DELAY

ECHO

PROGRAM

USER

POWER

DISPLAY

SLEEP

VOLUME

FLAT

2

3

Содержание EMX-100CD

Страница 1: ... USER MEMORY INPUT SELECTOR VCR LD TV CD TUNER TAPE MD AUX VOLUME RANDOM DISPLAY MIC MIN MAX MIC MIXING REPEAT TIME MEMORY AUTO MAN L HOUR PRESET TUNING BAND A B C D E MIN TIME ADJ TIMER OPEN CLOSE DISC CHANGE CD CHANGER RECEIVER EMX 100CD PHONES POWER DISC 1 2 3 PROGRAM ECHO ECHO MUSIC USER MEMORY INPUT SELECTOR VCR LD TV CD TUNER TAPE MD AUX VOLUME RANDOM DISPLAY MIC MIN MAX MIC MIXING REPEAT TI...

Страница 2: ...l transmitter Controlador remoto Batteries size AA UM SUM 3 R6 HP 7 Pilas tamaño AA tipo UM SUM 3 R6 HP 7 AM loop antenna Antena de cuadro AM Indoor FM antenna Antena interior de FM 1 1 2 2 3 3 4 4 5 5 TIME A DISC SKIP PROG B C D I0 E OPEN CLOSE RANDOM REPEAT MODE 6 6 7 7 8 8 9 0 CD PRESET TUNER STOP INPUT PLAY PAUSE LEVEL MUSIC TEST FLAT CENTER REAR DELAY ECHO PROGRAM USER POWER DISPLAY SLEEP VOL...

Страница 3: ... MAX MIC MIXING REPEAT TIME MEMORY AUTO MAN L HOUR PRESET TUNING BAND A B C D E MIN TIME ADJ TIMER OPEN CLOSE DISC CHANGE MHz PRESET USER NOR TEST PHANTOM TIMER SLEEP STEREO TUNED MEMORY AUTO PROGRAM MUSIC ROCK BLUES RAP JAZZ PRO LOGIC HALL ARENA 3 STEREO KARAOKE L R 1 2 3 4 100 350 1K 3 5K 10K VOLUME G 8 9 7 6 5 4 3 H I F E J 1 2 D 0 B A C C E D 1 2 3 4 5 6 7 8 9 0 A B ...

Страница 4: ...MD AUX VOLUME RANDOM DISPLAY MIC MIN MAX MIC MIXING REPEAT TIME MEMORY AUTO MAN L HOUR PRESET TUNING BAND A B C D E MIN TIME ADJ TIMER OPEN CLOSE DISC CHANGE TRACK TOTAL REM USER RANDOM PROGRAM MUSIC ROCK ARENA 100 350 1K 3 5K 10K PROG S F REP VOLUME OVER 15 1 2 3 4 7 8 9 10 13 14 15 5 11 6 12 N O M L T K P Q K L J M N F G H I S R 2 ...

Страница 5: ...NTER REAR DELAY ECHO PROGRAM USER POWER DISPLAY SLEEP VOLUME 2 3 5 7 8 6 4 G F B D C A 0 E 9 1 1 1 2 2 3 3 4 4 5 5 TIME A DISC SKIP PROG B C D I0 E OPEN CLOSE RANDOM REPEAT MODE 6 6 7 7 8 8 9 0 CD PRESET TUNER STOP INPUT PLAY PAUSE LEVEL MUSIC TEST FLAT CENTER REAR DELAY ECHO PROGRAM USER POWER DISPLAY SLEEP VOLUME H I J K R Q N O M P L 1 3 2 4 30 30 0 2 m 6 m 8 20 5 ...

Страница 6: ...E OWNER S MANUAL FOR CONNECTION SEE OWNER S MANUAL FOR CONNECTION REAR 4Ω MIN SPEAKER REAR SINGLE 8Ω MIN SPEAKER R L UNSWITCHED 100W MAX AUDIO SIGNAL AUX TAPE MD LD TV AUDIO SIGNAL VCR SUBWOOFER R IN OUT IN OUT OUT VCR MONITOR OUT LD TV VIDEO SIGNAL ANTENNA AM FM GND 75Ω UNBAL NORMAL 50kHz 9kHz 10kHz 100kHz FM AM PHANTOM CENTER MODE FREQUENCY STEP IN OUT VIDEO SIGNAL SUBWOOFER OUT OUT Center speak...

Страница 7: ...AUDIO SIGNAL VCR SUBWOOFER R IN OUT IN OUT OUT VCR MONITOR OUT LD TV VIDEO SIGNAL ANTENNA AM FM GND 75Ω UNBAL NORMAL 50kHz 9kHz 10kHz 100kHz FM AM PHANTOM CENTER MODE FREQUENCY STEP IN OUT VIDEO SIGNAL To AC Outlet Al tomacorriente Tape deck etc Platina etc Video cassette recorder Videograbador Tape deck MD recoder etc Platina grabador de minidiscos etc LD player etc Tocadiscos de discos láser etc...

Страница 8: ...C MIN MAX MIC MIXING REPEAT TIME MEMORY AUTO MAN L HOUR PRESET TUNING BAND A B C D E MIN TIME ADJ TIMER OPEN CLOSE DISC CHANGE SPEAKERS CENTER REAR VOLTAGE SELECTOR SPEAKERS FRONT AC OUTLET MAINS R L CENTER REAR REAR REAR SINGLE CENTER 8Ω MIN SPEAKER 6Ω MIN SPEAKER SEE OWNER S MANUAL FOR CONNECTION SEE OWNER S MANUAL FOR CONNECTION REAR 4Ω MIN SPEAKER REAR SINGLE 8Ω MIN SPEAKER R L L UNSWITCHED 10...

Страница 9: ...UNING OPERATION 20 22 OPERATING EXTERNAL UNITS CONNECTED WITH THIS UNIT 23 USING GRAPHIC EQUALIZER 24 25 USING SOUND FIELD PROCESSOR 26 29 STORING YOUR OWN PROGRAMS 30 KARAOKE OPERATION 31 HOW TO USE THE BUILT IN TIMER 32 34 TROUBLESHOOTING 35 SPECIFICATIONS 36 Thank you for purchasing this YAMAHA product We hope it will give you many years of trouble free enjoyment For the best performance read t...

Страница 10: ...not use force on switches controls or connection wires When moving the unit first disconnect the power plug and the wires connected to other equipment Never pull the wire itself Do not attempt to clean the unit with chemical solvents this might damage the finish Use a clean dry cloth Be sure to read the TROUBLESHOOTING section regarding common operating errors before concluding that the unit is fa...

Страница 11: ...the AC outlet CAUTION 1 Use of controls or adjustments or performance of procedures other than those specified herein may result in hazardous radiation exposure CAUTION 2 As the laser beam used in this unit is harmful to the eyes do not attempt to disassemble the cabinet Refer servicing to qualified personnel only Laser component in this product is capable of emitting radiation exceeding the limit...

Страница 12: ...table According to the Music Source ROCK BLUES RAP and JAZZ 4 Sound Field and 4 Equalizer Control Mode Storing Capability Dolby Pro Logic Surround This unit employs a Dolby Pro Logic Surround decoder similar to professional Dolby Stereo decoders used in many movie theaters By using the Dolby Pro Logic Surround decoder you can experience the dramatic realism and impact of Dolby Surround movie theat...

Страница 13: ...cator PROGRAM 3 User Program Number Indicator 4 Center Channel Mode NOR PHANTOM Indicator 5 TEST Indicator 6 TIMER Set Indicator 7 SLEEP Indicator 8 AUTO Tuning Indicator 9 TUNED Indicator STEREO Indicator A MEMORY Indicator B Volume Level Meter C Graphic Equalizer Level Indicators D Preset Number Indicator E Multi Information Display Time Station Frequency Volume Level etc For CD player See figur...

Страница 14: ...mitter and the sensor on the main unit with a soft cloth Exposing the sensor on the main unit to strong light especially an inverter type of fluorescent lamp etc may interfere with operation In this case reposition the main unit to avoid direct lighting Keep the remote control transmitter away from moisture excessive heat shock and vibrations The remote control transmitter s usable range is within...

Страница 15: ...ker and the ambience will be excellent Set the center channel mode to the NORMAL position For details refer to page 11 2 4 Speaker Configuration The center speaker is not used in this configuration If the sound field program DOLBY PRO LOGIC is selected the center sound is output from the left and the right front speakers although the program DOLBY 3 STEREO is useless in this configuration However ...

Страница 16: ...nna try reversing the wire connections from the upper side to the lower side and vice versa Do not place the AM loop antenna on the unit It will result in noise generation since the unit is equipped with digital electronics Place the AM loop antenna away from the unit 3 External FM antenna Use an external FM antenna instead of an indoor FM antenna if you need better reception Consult your dealer 4...

Страница 17: ...terminal is for output to a monaural amplifier driving a subwoofer Only frequencies below 200 Hz from the front and center channels are output Connecting external components See figure 7 on page 7 7 This unit can be connected with external audio and video components Make connections between this unit and other components using RCA pin plug connector cables correctly that is to say L left to L and ...

Страница 18: ... HOUR button once to advance the time by 1 hour Press and hold to advance continuously 3 While holding the TIME ADJ button pressed press the MIN button and set the minute Press the MIN button once to advance the time by 1 minute Press and hold to advance continuously Singapore model use a 24 hour display For General model uses either the 24 hour display or the 12 hour display is selected depending...

Страница 19: ...d the sound output level heard at the listening position will be the same from each speaker This is important for the best performance of the built in Dolby Pro Logic surround decoder The adjustment of each speaker output level should be done at your listening position with the remote control transmitter Otherwise the result may not be satisfactory Before operation Set the CENTER MODE switch on th...

Страница 20: ...ressing the LEVEL control buttons changes the output level of the rear speakers Pressing the button raises and the button lowers the level 7 If the adjustments have finished press the TEST button to cancel the test tone TEST disappears from the display Notes Once you have completed these adjustments you can adjust whole sound level on your audio system by using the VOLUME control or the VOLUME key...

Страница 21: ...he DISC SKIP button on the remote control transmitter once or more so that the corresponding disc tray number is located on the top of the disc indicator 7 Press the play pause button to start playback from track 1 The indicator will appear and playback will begin As the playback of each track on the music calendar is finished that track number will go out For easier operation Pressing the DISC se...

Страница 22: ...t to shock or vibration can cause mistracking Playing back some compact discs at high volume can cause mistracking In this case listen at lower volume Do not pull open the disc table forcibly with your hands Do not push the disc table while it is moving If the power fails while the table is open wait until the power supply returns or gently push the table manually to close it The temperature range...

Страница 23: ...or backward from any point on the disc However it will not move forward during playback of the final track To advance or reverse play rapidly Manual search 1 Begin playback 2 Press and hold the button to advance playback rapidly and the button to reverse playback rapidly The sound can be heard although slightly garbled during manual search in either direction This is convenient for reviewing the c...

Страница 24: ...conds press the 2 button 5 Repeat steps 3 and 4 for any other track Up to 20 tracks can be programmed 6 Press the play pause button to start playback of programmed tracks Notes It is also possible to program a sequence of tracks while looking at the list of tracks on the surface of the disc before closing the disc table During playback or pause programming is not possible If the total time of the ...

Страница 25: ... correct program data 1 Follow the procedure described in To check program data 2 Display the track number to be corrected by pressing the or button 3 Press a track number input button to select a track to replace the one displayed The previously programmed track will be cleared from the memory and the new one will be programmed 4 When the correction has finished press the PROG button or play paus...

Страница 26: ... the all disc play mode All discs on the disc table are played back repeatedly In the random play mode the random play is performed among all discs and repeated with a different order of tracks every time Note In the program play mode a sequence of programmed tracks is played back repeatedly To cancel the repeat play Press the REPEAT button once or more so that the S F REP indicator goes out COMPA...

Страница 27: ...hat time will be displayed 41 minutes remain till the end of the disc Notes During random play the total remaining play time on the disc will not be displayed The remaining play time will not be displayed for track number 16 or higher If track number 16 or higher is programmed during the program play the total play time and the total remaining play time will not be displayed COMPACT DISC PLAYER OP...

Страница 28: ...gth is received Manual tuning 1 1 Follow steps 1 and 2 of the Automatic tuning method 2 2 Press the AUTO MAN L button so that AUTO disappears from the display In this mode stations are received in monaural 3 3 Press and hold the button to tune to a higher frequency or press and hold the button to tune to a lower frequency Release it just before reaching the desired frequency and then press it repe...

Страница 29: ...by selecting other groups in step 3 To recall a preset station 1 1 Select a group of preset stations by pressing the A B C D E button 2 2 Select the desired preset station number by pressing the or button repeatedly Notes A new setting can be programmed in place of the former one For presets the setting of the AUTO MAN L button is stored along with the station frequency For easier operation By usi...

Страница 30: ...tations are searched for first there may be a case that 40 preset stations are occupied by FM stations only With this function only stations with sufficient signal strength are stored automatically If the station you want to program is weak in signal strength tune in to it with the Manual tuning method in monaural and program it by following the procedure of the section To store stations on the pr...

Страница 31: ...OR 2 2 Play back the source and then turn the VOLUME control up to confirm the input source 3 3 Begin recording on the tape deck or VCR etc connected with this unit Note If the built in graphic equalizer and or sound field processor is used its effect is recorded along with the source when you make recording on the recording unit connected to the TAPEzMD terminals on the rear of this unit However ...

Страница 32: ...cies are also emphasized moderately MUSIC ROCK BLUES RAP JAZZ CD CHANGER RECEIVER EMX 100CD PHONES POWER DISC 1 2 3 PROGRAM ECHO ECHO MUSIC USER MEMORY INPUT SELECTOR VCR LD TV CD TUNER TAPE MD AUX VOLUME RANDOM DISPLAY MIC MIN MAX MIC MIXING REPEAT TIME MEMORY AUTO MAN L HOUR PRESET TUNING BAND A B C D E MIN TIME ADJ TIMER OPEN CLOSE DISC CHANGE 1 1 2 2 3 3 4 4 5 5 TIME A DISC SKIP PROG B C D I0 ...

Страница 33: ...with no equalization applied By one of the following methods the settings of preset graphic equalizer mode MUSIC and sound field program PROGRAM are turned off and the equalizer pattern is turned to flat Press the FLAT button on the remote control transmitter Pressing the FLAT button once more will restore the state before the equalizer was turned to flat Press the MUSIC button and the PROGRAM but...

Страница 34: ...e creators designed by using five speakers You can experience the dramatic realism and impact of a movie theater This program is effective not only for playback of sources encoded with Dolby Surround but also for sources not encoded with Dolby Surround or TV programs with 2 channel stereo sound With this program 2 channel stereo sound is converted into 3 channels left front center and right front ...

Страница 35: ...C or DOLBY 3 STEREO no sound is heard from the front speakers and the rear speakers Sound is heard only from the center speaker For DOLBY PRO LOGIC only however if the center channel mode is in PHANTOM the front speakers output the sound of the center channel USING SOUND FIELD PROCESSOR CD CHANGER RECEIVER EMX 100CD PHONES POWER DISC 1 2 3 PROGRAM ECHO ECHO MUSIC USER MEMORY INPUT SELECTOR VCR LD ...

Страница 36: ...not be adjusted This is because in this mode the center sound is automatically output from the left and right front speakers USING SOUND FIELD PROCESSOR 1 1 2 2 3 3 4 4 5 5 TIME A DISC SKIP PROG B C D I0 E OPEN CLOSE RANDOM REPEAT MODE 6 6 7 7 8 8 9 0 CD PRESET TUNER STOP INPUT PLAY PAUSE LEVEL MUSIC TEST FLAT CENTER REAR DELAY ECHO PROGRAM USER POWER DISPLAY SLEEP VOLUME Adjusting REAR LEVEL If d...

Страница 37: ...ontinuously The value stops changing momentarily at the preset point Notes When DOLBY 3 STEREO is selected this adjustment cannot be made Adding too much delay will cause an unnatural effect with some sources When the LEVEL control button is pressed sound is momentarily interrupted Note The values of the delay time center level and rear level you set the last time will remain memorized even when t...

Страница 38: ... store only an equalizer pattern of your own adjusting without storing any sound field program Notes A new program can be stored in place of the former one In step 4 or 5 if the user program number indicator stops flashing before operation return to step 3 To recall a user program 1 1 Play back a source For source playback refer to the sections beginning on page 13 2 2 Press the USER button once o...

Страница 39: ...program indicator 1 1 2 2 3 3 4 4 5 5 TIME A DISC SKIP PROG B C D I0 E OPEN CLOSE RANDOM REPEAT MODE 6 6 7 7 8 8 9 0 CD PRESET TUNER STOP INPUT PLAY PAUSE LEVEL MUSIC TEST FLAT CENTER REAR DELAY ECHO PROGRAM USER POWER DISPLAY SLEEP VOLUME Feature Signals on the left channel and the right channel are output from the left and right speakers respectively Selecting this mode is suitable for singing k...

Страница 40: ...following the setting procedure described below Current time TIMER on off mode Source selecting mode TUNER CD ON TIME Time setting mode OFF TIME Time setting mode Normal display mode Note The display mode will be changed to the next mode after about 8 seconds elapse in turn automatically If the mode is changed before the setting is completed call the mode again by pressing the DISPLAY button once ...

Страница 41: ...button Note If a timer play setting is made and the power is not turned off the source set for the timer play will begin playing when the time comes in place of the source played at that time To cancel the timer play setting After the timer play is finished press the DISPLAY button to call the current time While the current time is displayed press the TIMER button so that TIMER goes out from the d...

Страница 42: ... or press the SLEEP button repeatedly until OFF SLEEP appears on the display The SLEEP indicator will go out Using the timer and the sleep timer at the same time 1 Prepare timer play See page 32 and 33 Do not turn the power to this unit off after the timer setting is finished 2 Press the SLEEP button and set the sleep time When the sleep timer operation finishes the timer begins functioning to tur...

Страница 43: ...YMPTOM No power even if the POWER switch is pressed No sound from one speaker No sound from speakers No sound from the rear speakers No sound from the center speaker No sound or no picture from an external unit connected with this unit Can t set timer This unit will not operate properly Excessive static in FM broadcasts Noise increases during stereo broadcasts Stereo broadcasts are noisy and STERE...

Страница 44: ... Network AUX 75 dB Graphic Equalizer Characteristics 100 Hz 350 Hz 1 kHz 3 5 kHz 10 kHz 10 dB Video section Video Signal Level 1 Vp p 75 ohms Maximum Input Level 1 5 Vp p or more Signal to Noise Ratio 50 dB or more Monitor Out Frequency Response 5 Hz to 10 MHz 3 dB Tuner section Tuning Range FM 87 5 to 108 0 MHz AM Singapore model 531 to 1 611 kHz General model 530 to 1 710 kHz Usable Sensitivity ...

Страница 45: ...onía FM 87 5 a 108 0 MHz AM Modelo para Singapur 531 a 1 611 kHz Modelo General 530 a 1 710 kHz Sensibilidad útil FM 75 ohmios Silenciamiento a 30 dB de relación señal ruido 1 kHz modulación al 100 1 5 µV 14 8 dBf AM 280 µV m Sección del tocadiscos de discos compactos Tipo Cambiador automático de 3 discos en círculo Lectura de las senãles Recogidas por laser semiconductor de 3 rayos sin contacto C...

Отзывы: