background image

10

EAD10 Owner’s Manual

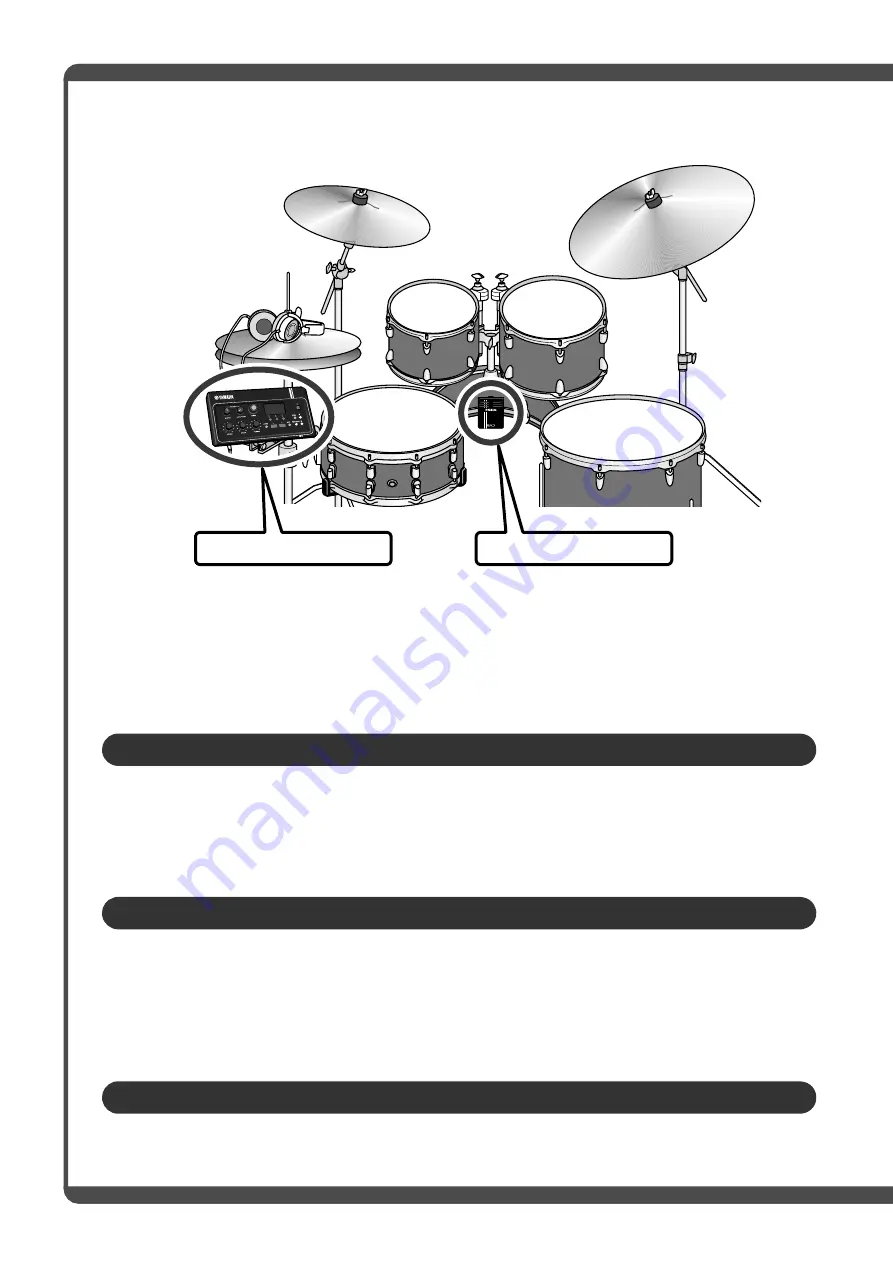
Features of the EAD10

The EAD10 lets you easily change the sound of your acoustic drums into the sound of your liking.
Connect a smart phone to the EAD10 and enjoy playing the drums along with your favorite music.
Also, it can be used in a wide range of applications from practice, recording to live situations.

• Sensor Unit that mounts on the bass drum makes setup simple
• Built-in XY configured stereo mic provides high quality monitoring of the entire drum set with natu-

ral balance and stereo orientation

• Loud drums can be monitored with proper volume using headphones or earphones

• Change effect settings with a single knob and easily save and recall settings
• PCM tone generator makes it easy to change the sound of your bass drum by using a Triggered 

sound — even in the middle of a performance

• Play a wide range of musical genres from contemporary to the by using the effects, your own sam-

ples or the internal Triggered sounds

• Recording and playback possible via USB flash drive or USB audio
• Left and right outputs allow you to easily connect to a PA

Main Unit

Sensor Unit

Easy setup allows comfortable monitoring of your drum sound while playing

Transforms the sound of your drums into a sound of your liking

Use for recording or in-live situations

Содержание EAD10

Страница 1: ...Owner s Manual Electronic Acoustic Drum Module EN Quick Guide Features of the EAD10 page 6 page 10 ...

Страница 2: ... believe that our products and the production methods used to produce them meet these goals In keep ing with both the letter and the spirit of the law we want you to be aware of the following Battery Notice This product MAY contain a small non rechargeable battery which if applicable is soldered in place The average life span of this type of battery is approximately five years When replacement bec...

Страница 3: ... in the users manual may cause interference harmful to the operation of other electronic devices Compliance with FCC regulations does not guarantee that interference will not occur in all installations If this product is found to be the source of interference which can be determined by turning the unit OFF and ON please try to elimi nate the problem by using one of the following measures Relocate ...

Страница 4: ... of the polarized or grounding type plug A polarized plug has two blades with one wider than the other A grounding type plug has two blades and a third grounding prong The wide blade or the third prong are provided for your safety If the provided plug does not fit into your outlet consult an electrician for replacement of the obsolete outlet 10 Protect the power cord from being walked on or pinche...

Страница 5: ...of old products please take them to applicable collection points in accordance with your national legislation By disposing of these products correctly you will help to save valuable resources and prevent any potential negative effects on human health and the environment which could otherwise arise from inappropriate waste handling For more information about collection and recycling of old products...

Страница 6: ...ied adaptor page 63 only Using the wrong adaptor can result in damage to the instrument or overheating Check the electric plug periodically and remove any dirt or dust which may have accumulated on it This instrument contains no user serviceable parts Do not open the instrument or attempt to disassemble or modify the internal components in any way If it should appear to be malfunctioning discontin...

Страница 7: ...er if you are installing the EAD10 on the hi hat stand Also make sure you use the wing bolts included with the module holder Failure to do so could cause damage to the internal components or result in the instrument falling over Be sure to securely tighten the clamp screw and module holder wing bolts when setting up the EAD10 Also do not loosen the clamp screw or module holder wing bolts rapidly N...

Страница 8: ...tion About copyrights Copying of the commercially available musical data including but not limited to MIDI data and or audio data is strictly prohibited except for your personal use This product incorporates and bundles contents in which Yamaha owns copyrights or with respect to which Yamaha has license to use others copyrights Due to copyright laws and other relevant laws you are NOT allowed to d...

Страница 9: ...quirements etc may be found on or near the name plate which is at the bottom of the unit You should note this serial number in the space provided below and retain this manual as a permanent record of your purchase to aid identification in the event of theft Model No Serial No ...

Страница 10: ...with the REVERB EFFECT and TRIGGER knobs Practicing with the Metronome Click page 39 1 Press the Click button 2 Press the button below to the start the Metronome 3 Use the or buttons to adjust the tempo 4 Press the button again to stop the Metro nome 1 Overall volume Volume control for the AUX IN auxiliary input and Met ronome click sounds other than what you play 2 1 Adjusts the Reverb depth Adju...

Страница 11: ... player to the AUX IN jack 2 Start music playback on your portable player 3 Play the drums while listening with head phones Recording Your Performance page 41 1 Press the RECORDER button 2 Press the button below to start record ing 3 Play the drums 4 Press the button below to stop record ing 2 1 3 1 2 4 3 ...

Страница 12: ...uide 17 Setting Up 17 Connect with Other Devices and Expand the Fun 24 Turning On or Off 25 Setting Up the Sensor Unit 27 Changing the Overall Settings 29 Using a USB Flash Drive 30 Basic Guide 32 Performing with Various of Scenes 32 Creating Your Own Scene 35 Using the Click Metronome 39 Recording Your Performance 41 Application Guide 48 Enhance Your Drum Set with Separately Sold Add Ons 48 Refer...

Страница 13: ...e to read this Owner s Manual carefully And after reading through this manual be sure to store it in a safe place so that you can refer back to it again as needed Included Accessories Owner s Manual this book AC adaptor Module holder Module holder wing bolts 2 Connector cables 1 pair Cable bands 3 Adhesive cushions 2 ...

Страница 14: ...ms can be monitored with proper volume using headphones or earphones Change effect settings with a single knob and easily save and recall settings PCM tone generator makes it easy to change the sound of your bass drum by using a Triggered sound even in the middle of a performance Play a wide range of musical genres from contemporary to the by using the effects your own sam ples or the internal Tri...

Страница 15: ...or The audio signal can be processed with Effects while the trigger sensor can be used to play Trigger Sounds depending on how you play your drums For more information on Trigger Sounds Effects and Reverb please see What is a Scene page 32 Mic sensor Trigger sensor Audio signal from the drum set Trigger signal from the bass drum Mic sound Effects Trigger Sound internal Voices Reverb Sensor Unit Ma...

Страница 16: ...tains other reference materials Reference Manual Advanced The Reference Manual provides a description of all of the functions that can be accessed by pressing the MENU but ton Data List This provides lists of Scene and Effect names in the EAD10 and MIDI related information iPhone iPad Connection Manual Describes how to connect smart devices such as an iPhone and iPad Printed Manual Digital Manual ...

Страница 17: ...al Advanced PDF REVERB knob page 33 Adjusts the reverb level EFFECT knob page 33 Adjusts the amount of Effect applied to the audio signal from the mic sensor TRIGGER knob page 33 Adjusts the Trigger Sound volume STORE button page 37 Opens the Store screen Stores Scenes that you have created button button Increases or decreases the value by one 1 Click button page 39 Accesses the Click Metronome sc...

Страница 18: ...i nal page 30 Connects a USB flash drive Cannot be used with other USB devices USB TO HOST terminal page 25 Connect a computer or smart device such as an iPhone or iPad to send and receive digital signals audio and MIDI Additional parts are required for connect ing an iPhone or iPad For more informa tion refer to iPhone iPad Connection Manual PDF Cord hook page 17 Wrap the AC adaptor cord around t...

Страница 19: ...3 5 mm to the PHONES jack CAUTION Do not use headphones for a long period of time at high volume Doing so can cause loss of hearing Mic Sensor Captures the whole drum set s acoustic sound converting it into an audio signal A jack Connect to the TO SENSOR UNIT A jack on the rear panel using the connector cable included Sends the trigger sensor signal B jack Connect to the TO SENSOR UNIT B jack on t...

Страница 20: ...ha Downloads http download yamaha com Yamaha Corporation reserves the right to modify this URL at any time without prior notice About the Trigger Input Jacks Standard stereo phone plug 6 3 mm Trigger Input jacks qKICK w The TO SENSOR UNIT A jack can be as the qKICK w jack page 48 This jack consists of a pair of mono trigger inputs eSNARE r This jack consists of a pair of mono trigger inputs Connec...

Страница 21: ...ned away from the Sensor Unit mounted on the bass drum may sound lower in volume When instruments such as the ride cymbal are positioned too close to the Sensor Unit the sound will be too loud and out of balance Using the sensor with double bass drum set ups gives an uneven and unbalanced sound so we do not recommend using it in this situation Workflow Attaching the Sensor Unit Installing the Main...

Страница 22: ...Unit is secure and not loose Other Hoop Types 1 Attach the included adhesive cushions one each to the top of the inner and outer hoop surfaces 2 Attach the sensor using the same procedure as for a standard hoop drum NOTICE Make sure the uneven surface is filled with adhe sive cushions to provide a secure attachment for the sensor The Sensor Unit may fall off if the adhesive cushions is not used Wo...

Страница 23: ...ting on a Hi Hat Stand 1 Combine the included module holder with a separately sold cymbal stand attachment CSAT924A and mount on the hi hat stand Tighten the module holder wing nuts to securely fasten the Main Unit and module holder We recommend attaching the Main Unit to a position where it cannot be hit by your knees Cymbal Stand Attachment Exploded view Main Unit Module holder Module holder win...

Страница 24: ...on the Sensor Unit B jack on the Main Unit B jack on the Sensor Unit CAUTION Do not connect or disconnect cables while the power is ON About the Module Holder The module holder has three sets of holes Use the center set of holes to mount in a standard position Use the rear set of holes if you want the unit positioned forward and use the front set of holes to position the unit to the rear Main Unit...

Страница 25: ...e the Sensor Unit does not touch the toms or other instruments Securing the Cables Position the L shaped plugs connected the Sensor Unit on their sides This provides a more stable cable position Use the Cable band to secure the Connector Cables close to the Sensor Unit When mounting the Main Unit on a hi hat stand use the Cable band to keep the cables from interfering with the foot pedal Example o...

Страница 26: ...ny abnormalities during operation turn the power off immedi ately and unplug the AC adaptor WARNING For AC adaptors with a removable plug only use the AC adaptor with the plug attached and keep the plug Plugging only the plug into the power outlet can cause electric shock or fire If the removable plug comes off from the AC adaptor avoid touching the metal parts on the plug and slide the AC adaptor...

Страница 27: ...he instrument at the minimum level When you are not using the EAD10 for a long period of time make sure that you unplug the AC adaptor from the wall AC outlet NOTE When disconnecting the AC adaptor turn the instrument and then carry out this procedure in reverse order CAUTION Do not use headphones at high volume for an extended period of time Doing so can cause loss of hearing NOTE Please take not...

Страница 28: ...ud squeal or screech may occur depending upon the position of the microphone and the proximity and direction of the speakers Please note that Scenes using high gain effects such as distortion or compression are more likely to cause feed back if the speakers are too close or pointed towards the drum set NOTICE Whenever connecting other devices make sure that plugs on the cables you are using match ...

Страница 29: ... observe the following points Failing to do so risks freezing the computer and corrupting or losing the data If the computer or the instrument freezes restart the application software or the computer OS or turn the power to the EAD10 off then on again NOTICE Use an AB type USB cable of less than 3 meters USB 3 0 cables cannot be used Before connecting a computer to the USB TO HOST terminal disable...

Страница 30: ...ob fully counterclockwise to lower the volume to its minimum 3 Hold down the Standby On switch The EAD10 is in Standby and the display and lights are off NOTICE The Main Unit automatically stores settings when the power is turned off so do not unplug the AC adaptor until the LCD screen is turned off completely Unsaved Scene data will lost so always save Store data before turning the power off Powe...

Страница 31: ...the instruments in the drum set TRG Trigger gain The level should reach to the right when the bass drum is struck loudly Mic gain Trigger gain Press the EXIT but ton to return to the Scene screen Setting Up Automatically 2 Press the button below AUTO F3 3 Strike each of the instruments in the drum set with an 8 beat rhythm The setting is complete after about 10 seconds of playing the drums If you ...

Страница 32: ...een TRG SENS Trigger Sensitivity Sensitivity for light strokes The larger the value the louder the sound produced when struck lightly L Mic gain left Adjust the L and R settings when the volume balance between the left and right Mics is poor R Mic gain right Mic gain Trigger gain Lower Higher SENSOR UNIT screen SENSOR UNIT fine adjustment screen NOTE If this is set too low the Trigger sound might ...

Страница 33: ...ta is lost when the Main Unit is turned off with the Auto Power Off function Always store data before turning the power off In certain modes of operation the Auto Power Off function will not turn off the Main Unit when the set time has elapsed So we recommend that you always turn off the Main Unit manually when you are finished using it If you expect the Main Unit to be inactive for a certain leng...

Страница 34: ...o you can save Main Unit settings to and load settings from a USB flash drive Connecting a USB Flash Drive to the Main Unit Precautions When Using the USB TO DEVICE Terminal When connecting a USB device to the terminal be sure to follow the important precautions below NOTICE A factory reset overwrites any settings you have made with the corresponding factory defaults Save any important user define...

Страница 35: ...nadvertently erased write protect the USB flash drive When you are saving data to the USB flash drive make sure you disable the write protect first NOTE Other USB devices such as USB hub mouse computer keyboard cannot be used A USB cable cannot be used to connect a USB device to the USB TO DEVICE terminal NOTICE The rating of the USB TO DEVICE terminal is a maximum of 5 V 500 mA Do not connect USB...

Страница 36: ...ced PDF MENU Job Scene MENU Utility PadFunction Performing with Various of Scenes DISTORTION DELAY WAH COMPRESSOR FLANGER PHASER Scene Reverb Trigger Sound Effects Studio Concert Hall Stage Distortion Phaser Wah Delay Flanger Compressor Bass drum Cymbal Cowbell Snare drum Other instruments Tambourine Simulates the acoustical characteristics of a venue or studio For example you can re create the am...

Страница 37: ...to the Scene Screen from other screens Adjusts the volume of Reverb Effect or Trigger Sound Changes the type of Reverb Effect or Trigger Sound NOTE When in the screens listed below the knob can be used like the and but tons without returning to the Scene Screen Screens such as Store where it is used for selecting a Scene Number Screen for entering a name Scene number Scene name Opens to the REVERB...

Страница 38: ... Preset Scene Presets that are already stored in the EAD10 U User Scene Scene you have created NOTE When you select another Scene before storing the Scene being edited you can use the recall function to recall the edited contents For more information refer to the Reference Manual Advanced PDF MENU Job Scene Recall REVERB knob Adjusts the amount of Reverb EFFECT knob Adjusts the amount of Effect ap...

Страница 39: ...po synced Effects Changing the Trigger Sound Changing the Trigger Sound on the Bass Drum Set as a Factory Default 1 Press the button below TRG F3 The TRIGGER INST screen opens 2 Use the or buttons to select the number for the Trigger Sound you want to use Trigger Sound name Trigger Sound number About the BYPASS In each screen selecting BYPASS F3 causes the corresponding knob lamps to dimly flash a...

Страница 40: ...PDF MENU Scene Edit Inst or MENU Scene Edit Voice 1 Press the button below TRG F3 Instrument category name Trigger Sound number Pad name Trigger Sound name The TRIGGER INST screen opens Switching the Instrument Category 2 Press the button below F1 to move the cursor to Category instru ment category name 3 Use the or buttons to select the instrument category you want to use Next move the cursor to ...

Страница 41: ...age 30 Saving a Scene Under a New Name 1 Press the STORE button The STORE screen opens 2 Press the button below NAME F2 to open the NAME screen 3 Use the buttons below or F1 or F3 to select the character position then use the or buttons to select a letter A name of up to 10 characters can be set to the Scene NOTE You can also use the SCENE knob to select characters User Scene number and User Scene...

Страница 42: ...ene screen NOTE You can also use the SCENE knob to make changes NOTE You cannot save an edited Scene to a Preset Scene NOTICE When overwriting a Scene the current Scene settings are replaced with the new settings Before overwriting a Scene ensure that the Scene contains no irreplaceable settings Overwrite appears when the selected Scene Number already con tains a Scene If you want to overwrite to ...

Страница 43: ...ow F1 to stop the Click NOTE You can also press the Click button to start the Click and to stop the Click Setting Click Beat Volumes and Types of Sounds 2 Press the button below VOL BEAT F2 The VOLUME BEAT screen opens Tap the button at the desired tempo to set the tempo 2 Press the button below TAP F3 The TAP screen opens 3 Tap the button below TAP F3 at least 3 times The tapped tempo is detected...

Страница 44: ...et the volume Set the time signature Accents Quarter notes Eighth notes Sixteenth notes Eighth note triplets Beats 1 4 16 4 1 8 16 8 1 16 16 16 Setting Individual Click Beat Volumes 3 Use the buttons below or F1 or F2 to move the cursor 4 Use the or buttons to adjust the volume Changing the Click Sounds 3 Press the button below VOICE F3 The CLICK VOICE screen opens 4 Use the or buttons to change t...

Страница 45: ...ing elapsed recording time min sec appears 3 Play the drums 4 After you finish play ing press the button below F1 to stop recording Recording Playing Back 2 Press the button F2 to start play back 3 To stop playback press the button F2 NOTE This is not displayed when there is no recorded song NOTICE When your performance is already recorded on the Main Unit recording again on the Main Unit erases t...

Страница 46: ... time min sec appears 4 Play the drums 5 After you finish play ing press the button below F1 to stop recording The RECORDER SAVE screen opens 6 Press the button below SAVE F3 and save the file Press the button below CAN CEL F2 if you do not want to save the file NOTE If you want to change the file name press the button below NAME F1 and enter a new name page 37 Recording File name Switching to AUX...

Страница 47: ... button 2 Press the button below SOURCE F3 3 Press the button below YES F1 The setting is changed to the AUX IN recording After you finish recording the EAD10 returns to the normal record settings NOTE Your performance does not sound and is not recorded while in AUX IN recording When recording to the Main Unit When recording to a USB flash drive A confirmation message appears ...

Страница 48: ... from the AUX IN Jack Connect a portable music player or other such device to the AUX IN jack on the rear panel and have the song ready for playback Recording the Accompaniment Song 1 Connect the USB flash drive to the USB TO DEVICE terminal on the rear panel then connect a portable music player to the AUX IN jack 2 Press the RECORDER button The RECORDER USB screen opens NOTE If you play along to ...

Страница 49: ...back on the portable music player to start playback of the accompani ment song 6 After the song playback finishes press the button below F1 to stop recording The RECORDER SAVE screen opens 7 Press the button below SAVE F3 and save the file Press the button below CANCEL F2 if you do not want to save the file By doing this the external song you have just recorded is on the USB flash drive ready for ...

Страница 50: ...ccompaniment you have prepared 2 Press the button below F1 and the button below F2 to start recording and playback 3 Play the drums 4 After you finish playing press the button below F1 to stop recording You have now just recorded yourself over the song on the USB flash drive NOTE Pressing the button below F2 stops accompaniment playback but recording continues ...

Страница 51: ...e DAW software to record your performance For more information on how to connect a computer refer to the Reference Manual Advanced PDF For more informa tion on how to use the DAW software refer to the Owner s Manual for your DAW software NOTE To eliminate the risk of interference due to noise by your iPhone or iPad when used in combination with the EAD10 turn on the Air plane Mode and then turn on...

Страница 52: ...tails regarding any subsequently released models will be made available via the following web site http download yamaha com Yamaha Corporation reserves the right to modify this URL at any time without prior notice Enhance Your Drum Set with Separately Sold Add Ons Separately sold add ons Main applications Drum Trigger page 50 Attach a drum trigger to an acoustic drum and trigger a sound from the E...

Страница 53: ...ions Play Trigger Sounds Choose the pedal that best fits your needs NOTE In this manual the term FC3 refers to the FC3 and all other equivalent products such as the FC3A In this manual the term FC4 refers to the FC4 and all other equivalent products such as the FC4A Switch on or off Adjust volume keeps its position when released Switch on or off Play Trigger Sounds Switch on or off Adjust volume p...

Страница 54: ...oke For example layer internal drum sounds to enhance the sound or layer other instrument sounds like percussion or sound effects Drum Trigger Connection Examples Procedure Example Connecting a DT50S Drum Trigger 1 Turn off the Main Unit Make sure the Main Unit is turned off before connecting 2 Attach the DT50S between two of the tension rods on the snare drum For more information refer to the DT5...

Страница 55: ...d to the eSNARE r jack settings can be used as they are without having to make any changes When any other drum trigger is connected perform the following settings Specify the type of trigger that is connected Select the appropriate pad from the pad type list For more information refer to the Reference Manual Advanced PDF MENU Trigger Pad Type Specify the function of the connected trigger Play trig...

Страница 56: ... play drum percussion or other sounds or control functions using pads sold separately connected to the Main Unit Pad Connection Example Procedure Example Connecting a TP70S 1 Turn off the Main Unit Make sure the Main Unit is turned off before connecting 2 Attach the pad Pad Main Unit All off Clamp rod Example Cymbal stand Electronic Drum Pad TP70S Cymbal stand attachment CSAT924A ...

Страница 57: ...ack settings can be used as they are without having to make any changes When any other pad is connected per form the following settings Specify the type of pad that is connected Select the appropriate pad from the pad type list For more information refer to the Reference Manual Advanced PDF MENU Trigger Pad Type Specify the function of the connected pad Play trigger sounds page 35 Switch functions...

Страница 58: ...nel Plug the other end of the cable that came with the HH65 into the OUTPUT jack on the HH65 3 Turn the Main Unit on 4 Press the MENU button to carry out the initial setting When the HH65 is connected settings can be used as they are without having to make any changes Perform the fol lowing settings when connecting any other pedal Specify the type of pedal that is connected Select the pedal you co...

Страница 59: ... Select MIDI Message Type Effect ReverbType Reverb Type ReverbSend Reverb Send RevReturn Reverb Return Mic RevSend Mic Reverb Send TriggerRevSend Trigger Sound Reverb Send Voice RevSend Trigger Sound Voice Reverb Send MicEffType Mic Effect Type MicEffDepth Mic Effect Depth TrgEffType Trigger Sound Effect Type TrgEffSend Trigger Sound Effect Send and Dry Balance TrgEffReturn Trigger Sound Effect Re...

Страница 60: ...t Lvl All Rejection Level Reject Lvl Rejection Level Source Pad FootSwSelect Select Foot Switch Utility General SceneKnob Scene Knob AutoPowerOff Auto Power Off LCD Contrast LCD Contrast ClickOutput Click Output Destination ClickCountOff Click Countoff L R Volume External Device Output Volume MicNoiseGate Mic Noise Gate AudioOutGain Audio Out Gain AudioMix Audio Mix USB To Host USB TO HOST Termina...

Страница 61: ...ll Import All Audio Files Delete Delete Selected Audio File Delete All Delete All Audio Files Optimize Optimize Memory Memory Info Memory Information Recorder Export Audio Export Audio File Save Save File Load Load File Rename Rename File Delete Delete File Format Format USB Flash Drive Memory Info USB Flash Drive Memory Information Factory Reset Factory Reset ...

Страница 62: ...tting Check the power and volume set tings on the external devices page 13 Poor volume balance Poor volume balance between the Mic Sound and Trigger Sound Adjust the Trigger Sound volume If it does not solve the problem adjust the mic gain page 34 page 28 Poor volume balance between the AUX IN and your perfor mance Adjust the volume on the device connected to the AUX IN jack Adjust the AUDIO CLICK...

Страница 63: ...double trigger Double triggers are occurring Make sure the Sensor Unit is prop erly attached to the hoop page 17 The longer the bass drum head vibrates the easier it is to cause double triggers Adjust the bass drum so it produces a shorter sound Try muting or tun ing the head or changing the head Separately sold add on pads do not sound or Hard to produce sound Make sure the pad type setting is co...

Страница 64: ...tion from the USB flash drive Audio files recorded on a USB flash drive have low volume when playing back on the Main Unit Adjust the volume to an appropriate level when recording Adjust the AUDIO CLICK VOL UME knob during playback Record Reference Manual Advanced PDF Playback page 13 The audio file in the USB flash drive cannot be played back with the Main Unit or Playback stops in the middle of ...

Страница 65: ...tartup if you did a factory reset File already exists A file with the same name already exists File not found The selected file type was not found Illegal file Appears when loading a file and the Main Unit cannot handle the tar get file or does not support the audio file Incompatible USB device Appears when an unsupported USB device is connected to the USB TO DEVICE terminal Invalid USB device The...

Страница 66: ... the USB device was interrupted by an abnormal electric current Disconnect the USB device and press the button below OK USB device s transfer speed too slow Appears when the transfer speed to the USB device is insufficient For information on devices that have been tested and confirmed to work properly with the EAD10 refer to the Compatible USB Device List 1 on the Yamaha web site USB device full A...

Страница 67: ...y On Connectivity DC IN DC IN 12 V Headphones PHONES standard stereo phone jack AUX IN AUX IN stereo mini jack OUTPUT OUTPUT L MONO R standard phone jack USB USB TO DEVICE USB TO HOST Sensor input For Trigger sensor A standard stereo phone jack For Mic sensor B standard stereo phone jack Trigger input Stereo L trigger R trigger qKICK w also serves as A eSNARE r standard stereo phone jack Three zon...

Страница 68: ...7 H Headphones 23 Hoop 18 I Imported Sounds 37 Input Source 43 internal Voices 11 iPhone iPad 47 L L Mic gain left 28 M Main Unit 10 13 MASTER VOLUME knob 13 MENU button 13 Metal hoops 18 Metronome 39 MIC 27 Mic gain 27 Mic Sensor 15 Mic sound 11 Module holder 9 20 Module holder wing bolts 9 O OUTPUT R L MONO jacks 14 P PA System 24 Pad 48 52 Pedal 49 PHONES jack 15 Portable Music Player 24 Preset...

Страница 69: ...ference noise caused by improper grounding or the improper use of either certified or uncertified equipment if applicable Any evidence of alteration erasing or forgery of proof of purchase documents will cause this warranty to be void This warranty covers only the Original Owner and is not transferable In Order to Obtain Warranty Service Warranty service will only be provided for defective product...

Страница 70: ...66 EAD10 Owner s Manual ...

Страница 71: ...el 46 31 89 34 00 DENMARK Yamaha Music Denmark Fillial of Yamaha Music Europe GmbH Tyskland Generatorvej 8C ST TH 2860 Søborg Denmark Tel 45 44 92 49 00 FINLAND F Musiikki Oy Antaksentie 4 FI 01510 Vantaa Finland Tel 358 0 96185111 NORWAY Yamaha Music Europe GmbH Germany Norwegian Branch Grini Næringspark 1 1332 Østerås Norway Tel 47 6716 7800 ICELAND Hljodfaerahusid Ehf Sidumula 20 IS 108 Reykjav...

Страница 72: ...Manual Development Group 2017 Yamaha Corporation Published 06 2017 POHD A0 Printed in China ZW72890 ...

Отзывы: