background image

REMOTE CONTROL FEATURES

47 

En

English

AD

V

A

NCED OPERA

T

ION

5

In addition to controlling this DVD receiver, the 
remote control can also operate the other A/V 
components made by YAMAHA and other 
manufacturers. To control other components, you must 
set up the remote control with the appropriate remote 
control codes.

Depending on the external A/V component you are using, 
you may not be able to operate the component with the 
remote control, even if a remote control code is set. In this 
case, operate the component using the supplied remote 
control.

Setting remote control codes

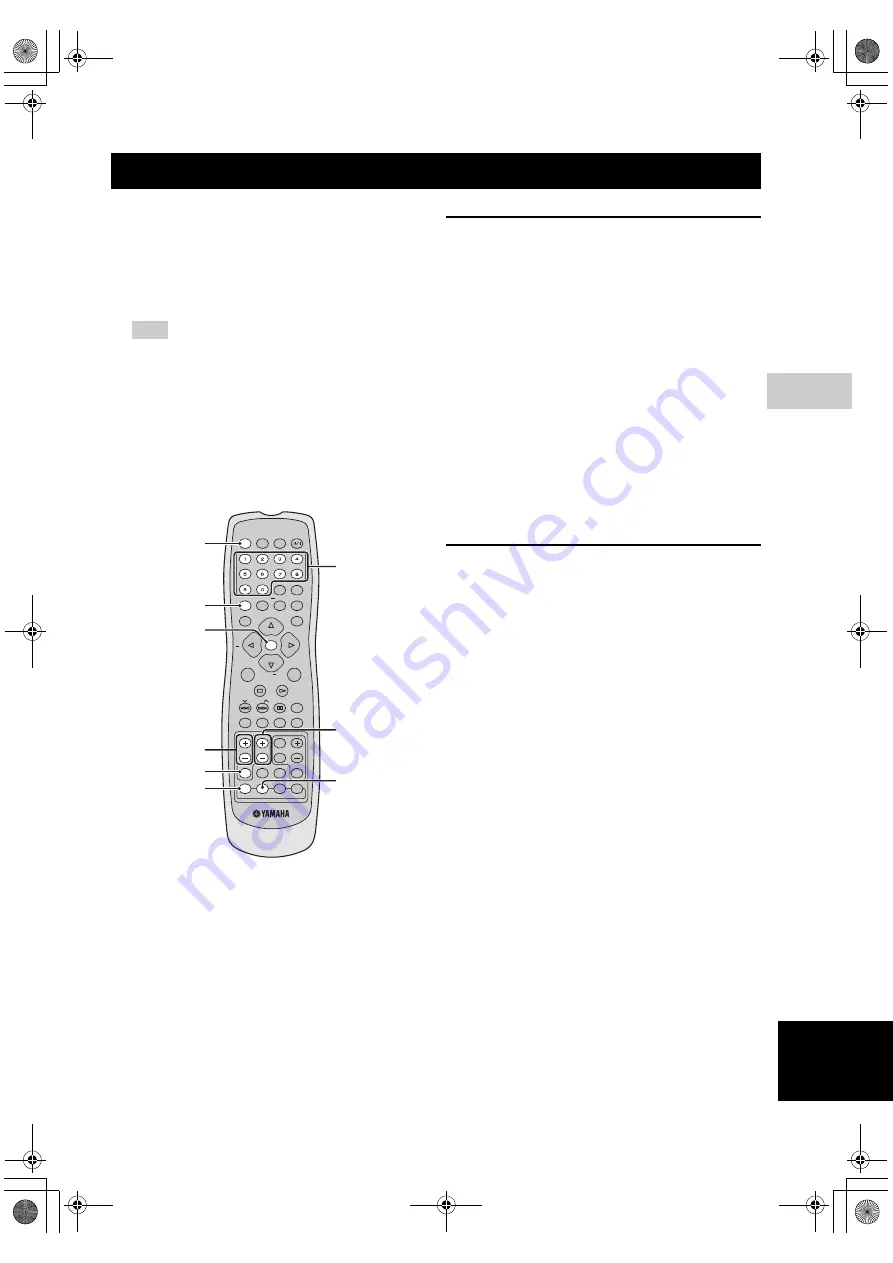
Set a TV remote control code for 

TV

 and set a cable or 

satellite tuner remote control code for 

AUX

.

1

Press and hold 

TV

 or 

AUX

.

2

Press 

PROG

, and then release both keys.

3

Press the 

numeric keypad (0-9)

 to enter the 4 digit 

remote control codes (see “LIST OF REMOTE 
CONTROL CODES” at the end of this manual). 

4

Press 

PROG

 again to store.

Operating your TV

Press 

TV

 for your TV operations.

POWER (TV)*

Turns on or off the power of your TV.

TV VOL (+/–)*

Adjusts the audio output level of your TV.

TV INPUT*

Switches the input source for the TV.

Numeric keypad (0-9)

Selects a TV channels for playback.

TV CH (+/–)*

Switches between the available TV channels.

*You can also operate these functions in DVD/CD or 
TUNER mode.

Operating your cable and satellite 
tuner

Press 

AUX

 for your cable and satellite tuner 

operations.

POWER (TV)

Turns on or off the power of your cable or satellite 
tuner.

ENTER (OK)

Confirms a selection.

Numeric keypad (0-9)

Cable: enters a number of a cable channel.
Satellite tuner: enters a number of a preset radio 
station.

TV CH (+/–)

Switches between the available cable or satellite tuner 
channels.

REMOTE CONTROL FEATURES

Note

POWER

DISPLAY

SET UP

MENU

SRCH

DIMMER

SLEEP

SCAN

A - B

SHUFFLE

REPEAT

PROG

ON SCREEN

SUBTITLE

PRESET

AUDIO

ANGLE

EFFECT

SURR

ZOOM

VOL

TV CH

TV VOL

TV

AUX

TUNER DVD/CD

CH 

+

CAT

CAT

ENTER

CH

TOP MENU/RETURN

PAGE

POWER

+

XM

OK

DISC

SKIP

TRE

BASS

MUTE

TV 

INPUT

TV

DOCK

Numeric 
keypad (0-9)

PROG

TV

AUX

POWER (TV)

TV CH (+/–)

TV VOL (+/–)

TV INPUT

ENTER (OK)

01EN_DVX-C310_UC.book  Page 47  Monday, July 10, 2006  11:22 AM

Содержание DVX-C310

Страница 1: ...ersal 3061 3053 3060 3062 3063 Videoway 3017 Viewstar 3059 3055 3058 3064 3066 Visicable 3033 Westminster 3012 Wolsey Gene 3037 Zenith 3001 3034 SATELLITE TUNER Absat 4006 AST 4027 Alba 4029 4034 4037 4052 Aldes 4019 Amstrad 4003 4016 4025 4038 4039 4042 Ankard 4013 4019 4030 4044 Anttron 4009 4034 Armstrong 4015 Astra 4005 Astro 4008 4039 4045 Avalon 4031 Axis 4030 4046 Beko 4010 Best 4030 Blaupu...

Страница 2: ...s required when the apparatus has been damaged in any way such as power supply cord or plug is damaged liquid has been spilled or objects have fallen into the apparatus the apparatus has been exposed to rain or moisture does not operate normally or has been dropped 15 Be sure to allow spaces of at least 10 cm above behind and on both sides of DVR C310 and at least 1m above 30cm behind and on both ...

Страница 3: ...na lead in is 300 ohm ribbon lead change the lead in to coaxial type cable If these corrective measures do not produce satisfactory results please contact the local retailer authorized to distribute this type of product If you can not locate the appropriate retailer please contact Yamaha Electronics Corp 6660 Orangethorpe Ave Buena Park CA90622 The above statements apply ONLY to those products dis...

Страница 4: ...ting from use of this unit with a voltage other than as specified 13 To prevent damage by lightning keep the power cord out and outdoor antennas disconnected from a wall outlet or the unit during a lightning storm 14 Do not attempt to modify or fix this unit Contact qualified YAMAHA service personnel when any service is needed The cabinet should never be opened for any reason 15 When not planning ...

Страница 5: ...l DVD features 24 Special VCD SVCD features 24 Playing MP3 JPEG DivX WMA discs 25 Playing Super Audio CDs 25 DVD Audio Features 26 Playing JPEG Kodak picture CDs 26 iPod OPERATION 27 Controlling iPod using the OSD 27 DVD SETUP MENU OPTIONS 28 Menu overview 28 Using the OSD menu 29 General setup 30 Audio setup 32 Video setup 34 Preference setup 36 FM AM TUNING 39 Tuning stations 39 Presetting stati...

Страница 6: ...ailable cleaners or antistatic spray intended for analog records Disc care Write only on the printed side of a CD R CD RW and only with a soft felt tipped pen Handle the disc by its edge do not touch the surface Region codes DVD discs must be labeled ALL regions or Region 1 U S A and Canada models in order to play on this DVD receiver You cannot play discs labeled for other regions Features Active...

Страница 7: ...VIDEO DVX C310 only POWER DISPLAY SET UP MENU SRCH DIMMER SLEEP SCAN A B SHUFFLE REPEAT PROG ON SCREEN SUBTITLE PRESET AUDIO ANGLE EFFECT SURR ZOOM VOL TV CH TVVOL TV AUX TUNER DVD CD CH CAT CAT ENTER CH TOPMENU RETURN PAGE POWER XM TV OK DISC SKIP TRE BASS MUTE TV INPUT DOCK System control cable FM wire antenna Video pin cable Remote control AM loop antenna Speaker cables 5 m x 3 15 m x 2 Batteri...

Страница 8: ...track or chapter Press and hold to fast forward or fast reverse TUNER mode selects the preset number 0 PORTABLE jack Connects a portable audio player A Remote control sensor Receives infrared signal from the remote control B Front panel display Shows information about the operational status of this DVD receiver MULTI Lights up when you play a multi channel audio source DOWNMIX Lights up when you p...

Страница 9: ...ks of your TV see page 12 9 COAXIAL input jack Connect to the digital out jack on a digital audio component see page 16 0 SYSTEM CONNECTOR terminal Connect to the subwoofer see page 11 A LINE OUT jacks Connect to the audio input jacks of your VCR see page 14 B AUX IN jacks Connect to the audio output jacks on your VCR or cassette deck see page 14 C TV IN jacks Connect to the corresponding audio ou...

Страница 10: ... see page 42 ENTER OK Confirms a selection 8 MENU Accesses the menu of a disc During playback returns to the main menu For VCD version 2 0 only Switches PBC playback control on or off 9 s DVD CD mode stops playback Holding down the button opens and closes the disc tray TUNER mode deletes a preset station if held more than two seconds or cancels the preset installation in Plug and Play see page 39 ...

Страница 11: ...sc K PAGE Turns the pages of DVD Audio still pictures L REPEAT A B Repeats a specific section on a disc M SHUFFLE Plays tracks in random order N ON SCREEN DISPLAY Accesses or exits from the OSD on screen display menu of this DVD receiver O SET UP Accesses or exits from the setup menu of this DVD receiver P h DVD CD mode starts playback TUNER mode starts preset installation in Plug and Play see pag...

Страница 12: ...al sounds 3 Surround Speakers L R Place the surround left right speakers behind the listening position Main roles Produces surround sounds and effect sounds 4 Subwoofer Place the subwoofer near a front speaker and turn it slightly toward the center of the room to reduce wall reflections Main roles Produces bass sounds and low frequency LFE sounds contained in Dolby Digital or DTS To avoid magnetic...

Страница 13: ...s Diameter 3 5 to 4 mm 1 8 to 5 32 Length 25 mm 1 or more Each speaker requires two screws 1 Install two screws in the wall where you want to place the speaker 2 Hang the speaker on the screws using the holes in the rear of the speaker To attach a speaker to a wall using screws the wall must be firm Do not attach a speaker to a wall that is made of weak materials such as plaster or veneered woods ...

Страница 14: ...UX IN LINE OUT TO NX SW300 SYSTEM CONNECTOR DOCK VIDEO S VIDEO COMPONENT COAXIAL DIGITAL IN VIDEO OUT DVD ONLY PCM DTS q DIGITAL Y PR PB XM HDMI GND AM FM 75Ω UNBAL L R FRONTCENTERSURROUND FRONT CENTER SURROUND SPEAKERS Subwoofer DVD receiver Front speaker R Front speaker L Center speaker Surround speaker R Surround speaker L 01EN_DVX C310_UC book Page 10 Monday July 10 2006 11 22 AM ...

Страница 15: ...ol cable Attach one end to the subwoofer and the other to the SYSTEM CONNECTOR terminal at the rear of the DVD receiver After inserting the system control cable be sure to tighten the cable screws Ensure that the speaker cables are correctly connected Improper connections may damage the system due to a short circuit When connecting the speakers fix the speaker cables in place so that cables do not...

Страница 16: ...ith a progressive scan TV To activate the progressive scan function see page 34 1 TV IN jacks To output TV sound from the speakers connected to this DVD receiver use commercially available audio cables white red to connect the TV IN input jacks of this DVD receiver to the corresponding audio output jacks of your TV 2 COAXIAL jack To output TV sound from the speakers connected to this DVD receiver ...

Страница 17: ...nput jack of your HDMI compatible component using a commercially available HDMI cable 2 Select the appropriate audio output from HDMI SETUP in AUDIO SETUP PAGE see page 33 3 Select the appropriate video output from HDMI SETUP in VIDEO SETUP PAGE see page 35 This DVD receiver is not compatible with HDCP incompatible HDMI or DVI components You need a commercially available HDMI DVI conversion cable ...

Страница 18: ...ideo input jack of your VCR OR Connect the VIDEO output jack of this DVD receiver and the video input jack of your VCR 2 Connect the LINE OUT jacks of this DVD receiver to the audio input jacks of your VCR Some DVDs are copy protected You cannot record copy protected discs using a VCR Note TV IN ANTENNA AUX IN LINE OUT TO NX SW300 SYSTEM CONNECTOR DOCK XM HDMI GND AM L R 1 AUDIO OUT VIDEO IN VIDEO...

Страница 19: ...eceiver this DVD receiver begins the signal transmission with your iPod Unless your iPod is firmly stationed in a YAMAHA iPod universal dock connected to the DOCK terminal of this DVD receiver audio signals may not be output properly Once the connection between your iPod and this DVD receiver is complete DOCKED appears in the front panel display If the connection between your iPod and this DVD rec...

Страница 20: ...connected component for complete connection and usage details Connecting a portable audio player Be sure to turn off the volume of this DVD receiver and the connected component before making connections Listening to playback Use the PORTABLE jack on the front panel to connect your portable audio player to this DVD receiver Before starting operation press AUX repeatedly to select AUX FRONT to activ...

Страница 21: ...to prevent unwanted interference The AM loop antenna should be placed away from this DVD receiver A properly installed outdoor antenna provides clearer reception than an indoor one If you experience poor reception quality an outdoor antenna may improve the quality Consult the nearest authorized YAMAHA dealer or service center about outdoor antennas Notes TV IN ANTENNA AUX IN LINE OUT XM HDMI GND A...

Страница 22: ...teries such as alkaline and manganese batteries together Read the packaging carefully as these different types of batteries may have the same shape and color Dispose of the batteries correctly in accordance with your local regulations Using the remote control Use the remote control within 6 m 20 ft approx of the DVD receiver and point it toward the remote control sensor Handling the remote control...

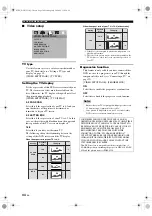
Страница 23: ...TV type and display This DVD receiver is compatible with both NTSC and PAL video formats Select the color system that matches your TV For details on how to use the OSD menu see page 29 PAL Select this if the connected TV is a PAL system TV It will change the video signals of NTSC discs and output them in PAL format NTSC Select this if the connected TV is an NTSC system TV It will change the video ...

Страница 24: ... in the system menu remains once selected For details on how to use the OSD menu see page 29 Setting the OSD language Setting the audio subtitle and disc menu languages Before displaying PREFERENCE PAGE be sure to press s twice to stop playback AUDIO audio language SUBTITLE subtitle language DISC MENU disc s menu language Note TV TYPE TV DISPLAY PROGRESSIVE PICTURE SETTING BLACK LEVEL CLOSED CAPTI...

Страница 25: ...e front panel to open the disc tray and then reload or unload discs without interrupting current disc playback Playback stops after all discs have been played When the disc tray is open press h e PLAYXCHANGE or DISC 1 2 3 4 5 to close the disc tray automatically General operation Unless stated otherwise all operations described here are carried out using the supplied remote control Pausing playbac...

Страница 26: ...k press SHUFFLE repeatedly to select from SHUFFLE DISC SHUFFLE ALL DISC and SHUFFLE OFF The selected mode appears in the front panel display for several seconds SHUFFLE DISC all tracks on the disc currently playing are played in a random order SHUFFLE ALL DISC tracks from all discs are played in a random order To exit from the shuffle mode Press SHUFFLE repeatedly to select SHUFFLE OFF For Hybrid ...

Страница 27: ...ou can resume playback of the last 10 discs even if the discs were ejected or the power of this DVD receiver was turned off 1 Load one of the last played 10 discs LOADING the disc tray number 1 5 appears on the TV screen 2 Press h while LOADING is displayed on the TV screen RESUME PLAY appears on the TV screen and the disc is played back from the last point To cancel the resume mode When playback ...

Страница 28: ...nction allows you to view the picture from a number of different angles Press ANGLE repeatedly to select the desired angle Audio For DVD Changing the audio language and or format Press AUDIO repeatedly to select an audio language For VCD Changing the audio channel Press AUDIO repeatedly to select the available audio channels provided by the disc STEREO MONO LEFT MONO RIGHT or MIX MONO Subtitles Pr...

Страница 29: ...elect a track file 3 Press ENTER OK to confirm your selection Playback starts from the selected file to the end of the folder Playing MP3 music and JPEG pictures simultaneously 1 Load a disc that contains both music and picture data The disc menu appears on the TV screen 2 Select an MP3 track 3 During MP3 music playback select a picture from the TV screen and then press h The picture files are pla...

Страница 30: ...dio discs include DVD Video contents that can be played on conventional DVD Video players Playing JPEG Kodak picture CDs 1 Load a disc JPEG or Kodak picture CD For JPEG discs the picture menu appears on the TV screen For Kodak discs the slideshow begins 2 Press h to start the slideshow Preview function JPEG This function displays the content of the current folder or the entire disc 1 Press s durin...

Страница 31: ...sired music menu item from the following options Playlists Songs Artists Album Songs Album Songs Songs Genres Artists Albums Songs Composers Albums Songs 3 Press h to start playback To return to the previous menu Press MENU Shuffle Use this feature to set this DVD receiver to play songs or albums in a random order Press SHUFFLE to turn on the shuffle mode SHUFFLE appears on your TV To exit from th...

Страница 32: ... TIME VIDEO SETUP PAGE page 34 TV TYPE PAL NTSC MULTI TV DISPLAY 4 3 PAN SCAN 4 3 LETTER BOX 16 9 PROGRESSIVE ON OFF PICTURE SETTING STANDARD BRIGHT SOFT PERSONAL BRIGHTNESS CONTRAST TINT COLOR BLACK LEVEL ON OFF CLOSED CAPTION ON OFF HDMI SETUP WIDE SCREEN FORMAT SUPER WIDE 4 3 PILLAR BOX OFF HDMI VIDEO 480P 576P 720P 1080I AUTO PREFERENCE PAGE page 36 AUDIO ENGLISH CHINESE JAPANESE FRENCH SPANIS...

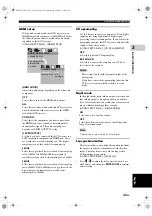
Страница 33: ...ress ENTER OK to confirm your selection POWER DISPLAY SET UP MENU SRCH DIMMER SLEEP SCAN A B SHUFFLE REPEAT PROG ONSCREEN SUBTITLE PRESET AUDIO ANGLE EFFECT SURR ZOOM VOL TV CH TVVOL TV AUX TUNER DVD CD CH CAT CAT ENTER CH TOPMENU RETURN PAGE POWER XM TV OK DISC SKIP TRE BASS MUTE TV INPUT DOCK Cursors ENTER OK SET UP DVD CD DVD AUDIO DISC LOCK PROGRAM OSD LANGUAGE SCREEN SAVER DIVX R VOD CODE GEN...

Страница 34: ...disc tracks Program Track except for Picture CD SA CD MP3 WMA DivX You can playback the contents of a disc in the desired order by programming the tracks to be played You can store up to 20 tracks per disc with a maximum of 10 discs 1 Press PROG on the remote control OR GENERAL SETUP PAGE PROGRAM FTS To input your favorite tracks chapters 2 Use the numeric keypad 0 9 to enter a valid track chapter...

Страница 35: ...ins various language options for the on screen display OSD language For details see Setting the OSD language on page 20 GENERAL SETUP PAGE OSD LANGUAGE Screen saver Use this feature to turn on or off the screen saver GENERAL SETUP PAGE SCREEN SAVER ON Select this if you wish to turn off the TV screen when disc playback is stopped or paused for more than 15 minutes OFF Select this to disable the sc...

Страница 36: ...DELAY Delay time settings is in relation to the listening position distance for center and surround speakers 0 MS to 15 MS Use a longer delay time settings when the surround speakers are closer to the listener than the front speakers A test tone will be automatically generated to help you judge the sound level of each speaker Notes SPEAKER SETUP HDMI SETUP CD UPSAMPLING NIGHT MODE LIP SYNC AUDIO S...

Страница 37: ...ature to convert your music CD to a higher sampling rate using sophisticated digital signal processing for better sound quality If you activate the upsampling function this DVD receiver automatically switches to the stereo mode AUDIO SETUP PAGE CD UPSAMPLING OFF Select this to disable CD upsampling 88 2 kHz X2 Select this to convert the sampling rate of CDs to twice that of the original This setti...

Страница 38: ...ressive function This feature is only valid if you have connected this DVD receiver to a progressive scan TV through the component video jacks see Connecting a TV on page 12 VIDEO SETUP PAGE PROGRESSIVE ON Select this to enable the progressive scan function OFF Select this to disable the progressive scan function Ensure that your TV is equipped with progressive scan Connect using a component video...

Страница 39: ... the TV type is set to PAL see Setting a TV type and display on page 19 VIDEO SETUP PAGE BLACK LEVEL ON Select this to enhance the black level OFF Select this for standard black level setting Closed captions Closed captions are data hidden in the video signals of specific discs and are invisible without the use of a special decoder The difference between subtitles and captions is that subtitles ar...

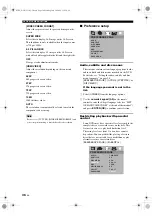
Страница 40: ...enus recorded on the DVD For details see Setting the audio subtitle and disc menu languages on page 20 PREFERENCE PAGE AUDIO SUBTITLE or DISC MENU If the language you want is not in the list 1 Select OTHERS from the language options 2 Use the numeric keypad 0 9 on the remote control to enter the 4 digit language code see LIST OF LANGUAGE CODES at the end of this manual and press ENTER OK to confir...

Страница 41: ...Picture CD Playback of VR format There are two ways to play back a disc in VR Video Recording format ORIGINAL LIST and PLAY LIST This feature is not available with non VR format discs PREFERENCE PAGE VR LIST ORIGINAL LIST Select this to play the originally recorded titles on the disc PLAY LIST Select this to play the edited version of the disc This feature is only available when a play list has be...

Страница 42: ...e the proper font set on screen by setting the following options PREFERENCE PAGE DIVX SUBTITLE STANDARD Supports the following languages Albanian Breton Catalan Danish Dutch English Faroese Finnish French Gaelic German Icelandic Irish Italian Norwegian Portuguese Spanish and Swedish CYRILLIC Supports the following languages Bulgarian Belorussian English Macedonian Moldavian Russian Serbian and Ukr...

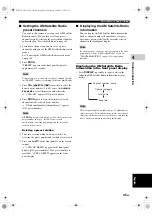
Страница 43: ...electing the preset station number This DVD receiver will exit presetting mode if no button is pressed within 20 seconds Plug and Play This function enables this DVD receiver to automatically tuned into FM stations followed by AM stations with strong signals 1 Press TUNER AUTO PRESET and PRESS PLAY appears one after the other if installation has not been completed 2 Press h on the front panel to s...

Страница 44: ...want to store is weak in signal strength store it by manually 1 Tune into a station which you want to store see Tuning stations on page 39 2 Press PROG 3 Press b a to select a preset number Press a to select a higher preset number and press b to select a lower preset number 4 Press PROG again to store 5 Repeat steps 1 to 4 to store other stations Selecting preset stations You can tune any desired ...

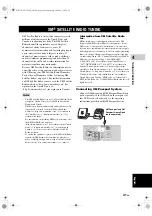
Страница 45: ...in the United States or http www xmradio ca for residents in Canada or consult your local retailer that sells XM Ready products To ensure the optimal reception of the XM Satellite Radio signals the XM Passport System must be placed at or near a southerly facing window with no obstacles in the path to the sky You can mount it indoors or outdoors Information from XM Satellite Radio Inc XM monthly se...

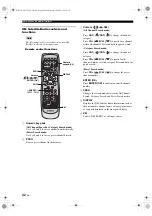
Страница 46: ...el within a selected category Press and hold for quick search Preset Search mode Press CH CH to change the preset channel number ENTER OK Press ENTER OK to confirm an entered channel number 4 SRCH Changes the search mode between the All Channel Search Category Search and Preset Search modes 5 DISPLAY Displays the XM Satellite Radio information such as channel number channel name category artist na...

Страница 47: ...eceiver properly See Connecting XM Passport System on page 41 and check the connection 3 Press CH CH to select channel 0 RADIO ID appears in the front panel display for few seconds and then the Radio ID number appears You cannot select channel 0 if the All Channel Search mode see page 44 is not selected 4 Check the XM Radio Satellite Radio ID number displayed in the front panel display and write i...

Страница 48: ...o search for a channel with the selected channel category Preset Search mode 1 Press XM repeatedly until XM RADIO appears in the front panel display 2 Press SRCH repeatedly to select PRESET SEARCH 3 Press CH CH repeatedly to change the preset channel number 1 to 40 You can also select the preset channel number 1 to 40 directly by pressing the numeric key pads on the remote control Direct Number Ac...

Страница 49: ...raming and the last tuned station will be restored Deleting a preset station 1 Tune into a station which you want to delete by selecting the preset number under which it was stored 2 Press and hold s on the front panel or on the remote control CH XX DELTD appears in the front panel display XX preset number If no preset number is available CH 0 DELTD appears in the front panel display Displaying th...

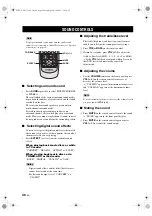
Страница 50: ...AL CLASSIC or JAZZ Digital sound effects and the treble bass features cannot be activated at the same time For flat sound output select CONCERT or CLASSIC Adjusting the treble bass level The treble high tone and bass low tone features enable you to define the sound processor settings 1 Press TRE or BASS on the remote control 2 Within five seconds press VOL to adjust the treble or bass level MIN 2 ...

Страница 51: ... your TV operations POWER TV Turns on or off the power of your TV TV VOL Adjusts the audio output level of your TV TV INPUT Switches the input source for the TV Numeric keypad 0 9 Selects a TV channels for playback TV CH Switches between the available TV channels You can also operate these functions in DVD CD or TUNER mode Operating your cable and satellite tuner Press AUX for your cable and satel...

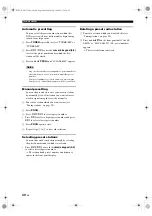
Страница 52: ...riod The sleep timer is useful if you are going to sleep after a certain amount of time while this DVD receiver is still playing back a source 1 Press SLEEP repeatedly to set the amount of time for sleep timer SLEEP XX appears in the front panel display XX 15 30 45 60 or OFF 2 Wait for few seconds without operating this DVD receiver to confirm the setting for the sleep time SLEEP appears in the fr...

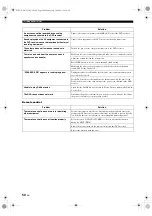
Страница 53: ...ected Make sure that the audio cables are connected and press the input selection buttons to select the correct input source TV or AUX for example to choose the equipment that you want to hear through the DVD receiver Check if the AC power cord of the subwoofer is properly connected Make sure that you use a disc supported by the DVD receiver Sound is too low on one side Check if all cables are pro...

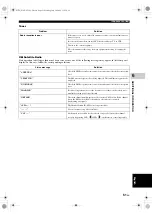
Страница 54: ... subwoofer then make sure the front center and surround speakers are connected correctly Set the DVD receiver to the standby mode then disconnected the power cord Wait for about 30 seconds then reconnect the power cord and turn on the DVD receiver Unable to play DivX movies Check that the DivX file was encoded in Home Theater mode with a DivX 5 x encoder The DVD receiver does not work Disconnect t...

Страница 55: ...ections and orient it for the best reception level UPDATING The XM user encryption code is being updated Wait until the encryption code is updated NO SIGNAL Check the XM Passport System connections and orient it for the best reception level LOADING If it takes longer than four seconds for audio or text data to be decoded wait until the decoding process has finished OFF AIR Check the channel number...

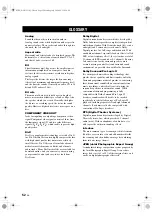
Страница 56: ...h is developed by Dolby Laboratories provides completely independent multi channel audio With 3 front channels left center and right and 2 surround stereo channels Dolby Digital provides five full range audio channels With an additional channel especially for bass effects called LFE or low frequency effect the system has a total of 5 1 channels LFE is counted as 0 1 channel By using 2 channel ster...

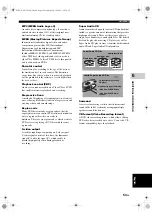
Страница 57: ...ntrol DVD software distribution only to regions where they are ready to distribute There are six regions codes which restrict a DVD receiver to playing a DVD disc with the same region code S video output A jack for inputting or outputting an S video signal S video signal consists of two lines the luminance signal Y and color signal C which enable to provide high quality video during playback or re...

Страница 58: ...urround Signal to Noise Ratio 100 dB Input Sensitivity AUX In TV In 300 mV Dimensions W x H x D 435 x 75 x 434 mm Weight 5 6 kg FRONT SPEAKER NX F300 System 2 way Bass Reflex System Impedance 6 Ω Speaker Drivers 6 5 cm 2 5 woofer 2 5 cm 1 Frequency Response 100 Hz 20 Hz 20 kHz Dimensions W x H x D 83 x 181 x 78 mm Weight 0 7 kg CENTER SPEAKER NX C300 System 2 way Bass Reflex System Impedance 6 Ω S...

Страница 59: ...8 Sinhalese 8373 Slovak 8375 Slovenian 8376 Somali 8379 Sotho Southem 8384 South Ndebele 7882 Spanish Castilian 6983 Sundanese 8385 Swahili 8387 Swati 8383 Swedish 8386 Tagalog 8476 Tahitian 8489 Tajik 8471 Tamil 8465 Tatar 8484 Telugu 8469 Thai 8472 Tibetan 6679 Tigrinya 8473 Tonga Tonga Islands 8479 Tsonga 8483 Tswana 8478 Turkish 8482 Turkmen 8475 Twi 8487 Uighur 8571 Ukrainian 8575 Urdu 8582 U...

Страница 60: ...ersal 3061 3053 3060 3062 3063 Videoway 3017 Viewstar 3059 3055 3058 3064 3066 Visicable 3033 Westminster 3012 Wolsey Gene 3037 Zenith 3001 3034 SATELLITE TUNER Absat 4006 AST 4027 Alba 4029 4034 4037 4052 Aldes 4019 Amstrad 4003 4016 4025 4038 4039 4042 Ankard 4013 4019 4030 4044 Anttron 4009 4034 Armstrong 4015 Astra 4005 Astro 4008 4039 4045 Avalon 4031 Axis 4030 4046 Beko 4010 Best 4030 Blaupu...

Отзывы: