background image

The Silent Piano™ Function

English

6

Chapter

49

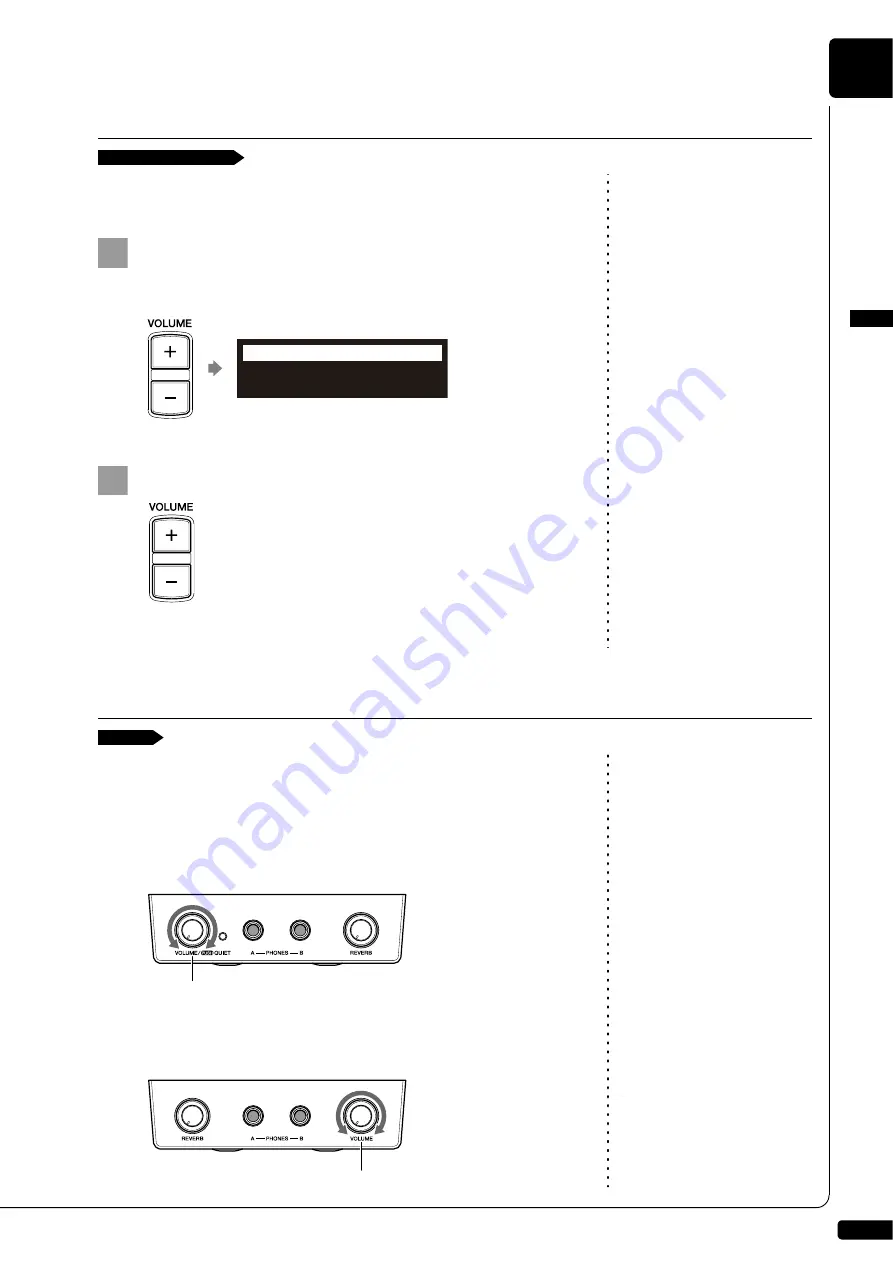
In the quiet mode, volume can be adjusted with the remote control.

Press [] or [VOLUME –] on the remote control.

The main volume setting screen appears.

Note:

You can also use the dial on the 
control unit to adjust the volume.

Press [] or [VOLUME –] to adjust the volume.

Volume can be adjusted in a range of –10 to 0.

Note:

Turning the knob fully 
counterclockwise mutes the sound 
of the digital piano.

In the headphone mode, volume can be adjusted with the [VOLUME] knob 
on the Silent Piano™ control box. Turn the knob clockwise to increase and 
counterclockwise to decrease the volume.

For Grand Pianos

For Upright Pianos

Adjusting the Volume in the Quiet Mode

[] or [VOLUME –]

1

MAIN VOLUME -01

=BALANCE=

VOLUME-/+

2

Adjusting the Volume in the Headphone Mode

[VOLUME]

[VOLUME] knob

[VOLUME] knob

Содержание Disklavier E3

Страница 1: ......

Страница 2: ...r safe and environmental ly friendly We sincerely believe that our products and the production methods used to produce them meet these goals In keeping with both the letter and the spirit of the law we want you to be aware of the following Battery Notice This product MAY contain a small non rechargeable battery which if applicable is soldered in place The average life span of this type of battery ...

Страница 3: ... could walk on trip over or roll anything over power or connecting cords of any kind The use of an extension cord is not recommended If you must use an extension cord the minimum wire size for a 25 cord or less is 18 AWG NOTE The smaller the AWG number the larger the current handling capacity For longer extension cords consult a local electrician WARNING To reduce the risk of fire or electric shoc...

Страница 4: ... or adjustments or performance of procedures other than those specified herein may result in hazardous radiation exposure PRECAUCIÓN El emplo de controles o ajustes o la realización de procedimientos distintos a los especificados en este manual podrá resultar en una peligrosa exposición a la radiación ПРЕДОСТЕРЕЖЕНИЕ Использование управления регулировок или выполнение процедур отличающихся от опис...

Страница 5: ...ical involved Información para Usuarios sobre Recolección y Disposición de Equipamiento Viejo y Baterías usadas Estos símbolos en los productos embalaje y o documentación que se acompañe significan que los productos electrónicos y eléctricos usados y las baterías usadas no deben ser mezclados con desechos hogareños corrientes Para el tratamiento recuperación y reciclado apropiado de los productos ...

Страница 6: ...ться и попасть в отверстия Беречь от огня Не ставьте на инструмент зажженные свечи и другие подобные предметы Горящий предмет может упасть и вызвать пожар ВНИМАНИЕ Место установки При установке инструмента убедитесь в том что используемая электрическая розетка легкодоступна При возникновении какого либо сбоя или неисправности немедленно отключите питание инструмента и отсоедините кабель питания от...

Страница 7: ......

Страница 8: ...trol unit using the four screws 4 10 supplied with the Disklavier Coloque el soporte metálico de suspensión suministrado con el modelo de gran piano Disklavier en la unidad de control luego fije el soporte metálico de suspensión utilizando los cuatro tornillos 4 10 suministrados con el Disklavier Поместите металлический кронштейн подвески поставляемый с Disklavier над блоком управления Прикрепите ...

Страница 9: ... 5mm 정도의 틈이 남도록 나사를 조여주십시오 Fit the slots of the metal suspension bracket containing the control unit to the screws mentioned in step 3 After mounting the control unit push the control unit back as far as it will go and then tighten the three screws to secure the bracket Fije las ranuras del soporte metálico de suspensión que contiene la unidad de control a los tornillos mencionados en el paso 3 De...

Страница 10: ... altavoces a las tomas OUTPUT Solamente para los modelos suministrados con los altavoces monitores Подключите кабельные шнуры Disklavier к соответствующим разъемам на задней панели блока управления Коаксиальный кабель к разъемам TO PIANO Кабель для подключения мониторов к гнездам OUTPUT Только для моделей поставляемых с мониторами 将从钢琴伸出的电缆连接到控制器背面板上相应的端子 同轴电缆 连接到 TO PIANO 端子 扬声器软线 连接到 OUTPUT 端子 仅...

Страница 11: ...de control queda angulada aproximadamente unos 18º respecto a la posición horizontal Примечания 1 При установке кронштейна подвески и блока управления соблюдайте осторожность во избежание появления царапин 2 Винты Для установки кронштейна подвески Потайная головка 4 10 4 Для подвески блока управления Обвязывающая головка 5 12 3 3 При правильной установке блок управления должен располагаться прибли...

Страница 12: ... корпуса установите дисковод 取下盒内的两面胶带覆纸 将软磁盘驱动器固定在盒中 取下盒內的兩面膠帶覆紙 將軟磁盤驅動器固定在盒中 케이스 내부에 있는 점착테이프로부터 보호지를 제거하고 플로피 디스크 드라이브를 케이스에 끼워 넣어주십시오 Attach the drive and case assembly to the bottom of the control unit using the four screws 3 6 supplied with the Disklavier Fije el conjunto de la unidad y la caja en la parte inferior de la unidad de control por medio de los cuatro tornillos 3 6 suministrados c...

Страница 13: ...is supplied with the USB floppy disk drive 2 Use the screws 3 6 supplied with the Disklavier when attaching Notas 1 La caja se suministra con la unidad de disco floppy USB 2 Utilice los tornillos 3 6 suministrados con el Disklavier para su fijación Примечания 1 Корпус поставляется с USB дисководом гибких дисков 2 При закреплении корпуса используйте винты 3 6 поставляемые с Disklavier 注 1 盒为 USB 软磁...

Страница 14: ...English Operation manual ...

Страница 15: ...tions made to the software for this product by a third party other than Yamaha or party authorized by Yamaha Note that re use of source code released to the public domain by Yamaha is unguaranteed and Yamaha shall not bear any responsibility whatsoever for the source code Trademarks Copyrights The contents of this operation manual and the copyrights thereof are under exclusive ownership by Yamaha ...

Страница 16: ...r location turn off the power remove the power plug from the AC outlet and remove all cables connected to external devices Cautions Turn off all audio devices when connecting to the Disklavier Refer to the user s guide for each device Use the correct cables and connect as specified Set the volume level on all the devices to minimum before applying power Do not play the Disklavier at a high volume ...

Страница 17: ...arged or shorted or it can cause them to heat up leak electrolyte or burst which in turn may result in a fire damage to nearby objects or in burns injury or other bodily harm Use only the designated batteries Do not use used batteries with unused batteries or different types of batteries together This can cause them to heat up leak electrolyte or burst which in turn may result in a fire or in burn...

Страница 18: ...ble Sound and Software Playback 32 Adjusting the Pitch of Audio 34 Adjusting the L R Balance of Audio 35 Using the Timer Play 36 Skipping the Blank Part at the Beginning of a Song 39 Video Synchronized Playback 40 Adding Disklavier Accompaniment to Commercial CD Songs PianoSmart Playback 41 SmartKey Playback 41 Chapter 5 Advanced Piano Playing Playing the Disklavier along with the Internal Metrono...

Страница 19: ... the Internet 105 Setting the Disklavier for the Internet Connection 107 Initializing Internet Settings 108 Chapter 11 Enhancing the Disklavier by Hooking Up Other Devices Hooking Up Audio Equipment 109 Setting the Disklavier for Audio Data Reception Transmission 110 Hooking Up MIDI Devices 112 Setting the Disklavier for MIDI Data Reception 113 Setting the Disklavier for MIDI Data Transmission 115...

Страница 20: ...mances with perfectly synchronized audio and video Your valuable music data on the floppy disk can be played back with the optional floppy disk drive UD FD01 Simple and Easy to use Features Enhancing Your Performance The remote control with clear and logical layout of buttons lets you quickly enjoy the features of the Disklavier E3 The display on the front panel employs an organic electro luminesc...

Страница 21: ... to start and pause playback STOP button page 22 Used to stop playback and recording RECORD button page 53 Used to engage the record standby mode before recording starts SELECT button Used to select media Cursor ENTER buttons Cursor Used to select options and parameters ENTER Used to execute the selection Display Shows various information Dial Used to adjust the volume and to set parameter values ...

Страница 22: ...the microphone line input of a camcorder OMNI SYNC IN jacks Used to connect the audio output of a camcorder TO PIANO connectors Used to connect the piano DC IN 12V connector Used to connect to the power supply unit USB TO HOST port Used to connect the USB cable from a computer MIDI OUT terminal Used to connect external MIDI equipment for outputting MIDI data MIDI IN terminal Used to connect extern...

Страница 23: ...n page 44 Used to access the voice function RECORD button page 53 Used to engage the record standby mode before recording starts PLAY button page 20 Used to start playback REVERSE FORWARD buttons In the play mode used to fast preview and review In the pause mode used to fast forward and reverse Cursor buttons Used to select options and parameters Remote Control 1 13 14 18 19 21 22 23 25 26 27 15 1...

Страница 24: ...de PART SELECT buttons For L R and ensemble songs these buttons are used to choose which part will play left hand part right hand part or both parts They are also used to select a part for recording PAUSE button page 22 Used to pause playback STOP button page 22 Used to stop playback and recording ENTER button Used to execute the selection FUNC button Used to access the function menu SELECT button...

Страница 25: ... while the speaker is turned on LINE1 2 volume controls Adjust the sound volume for each line input Note For normal use turn down the LINE2 volume completely and turn up the LINE1 volume at the three o clock position Only for models supplied with the monitor speakers Monitor Speaker LOW HIGH LINE 1 2 1 3 2 1 2 3 ...

Страница 26: ...ect the headphones You can use two headphones simultaneously REVERB knob Used to adjust the amount of reverb REVERB knob Used to adjust the amount of reverb PHONES jacks Used to connect the headphones You can use two headphones simultaneously VOLUME knob Used to adjust the volume of the headphones while in the headphone mode Only for models equipped with the Silent Piano function Silent Piano Cont...

Страница 27: ...lassical jazz and popular The disk includes songs for listening enjoyment piano study disks for the piano student and accompaniment disks for vocal and instrumental practice PianoSoft is sometimes used as a generic term for PianoSoft and PianoSoft Plus PianoSoft Plus PianoSoft Plus software contains prerecorded ensemble songs featuring instrumental accompaniment that can be played back on the Disk...

Страница 28: ...Note For grand piano models be sure to mount the control unit to the underside of the bass side key bed 1 Only for models supplied with the monitor speakers 2 Only for models equipped with the Silent Piano function Connect the power cord extending from the power supply unit of the piano to the DC IN 12V connector of the control unit Important Make sure that the voltage of the AC wall outlet matche...

Страница 29: ...batteries Replacement batteries should be UM 3 AA R6P or LR6 type Do not use new and old dry batteries together Do not use different types of batteries alkaline and manganese batteries batteries made by different manufacturers or different battery products made by the same manufacturer together Remove spent batteries immediately from the remote control Otherwise batteries will overdischarge causin...

Страница 30: ... at the remote control sensor on the control unit Make sure that the main switch on the power supply unit is turned on Approx 5 m 30 30 30 30 30 30 30 30 Turning On the Disklavier 1 ON OFF MAINS Power supply unit located on the bottom Grand piano Power supply unit located on the rear Upright piano ...

Страница 31: ...last selected song will be loaded Your Disklavier is now ready for use Setting the correct time is also important for engaging timer controlled programs See Chapter 4 Advanced Song Playback Using the Timer Play on page 36 The Disklavier has an internal calendar that can be set from 1 1 1985 00 00 00 to 12 31 2084 23 59 59 Set the calendar accurately so that the Disklavier displays the correct curr...

Страница 32: ... time zone setting on the Disklavier and actual time zone used in each area Press ENTER The time zone is set and the display returns to the system menu Proceed to the calendar setting 2 3 Setting Actual Time Zone GMT 6 Mexico Mexico City GMT 5 Panama Peru GMT 4 Chile GMT 3 Argentina Brazil Rio de Janeiro GMT 0 U K GMT 1 Central Europe Paris Berlin GMT 2 Eastern Europe Athens GMT 3 Russia Moscow GM...

Страница 33: ...pears with the cursor flashing on the hours display Select year month date hours minutes and seconds with the cursor buttons then press YES and NO to set a value Press ENTER The date and time are stored in the internal calendar and the display returns to the current time screen Press BACK on the remote control The display returns to the system menu screen 1 2 3 4 5 ...

Страница 34: ... in CD DA Note Do not insert or remove the USB media while reading or writing data Make sure that reading or writing has finished before doing so The data CDs should be formatted in ISO 9660 Level 1 USB Flash Memory You can use commercially available USB flash memories to store song data The USB flash memory should be formatted in FAT16 or FAT32 file system USB Hard Disk You can use commercially a...

Страница 35: ... or fil Handling CDs In order to protect data stored on compact discs from damage or loss handle them with care and observe the following precautions Do not touch the surface of a CD Do not expose CDs to extreme temperatures or humidity The working temperature range is between 4 C and 52 C 40 F and 125 F Wipe CDs with a clean dry cloth before playback Remove the CD from the CD drive before turning...

Страница 36: ...re played back on the Disklavier the piano parts area played by the Disklavier keyboard as with PianoSoft and PianoSoft Plus songs and all other instrumental and vocal parts are heard from the monitor speakers just like a normal stereo system SmartPianoSoft SmartPianoSoft contains a recorded piano accompaniment to the commercial CDs and the acoustic accompaniment will play back matching with the c...

Страница 37: ...Management Copying Song File from a Personal Computer to the Disklavier on page 92 Selecting Medium and Their Contents SELECT 1 CD eject button CD USB flash memory USB port 2 Control unit Remote control or Memory CD MEDIA SELECT 3 Medium Description Memory Internal flash memory CD Audio CD or data CD USB1 USB2 USB flash memory or USB HDD USB1 indicates the first inserted one and USB2 indicates the...

Страница 38: ...reen press Press ENTER or The song selection screen appears Note The maximum number of the selectable songs in an album is 999 Select a desired song with the cursor buttons Note You can also select songs directly using the number keypad on the remote control See Chapter 3 Basic Song Playback Using the Number Keypad on page 20 To return to the album selection screen press Press ENTER The selected s...

Страница 39: ... 36 first press 0 then 3 then 6 then ENTER Press PLAY PAUSE on the control unit or PLAY on the remote control PLAY PAUSE on the control unit lights green and the numerical value of the counter advances At the end of the song the Disklavier selects the next song automatically and continues playback After playback the last song in the album playback stops Using the Number Keypad Album or song select...

Страница 40: ...volume setting is displayed here Song Title The title of the selected song is displayed here If the title is long it scrolls across the display 7 2 3 1 4 5 6 Display Description Axx yyy xx album number 01 to 99 yyy song number 001 to 999 Pxx yyy xx playlist number 01 to 99 yyy song number 001 to 999 Display Description xx yy Minutes xx and seconds yy xxx y Measures xxx and beats y Display Descript...

Страница 41: ...on the control unit or PAUSE on the remote control Playback pauses PLAY PAUSE on the control unit flashes and the counter stops counting Press PLAY PAUSE on the control unit or PLAY on the remote control to continue playback Stopping Playback During playback STOP Control unit Remote control or Pausing Playback PAUSE During playback 1 Control unit Remote control or 2 Control unit Remote control or ...

Страница 42: ... Release on the control unit or press FORWARD on the remote control again to return to normal playback If a song is previewed all the way to the end it will be paused at the end of the song Fast Review To review hold on the control unit or press REVERSE on the remote control Release on the control unit or press REVERSE on the remote control again to return to normal playback If a song is reviewed ...

Страница 43: ...return to the pause mode If you fast forward a song all the way to the end it will be paused at the end of the song Fast Reverse In the pause mode hold on the control unit or press REVERSE on the remote control PLAY PAUSE on the control unit flashes quickly and the counter shows the current position Release on the control unit or press REVERSE on the remote control again to return to the pause mod...

Страница 44: ... with the counter flashing The song will be paused at the exact point as you press SEARCH Note If you enter a value higher than the entire song time the search goes to the end of the song Enter the time that you want to search for with the number keypad For example to search for 2 56 minutes and seconds first press 0 then 2 5 and 6 For example to search for 52 3 measures and beats first press 0 th...

Страница 45: ...apter 3 Basic Song Playback Selecting Medium and Their Contents on page 18 The channel selection screen appears Press or or YES or NO to select a channel Press ENTER or to begin the broadcast of the selected channel The DisklavierRadio screen appears Press twice to stop the broadcast and return to the media selection screen Listening to the DisklavierRadio Media selection screen D Radio 1 01 Compl...

Страница 46: ...d Software Playback on page 32 For ensemble songs the volume of the piano and internal XG tone generator are adjusted simultaneously so it is a good idea to first balance the volume of the piano and XG tone generator For songs on PianoSoft PlusAudio you should first balance the volume of the MIDI piano and audio parts Press VOLUME or VOLUME on the remote control The main volume setting screen appe...

Страница 47: ...rs Note You can also use the dial on the control unit to adjust the tempo Press TEMPO or TEMPO to adjust the tempo Playback tempo can be adjusted from 50 to 50 in 1 increments Press TEMPO 0 to set to the original tempo Note This function cannot be used to transpose songs from external devices connected to the OMNI IN jacks or on audio CDs Playback can be transposed up or down by up to two octaves ...

Страница 48: ...scribed below You can use these functions for entertainment or study purpose Repeat mode settings remain in effect until recording is started another medium or album is selected or the Disklavier is tuned off Press REPEAT on the remote control The repeat setting screen appears Press REPEAT to select repeat modes The following options are available 1 TRANS 01key Memory TRANS 0 2 Repeating Song Play...

Страница 49: ...ding is started or the Disklavier is turned off To set point A play back a song and press A B on the remote control when the desired point is reached Point A is set The A B repeat setting screen appears with the B flashing Note You cannot set point B that is beyond the selected song To set point B press A B again Point B is set Playback starts from point A continues up to point B and returns to po...

Страница 50: ...ge 18 Select the desired song Press PART SELECT L or PART SELECT R on the remote control to cancel a part The part cancellation screen appears with the corresponding part canceled Note For the SmartKey song ON OFF and G appear sequentially each time you press PART SELECT L or PART SELECT R Notes of displays To replay the cancelled part press PART SELECT L or PART SELECT R again so that ON appears ...

Страница 51: ...t sound sources as described below can be adjustable TG Adjusts the volume of the ensemble sound reproduced by the tone generator TG of the Disklavier Audio Adjusts the volume of the accompaniment or standard audio sound pre recorded in the software CDs See Chapter 5 Advanced Piano Playing Playing the Disklavier with an Ensemble Voice on page 44 Voice Adjusts the volume of the ensemble voice when ...

Страница 52: ...t the volume of the tone generator Tone generator volume can be adjusted in a range of 10 to 127 Adjusting the Audio Balance Press BALANCE twice on the remote control The audio balance setting screen appears Note You can also use the dial on the control unit to adjust the volume Press YES and NO to adjust the volume of the audio Audio volume can be adjusted in a range of 10 to 127 1 TG BALANCE 100...

Страница 53: ...ks You can temporarily adjust the pitch of the song contains audio PianoSoft PlusAudio SmartPianoSoft or an audio CD for your listening pleasure Pitch adjustments are effective until another medium or album is selected recording is started or the Disklavier is turned off During the song playback press FUNC on the remote control The audio pitch setting screen appears Press YES and NO to change the ...

Страница 54: ...dio pan setting screen appears Press YES and NO to change the audio pan The following pan settings are available Adjusting the L R Balance of Audio During playback FUNC Option Description Left Audio of the L channel is output to both of the L and R channels Center Audio of the L channel is output to the L channel and the R channel is output to the R channel Right Audio of the R channel is output t...

Страница 55: ...rder for the timer play to function The timer play cannot turn on off the control unit The following describes how to play back the first album in the internal flash memory at 8 15 AM Press SETUP on the remote control The setup menu screen appears Select TimerPlay with the cursor buttons then press ENTER The timer play setting screen appears Confirm that the cursor is on the timer switch then pres...

Страница 56: ...ou select RND in step 5 The following selections are available Note When Radio is selected the Disklavier will connect to the Internet one minute prior to the time you have set and the channel selection screen appears DisklavierRadio will begin to play at the designated time PLAY Starts playback of songs STOP Stops playback of songs RND Starts playback of songs at random OFF Turns off the Disklavi...

Страница 57: ...ay functions on every day of the week MON The timer play functions only on Monday TUE The timer play functions only on Tuesday WED The timer play functions only on Wednesday THU The timer play functions only on Thursday FRI The timer play functions only on Friday SAT The timer play functions only on Saturday SUN The timer play functions only on Sunday M F The timer play functions on Monday thru Fr...

Страница 58: ...emote control The setup menu screen appears Select Playback with the cursor buttons then press ENTER Note The Reverb option appears only on models equipped with the Silent Piano function The playback setting screen appears with the cursor flashing Note The KeyMotion option appears only on models equipped with the Silent Piano function Press YES and NO to change setting Indicates that the timer pla...

Страница 59: ...amcorder only Note When searching for songs for video synchronized playback from a USB flash memory you can search from a maximum of 150 songs per USB flash memory It is therefore recommended that you copy songs for video synchronized playback onto the internal memory When saving onto a USB flash memory it is recommended that you do not exceed a total of 150 saved songs per memory The Disklavier a...

Страница 60: ...tten music SmartKey software does this by partially depressing the piano key to signal which note should be played The Disklavier then waits for you to press this key before it continues to the next note in the melody If you miss the movement of the key the Disklavier will repeat the movement until you press the key When you press the key the Disklavier will reward you with ear tickling phrases in...

Страница 61: ...avier patiently waits for you to play the right key before proceeding to the next key Also notice that if you happen to miss the cue it will gently remind you what the key is every few seconds until you play the right key Key Notation As a reference C3 is middle C which means C4 is an octave above middle C and so on 2 Key moves slightly Pachelbel s Flashes 3 C2 D2 E2 F2 G2A2 B2 C3 D3 E3 F3 G3A3 B3...

Страница 62: ... the remote control The metronome setting screen appears and the metronome starts to click To change the tempo move the cursor to the tempo parameter TEMPO with the cursor buttons then press YES and NO The tempo can be adjusted in a range of 30 bpm to 400 bpm To change the beat move the cursor to the beat parameter with the cursor buttons then press YES and NO The following beat settings are avail...

Страница 63: ...tails on voice groups and voices see Chapter 13 Internal Tone Generator Voices on page 131 The Disklavier s VOICE lets you assign a voice from the internal XG tone generator to accompany the piano while you play You will hear in unison the piano sound coming from the Disklavier and an ensemble voice produced by the internal XG tone generator This is sometimes referred to as voice layering or uniso...

Страница 64: ...e voice parameter Voice then press YES and NO See Chapter 4 Advanced Song Playback Adjusting the Volume Balance among the Keyboard Playing Ensemble Sound and Software Playback on page 32 If necessary adjust the volume of the voice in the voice balance setting screen To inactivate this function press VOICE again Note The voice function is inactivated if you escape from the voice selection screen by...

Страница 65: ...c piano is silenced and the piano parts are played by the digital piano tone generator This enables you to adjust the volume of not only the accompanying sounds but of the piano as well as that you can enjoy listening to songs quietly through the monitor speakers or silently through stereo headphones There are two modes to the Silent Piano function quiet mode and headphone mode You can select eith...

Страница 66: ...no control box or press the blue button on the remote control to play the digital piano The QUIET indicator on the Silent Piano control box lights green and the quiet mode is activated To disengage the quiet mode push the QUIET switch on the Silent Piano control box again or press the red button on the remote control For Upright Pianos Press the center pedal and slide it to the left To disengage t...

Страница 67: ... though the headphone mode is activated the keying sound of the keyboard remains Connect the headphones to the PHONES jack on the Silent Piano control box The QUIET indicator on the Silent Piano control box lights green and the headphone mode is activated For Upright Pianos Press the center pedal and slide it to the left Connect the headphones to the PHONES jack on the Silent Piano control box Usi...

Страница 68: ...lume Volume can be adjusted in a range of 10 to 0 Note Turning the knob fully counterclockwise mutes the sound of the digital piano In the headphone mode volume can be adjusted with the VOLUME knob on the Silent Piano control box Turn the knob clockwise to increase and counterclockwise to decrease the volume For Grand Pianos For Upright Pianos Adjusting the Volume in the Quiet Mode VOLUME or VOLUM...

Страница 69: ... Changing the voice group displays the top voice of that group in the voice parameters See Chapter 4 Advanced Song Playback Adjusting the Volume Balance among the Keyboard Playing Ensemble Sound and Software Playback on page 32 To change the voice press to move the cursor to the voice parameter Voice then press YES and NO If necessary adjust the volume of the voice in the voice balance setting scr...

Страница 70: ...rt hall gives you the feeling of the being at a live performance Note Reverb is off when the REVERB knob is turned fully counterclockwise Turn the REVERB knob clockwise to turn the reverb effect on For Grand Pianos For Upright Pianos Press SETUP on the remote control The setup menu screen appears Select Reverb with the cursor buttons then press ENTER The reverb setting screen appears Applying the ...

Страница 71: ...y move in accordance with the playback of the respective note s key In the quiet or headphone mode you can select an option of stopping this key movement This enables you for example to play along with the song being played back to add your own improvisation or to create a four hand duet During the song playback in the quiet or headphone mode press FUNC several times Note You can change the settin...

Страница 72: ...tion medium and album Press RECORD Note You cannot select CD as the destination medium The recording standby screen appears and RECORD on the control unit lights red and PLAY PAUSE flashes in green The level appears in the format section as soon as you play a keyboard or press a pedal Press PLAY PLAY PAUSE stops flashing The Disklavier is now ready for you to play Start playing your song Recording...

Страница 73: ...isting song see Chapter 9 Media Management Renaming a Song on page 79 Press RECORD Press FUNC twice in the recording standby screen The song title editing screen appears Enter a title to a new song You can enter up to 64 characters Follow the instructions in Entering Characters on next page Press PLAY after title determined Recording begins Titling a Song at the Start of Recording FUNC 2 RECORD 1 ...

Страница 74: ...k l m n o p q r s t u v w x y z Symbols etc Space _ Numbers 0 9 Space 0 1 2 3 4 5 6 7 8 9 Number keypad Overwrites a number SEARCH button Overwrites a dot REVERSE button Deletes a character The characters on the right of the deleted one move to the left for one character space FORWARD button Inserts a space buttons Moves the cursor left and right YES NO buttons Selects the character Pressing these...

Страница 75: ...ded with the metronome will be in the measures and beats format All metronome parameters are reset when the Disklavier is switched off Press METRONOME on the remote control The metronome setting screen appears To change the tempo move the cursor to the tempo parameter TEMPO with the cursor buttons then press YES and NO The tempo can be adjusted in a range of 30 bpm to 400 bpm To change the beat mo...

Страница 76: ...parameter SOUND with the cursor buttons then press YES and NO The following sound settings are available BUZZER TG Press RECORD in the metronome setting screen The metronome recording setting screen appears Press PLAY Recording begins immediately PLAY PAUSE REC and SELECT on the control unit flash simultaneously at the first beat of the metronome Start playing your song Press STOP when you finish ...

Страница 77: ...le your new song before recording see Chapter 7 Basic Recording Titling a Song at the Start of Recording on page 54 to rename the title after recording see Chapter 9 Media Management Renaming a Song on page 79 Press RECORD Press FUNC in the recording standby screen The part selection screen appears If you want to record your L R song using the metronome see Chapter 8 Advanced Recording Recording w...

Страница 78: ...by screen The part selection screen appears The part that has already been recorded is displayed as L PLY Press PART SELECT R to record the right hand part The part set to REC will be recorded Press PLAY Playback of the left hand recorded part starts immediately so be sure that you are ready to play the right hand part along with it 7 8 9 L PLY R OFF Memory LR 10 L PLY R REC Memory LR 11 ...

Страница 79: ...RD In the case you want to title your new song before recording see Chapter 7 Basic Recording Titling a Song at the Start of Recording on page 54 to rename the title after recording see Chapter 9 Media Management Renaming a Song on page 79 Press FUNC in the recording standby screen The part selection screen appears If you want to record your L R song using the metronome see Chapter 8 Advanced Reco...

Страница 80: ...nd part as shown in the following figure To change the split point press a key on the keyboard or YES and NO to select a different key The split point can be set from note A 1 to note C7 Press PLAY The Disklavier is now ready for you to play Starts playing your song with the left and right hand parts and the pedal part simultaneously Recording will start as soon as you touch a key Press STOP when ...

Страница 81: ...ress and to select the L R song that you want to re record then press ENTER Press PART SELECT L or PART SELECT R to select the part to re record The part set to REC will be re recorded Press PLAY Recording will start immediately so be sure that you are ready to play the part Press STOP when you finish playing your song The following screen appears Re Recording One Part PART SELECT L or PART SELECT...

Страница 82: ...s For example you could record a difficult left hand part at a slow tempo use this function to change the tempo then record the right hand part at the normal tempo If a song s time format is minutes and seconds tempo changes are specified as a percentage of the original tempo If a song s time format is measures and beats tempo changes are specified in beats per minute To select a medium or album s...

Страница 83: ...es the tempo and NO decreases the tempo For measure and beats the tempo range is from 30 bpm to 400 bpm For minutes and seconds the tempo range is from 75 to 242 Press STOP to save the tempo change The following screen appears The following table gives a description of each of the options 3 4 3 Option Description SAVE The song is saved at its new tempo under the current song number NEW The song is...

Страница 84: ...ording later on you can enjoy piano playback with the video First set up the camcorder the DVD recorder and the Disklavier and then start recording by following the procedures below Setting for Video Synchronized Recording Press SETUP on the remote control The setup menu screen appears Select AudioI O with the cursor buttons then press ENTER The audio I O setting screen appears 7 Video Synchronize...

Страница 85: ...f input output connectors on the camcorder and the DVD recorder and prepare the cables fit to them Connect a camcorder and a DVD recorder to the control unit 3 4 5 6 TV for displaying RCA cord not supplied Control unit RCA cord not supplied To audio output To video input To audio input To A V output To video input To video output DVD recorder for recording and playback Video connector yellow Video...

Страница 86: ...corder to video shooting mode Select the video input on the DVD recorder which the camcorder is connected to then start recording on the DVD recorder Press PLAY PLAY PAUSE stops flashing and the counter starts to advance Note This step is necessary for synchronization of the song and the video playback and should not be omitted Wait for approximately ten seconds and then start playing your song Pr...

Страница 87: ... to 5 on page 65 2 Connect a camcorder to the control unit 3 Select a destination medium and album 4 Press RECORD 5 Start recording on the camcorder 6 Press PLAY 7 Wait for approximately ten seconds and then start playing your song 8 Press STOP when you finish playing your song 9 Stop recording on the camcorder Camcorder RCA cord with resistance not supplied To mic line input To audio output Contr...

Страница 88: ...d select the song that you want to synchronize with Press RECORD The SPS recording standby screen appears and RECORD on the control unit lights red and PLAY PAUSE flashes in green Select the desired part of a song then press PLAY to start synchronizing Recording begins with the CD playback Start playing the Disklavier along with the CD playback To play back the performance recorded with this featu...

Страница 89: ... the medium you selected Select a desired function with the cursor buttons then press ENTER About playlists see Chapter 9 Media Management Managing Playlists on page 84 The following functions are available CopyAlbum DeleteAlbum NewAlbum RenameAlbum SortAlbum AddToPList DeleteList NewList RenameList Note Up to 99 albums can be saved in a medium You can make copies of the album to the different med...

Страница 90: ...ation medium with YES and NO To copy to the new album press ENTER OK flashes in the first line of the screen To add to the existing album press to move the cursor to the album and press YES and NO to select the album then press ENTER OK flashes in the first line of the screen 1 CopyAlbum NewAlbum DeleteAlbum RenameAlbum ALBUM MENU 1 2 2 3a 3b ...

Страница 91: ...tion menu then press ENTER The DeleteAlbum screen appears Press ENTER OK flashes in the first line of the screen Press YES to delete the album NO to cancel After a while the completion message appears Press any button to return to the album selection screen 4 Executing CopyAlbum Completed Press any button CopyAlbum ANY Deleting Albums DeleteAlbum FUNC Album selection screen 1 CopyAlbum NewAlbum De...

Страница 92: ...indicates the number Select the NewAlbum in the album function menu then press ENTER The NewAlbum screen appears Press ENTER The album title editing screen appears Enter a title to a new album You can enter up to 64 characters Follow the instructions in Entering Characters on page 55 Press ENTER OK flashes in the first line of the screen Creating a New Album NewAlbum FUNC Album selection screen 1 ...

Страница 93: ... RenameAlbum in the album function menu then press ENTER The RenameAlbum screen appears Press ENTER The album title editing screen appears Enter a new title to the selected album You can enter up to 64 characters Follow the instructions in Entering Characters on page 55 5 Executing NewAlbum Completed Press any button NewAlbum ANY Renaming an Album RenameAlbum FUNC Album selection screen 1 CopyAlbu...

Страница 94: ...tion is available only for albums on Memory Select SortAlbum in the album function menu then press ENTER The SortAlbum screen appears Press and to move the albums to the desired position 4 5 Executing RenameAlbum Completed Press any button RenameAlbum ANY Rearranging the Order of Albums SortAlbum FUNC Album selection screen 1 06 Favorite Latin Select 07 Free Flight SortAlbum ENT 2 06 Favorite Lati...

Страница 95: ...appears Note Available functions vary depending on the medium you selected Select a desired function with the cursor buttons then press ENTER Note If there is no available function or no song the song function menu screen does not appear although pressing FUNC About playlists see Chapter 9 Media Management Managing Playlists on page 84 The following functions are available CopySong DeleteSong Rena...

Страница 96: ... be saved in an album Select CopySong in the song function menu then press ENTER The CopySong screen appears Select a destination medium with YES and NO Press to move the cursor to the album and press YES and NO to select a destination album Press ENTER OK flashes in the first line of the screen Making Copies of Songs FUNC Song selection screen CopySong 1 CopySong RenameSong DeleteSong SONG MENU 1...

Страница 97: ... song function menu then press ENTER The DeleteSong screen appears Press ENTER OK flashes in the first line of the screen Press YES to delete the song NO to cancel After a while the completion message appears Press any button to return to the song selection screen 5 Executing CopySong Completed Press any button CopySong ANY Deleting Songs FUNC Song selection screen DeleteSong 1 CopySong RenameSong...

Страница 98: ...ppears Press ENTER The song title editing screen appears Enter a new title to the selected song You can enter up to 64 characters Follow the instructions in Entering Characters on page 55 Press ENTER OK flashes in the first line of the screen Renaming a Song FUNC Song selection screen RenameSong 1 CopySong RenameSong DeleteSong SONG MENU 1 2 SortSong 006 Toccata RenameSong ENT 2 Toccata RenameSong...

Страница 99: ...aylist Select SortSong in the song function menu then press ENTER The SortSong screen appears Press and to move the songs to the desired position 5 Executing RenameSong Completed Press any button RenameSong ANY Rearranging the Order of Songs FUNC Song selection screen SortSong 1 CopySong RenameSong DeleteSong SONG MENU 1 2 SortSong 006 Toccata and Fugue 007 Admiration SortSong ENT 2 006 Toccata an...

Страница 100: ...the end of the album The song format can be converted to other format This function is available for songs in the album on Memory USB1 USB2 and FromToPC Select ConvertSong in the song function menu then press ENTER The ConvertSong screen appears 3 008 Interaction 006 Toccata and Fugue SortSong OK YES NO 4 Executing SortSong Completed Press any button SortSong ANY Converting Song Format FUNC Song s...

Страница 101: ...s and beats metronome to minutes and seconds or vice versa This function is available for songs in the album on Memory USB1 USB2 and FromToPC Option Song Format E SEQ E SEQ format SMF0 SMF Standard MIDI File format 0 SMF1 SMF Standard MIDI File format 1 Piano1 E SEQ format to play on all Disklavier in correct tempo 2 001 Song For Students SMF0 Piano1 ConvertSong ENT 3 001 Song For Students SMF0 Pi...

Страница 102: ...he Disklavier PRO model but is not used when the file is played back on general MIDI devices When you edit the song with external MIDI devices for example a software sequencer the relationship between the note data and the XP event as well as the actual performance may not be maintained There may be cases in which songs edited in this manner cannot be played back normally depending on the instrume...

Страница 103: ...ssage appears Press any button to return to the song selection screen To create a playlist see Chapter 9 Media Management Creating a New Playlist on page 87 By creating lists of your favorite songs you can program your Disklavier to automatically play back a series of songs At the initial factory settings no playlist is created in the internal flash memory First create your own playlist then play ...

Страница 104: ...pied to that playlist Select a destination playlist with YES and NO Note If you select New Playlist and add songs to it the playlist is titled as My Playlist Note The new playlist created in this procedure can be selected from Playlist in the media selection screen Press ENTER OK flashes in the first line of the screen Press YES to add NO to cancel After a while the completion message appears Pres...

Страница 105: ... Press ENTER OK flashes in the first line of the screen Press YES to delete the playlist NO to cancel After a while the completion message appears Press any button to return to the album selection screen for the playlist Deleting a Playlist FUNC Album selection screen DeleteList Media selection screen Playlist 1 DeleteList RenameList NewList ALBUM MENU 1 1 02 My Best Collection DeleteList ENT 2 02...

Страница 106: ...nction menu for the playlist then press ENTER The NewList screen appears Press ENTER The playlist title editing screen appears Enter a title to a new playlist You can enter up to 64 characters Follow the instructions in Entering Characters on page 55 Press ENTER OK flashes in the first line of the screen Creating a New Playlist FUNC Album selection screen NewList Media selection screen Playlist 1 ...

Страница 107: ...y registered Select RenameList in the album function menu for the playlist then press ENTER The RenameList screen appears Press ENTER The playlist title editing screen appears Enter a new title to the selected playlist You can enter up to 64 characters Follow the instructions in Entering Characters on page 55 5 Executing NewList Completed Press any button NewList ANY Renaming a Playlist FUNC Album...

Страница 108: ...e contents inside the media Press FUNC in the media selection screen The media function menu screen appears Note Available functions vary depending on the medium you selected Select a desired function with the cursor buttons then press ENTER Note If there is no available functions the media function menu screen does not appears although pressing FUNC The following functions are available CopyAll D...

Страница 109: ...e to store the contents Select a destination medium with YES and NO Press ENTER OK flashes in the first line of the screen Note If the maximum number of the albums in the destination medium exceeds 99 copying stops Press YES to make a copy NO to cancel After a while the completion message appears Press any button to return to the media selection screen Making Copies of the Entire Contents in a Med...

Страница 110: ...ction menu then press ENTER The DeleteAll screen appears Press ENTER OK flashes in the first line of the screen Press YES to delete NO to cancel After a while the completion message appears Press any button to return to the media selection screen Deleting the Entire Contents in a Medium FUNC Media selection screen DeleteAll 1 CopyAll DeleteAll MEDIA MENU Media Memory DeleteAll ENT 2 Media Memory D...

Страница 111: ... the Disklavier properly for network communications by enabling it to get a DHCP IP address automatically recommended or by assigning an appropriate address manually The procedure is the same as the one used for setting up the Disklavier for Internet communications Please follow the instructions in Chapter 10 Internet Direct Connection IDC Setting the Disklavier for the Internet Connection on page...

Страница 112: ...files to the FromToPC folder See Chapter 9 Media Management Refreshing the Contents in FromToPC on page 96 Refresh the contents in the folder 2 3 4 5 For Windows In case that you cannot find the Dkv icon 1 Press SETUP on the remote control 2 Select Network in the setup menu screen 3 Select Information to display the information of network settings 4 Press several times to display NAME DKV and memo...

Страница 113: ...kv icon Note If the user ID and password are required during the process enter any name for the ID and leave the space for the password blank In the first dialog that appears select FromToPC from the mini menu and click OK Click OK again in the next dialog that appears Connection process completes and the FromToPC icon appears in the left side of the window Click the FromToPC icon The FromToPC fol...

Страница 114: ...older See Chapter 9 Media Management Refreshing the Contents in FromToPC on page 96 Refresh the contents in the folder 2 3 4 5 For Macintosh In case that you cannot find the Dkv icon 1 Press SETUP on the remote control 2 Select Network in the setup menu screen 3 Select Information to display the information of network settings 4 Press several times to display NAME DKV and memorize that name 5 Sele...

Страница 115: ...ect Refresh in the media function menu then press ENTER The Refresh screen appears Press ENTER OK flashes in the first line of the screen Press YES to refresh NO to cancel After a while the completion message appears Press any button to return to the media selection screen Refreshing the Contents in FromToPC FUNC Refresh FromToPC Media selection screen 1 Media FromToPC Refresh ENT 2 Media FromToPC...

Страница 116: ...floppy drive optional to the USB port on the control unit Note If you are formatting a floppy disk make sure that the floppy disk s erasure protection tab is set to unprotected Insert a floppy disk to the floppy drive Select Format in the media function menu then press ENTER The Format screen appears Press ENTER OK flashes in the first line of the screen Press YES to format NO to cancel After a wh...

Страница 117: ... and playlists In order to protect your valuable music data Yamaha strongly recommends that you backup your memory on regular basis If the floppy disk is inserted to the optional floppy disk drive eject it before you start making backups Note Make sure that the USB medium has enough space to save the backup data Connect an external USB medium to the USB port on the control unit Press SYSTEM on the...

Страница 118: ...em menu screen To make a backup see Chapter 9 Media Management Making Backups of Songs on page 98 You can restore the current condition of the internal memory to the previous condition that you made a backup copy Connect an external USB medium in which you made backup last time to the USB port on the control unit Press SYSTEM on the remote control The system menu screen appears 3 4 Backup song dat...

Страница 119: ...een appears Press ENTER OK flashes in the first line of the screen Press YES to restore NO to cancel After a while the completion message appears Press any button to return to the system menu screen 3 4 Restore this data Date 2007 10 22 15 42 00 Restore OK YES NO 5 Completed Press any button Restore ANY ...

Страница 120: ...https member yamaha com myproduct regist Note Some IDC service functions do not require an ID and password Once you have an IDC account you will interact with that account using the remote control To use the full IDC service you are required to enter your registered ID e mail address and password with the remote control You can connect the Disklavier to a full time online Internet connection ADSL ...

Страница 121: ... router function Note Some types of modems such as ADSL modems or cable modems have multiple ports for connecting two or more devices such as computer musical instrument etc If your modems have only one port an optional router or hub is required in order to connect several devices simultaneously Note Use an STP shielded twisted pair cable for connection Connection example 2 Using a modem without r...

Страница 122: ...diaries or Yamaha s and or its subsidiaries directors officers or employees be responsible for unauthorized access loss or alteration of the data of the purchaser or be liable for any damage from intrusions Note Free contents that do not require an ID and password are available Once you have established an IDC account and successfully connected your Disklavier to the Internet you can access a spec...

Страница 123: ... of DisklavierRadio Login Select this to log in to the IDC service You need to enter your ID and password Logout If you wish to use another IDC account or prevent the current account from being used by others select this to log out from the IDC service Account Information Select this to confirm your account information Subscription Status Select this to confirm your DisklavierRadio subscription st...

Страница 124: ...ttons then press ENTER Perform operations on the screen that appears You can download the update program directly from the Internet and update the firmware of the Disklavier Press INTERNET on the remote control The Internet menu screen appears 2 D Radio Update MyAccount Internet 1 1 3 Updating the Disklavier Using the Internet Update INTERNET 1 D Radio Update MyAccount Internet 1 1 ...

Страница 125: ...the screen select the option with the cursor buttons then press ENTER The download process of the update program starts Shut down the Disklavier with ON OFF on the control unit after the download process is completed The update program is now prepared Update the firmware following the procedures in Chapter 12 Other Settings Updating the Disklavier on page 129 2 D Radio Update MyAccount Internet 1 ...

Страница 126: ...address of the primary and secondary DNS server These settings must be made when Use DHCP is set to DHCP DNS or MANUAL IPAddr SubMask Gateway Enter the address of the control unit subnet mask and gateway server These settings must be made when Use DHCP is set to MANUAL Proxy Proxy Port Enter the name and the port number for the proxy server These settings are necessary only when a proxy server is ...

Страница 127: ...ER after confirming Press ENTER to complete the operation For details on cookies see Chapter 16 Glossary on page 140 If you want to initialize the Internet settings first you must reset the Disklavier to its initial factory setting However cookies are still remain after parameter resetting To delete cookies perform the appropriate operation on the reset screen See Chapter 12 Other Settings Resetti...

Страница 128: ... system you can hear the sound played played back on the Disklavier from the connected audio system and the sound played back on the connected audio system from the Disklavier Hooking Up Audio Equipment Control unit AV amplifier To audio inputs CD player etc To audio outputs RCA cord not supplied RCA cord not supplied ...

Страница 129: ...s when you output the same audio signals as the ones for the monitor speakers 1 2 Only for models equipped with the Silent Piano function Output PianoTG 2 Select this when you output the ensemble part and the digital piano sound Note that the digital piano sound is also output in the acoustic mode PianoTG 2 Select this when you output only the digital piano sound SYNC Select this when you output t...

Страница 130: ...ying SYNC OUT Level Adjusts the output level of the SMPTE signal For normal use the adjustment of this option is not required If noises synchronized signal are output from the OUTPUT jacks during video synchronized playback turn down the level and re record OUTPUT Offset For some speakers or digital amplifiers the audio from the Disklavier may be output a little bit later than the acoustic piano p...

Страница 131: ... MIDI an acronym for Musical Instrument Digital Interface allows electronic device synthesizers etc to interact and work in synchronization with other MIDI compatible device The Disklavier enables you to enjoy a variety of MIDI features by connecting a MIDI device or computer to the Disklavier s control unit Note Be sure to use the commercially available MIDI cable with the L shaped connector on t...

Страница 132: ...desired channel to which you assign the piano part 1 2 Select this when the 01 and 02 channels are assigned to the piano parts Prg Select the smallest number channel assigned to the piano group voice see page 131 to be played on the Disklavier Prg All Select all channels assigned to the piano group voice see page 131 to be played on the Disklavier MIDI IN Delay When the Disklavier receives two kin...

Страница 133: ...een appears Select MIDI with the cursor buttons then press ENTER The MIDI setting screen appears Select a desired option with the cursor buttons then press YES and NO to change setting Press ENTER to complete the operation 1 TimerPlay MIDI AudioI O M Tune SETUP MENU 1 3 2 TimerPlay MIDI AudioI O M Tune SETUP MENU 1 3 3 4 ...

Страница 134: ...ce is connected to MIDI OUT terminal USB Select this when the MIDI device is connected to USB port MIDI OUT Selects one of the following parts to be transmitted to the connected MIDI device ESBL Out Select this when you transmit the ensemble part played back on the Disklavier KBD Out Select this when you transmit the piano part played on the Disklavier Press SETUP on the remote control The setup m...

Страница 135: ...red channels 01 thru 16 Select the desired channel to which you assign the piano part Local Selects whether you reproduce or not the piano part playing with the Disklavier s internal tone generator ON Select this when you reproduce the piano part with the Disklavier s internal tone generator OFF Select this when you reproduce the song played on the Disklavier on the external MIDI device This optio...

Страница 136: ... screen appears Select MIDI with the cursor buttons then press ENTER The MIDI setting screen appears Select a desired option with the cursor buttons then press YES and NO to change setting Press ENTER to complete the operation 1 TimerPlay MIDI AudioI O M Tune SETUP MENU 1 3 2 TimerPlay MIDI AudioI O M Tune SETUP MENU 1 3 3 4 ...

Страница 137: ...setup menu screen appears Select M Tune with the cursor buttons then press ENTER The TG Master Tune setting screen appears Playing the keyboard press YES and NO to tune the pitch of the internal XG tone generator The same note will sound simultaneously on the XG tone generator s digital piano and on the acoustic piano as soon as you play the keyboard The pitch of the internal XG tone generator can...

Страница 138: ...ning Functions Press SETUP on the remote control The setup menu screen appears Select Shortcut with the cursor buttons then press ENTER Note The Reverb option appears only on models equipped with the Silent Piano function The shortcut setting screen appears Press and to select the desired number 4 Assigning Frequently used Functions to the Number Keypad on the Remote Control SETUP Shortcut 1 Timer...

Страница 139: ...f a song or songs in the selected album or playlist RND Starts playback of songs in the selected album or playlist at random RADIO Starts playback of the selected DisklavierRadio channel BLNC Adjusts the volume balance among the different sound sources tone generator or audio POWER Turns on and off the Disklavier QUIET Activates and inactivates the quiet mode Option 1 Option 2 Description Mem01 Me...

Страница 140: ...ion 1 Lst01 Lst99 Starts repeat playback of all songs in the playlist selected for option 1 from the first song 001 999 Starts repeat playback of the song selected for option 2 in the playlist selected for option 1 Option Description Mem01 Mem99 Starts playback of songs in the selected album at random Lst01 Lst99 Starts playback of songs in the selected playlist at random Option Description CH01 C...

Страница 141: ...r or you can also set the MAC address of the external remote controller to allow it to access your Disklavier without entering the passcode Note If changes are inappropriately made for these settings the external remote controller may not function properly In such cases enter to reset the passcode setting Setting the Passcode Press SETUP on the remote control The setup menu screen appears Select P...

Страница 142: ...e MAC address of the external remote controller This will allow the external remote controller with the registered MAC address to access your Disklavier without entering the passcode With the passcode properly set press to select MAdr1 Press and to move the cursor left and right Note You can also use the dial on the control unit to enter the address Enter the address with YES and NO You can set up...

Страница 143: ...ars Select Display with the cursor buttons then press ENTER The display setting screen appears Press YES and NO to change the brightness The following brightness settings are available 40 60 80 100 Adjusting the Brightness of the Display SETUP Display 1 Clock Adj Backup TimeZone Restore STSTEM MENU 1 2 2 Language Display Maintenance STSTEM MENU _ 2 2 Brightness 100 Dim light OFF Display ENT 3 Brig...

Страница 144: ...in 3min 5min 10min 15min 30min 45min 60min If there is no operation for the time set above the display dims to half the brightness of its original setting Press ENTER to complete the operation Press SYSTEM on the remote control The system menu screen appears Select Language with the cursor buttons then press ENTER The language setting screen appears 4 Brightness 100 Dim light 1min Display ENT 5 Sw...

Страница 145: ...ecommends that you backup your songs in the internal memory However you cannot backup your various parameter settings If you want to return your Disklavier to its initial factory settings follow the procedure below Press SETUP on the remote control The setup menu screen appears To make a backup copy of the songs which are in the internal memory see Chapter 9 Media Management Making Backups of Song...

Страница 146: ...message appears Press any button to return to the setup menu screen Option Description Parameter Reset all parameters excluding the clock setting and the Internet setting Memory Reset the internal memory Factory Init Reset the Disklavier to its initial factory setting DeleteCookies Delete the contents of all saved cookies 3 4 Reset Factory Init Reset OK YES NO 5 Executing Reset Completed Press any...

Страница 147: ... the remote control The system menu screen appears Select Maintenance with the cursor buttons then press ENTER The maintenance screen appears Press ENTER The maintenance options appears Diagnosing the Disklavier Maintenance Mode SYSTEM Maintenance Grand piano Upright piano 1 2 Language SYSTEM MENU 2 2 Maintenance Display ENT Maintenance Mode 3 2 Program Versions 3 Pedal Calibration 1 Post Delivery...

Страница 148: ...n download the update program from the following website http download yamaha com Make sure that Disklavier is shut down Note Depending on the version or specification of the Disklavier the actual indications for the version and module names may differ from ones depicted here Holding PLAY PAUSE on the control unit press ON OFF The current version information of each module appears one after the ot...

Страница 149: ...ond module The update process of the second module takes approximately 3 minutes A total of four modules needs to be updated Repeat this step to complete the update Confirmation message of the third module The update process of the third module takes approximately 2 minutes Confirmation message of the fourth module The update process of the fourth module takes approximately 2 minutes The closing s...

Страница 150: ...n2 051 Log Drum 052 Xylophon 053 TubulBel 054 ChrchBel 055 Carillon 056 Dulcimer 057 Dulcimr2 058 Cimbalom 059 Santur 03 Organ 060 DrawOrgn 061 DetDrwOr 062 60sDrOr1 063 60sDrOr2 064 70sDrOr1 065 DrawOrg2 066 60sDrOr3 067 EvenBar 068 16 2 2 3 069 Organ Ba 070 70sDrOr2 071 CheezOrg 072 DrawOrg3 073 PercOrgn 074 70sPcOr1 075 DetPrcOr 076 LiteOrg 077 PercOrg2 078 RockOrgn 079 RotaryOr 080 SloRotar 08...

Страница 151: ...m 193 70s Str 194 Str Ens3 195 Syn Str1 196 ResoStr 197 Syn Str4 198 SS Str 199 Syn Str2 200 ChoirAah 201 S Choir 202 Ch Aahs2 203 MelChoir 204 ChoirStr 205 VoiceOoh 206 SynVoice 207 SynVox2 208 Choral 209 AnaVoice 210 Orch Hit 211 OrchHit2 212 Impact 08 Brass 213 Trumpet 214 Trumpet2 215 BriteTrp 216 WarmTrp 217 Trombone 218 Trmbone2 219 Tuba 220 Tuba 2 221 Mute Trp 222 Fr Horn 223 FrHrSolo 224 F...

Страница 152: ...cestrl 339 Crystal 340 SynDrCmp 341 Popcorn 342 TinyBell 343 RndGlock 344 GlockChi 345 ClearBel 346 ChorBell 347 SynMalet 348 SftCryst 349 LoudGlok 350 XmasBell 351 VibeBell 352 DigiBell 353 AirBells 354 BellHarp 355 Gamelmba 356 Atmosphr 357 WarmAtms 358 HollwRls 359 NylonEP 360 NylnHarp 361 Harp Vox 362 AtmosPad 363 Planet 364 Bright 365 FantaBel 366 Smokey 367 Goblins 368 GobSyn 369 50sSciFi 37...

Страница 153: ...ootStep 488 MchinGun 489 LaserGun 490 Xplosion 491 FireWork Voice Display Name 17 Drum Kit 439 StandKit 440 Stnd2Kit 441 Room Kit 442 Rock Kit 443 ElectKit 444 AnalgKit 445 Jazz Kit 446 BrushKit 447 ClascKit 448 SFX Kit1 449 SFX Kit2 Voice Display Name Internal TG3 Tone Generator Basic Voice List Voice Display Name 01 Piano 001 GrandPno 002 BritePno 003 E Grand 004 HnkyTonk 005 E Piano1 006 E Pian...

Страница 154: ...carina 11 Synth Lead 081 SquareLd 082 Saw Lead 083 CaliopLd 084 Chiff Ld 085 CharanLd 086 Voice Ld 087 Fifth Ld 088 Bass Ld 12 Synth Pad 089 NewAgePd 090 Warm Pad Voice Display Name 091 PolySyPd 092 ChoirPad 093 BowedPad 094 MetalPad 095 Halo Pad 096 SweepPad 13 Synth Effects 097 Rain 098 SoundTrk 099 Crystal 100 Atmosphr 101 Bright 102 Goblins 103 Echoes 104 Sci Fi 14 Ethnic 105 Sitar 106 Banjo 1...

Страница 155: ...hile the Disklavier is turned on also in the standby mode this is not a malfunction Remote Control Symptom Remedy You cannot control the Disklavier using the remote control Make sure that you are pointing the remote control at the control unit s remote control sensor Make sure that you are within the remote control s specified operating range approx 5 m Make sure that the remote control s batterie...

Страница 156: ...ypad but the last song on the album is selected If a song number higher than the last song number on the album is specified the last song will be selected When specifying a search time using the remote control s number keypad but the end of the song is selected If a time value higher than the total length of the song is specified the end of the song will be selected Some notes drop out during play...

Страница 157: ...hat the OMNI IN option on the Disklavier is set to AutoDetect Make sure that the OMNI OUT option on the Disklavier is set to SYNC Noises are heard during recording Turn down the volume of the TV connected to the DVD recorder Disconnect the left side connector of the RCA cord from the OMNI OUT L jack on the Disklavier This will not affect the functionality of video synchronized recording Noises are...

Страница 158: ...tected CANNOT EXECUTE PROTECTED FILE You tried to copy the protected song file to the removable medium such as a USB flash memory You cannot copy the protected file to the removable medium Deleted all songs in this album You tried to delete the album with sub folders on the external medium CANNOT EXECUTE TO CREATE MORE THAN 99 ALBUMS You tried to create a new album on the medium that already conta...

Страница 159: ...dards General MIDI GM An addition to the MIDI standard that simplifies the transfer of MIDI song files between instruments of different manufacturers A MIDI song recorded using a GM compatible tone generator should play back correctly when used with any GM compatible tone generator The standard specifies that a GM compatible tone generator must support 24 note polyphony 16 parts and 128 standard v...

Страница 160: ...ly for security and to prevent unauthorized access to an internal network Quiet Mode A mode of the Silent Piano function in which sound is output through the monitor speakers enabling you to freely adjust the volume of the piano Router A device for connecting multiple computer networks For example a router is necessary when connecting several computers in a house or office to allow all of them acc...

Страница 161: ...if connected a USB flash memory or a USB hard disk to TO DEVICE terminal Also the Disklavier enables you to enjoy a variety of MIDI features by connecting a computer to TO HOST terminal Voice The sounds produced by a tone generator expressing various instruments Web Page Refers to each individual page that makes up a website Website This refers to the group of web pages that are opened together Fo...

Страница 162: ... Hard Disk FAT32 format Yamaha does not assure the operation of the commercially available USB hard disks Floppy Disk 3 5 2DD 720 KB or 2HD 1 44 MB floppy disk 3 File Format Standard MIDI File SMF format 0 Standard MIDI File SMF format 1 E SEQ format Song Format PianoSoft Solo PianoSoft Plus PianoSoft PlusAudio SmartPianoSoft SmartKey CueTIME Control Unit Drive CD read only Dimensions W H D 292 49...

Страница 163: ...d w sound MIDI songs reverse forward w o sound audio songs directly by time or measure Repeat ALL all songs in current album RPT current song RND all songs in current album in random order A B Part Cancel L left R right pedal Timer Playback See page 36 Video Synchronization See page 40 SmartKey Playback See page 41 PianoSmart Playback See page 41 Playback Controls Volume 11 levels 10 to 0 Tempo 50...

Страница 164: ...Appendix Appendix ...

Страница 165: ...need to make restrictions that forbid anyone to deny you these rights or to ask you to surrender the rights These restrictions translate to certain responsibilities for you if you distribute copies of the software or if you modify it For example if you distribute copies of such a program whether gratis or for a fee you must give the recipients all the rights that you have You must make sure that t...

Страница 166: ...ese conditions a You must cause the modified files to carry prominent notices stating that you changed the files and the date of any change b You must cause any work that you distribute or publish that in whole or in part contains or is derived from the Program or any part thereof to be licensed as a whole at no charge to all third parties under the terms of this License c If the modified program ...

Страница 167: ...rties are not compelled to copy the source along with the object code 4 You may not copy modify sublicense or distribute the Program except as expressly provided under this License Any attempt otherwise to copy modify sublicense or distribute the Program is void and will automatically terminate your rights under this License However parties who have received copies or rights from you under this Li...

Страница 168: ...applies to it and any later version you have the option of following the terms and conditions either of that version or of any later version published by the Free Software Foundation If the Program does not specify a version number of this License you may choose any version ever published by the Free Software Foundation 10 If you wish to incorporate parts of the Program into other free programs wh...

Страница 169: ...se restrictions translate to certain responsibilities for you if you distribute copies of the library or if you modify it For example if you distribute copies of the library whether gratis or for a fee you must give the recipients all the rights that we gave you You must make sure that they too receive or can get the source code If you link other code with the library you must provide complete obj...

Страница 170: ... version of the Library The precise terms and conditions for copying distribution and modification follow Pay close attention to the difference between a work based on the library and a work that uses the library The former contains code derived from the library whereas the latter must be combined with the library in order to run TERMS AND CONDITIONS FOR COPYING DISTRIBUTION AND MODIFICATION 0 Thi...

Страница 171: ...this function must be optional if the application does not supply it the square root function must still compute square roots These requirements apply to the modified work as a whole If identifiable sections of that work are not derived from the Library and can be reasonably considered independent and separate works in themselves then this License and its terms do not apply to those sections when ...

Страница 172: ...aining this object code plus portions of the Library will still fall under Section 6 Otherwise if the work is a derivative of the Library you may distribute the object code for the work under the terms of Section 6 Any executables containing that work also fall under Section 6 whether or not they are linked directly with the Library itself 6 As an exception to the Sections above you may also combi...

Страница 173: ...to find the accompanying uncombined form of the same work 8 You may not copy modify sublicense link with or distribute the Library except as expressly provided under this License Any attempt otherwise to copy modify sublicense link with or distribute the Library is void and will automatically terminate your rights under this License However parties who have received copies or rights from you under...

Страница 174: ...h applies to it and any later version you have the option of following the terms and conditions either of that version or of any later version published by the Free Software Foundation If the Library does not specify a license version number you may choose any version ever published by the Free Software Foundation 14 If you wish to incorporate parts of the Library into other free programs whose di...

Страница 175: ...SOFTWARE OR THE USE OR OTHER DEALINGS IN THE SOFTWARE This file contains the copying permission notices for various files in the GNU C Library distribution that have copyright owners other than the Free Software Foundation These notices all require that a copy of the notice be included in the accompanying documentation and be distributed with binary distributions of the code so be sure to include ...

Страница 176: ...ING FROM LOSS OF USE DATA OR PROFITS WHETHER IN AN ACTION OF CONTRACT NEGLIGENCE OR OTHER TORTIOUS ACTION ARISING OUT OF OR IN CONNECTION WITH THE USE OR PERFORMANCE OF THIS SOFTWARE The Sun RPC support from rpcsrc 4 0 is covered by the following license Copyright 1984 Sun Microsystems Inc Sun RPC is a product of Sun Microsystems Inc and is provided for unrestricted use provided that this legend i...

Страница 177: ...D BY CARNEGIE MELLON UNIVERSITY AND CONTRIBUTORS AS IS AND ANY EXPRESS OR IMPLIED WARRANTIES INCLUDING BUT NOT LIMITED TO THE IMPLIED WARRANTIES OF MERCHANTABILITY AND FITNESS FOR A PARTICULAR PURPOSE ARE DISCLAIMED IN NO EVENT SHALL THE UNIVERSITY OR CONTRIBUTORS BE LIABLE FOR ANY DIRECT INDIRECT INCIDENTAL SPECIAL EXEMPLARY OR CONSEQUENTIAL DAMAGES INCLUDING BUT NOT LIMITED TO PROCUREMENT OF SUB...

Страница 178: ...ode must retain the authors copyright notice s this list of conditions and the following disclaimer 3 Redistributions in binary form must reproduce the authors copyright notice s this list of conditions and the following disclaimer in the documentation and or other materials provided with the distribution 4 The copyright holder has authorized the removal of this clause 5 Neither the name s of the ...

Страница 179: ...IN CONTRACT STRICT LIABILITY OR TORT INCLUDING NEGLIGENCE OR OTHERWISE ARISING IN ANY WAY OUT OF THE USE OF THIS SOFTWARE EVEN IF ADVISED OF THE POSSIBILITY OF SUCH DAMAGE Copyright 2000 2003 Intel Corporation All rights reserved Redistribution and use in source and binary forms with or without modification are permitted provided that the following conditions are met Redistributions of source code...

Страница 180: ...ust reproduce applicable copyright statements and notices this list of conditions and the following disclaimer in the documentation and or other materials provided with the distribution and 3 Redistributions must contain a verbatim copy of this document The OpenLDAP Foundation may revise this license from time to time Each revision is distinguished by a version number You may use this Software und...

Страница 181: ...enSSL Toolkit http www openssl org 4 The names OpenSSL Toolkit and OpenSSL Project must not be used to endorse or promote products derived from this software without prior written permission For written permission please contact openssl core openssl org 5 Products derived from this software may not be called OpenSSL nor may OpenSSL appear in their names without prior written permission of the Open...

Страница 182: ...ntation and or other materials provided with the distribution 9 All advertising materials mentioning features or use of this software must display the following acknowledgement This product includes cryptographic software written by Eric Young eay cryptsoft com The word cryptographic can be left out if the routines from the library being used are not cryptographic related 10 If you include any Win...

Страница 183: ...NTAL SPECIAL EXEMPLARY OR CONSEQUENTIAL DAMAGES INCLUDING BUT NOT LIMITED TO PROCUREMENT OF SUBSTITUTE GOODS OR SERVICES LOSS OF USE DATA OR PROFITS OR BUSINESS INTERRUPTION HOWEVER CAUSED AND ON ANY THEORY OF LIABILITY WHETHER IN CONTRACT STRICT LIABILITY OR TORT INCLUDING NEGLIGENCE OR OTHERWISE ARISING IN ANY WAY OUT OF THE USE OF THIS SOFTWARE EVEN IF ADVISED OF THE POSSIBILITY OF SUCH DAMAGE ...

Страница 184: ... Info ZIP retains the right to use the names Info ZIP Zip UnZip UnZipSFX WiZ Pocket UnZip Pocket Zip and MacZip for its own source and binary releases 1995 2004 Jean loup Gailly and Mark Adler This software is provided as is without any express or implied warranty In no event will the authors be held liable for any damages arising from the use of this software Permission is granted to anyone to us...

Страница 185: ...Range 6 Data Entry MSB 0 127 38 Data Entry LSB 0 127 Parameter value is determined by combining MSB and LSB 1 2 5 Main Volume Piano Part ESBL Part transmitted Cntrl Parameter Data Range 7 Main Volume 0 127 1 2 6 Pan ESBL Part Cntrl Parameter Data Range 10 Pan 0 127 1 2 7 Expression Piano Part ESBL Part Cntrl Parameter Data Range 11 Expression 0 127 1 2 8 Hold1 Piano Part ESBL Part transmitted Cntr...

Страница 186: ...m 00 40 7F 64 0 63 rr drum instrument note number 1A rr mm Drum Instrument Level mm 00 7F 0 max rr drum instrument note number 1C rr mm Drum Instrument Pan mm 00 40 7F random left center right rr drum instrument note number 1D rr mm Drum Instrument Reverb Send Level mm 00 7F 0 max rr drum instrument note number 1E rr mm Drum Instrument Chorus Send Level mm 00 7F 0 max rr drum instrument note numbe...

Страница 187: ...R 1 Master tuning 2 TG300 System Data Parameter change 3 TG300 Multi Effect Data parameter change 4 TG300 Multi Part Data parameter change 2 1 2 Universal Realtime Messages 2 1 2 1 Master Volume Piano Part ESBL Part 11110000 F0 Exclusive status 01111111 7F Universal Real Time 01111111 7F ID of target device 00000100 04 Sub ID 1 Device Control Message 00000001 01 Sub ID 2 Master Volume 0sssssss SS ...

Страница 188: ...00100111 27 Model ID 00110000 30 Sub ID2 00000000 00 00000000 00 0mmmmmmm mm Master Tune MSB 0lllllll ll Master Tune LSB 0ccccccc cc 11110111 F7 End of Exclusive This message simultaneously changes the pitch of all channels 2 2 Bulk Dump ESBL Part The Disklavier receives the following bulk dump data XG NATIVE 1 XG System Data 2 Multi Effect1 Data 3 Multi Part Data 4 Drums Setup Data QS300 NATIVE 1...

Страница 189: ... Address Size Data Parameter Description Default value H H H H 02 01 00 2 00 7F REVERB TYPE MSB see Effect Type List 01 HALL1 00 7F REVERB TYPE LSB 00 basic type 00 02 1 00 7F REVERB PARAMETER 1 see Effect Parameter List Depends on reverb type 03 1 00 7F REVERB PARAMETER 2 04 1 00 7F REVERB PARAMETER 3 05 1 00 7F REVERB PARAMETER 4 06 1 00 7F REVERB PARAMETER 5 07 1 00 7F REVERB PARAMETER 6 08 1 0...

Страница 190: ...t Depends on variation type 00 7F VARIATION PARAMETER 1 LSB 44 2 00 7F VARIATION PARAMETER 2 MSB 00 7F VARIATION PARAMETER 2 LSB 46 2 00 7F VARIATION PARAMETER 3 MSB 00 7F VARIATION PARAMETER 3 LSB 48 2 00 7F VARIATION PARAMETER 4 MSB 00 7F VARIATION PARAMETER 4 LSB 4A 2 00 7F VARIATION PARAMETER 5 MSB 00 7F VARIATION PARAMETER 5 LSB 4C 2 00 7F VARIATION PARAMETER 6 MSB 00 7F VARIATION PARAMETER 6...

Страница 191: ...QUENCY 64 63 40 nn 19 1 00 7F FILTER RESONANCE 64 63 40 nn 1A 1 00 7F EG ATTACK TIME 64 63 40 nn 1B 1 00 7F EG DECAY TIME 64 63 40 nn 1C 1 00 7F EG RELEASE TIME 61 63 40 nn 1D 1 28 58 MW PITCH CONTROL 24 24 semitones 40 nn 1E 1 00 7F MW FILTER CONTROL 9600 9450 cent 40 nn 1F 1 00 7F MW AMPLITUDE CONTROL 64 63 40 nn 20 1 00 7F MW LFO PMOD DEPTH 0 127 0A nn 21 1 00 7F MW LFO FMOD DEPTH 0 127 00 nn 2...

Страница 192: ...5E 1 00 7F AC1 LFO FMOD DEPTH 0 127 00 nn 5F 1 00 7F AC1 LFO AMOD DEPTH 0 127 00 nn 60 1 00 5F AC2 CONTROLLER NUMBER 0 95 11 nn 61 1 28 58 AC2 PITCH CONTROL 24 24 semitones 40 nn 62 1 00 7F AC2 FILTER CONTROL 9600 9450 cent 40 nn 63 1 00 7F AC2 AMPLITUDE CONTROL 64 63 40 nn 64 1 00 7F AC2 LFO PMOD DEPTH 0 127 00 nn 65 1 00 7F AC2 LFO FMOD DEPTH 0 127 00 nn 66 1 00 7F AC2 LFO AMOD DEPTH 0 127 00 nn...

Страница 193: ... Name 07 08 not used 0A 0B 01 03 Element Switch 1 Element 1 on 2 Element 2 on 3 Element 1 and 2 on 0C 00 7F Voice Level 0D not used 3C Element 1 3D 00 7F Wave Number High bit13 bit7 3E 00 7F Wave Number Low bit6 bit0 3F 00 7F Note Limit Low 40 00 7F Note Limit High 41 00 7F Velocity Limit Low 42 00 7F Velocity Limit High 43 00 01 Filter EG Velocity Curve 44 00 02 LFO Wave Select 0 saw 1 tri 2 S H ...

Страница 194: ... 00 7F FEG Level 0 72 00 7F FEG Level 1 73 00 7F FEG Level 2 74 00 7F FEG Level 3 75 00 7F FEG Level 4 76 00 7F Element Level 77 00 7F Level Scaling Break Point 1 78 00 7F Level Scaling Break Point 2 79 00 7F Level Scaling Break Point 3 7A 00 7F Level Scaling Break Point 4 7B 00 7F Level Scaling Offset 1 7C 00 7F Level Scaling Offset 2 7D 00 7F Level Scaling Offset 3 7E 00 7F Level Scaling Offset ...

Страница 195: ...2 Fretles2 2 33 Fretles3 2 34 Fretles4 2 96 SynFretl 2 97 Smooth 2 37 0 SlapBas1 1 27 ResoSlap 1 32 PunchThm 2 38 0 SlapBas2 1 43 VeloSlap 2 39 0 SynBass1 1 18 SynBa1Dk 1 20 FastResB 1 24 AcidBass 1 35 Clv Bass 2 40 TeknoBa 2 64 Oscar 2 65 SqrBass 1 66 RubberBa 2 96 Hammer 2 40 0 SynBass2 2 6 MelloSB1 1 12 Seq Bass 2 18 ClkSynBa 2 19 SynBa2Dk 1 32 SmthBa 2 2 40 ModulrBa 2 41 DX Bass 2 64 X WireBa ...

Страница 196: ...101 0 Bright 2 64 FantaBel 2 96 Smokey 2 102 0 Goblins 2 64 GobSyn 2 65 50sSciFi 2 66 Ring Pad 2 67 Ritual 2 68 ToHeaven 2 70 Night 2 71 Glisten 2 96 BelChoir 2 103 0 Echoes 2 8 EchoPad2 2 14 Echo Pan 2 64 EchoBell 2 65 Big Pan 2 66 SynPiano 2 67 Creation 2 68 Stardust 2 69 Reso Pan 2 104 0 Sci Fi 2 64 Starz 2 Instrument Group Bank Voice Name Program Ele ment Ethnic 105 0 Sitar 1 32 DetSitar 2 35 ...

Страница 197: ...y 1 Instrument Group Bank Voice Name Program Ele ment Strings 41 0 Violin 1 8 SlowVln 1 126 E Organ4 2 127 synecho1 2 42 0 Viola 1 126 E Organ5 2 127 rain 2 43 0 Cello 1 126 E Organ6 2 127 synoboe 2 44 0 Contrabs 1 126 E Organ7 2 127 synecho2 2 45 0 Trem Str 1 8 SlowTrStr 1 9 Susp Str 2 126 E Organ8 2 127 synsolo 2 46 0 Pizz Str 1 126 E Organ9 2 127 synrdorg 2 47 0 Harp 1 126 SoftTP 1 1 127 synbel...

Страница 198: ...7 brssect1 1 Instrument Group Bank Voice Name Program Ele ment Synth 97 0 Rain 2 Effects 1 HrmoRain 2 2 AfrcnWnd 2 8 ClaviPad 2 127 brssect2 2 98 0 SoundTrk 2 1 Ancestrl 2 2 Prologue 2 127 vibe1 1 99 0 Crystal 2 1 SynMalet 1 2 SftCryst 2 3 RndGlock 2 4 LoudGlok 2 5 GlockChi 2 6 ClearBel 2 7 XmasBell 2 8 VibeBell 2 9 DigiBell 2 16 ChorBell 2 17 AirBells 2 18 BellHarp 2 19 Gamelmba 2 127 vibe2 1 100...

Страница 199: ...e 42 F 1 1 Hi Hat Closed Analog HH Closed 1 Telephone Ring2 43 G 1 Floor Tom H Room Tom 2 Rock Tom 2 E Tom 2 Analog Tom 2 Jazz Tom 2 Brush Tom 2 Jazz Tom 2 44 G 1 1 Hi Hat Pedal Analog HH Closed 2 45 A 1 Low Tom Room Tom 3 Rock Tom 3 E Tom 3 Analog Tom 3 Jazz Tom 3 Brush Tom 3 Jazz Tom 3 46 A 1 1 Hi Hat Open Analog HH Open 47 B 1 Mid Tom L Room Tom 4 Rock Tom 4 E Tom 4 Analog Tom 4 Jazz Tom 4 Brus...

Страница 200: ...tting Up 50 D 2 High Tom Room Tom 6 Room Tom 6 E Tom 6 Analog Tom 6 Jazz Tom 6 Jazz Tom 6 Timpani D Ac Bass Slap 51 D 2 Ride Cymbal 1 Timpani D FL Key Click 52 E 2 Chinese Cymbal Reverse Cymbal Timpani E Laughing 53 F 2 Ride Cymbal Cup Timpani F Screaming 54 F 2 Tambourine Punch 55 G 2 Splash Cymbal Heartbeat 56 G 2 Cowbell Analog Cowbell Footsteps 1 57 A 2 Crash Cymbal 2 Hand Cym 1 Footsteps 2 58...

Страница 201: ...hat creates three delay sounds L R and C center 06 00 DELAY L R A program that creates two delay sounds L and R Two feedback delays are provided 07 00 ECHO Two delays L and R and independent feedback delays for L and R 08 00 CROSS DELAY A program that crosses the feedback of two delays 09 00 EARLY REF1 An effect that produces only the early reflection component of reverb 09 01 EARLY REF2 An effect...

Страница 202: ...2 0kHz 8 40 table 3 14 EQ Low Gain 12 12dB 52 76 15 EQ High Frequency 500Hz 16 0kHz 28 58 table 3 16 EQ High Gain 12 12dB 52 76 ECHO 1 Lch Delay1 0 1 355 0ms 1 3350 2 Lch Feedback Level 63 63 1 127 3 Rch Delay1 0 1 355 0ms 1 3550 4 Rch Feedback Level 63 63 1 127 5 High Damp 0 1 1 0 1 10 6 Lch Delay2 0 1 355 0ms 1 3550 7 Rch Delay2 0 1 355 0ms 1 3550 8 Delay2 Level 0 127 0 127 9 10 Dry Wet D63 W D ...

Страница 203: ... See Table Con trol ROTARY SPEAKER 1 LFO Frequency 0 00 39 7Hz 0 127 table 1 2 LFO Depth 0 127 0 127 3 4 5 6 EQ Low Frequency 50Hz 2 0kHz 8 40 table 3 7 EQ Low Gain 12 12dB 52 76 8 EQ High Frequency 500Hz 16 0kHz 28 58 table 3 9 EQ High Gain 12 12dB 52 76 10 Dry Wet D63 W D W D W63 1 127 11 12 13 14 15 16 TREMOLO 1 LFO Frequency 0 00 39 7Hz 0 127 table 1 2 AM Depth 0 127 0 127 3 PM Depth 0 127 0 1...

Страница 204: ...B 52 76 6 EQ Low Frequency 50Hz 2 0kHz 8 40 table 3 7 EQ High Frequency 500Hz 16 0kHz 28 58 table 3 8 9 10 11 12 13 14 15 16 No Parameter Range Value See Table Con trol 2 BAND EQ 1 EQ Low Frequency 50Hz 2 0kHz 8 40 table 3 2 EQ Low Gain 12 12dB 52 76 3 EQ High Frequency 500Hz 16 0kHz 28 58 table 3 4 EQ High Gain 12 12dB 52 76 5 6 7 8 9 10 11 EQ Mid Frequency 100Hz 10 0kHz 14 54 table 3 12 EQ Mid G...

Страница 205: ... 0 1 1 1 7 2 3 2 3 4 8 4 6 4 5 8 0 6 9 5 7 11 1 8 12 7 9 14 3 10 15 8 11 17 4 12 19 0 13 20 6 14 22 1 15 23 7 16 25 3 17 26 9 18 28 4 19 30 0 20 31 6 21 33 2 22 34 7 23 36 3 24 37 9 25 39 5 26 41 0 27 42 6 28 44 2 29 45 7 30 47 3 31 48 9 32 50 5 33 52 0 34 53 6 35 55 2 36 56 8 37 58 3 38 59 9 39 61 5 40 63 1 41 64 6 42 66 2 43 67 8 44 69 4 45 70 9 46 72 5 47 74 1 48 75 7 49 77 2 50 78 8 51 80 4 52...

Страница 206: ...5 10 1 2 6 38 2 Data Entry 64 Hold1 Sustain Control 65 2 Portament 66 4 2 Sostenuto Change 67 Soft Shift Pedal 71 74 84 2 91 93 94 2 Effect Depth 96 101 1 2 Prog 0 127 0 127 2 Change True System Exclusive Song Pos Common Song Sel Tune System Clock Real Time Commands Aux All Sound OFF 120 126 127 Reset All Cntrls 121 Local ON OFF All Notes OFF 123 125 Messages Active Sense Reset Notes 1 Received tr...

Страница 207: ......

Отзывы: