45
DBR10/DBR12/DBR15
2. Inspection
Items
2-1. Writing of model ID
Execute MODEL-ID setting inspection of diagnostic
mode.
Con
fi
rm that the MODEL-ID is written in a CPU.
2-2. Power consumption when idling
Perform measurement with no signal input.
Con
fi
rm that the primal power consumption is 25W or less.
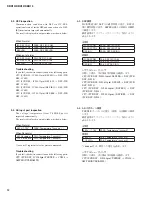
2-3. Confi rmation of frequency for AMP
Confirm that the AMP oscillation frequency is within the
speci
fi
ed below.
Between CN202-1 and CN202-2 : 380kHz ± 4kHz
Between CN202-3 and CN202-4 : 380kHz ± 4kHz
1-3. Preparation
• The load resistors for each output terminals are as
follows.
SP OUT (HF) Between 1 pin and 2 pin of CN304:
8 ohms±1 % (Rated 100 W or more)
SP OUT (LF) Between 4 pin and 3 pin of CN304:
4 ohms±1 % (Rated 500 W or more)
OUT PUT (XLR) Between 2 pin and 3 pin of JK601:
3 k ohms±1 % (Rated 1/4 W or more)
• 0 dBu is referenced to 0.775 Vrms. 0 dBV is referenced
to 1 Vrms.
• Unless otherwise speci
fi
ed, the controls should be set
as follows.
Level control (INPUT 1) : VOL1
: MIN
Level control (INPUT 2) : VOL2
: MIN
LINE/MIC switch
: LINE
HPF switch
: OFF
D-CONTOUR switch
: OFF
THRU/MIX
switch
:
THRU
110V/220V
:
110V
(P destination only )
• Unless otherwise speci
fi
ed, the input signal should be
1 kHz sine wave.
• The output impedance of signal generator should be
100
Ω
- 150
Ω
.
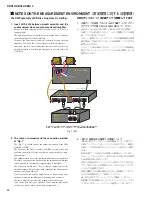
1-4. Activating diagnostic mode and application for
service inspection
The inspection must be performed with both the
diagnostic mode of the unit and the application for service
inspection of PC are activated.
Follow the steps below.
(1) When the power is supplied to the AMP UNIT, the
diagnostic mode is activated automatically and LED
in the rear panel are all-points lighted. It starts in the
state of CFG0 (PROTECTION : off, FAN : stop, AMP
: disable, MUTE : all on)of ANALOG inspection.
(2) Run application for service inspection (DiagDBR-
SERVICE.exe).
2. 検査項目
2-1. モデルIDの書き込み
ダイアグモードの MODEL-ID 設定検査を実行します。
モデル ID が CPU に書き込まれたことを確認します。
2-2. アイドリング時の消費電力
測定は入力無信号の状態で行います。
一次消費電力が 25W 以下であることを確認します。
2-3. AMP の周波数確認
アンプ発振周波数が下記の規定範囲内であることを
確認します。
CN202-1、CN202-2 の間 : 380kHz ± 4kHz
CN202-3、CN202-4 の間 : 380kHz ± 4kHz
1-3. 準備
• 各出力端子に下記の負荷抵抗を接続します。
SP OUT (HF) CN304 1-2 ピン間 :
8 Ω± 1 %(定格 100 W 以上)
SP OUT (LF) CN304 4-3 ピン間 :
4 Ω± 1 %(定格 500 W 以上)
OUT PUT (XLR) JK601 2-3 ピン間 :
3 kΩ± 1 %(定格 1/4 W 以上)
• 0 dBu = 0.775 Vrms、 0 dBV = 1 Vrms とします。
• 特に指定のない場合、コントロールツマミ類は以下の
ように設定します。
LEVEL コントロール(INPUT 1): VOL1: 最小
LEVEL コントロール(INPUT 2): VOL2: 最小
LINE/MIC スイッチ
:LINE
HPF スイッチ
:OFF
D-CONTOUR スイッチ
:OFF
THRU/MIX スイッチ
:THRU
110V/220V
:110V
(P 仕向けのみ)
• 特に指定のない場合、入力信号は 1 kHz 正弦波と
します。
• 信号発生器の出力インピーダンスは 100 Ω〜 150
Ωとします。
1-4. ダイアグモードとサービス検査用アプリケーション
の起動
検査は、本体のダイアグモードと PC のサービス検
査用アプリケーション両方を起動した状態で行いま
す。
以下の操作をします。
(1) AMP UNIT の 電 源 を 入 れ る と、 自 動 的 に ダ イ
ア グ モ ー ド が 起 動 し、 リ ア パ ネ ル の LED が
全 点 灯 し ま す。 こ の と き、ANALOG 検 査 の
CFG0 (PROTECTION : off、FAN : stop、AMP :
disable、MUTE : all on)の状態で起動します。
(2) サービス検査用アプリケーション(DiagDBR-
SERVICE.exe)を起動します。
Содержание DBR Series
Страница 6: ...6 DBR10 DBR12 DBR15 O 03 66 0 アンプ組立 68 63 1 68 63 287 036 68 1 63 96 P destination only ...
Страница 24: ...24 DBR10 DBR12 DBR15 AMPS Circuit Board 2NA ZJ27480 1 Pattern side パターン側 ...
Страница 67: ...8 DBR10 DBR12 DBR15 CABINET ASSEMBLY キャ ビネ ッ ト組立 DBR10 ...
Страница 69: ...10 DBR10 DBR12 DBR15 CABINET ASSEMBLY キャ ビネ ッ ト組立 DBR12 ...
Страница 71: ...12 DBR10 DBR12 DBR15 DBR15 CABINET ASSEMBLY キャ ビネ ッ ト組立 ...
Страница 80: ...21 DBR10 DBR12 DBR15 AMP ASSEMBLY アンプ組立 6 03 66 0 シールド AMP 組立 6HH SDJH 63 1 A ...
Страница 83: ...24 DBR10 DBR12 DBR15 6 03 66 0 シールド AMP 組立 6 63 66 0 シールド DSP 組立 ...


