background image

CAUTION II

1.

IMPORTANT NOTICE : DO NOT MODIFY THIS
UNIT!

This product, when installed as indicated in the
instructions contained in this manual, meets FCC
requirements.  Modifications not expressly approved
by Yamaha may void your authority, granted by the
FCC, to use the product.

2.

IMPORTANT :

 When connecting this product to

accessories and/or another product use only high
quality shielded cables.  Cable/s supplied with this
product MUST be used.  Follow all installation
instructions.  Failure to follow instructions could void
your FCC authorization to use this product in the USA.

3.

NOTE :

 This product has been tested and found to

comply with the requirements listed in FCC
Regulations, Part 15 for Class “B” digital devices.
Compliance with these requirements provides a
reasonable level of assurance that your use of this
product in a residential environment will not result in
harmful interference with other electronic devices.

This equipment generates/uses radio frequencies and,
if not installed and used according to the instructions
found in the users manual, may cause interference
harmful to the operation of other electronic devices.

Compliance with FCC regulations does not guarantee
that interference will not occur in all installations.  If
this product is found to be the source of interference,
which can be determined by turning the unit “OFF” and
“ON”, please try to eliminate the problem by using one
of the following measures:

Relocate either this product or the device that is being
affected by the interference.

Utilize power outlets that are on different branch (circuit
breaker or fuse) circuits or install AC line filter/s.

In the case of radio or TV interference, relocate/reorient
the antenna.  If the antenna lead-in is 300 ohm ribbon
lead, change the lead-in to coaxial type cable.

If these corrective measures do not produce satisfactory
results, please contact the local retailer authorized to
distribute this type of product.  If you can not locate the
appropriate retailer, please contact Yamaha Electronics
Corp., U.S.A. 6660 Orangethorpe Ave, Buena Park, CA
90620.

The above statements apply ONLY to those products
distributed by Yamaha Corporation of America or its
subsidiaries.

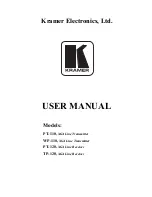
 EXAMPLE OF ANTENNA GROUNDING

MAST

GROUND
CLAMP

ANTENNA
LEAD IN
WIRE

ANTENNA
DISCHARGE UNIT
(NEC SECTION 810–20)

GROUNDING CONDUCTORS
(NEC SECTION 810–21)

GROUND CLAMPS

POWER SERVICE GROUNDING
ELECTRODE SYSTEM
(NEC ART 250. PART H)

ELECTRIC
SERVICE
EQUIPMENT

NEC 

– NATIONAL ELECTRICAL CODE

FCC INFORMATION (for US customers)

Note to CATV system installer:

This reminder is provided to call the CATV system installer’s
attention to Article 820-40 of the NEC that provides
guidelines for proper grounding and, in particular, specifies
that the cable ground shall be connected to the grounding
system of the building, as close to the point of cable entry as
practical.

d)

If the product does not operate normally by following
the operating instructions. Adjust only those controls
that are covered by the operating instructions as an
improper adjustment of other controls may result in
damage and will often require extensive work by a
qualified technician to restore the product to its normal
operation,

e)

If the product has been dropped or damaged in any
way, and

f)

When the product exhibits a distinct change in
performance - this indicates a need for service.

20

Replacement Parts – When replacement parts are required,
be sure the service technician has used replacement parts
specified by the manufacturer or have the same
characteristics as the original part. Unauthorized
substitutions may result in fire, electric shock, or other
hazards.

21

Safety Check – Upon completion of any service or repairs
to this product, ask the service technician to perform safety
checks to determine that the product is in proper operating
condition.

22

Wall or Ceiling Mounting – The unit should be mounted to
a wall or ceiling only as recommended by the manufacturer.

23

Heat – The product should be situated away from heat
sources such as radiators, heat registers, stoves, or other
products (including amplifiers) that produce heat.

24

Outdoor Antenna Grounding – If an outside antenna or
cable system is connected to the product, be sure the
antenna or cable system is grounded so as to provide some
protection against voltage surges and built-up static charges.
Article 810 of the National Electrical Code, ANSI/NFPA 70,
provides information with regard to proper grounding of the
mast and supporting structure, grounding of the lead-in wire
to an antenna discharge unit, size of grounding conductors,
location of antenna discharge unit, connection to grounding
electrodes, and requirements for the grounding electrode.

SAFETY INSTRUCTIONS

0102CRXE500(U).Cau.E

02.7.9, 4:40 PM

3

Содержание CRX-E500

Страница 1: ...CE S A RUE AMBROISE CROIZAT BP70 CROISSY BEAUBOURG 77312 MARNE LA VALLEE CEDEX02 FRANCE YAMAHA ELECTRONICS UK LTD YAMAHA HOUSE 200 RICKMANSWORTH ROAD WATFORD HERTS WD1 7JS ENGLAND YAMAHA SCANDINAVIA A...

Страница 2: ...ct should be operated only from the type of power source indicated on the marking label If you are not sure of the type of power supply to your home consult your product dealer or local power company...

Страница 3: ...NA DISCHARGE UNIT NEC SECTION 810 20 GROUNDING CONDUCTORS NEC SECTION 810 21 GROUND CLAMPS POWER SERVICE GROUNDING ELECTRODE SYSTEM NEC ART 250 PART H ELECTRIC SERVICE EQUIPMENT NEC NATIONAL ELECTRICA...

Страница 4: ...service is needed The cabinet should never be opened for any reason 15 When not planning to use this unit for long periods of time i e vacation disconnect the AC power plug from the wall outlet CAUTI...

Страница 5: ...RTED Notes on the transportation pad 3 Remote control 4 Connecting the speakers and antennas 5 Connecting the system 6 Setting the clock 7 Adjusting the brightness of the display 7 RX E400 NAMES OF BU...

Страница 6: ...en the disc is being handled can adversely affect the disc s play Do not use cleaning discs or warped discs All of these could damage the unit To prevent a malfunction of this unit Do not use any non...

Страница 7: ...RTED Installing the transportation pad Keep the pad and the caution label and reattach it as described below whenever the unit is moved Before attaching it remove all discs from the disc tray 1 Press...

Страница 8: ...lothing etc Clean the battery compartment thoroughly before installing new batteries Remote control operation range Notes There should be no large obstacles between the remote control and the main uni...

Страница 9: ...it 3 Connect the indoor FM antenna 4 Connect the AC power cord to a wall outlet Notes Use external FM AM antennas if you need better reception Consult your dealer The AM loop antenna should be placed...

Страница 10: ...E400 4 Connect DIGITAL OPTICAL OUT of CDC E500 to DIGITAL OPTICAL IN of MDX E300 Take off the covers of the optical fiber cable plug the DIGITAL OPTICAL OUT jack and the DIGITAL OPTICAL IN jack before...

Страница 11: ...a power failure or when the AC power cord is disconnected for more than five minutes you must reset the clock Adjusting the brightness of the display You can adjust the brightness of the display If yo...

Страница 12: ...T indicator P 12 4 STEREO indicator P 11 5 TUNED indicator P 11 RX E400 NAMES OF BUTTONS AND CONTROLS 9 VOLUME P 10 0 PHONES P 10 q Remote control sensor P 4 w BASS P 10 e TREBLE P 10 r BALANCE P 10 t...

Страница 13: ...P 14 q DISPLAY P 13 w VOLUME P 10 Note 5 9 are operation buttons and input selectors for each component RX E400 NAMES OF BUTTONS AND CONTROLS POWER 1 2 3 1 2 3 4 5 6 4 5 6 7 8 9 7 8 0 10 100 REP RAND...

Страница 14: ...requency response BALANCE Adjust the balance of the output volume from the left and right speakers to compensate for sound imbalance caused by the speaker location or listening room conditions When yo...

Страница 15: ...he desired station try manual tuning as described next When an FM stereo broadcast with sufficient signal strength is received STEREO appears on the display and you can listen to stereo sound Listenin...

Страница 16: ...as input source by turning INPUT 2 Press MEMORY for about 2 seconds The unit starts presetting stations AUTO and MEMORY will flash on the display Received stations are stored to A1 A2 A8 sequentially...

Страница 17: ...press STANDBY ON to turn on this unit To cancel the timer play setting Press DISPLAY to show the current time then press TIMER so that TIMER goes off from the display You can also cancel by pressing...

Страница 18: ...ime changes as follows About 4 seconds after setting the normal display will resume SLEEP will appear in the display 3 The unit will turn off automatically when the selected sleep time is reached SLEE...

Страница 19: ...cator P 18 5 DISC 1 2 3 Open Close P 17 6 Stop P 17 7 Play Pause P 17 8 Skip Search Backward Skip Search Forward P 17 STANDBY ON DISC 1 DISC 2 DISC 3 DISC SKIP NATURAL SOUND COMPACT DISC PLAYER CDC E5...

Страница 20: ...P 18 7 DISC SKIP P 18 8 Play Pause P 17 9 Stop P 17 0 Skip Search Backward P 17 q Skip Search Forward P 17 w CD input P 17 POWER 1 2 3 1 2 3 4 5 6 4 5 6 7 8 9 7 8 0 10 100 REP RANDOM PROG MODE A B C...

Страница 21: ...ipped Notes You cannot enter a number that is higher than the last track number on the selected disc These operations can also be performed when the unit is in the pause or stop mode During stop mode...

Страница 22: ...2 3 1 2 3 4 5 6 4 5 6 7 8 9 7 8 0 10 100 REP RANDOM PROG MODE A B C TEXT TIME DISC SKIP D E TEXT TIME 03 3 53 1 2 3 3DISCS 3 4 5 6 7 03 2 22 1 2 3 3DISCS 3 4 5 6 7 03 T 50 33 1 2 3 3DISCS 3 4 5 6 7 0...

Страница 23: ...NS 1 If necessary switch the disc play mode by pressing MODE If the single disc play mode is selected select the desired disc by pressing DISC SKIP 2 Press RANDOM RANDOM appears on the display The uni...

Страница 24: ...this internal operation WAIT appears on the display and your operation is canceled Program play By creating a program you can enjoy listening to your favourite tracks in any desired order As many as...

Страница 25: ...C PAUSE KX E300 1 Play 2 Fast forward 3 Rewind 4 Stop 5 TAPE input 6 TAPE REC PAUSE POWER 1 2 3 1 2 3 4 5 6 4 5 6 7 8 9 7 8 0 10 100 REP RANDOM PROG MODE A B C TEXT TIME DISC SKIP D E TAPE DIRECTION P...

Страница 26: ...sequence of the tracks of different discs make sure that the length of the MD or the tape is longer than the total play time of the programmed tracks so that it is enough to cover the time for changin...

Страница 27: ...g does not pause while CDC E500 changes discs When recording the tracks of different discs it is recommended to set the CD player to single disc play mode and record the discs individually When record...

Страница 28: ...ng stereo broadcasts Stereo broadcasts are noisy and STEREO indicator blinks on and off Cannot select preset stations Buzzing or static during AM broadcasts AM broadcast sensitivity is poor Cannot set...

Страница 29: ...isc Replace the batteries with new ones Use within 6 meters and 60 degree radius Change the position of the unit Relocate this unit away from the TV or cover the TV s remote control sensor The disc is...

Страница 30: ...0 V 60 Hz Australia model AC 240 V 50 Hz U K and Europe models AC 230 V 50 Hz General model AC 110 120 220 240 V 50 60 Hz Power consumption U S A and Canada models 110 W U K Europe Australia and Gener...

Страница 31: ...CE S A RUE AMBROISE CROIZAT BP70 CROISSY BEAUBOURG 77312 MARNE LA VALLEE CEDEX02 FRANCE YAMAHA ELECTRONICS UK LTD YAMAHA HOUSE 200 RICKMANSWORTH ROAD WATFORD HERTS WD1 7JS ENGLAND YAMAHA SCANDINAVIA A...

Отзывы: