background image

Audio input/output connections

 Owner’s Manual

33

Rotary switch and DIP switch settings of the I/O 
devices

Audio input/output 
connections

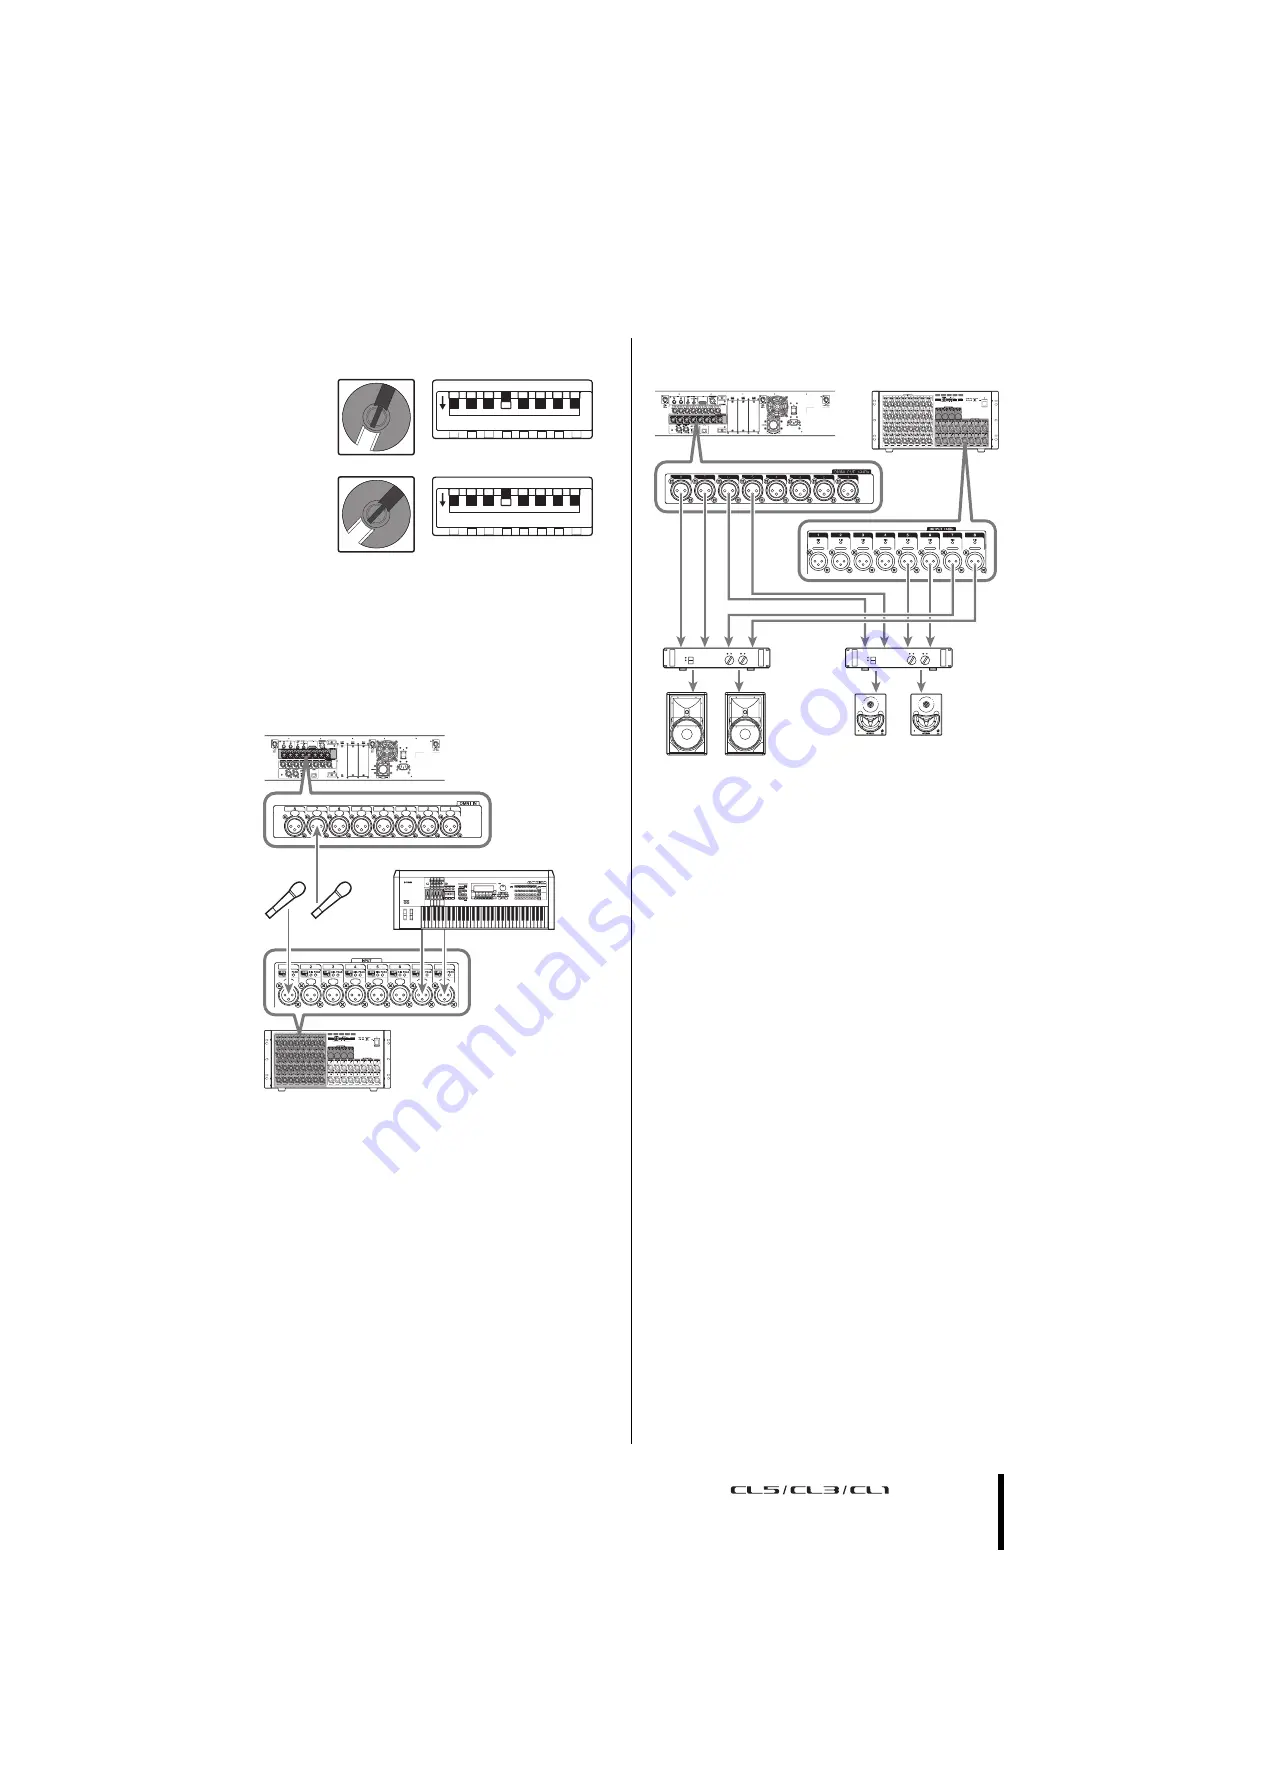
Analog input connections

The INPUT jacks on the I/O devices and the OMNI IN 
jacks are used mainly to connect microphones or monaural 
line-level devices.

NOTE

In the default state, the OMNI IN jacks are not patched. To 
use the signals connected here as inputs, you will need to 
make patch settings.

Analog output connections

To the OMNI OUT jacks on the CL series and the 
OUTPUT jacks on the Rio3224-D units, you can patch the 
output signals from output channels (MIX, MATRIX, 
STEREO (L/R), MONO (C)), monitor signals (MONITOR 
OUT L/R/C channels), and the direct out signals of the 
input channels. For information about patches, refer to 
“Patching the mixer output to the I/O device” (see page 41) 
in the Quick Guide section.
The PHONES Out jack located on the front panel is for 
monitoring, which always enables you to monitor the 
monitoring source signal. By assigning the MONITOR 
OUT L/R/C channels to the desired output jacks, you can 
also monitor the same signal through external speakers.

Digital input/output connections

Use the DIGITAL OUT jack to send the CL’s internal 
signals to an external digital audio device. When the CL is 
in the default state, the output signal of the STEREO 
channel is patched to the DIGITAL OUT jack, which 
enables you to record the main mix onto a CD recorder or 
other device.
You can connect this jack to the AES/EBU jack on an I/O 
device, such as Rio3224-D. Also, by installing separately 
sold mini-YGDAI I/O cards in slots 1–3, you can add 
input/output jacks to the CL or connect speaker processor 
units.
Refer to the Yamaha professional audio website for the 
most recent information on available I/O cards.

http://www.yamahaproaudio.com/

(ID#1)

(ID#2)

1  2  3  4  5  6  7  8

ON

1  2  3  4  5  6  7  8

ON

0

1

23

4

5

6

789AB

C

D

E

F

01

2

3

4

5

6

789AB

C

D

E

F

01

2

3

4

5

6

789AB

C

D

EF

Rio3224-D

CL series

01

2

3

4

5

6

789AB

C

D

EF

Rio3224-D

Main speakers

Monitor speakers

CL series

Содержание CL5

Страница 1: ...EN Owner s Manual Keep This Manual For Future Reference...

Страница 2: ...35 Specifying the brightness of the touch screen LEDs channel name displays and lamps 35 Setting the date and time of the internal clock 35 Word clock connections and settings 36 Making HA Head Amp an...

Страница 3: ...or when unused for long periods of time 14 Refer all servicing to qualified service personnel Servicing is required when the apparatus has been damaged in any way such as power supply cord or plug is...

Страница 4: ...oured GREEN and YELLOW must be connected to the terminal in the plug which is marked by the letter E or by the safety earth symbol or colored GREEN or GREEN and YELLOW The wire which is coloured BLUE...

Страница 5: ...thers or damage to the device or other property These precautions include but are not limited to the following When removing the electric plug from the device or an outlet always hold the plug itself...

Страница 6: ...content created with this product in revenue generating broadcast systems terrestrial satellite cable and or other distribution channels streaming applications via Internet intranets and or other netw...

Страница 7: ...are available on the following website http www yamahaproaudio com For information about updating and setting up the unit please refer to the firmware update guide available on the website About the O...

Страница 8: ...ple CL units share the same I O device the gain compensation function will maintain network audio streams at a constant level to help you enjoy the benefits of a large scale sound system The Dante Vir...

Страница 9: ...dministrator and for users to help prevent important settings from being changed accidentally Information specific to each user user level system settings and user defined key knob settings can be sto...

Страница 10: ...ection page 13 4 Centralogic section page 13 5 SCENE MEMORY MONITOR section page 14 6 USER DEFINED KNOBS section page 14 7 USER DEFINED KEYS section page 14 8 Master section page 15 9 USB connector pa...

Страница 11: ...be cue monitored If the cue is on the key LED will light 4 Meter LEDs Indicate the channel level 5 ON key Switches the channel on or off If a channel is on the key LED will light In SENDS ON FADER mod...

Страница 12: ...the HA analog gain is adjusted between 17 dB and 18 dB Keep in mind that noise may be generated when using phantom power if there is a difference between the Hot and Cold output impedance of an extern...

Страница 13: ...s DCA groups or custom groups selected by the Bank Select keys 1 Bank Select keys Select a bank to be controlled in the Centralogic section Press the INPUT key then press one of the Bank Select keys b...

Страница 14: ...ight of the touch screen Press the INC DEC keys simultaneously to return to the current scene number 4 UNDO key Cancels the scene recall and recovers the status obtained prior to recall The key LED li...

Страница 15: ...e to the USB connector to record or play audio files and to save or load internal data The Help file displayed on the unit screen is loaded from a connected USB flash drive You can also save on a USB...

Страница 16: ...d the MIDI OUT connector transmits messages from the CL unit These are used mainly to record CL parameter operations or scene library selections on an external device or to control CL parameters from...

Страница 17: ...om the PW800W even if its own internal power supply shuts down due to a problem Caution If you plan to connect the PW800W be sure to first power off both the CL unit and the PW800W Then use the power...

Страница 18: ...are used to operate knobs selected in the touch screen A thick line will be displayed around a selected knob if it can be controlled by a multifunction knob Typically a knob of this type corresponds...

Страница 19: ...a name or comment to a scene or library or to assign a name to a channel Press the keys in the window to enter the corresponding character Popup windows When you press a button or field for a specific...

Страница 20: ...his button the CH JOB menu which allows you to group and link channels will appear allowing you to select the function you want to operate 8 RACK When you press this button the VIRTUAL RACK screen wil...

Страница 21: ...el and DCA group and assign a title to scene and library data when saving it To assign a name you will use the keyboard window shown in the main area 1 Access the screen for assigning a name The scree...

Страница 22: ...l buttons In some popup windows the title bar at the top of the window contains tool buttons for additional functions You can use these buttons to access related libraries or to copy parameters from o...

Страница 23: ...settings from a library 1 Open a popup window that provides the tool buttons To access each popup window proceed as follows To recall settings from a channel library first display the SELECTED CHANNEL...

Страница 24: ...e recalled to all the selected channels GEQ EFFECT PREMIUM RACK popup window Use the rack select tabs at the bottom of the popup window to select a rack NOTE You cannot select a rack select tab of a r...

Страница 25: ...not be possible to press the RECALL button 5 Press the RECALL button 6 The selected data will immediately be loaded into the channel EQ dynamics or rack GEQ effect Premium Rack you selected in step 2...

Страница 26: ...ect the channel EQ dynamics or rack effect Premium Rack for which you want to initialize the settings 3 Press the DEFAULT button A dialog box will ask you to confirm the initialization operation 4 To...

Страница 27: ...en a popup window that provides the tool buttons 2 Select a channel EQ dynamics or rack GEQ effect Premium Rack 3 Press the COPY button to place the current settings in the buffer memory This will be...

Страница 28: ...r DCA groups Use the Bank Select keys on the right side of the Centralogic section to select the channels that you want to control When you press the keys the corresponding channels or DCA groups will...

Страница 29: ...groups that you want to control Each Bank Select key holds a Bank which bundles a group of multiple channels CUSTOM Bank Select keys enable you to assign and recall a bank with your own assortment of...

Страница 30: ...X and the buttons that enable you to select the destination MIX MATRIX buses 1 ON FADER switch button Pressing this button repeatedly will switch between MIX1 16 and MIX17 24 MATRIX 2 MIX MATRIX bus s...

Страница 31: ...nt should be negotiated automatically in switches that support EEE some switches do not perform the negotiation properly This may cause EEE to be enabled in Dante networks when it is not appropriate r...

Страница 32: ...r without affecting the audio About redundant networks A redundant network consists of two circuits a primary circuit and a secondary circuit Normally the network operates on the primary circuit Howev...

Страница 33: ...ich always enables you to monitor the monitoring source signal By assigning the MONITOR OUT L R C channels to the desired output jacks you can also monitor the same signal through external speakers Di...

Страница 34: ...place and remove the slot cover Keep the removed slot cover and screws in a safe place 3 Align the edges of the card with the guide rails inside the slot and insert the card into the slot Push the ca...

Страница 35: ...ptional MBCL meter bridge is installed on the CL3 CL1 this knob setting will also affect the LEDs on the meter bridge LAMP Adjusts the brightness of the lamps connected to the rear panel LAMP jacks 4...

Страница 36: ...SELECT field select the desired clock source When using the internal word clock Press the INT 48k or INT 44 1k button When a device on the Dante network serves as the clock master Press the DANTE 48k...

Страница 37: ...screen will change accordingly Using the Centralogic section settings for eight channels Use the Centralogic section and the OVERVIEW screen to make head amp settings for up to eight channels This me...

Страница 38: ...black characters on gray background press the button to switch it on 4 Verify that in the top panel the ON key of the corresponding input channel is turned on If the ON key is off the LED is dark pres...

Страница 39: ...TO ST PAN BALANCE field of the SELECTED CHANNEL VIEW page to display a popup window then switch the status on 3 In the Centralogic section verify that the ON key of the corresponding input channel is...

Страница 40: ...OK button The button you changed will change from red back to white please wait approximately 30 seconds for the settings to be applied 5 Set BIT to 24 and LATENCY to 0 25 Connecting I O devices 1 Ma...

Страница 41: ...NNEL section 3 Press the 48V button in the GAIN PATCH popup window as necessary depending on the microphone you use NOTE The phantom power master switch on the I O device must be turned on first Make...

Страница 42: ...Edit the dynamics type and parameters in the DYNAMICS popup window Use the knobs in the Centralogic section to edit the parameters 5 Edit the DYNAMICS 2 parameters in the same way Setting the output c...

Страница 43: ...aders 8 Perform the same operations for other GEQs as desired Applying effects Using EFFECT RACK with send return 1 Press the RACK button in the display screen 2 Press the EFFECT tab 3 Modify the INPU...

Страница 44: ...press the OUTPUT key then ST IN key 14 Adjust the effect return level using the fader in the Centralogic section 15 If necessary press the RACK button then the effect track icon of the EFFECT tab and...

Страница 45: ...RACK 11 Adjust the parameters in the PREMIUM RACK popup window Changing the patch settings Setting up INSERT or DIRECT OUT 1 Select the bank that contains the channel for which you want to set up INSE...

Страница 46: ...contains the channels you want to link in the Channel Strip section or Centralogic section 4 While pressing and holding down the SEL key of one channel press the SEL key of the other channel that you...

Страница 47: ...field press the channel strip number button 6 Press the SEL key for the channel that you want to assign in the Channel Strip section 7 In the same way select other channels that you want to assign Usi...

Страница 48: ...ious screen then press the OUTPUT button in the OSCILLATOR area Using scene memories Storing a scene 1 Use the INC DEC keys in the SCENE MEMORY section to select the store destination scene number 2 P...

Страница 49: ...ing level 6 Press the Rec button to arm recording 7 Press the Play button to start recording 8 When you have finished recording press the Stop button Playing audio files from a USB flash drive 1 Conne...

Страница 50: ...s the SAVE button Loading the unit settings from a USB flash drive 1 Press the SETUP button in the display screen 2 Press the SAVE LOAD button 3 To select the file that you want to load press the name...

Страница 51: ...ates that the initialization process is complete Press the EXIT button The CL will start up in normal operating mode NOTE Alternatively you can continue the operation by selecting a different menu ins...

Страница 52: ...s that you want to calibrate Faders for which a problem was detected at start up will already be selected 4 Press the START button A confirmation dialog box will appear 5 Press the OK button in the di...

Страница 53: ...exter nal head amp device or I O device set to an appropriate level Are the input channel faders raised Could the EQ gain be turned down excessively Are EQ s attenuators raised Could the GATE COMP th...

Страница 54: ...ed Could that channel or parameter be set to Recall Safe Could Focus be set in such a way that the channels or parameters will not be updated Could user level restrictions have been specified You turn...

Страница 55: ...riate for your situation 2 Hook holes B of the MBCL mounting strap onto screws A of the CL3 CL1 3 Tighten screws A to secure the MBCL starting with the upper two screws 4 Connect the MBCL connector C...

Страница 56: ...0ppm 48kHz 4 1667 0 1 0 1 4 0 200ppm Signal Delay Less than 2 5ms OMNI IN to OMNI OUT Fs 48kHz Fader 100mm motorized Resolution 1024steps 10dB to 138dB dB all faders Frequency Response 0 5 1 5dB 20Hz...

Страница 57: ...A Power supply pin Output voltage Vp 5V Max output current Imax 300mA 2 4pin 12V 3pin GND Lamp rating 5W Voltage control by software Input Terminals GAIN Actual Load Impedance For Use With Nominal Inp...

Страница 58: ...8 24V 20 CAUTION 9 24V 21 DETECT A 10 GND 22 DETECT B 11 GND 23 DETECT GND 12 GND Frame GND 1 2 3 4 5 6 7 8 9 10 11 12 13 14 15 16 17 18 19 20 21 22 23 Pin Signal Name Pin Signal Name 1 GPO1 9 GPO2 2...

Страница 59: ...Dimensions Owner s Manual 59 Dimensions 1053 15 201 130 299 667 CL5 CL3 CL1 648 15 201 130 299 667 839 15 201 130 299 667 Unit mm 90 4 374 70 184 5 26 29 2 MBCL...

Страница 60: ...w 19 L Lamps 35 Libraries 23 Linking 46 List windows 19 M Main area 21 MIX MATRIX bus 30 Multifunction knob 18 MUTE group 46 N Name displays 35 Network connections 31 O Option card 34 Oscillator 48 P...

Страница 61: ......

Страница 62: ...MEMO Owner s Manual 62...

Страница 63: ...AL ON To MATRIX VARI To MATRIX VARI STEREO MATRIX1 3 7 MATRIX2 4 8 To CASCADE IN SELECT SLOT SLOT1 SLOT2 SLOT3 METER SLOT IN 16 16 16 METER SLOT IN METER SLOT IN DANTE DANTE INPUT METER DANTE IN DELAY...

Страница 64: ...DE OUT 1 8 CUE CASCADE OUT L R DIRECT OUT 1 72 64 48 MATRIX OUT 1 8 MIX OUT 1 24 STEREO OUT L R MONO C MONITOR OUT L R MONO C CUE OUT L R CH INSERT 1 2 OUT 1 72 64 48 MIX INSERT OUT 1 24 STEREO INSERT...

Страница 65: ...g 20 10 0 10 20 30 40 50 60 70 80 90 100 110 120 130 140 150 160 24 4 170 180 190 Nominal Output 24dBu 4dBu 30 30 OMNI OUT1 8 Default setting Nominal Output 75mW 8 150mW 8 Max Output PHONES OMNI IN 1...

Страница 66: ...20020 Lainate Milano Italy Tel 02 935 771 SPAIN PORTUGAL Yamaha Music Europe GmbH Ib rica Sucursal en Espa a Ctra de la Coruna km 17 200 28231 Las Rozas Madrid Spain Tel 34 91 639 88 88 GREECE Philipp...

Страница 67: ...5 IPTO E0 2012 2015 Yamaha Corporation Manual Development Department Printed in Japan ZC58320 Yamaha Manual Library http www yamaha co jp manual Yamaha Pro Audio Global Web Site http www yamahaproaudi...

Отзывы: