background image

Содержание CINEMASTATION DVR-C300

Страница 1: ...OYAMAHA _ DVD HOME THEATER SOUND SYSTEM SYSTEME HOME CINEMA DVD DVX C300 DVR C300 NX SW300 NX F300 NX C300 NX S300 DVX C300SW DVR C300 NX SW300 tation OWNER S MANUAL MODE D EMPLOI ...

Страница 2: ...ng type plug A polarized plug has two blades with one wider than the other A grounding type plug has two blades and a third grounding prong The wide blade or the third prong are provided for your safety If the provided plug does not fit into your outlet consult an electrician for replacement of the obsolete outlet 10 Protect the power cord from being walked on or pinched particularly at the plugs ...

Страница 3: ...use circuits or install AC line filter s In the case of radio or TV interference relocate reorient the antenna If the antenna lead in is 300 ohm ribbon lead change the lead in to coaxial type cable If these corrective measures do not produce satisfactory results please contact the local retailer authorized to distribute this type of product If you can not locate the appropriate retailer please con...

Страница 4: ... the voltage specified on this unit Using this unit with a higher voltage than specified is dangerous and may cause fire damage to this unit and or personal injury YAMAHA will not be held responsible for any damage resulting from use of this unit with a voltage other than as specified 13 To prevent damage by lightning disconnect the power cord from the wall outlet during an electrical storm 14 Do ...

Страница 5: ...e damaged AUDIO _ VIDEO VIDE0CD r_lc_u f_ _u_10 ol_lT_a _u_lo Patent Information Manufactured under license from Dolby I nl_0_l Laboratories Dolby Pro Logic and the double D symbol are trademarks of Dolby Laboratories _ m G m TA L DTS and DTS Digital Surround are registered trademarks of DigitalTheater surRounl_ Systems Inc DivX DivX Certified and associated Iogos are trademarks of DivXNetworks In...

Страница 6: ...tle and Disc menu languages 20 Setting speaker channels 21 Disc Operations Playing discs 22 Auto Eco Power standby mode 22 Basic playback controls 22 Selecting various repeat shuffle functions 22 Repeat play mode 22 Repeating a section within a chapter track 23 Shuffle except DVDIDVD AudiolVCDI SVCD DivX 23 Other operations for video playback DVD VCD SVCD 24 Using the disc menu 24 Displaying disc ...

Страница 7: ...tic presetting 35 Manual presetting 35 Selecting a preset radio station 36 Deleting a preset radio station 36 Setting frequency step Australia model only 36 Sound Controls Selecting surround sound 37 Selecting digital sound effects 37 Adjusting the treble bass level 37 Volume Control and Other Functions Adjusting the volume level 38 Switching to active mode 38 Switching to eco power standby mode 3...

Страница 8: ... made by reliable manufacturers Do not use any non standard shaped discs heart shaped etc Do not use discs with tape seals or paste on their surface Doing so may damage this receive_ Do not use discs affixed with labels printed by a commercially available label printer Cleaning Discs When a disc becomes dirty clean it with a cleaning cloth Wipe the disc from the center out Do not wipe in a cirdar ...

Страница 9: ...Speakers NX F300 DVX C300 only Center Speaker NX C300 DVX C300 only Surround Speakers NX S300 DVX C300 only X2 III i iii il i i i i_ FM Wire Antenna AM Loop Antenna Remote Control and Batteries Video Pin Cable System Control Cable Speaker Cables 12m x2 5m x3 DVX C300 only Fasteners 2 Sets DVX C300 only 2 Sets ...

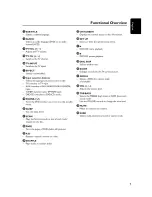
Страница 10: ...s up or down to select auto tuning 0 ENTER OK Confirms a selection _ _ POWER TV Turns theTV on or sets it to the standby mode _DIHHER Selects different levels of brightness for the display panel _ MENU Enters or exits the disc contents menu ForVCD version 2 0 only In stop mode turns on off playback conu ol PBC mode During playback returns to the main menu Exits an operation DVD CD stops playback D...

Страница 11: ...p timer _ SCAN Plays the first 6 seconds or less of each tracld chapter on the disc _PAGE Turns the pages of DVD Audio still pictures _ A B Repeats a specific section on a disc I_ SHUFFLE Plays tracks in random order I_ ON SCREEN Displays the current status or disc information SET UP Enters or exits the system setup menu DVD CD starts playback _ DVD CD pauses playback DISC SKIP Selects another dis...

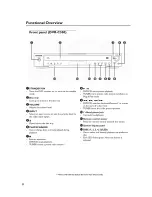
Страница 12: ... an operation DVD CD stops playback TUNER erases a preset radio station _ t_tl II DVD CD starts pauses playback TUNER starts preset radio station installation in Plug Play mode DVD CD searches backward forward e or moves to the start of a disc track TUNER tunes the radio preset up down _ Ci Head phone jack Connects headphones _i Remote control sensor Point the remote control towards this sensor Sy...

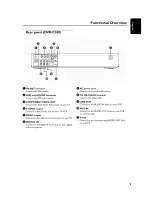
Страница 13: ...to the S video jack on yourTV VCR _VIDEO output Connect to the video composite jack on yourTV O DIGITAL IN Connect to the DIGITAL OUT jack on your digital audio component AC power cord Connect to a standard AC outlet O TO NX SW300 terminal Connect the subwoofer LINE OUT Connect to the AUDIO IN jacks on yourVCR AUX IN Connect to theAUDIO OUT jacks on yourVCR or cassette deck _DTV IN Connect to the ...

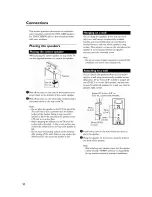
Страница 14: ...ter peeling o_ the seals Doing so may weaken the adhensive force and cause the speaker to fall You can hang the speakers front and surround only on a wall using a commercially available bracket and screws Diameter 6 mm Attach a bracket firmly to the rear of the speakers using screws Then mount a screw on the wall where the speaker is to be hung and hook the speaker securely onto the mounted screw ...

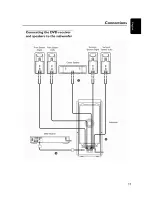
Страница 15: ...eceiver and speakers to the subwoofer Front Speaker Front Speaker Right Leftl o 0 6 6 _0 O0 It It Center Speaker O O It O DVD Receiver D O Surround Surround Speaker Right Speaker Left o o 6 6 00 _O tt tt _DDI _ _o Subwoo_r 0 000 L 11 ...

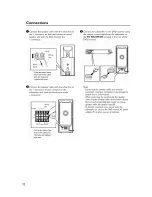
Страница 16: ...the DVD receiver using the system control cable from the subwoofer to the TO NX SW300 terminal at the rear of the DVD receiver Notes Ensure that the speaker cables are correctly connected Improper connections may damage the system due to a short circuit When connecting the speakers _x the speaker cables in place so that cables do nat leasen If your foot or hand accidentally gets caught on a lease ...

Страница 17: ...ot supplied to connect TV IN jacks to the corresponding AUDIO OUT jacks on the TV S separate video connections achieve a clearer picture than composite video connections Use an S video cable not supplied to connect the DVD receiver s SVIDEO output to athe S video input jack orY C or S VHS jack on the TV l_ _ _ I_ Trll Use a composite video cable yellow supplied to connect the DVD receiver s VIDEO ...

Страница 18: ...lCrl YUV jacks on theTV Activate the progressive scan function see Progressive function onloft on page 32 For the best possible surround sound all of the speakers except the subwoofer should be placed at the same distance from the listening poskion Place the front left and right speakers at equal distances from theTV Place the center speaker above theTV so that the center channel s sound is locali...

Страница 19: ...e antenna to the FM ANT terminal Extend the FM wire antenna and fix its ends to the wall For better FM stereo reception connect an external FM antenna not supplied Connecting the power cord After everything is connected properly plug theAC power cord into the power outlet Never make or change any connections with the power switched on Note Refer to the type plate on the rear of the DVD receiver an...

Страница 20: ...quipment refer to the manual for it TV 0 VCR or Cassette Deck t t 0v0R0ce v0r 0 Connect theVCR or cassette deck to theTV as shown O Connect the DVD receiver s AUX IN to the AUDIO OUT jacks on theVCR or cassette deck Before starting operation press AUX to select f U _ f _nLuo in order to activate the input source Some DVDs are copy protected You cannot record or dub protected discs using aVCR O Con...

Страница 21: ...peatedly _i F_t ITITFTT F _ to select u J o cqL n order to activate the input source Notes You cannot hear or record the SA CD or MP3 CD playback if you use a digital connection For playback through a digital connection set the digital output of that player to PCM format Always refer to the owner s manual of the connected component for complete connection and usage details 17 ...

Страница 22: ... battery acid come into contact with your skin or clothing Before inserting new batteries wipe the compartment clean Replace the batteries within two minutes to preserve the memory in the remote control Using the remote control _1 Use the Remote Control within 6 m 20 feet of the DVD receiver and point it toward the Remote contro sensor i 2ofoeo Press Input selection buttons on the remote control t...

Страница 23: ...R OK Follow the instructions shown on theTV to confirm the selection if any If a blank distorted TV screen appears wait for 15 seconds for auto recovery to activate Set the aspect ratio of the DVD receiver according to theTV you have connected The format you select must be available on the disc If it is not the TV display setting will not affect the picture during playback _ _ In DVD CD mode press...

Страница 24: ...NGUAGE then press I_ _ _ Press twice to stop playback if any then press SET UP Press I_ repeatedly to select PREFERENCE PAGE Press AV to highlight one of the options below at a time then press I_ AUDIO disc s soundtrack SUBTITLE disc s subtitles DISC MENU disc s menu 0 Press AW to select a language and press ENTER OK to confirm 0 Press AV to select a language and press ENTER OK to confirm If the l...

Страница 25: ... press I_ SPEAKERSVOLUME Volume level setting for individual speakers 6dB 6dB SPEAKERS DELAY Delay time settings is in relation to the listening position distance for center and surround speakers 0P1S 15P1S Press AV to select a language and pressENTER OK to confirm i _ Press AV to highlight one of the options below then press I_ _ Press 4 I_ to adiust the setting that best suit your surround sound...

Страница 26: ... a tracldchapte pressing 14141 I_l_l will replay the same track chapte Searching backward forward Press and hold 14141 I_I_L To resume normal playback press _ or I_11 O While searching pressing 14141 I_ I again will increase the search speed Stopping playback Press Selecting various repeat shuffle functions 0 Make sure the disc label is facing up O Playback will start automatically _ To playback a...

Страница 27: ...ack press SHUFFLE repeatedly to select between SHUFFLE DISC SHUFFLE ALL DISC and SHUFFLE OFE _ The selected mode appears in the display for several seconds In SHUFFLE DISC mode all tracks on the disc currently playing are played in random order For Hybrid SA CDs tracks on the SA CD layer are played by default see Playing Super Audio CDs SA CDs on page 27 In SHUFFLE ALL DISC tracks from all discs a...

Страница 28: ...upting disc playback _ _ During playback press ON SCREEN _ A list of available disc information appears on the TV screen Press _ to view the information and press ENTER OK to access _ i Use the numeric keypad 0 9 to enter the number time or press _ to make the selection then press ENTER OK to confirm Playback will change to the chosen time or to the selected tide chapter track This function allows...

Страница 29: ... 1 el k Lel Dj V L This operation works only on DVDs with multiple soundtrack language you can change the language you want while playing a DVD Press AUDIO repeatedly to select the available audio languages ForVCD changing the audio channel Press AUDIO repeatedly to select the available audio channels provided by the disc STEREO LEFT MONO RIGHT MONO or MIX MONO This operation works only on DVDs wi...

Страница 30: ... previous or next page Press ENTER OK to open confirm Press to highlight GROUP DIGEST TRACK DIGEST GROUP INTERVAL or TRACK INTERVAL Press ENTER OK to open one option GROUP DIGEST This function displays a thumbnail for each group to help you preview the groups on the disc TRACK DIGEST This function displays a thumbnail for each track to help you preview the tracks on the disc GROUP INTERVAL This fu...

Страница 31: ...ck During MP3 music playback select a picture folder from theTV screen and press IP_ or I_11 _ The picture files will be played back until end of the folder _ _To quit simultaneous playback press MENU followed by I Notes It may not be possible to play certain NIP3 JPEG DivX discs due to the configuration and characteristics of the disc or condition of the recording It is normal to experience an oc...

Страница 32: ...back press ZOOM repeatedly to select a different zoom factor Use _1 I_A keys to move through the zoomed image i _m i_ _ _ I_ _ _ _9 _ _ Special features for picture disc playback IMPORTANT You have to turn on yourTV and set to the correctVideo In channel see Setting the TV on page 19 Load a picture disc Kodak Picture CD JPEG _ For Kodak discs the slide show begins For JPEG discs the picture menu a...

Страница 33: ...ck DVD VIDEO 1 40DE Select this to playback the contents of the DVD Video Press AV to select a setting then press ENTER OK to confirm your selection Notes The DVD AUDIO indicator lights up when a DVD Audio disc is playing When you select DVD VIDEO MODE the DVD AUDIO indicator goes out Not all discs are rated or coded by the manufucturer of the disc You can prevent playback of a specific disc by lo...

Страница 34: ...GENERAL SETUP PAGE press AV to highlight SCREEN SAVER then press I_ ON Select this if you wish to turn off the TV screen when play is stopped or paused for more than 15 minutes OFF Select this to disable the screen saver function Press AV to select a setting and press ENTER OK to confirm To input your favorite discs O Use the numeric keypad 0 9 to enter a valid disc number _ _ Use _11_AV to move t...

Страница 35: ...ampling feature will be cancelled When night listening mode is activated high volume output is softened and low volume output brought upward to an audible level for DVD only It is useful for watching your favourite action movie without disturbing others at night This function is only available for Dolby Digital _ _ In AUDIO SETUP PAGE press AV to highlight NIGHT LISTENING MODE then press I_ OFF Se...

Страница 36: ...etting that you can define yourself In VIDEO SETUP PAGE press AV to highlight PICTURE SETTING then press I_ STANDARD Select this for the standard picture setting iii iiiiii i m Hi_ii_i _ii iiiiiiiiii _ _ _ O Press AV to highlight one of the following options BRIGHTNESS Increase the value to brighten the picture or vice versa Zero 0 is the average setting vaJue CONTRAST Increase the value to sharpe...

Страница 37: ... disc menus recorded on the DVD For details see Audio Subtitle and Disc menu languages on page 20 Some DVDs may have a parental level assigned to the complete disc or to certain scenes on the disc This feature lets you set a playback limitation level The rating levels are from 1 to 8 and are country dependent You can prohibit the playing of certain discs that are not suitable for your children or ...

Страница 38: ...cture CD WITHOUT MENU Select this to display all the files contained in the MP3 Picture CD O Press AV to select a setting then press ENTER OK to confirm The same password is used for both Parental Control and Disc Lock Enter your six digit password to play a prohibited disc or if prompted for a password The default password is 000 000 Jj _ In PREFERENCE PAGE press Ai v to highlight PASSWORD then p...

Страница 39: ... stations automatically I __l i_ll i _ _ _ Press TUNER NUT0 P_ESE T and P_E55 PLNU appear one after the other if installation was not completed after you purchased the DVD receiver Press I_ on the front panel to start installation _UT_ P_ESET appears l_ Once complete the last tuned radio station will play _ All available FM stations are stored followed by all available AM stations To stop installa...

Страница 40: ...reset radio station is deleted Setting frequency step Australia model only The inter station frequency spacing differs depending on the areas Set the frequency step according to the frequency spacing in your area Choices AM9kHz FMS0kHz AM10kHZ FM100kHz Default setting AM9 FMS0 To change theAM band to 10kHz and the FM band to 100kHz _ _ Unplug theAC power cord from the DVD receiver OWhile pressing ...

Страница 41: ...order to select between multi hannel and stereo tracks see Playing Super Audio CDs SA CDs on page 2 7 The surround sound mode cannot be selected if the system setup menu is selected Selecting digital sound effects You can select preset digital sound effects that match the content of your disc or that optimize the sound of the musical style you are playing Press EFFECT to select from the available ...

Страница 42: ... active mode Press TUNER repeatedly on the remote control to select the appropriate active mode Each time you press TUNER the front display changes as follows TUNER FH TUNER AN Press AUX repeatedly on the remote control to select the appropriate active mode Each time you press AUX the fi ont display changes as follows AUX ANALOG AUX DIGITAL Numeric J _ keypad 0 9 Tci _ 4 Y i J_ O _ TV _ AUX For th...

Страница 43: ...INPUT Switches the TV inputs Numeric keypad 0 9 Enters a number of aTV channel TV CH _ Switches the TV channels You can also operate these functions in DVD CD orTUNER mode Press AUX for the cable and satellite tuner operations POWEI fTX ENTER OK Numeric keypad 0 9 TV CH _ _J Functions for cable and satellite tuners POWER TV Turn the cable and satellite tuner on or set them to the standby mode ENTE...

Страница 44: ...mer mode until the desired turn off time is displayed 4 SLEEPappears on the display panel except when SL_ HP OFF is selected O Before the receiver switches to Eco Power standby mode a countdown of 10 seconds is displayed SLEEP I _ _ SLEEP 9 4 SLUP 2 _ SLE_ P I To cancel the sleep timer Press SLEEP r r _ n unt I ZLELI _ _ appears Recording on an external AV component _ _ Connect the external record...

Страница 45: ...e changing the setting of the TV TYPE wait for 15 seconds for auto recovery If this happens when you are turning on the progressive scan feature wait for 15 seconds for auto recovery Check the video connection Sometimes a small amount of picture dJstorUon may appear This is not a malfunction Clean the disc The aspect ratio is fixed on the DVD disc Depending on theTV it may not be possible to chang...

Страница 46: ...to unlock the disc for playback Moisture has condensed inside the player Remove the disc and leave the receiver turned on for about an hour Use proper audio sources Connect those equipment to the DVD receiver with analog connections Turn on the power of the component connected to the DVD receiver Make sure the center surround speakers and subwoofer are connected correctly Adjust the volume level i...

Страница 47: ...ectly toward the remote control sensor Check that the batteries are loaded correctly Set the correct remote control code Depending on the model and year of the product the DVD receiver s remote control may not be able to operate it partly or wholly In this case use the remote control supplied with each procduct Check that the DivX file was encoded in Home Theater mode with a DivX 5 x encoder Disco...

Страница 48: ...tal still picture format A still picture data compression system proposed by the Joint Photographic Expert Group which features small decrease in image quality in spite of its high compression ratio MP3 A file format with a sound data compression system MPY is the abbreviation of Motion Picture Experts Group 1 or MPEG 1 Audio Layer 3 By using the MP3 format One CD R or CD RW can contain about 10 t...

Страница 49: ...22 kHz 48 kHz 4 Hz 44 kHz 96 kHz PCM IEC 60958 Dolby Digital EC 60958 IEC 61937 DTS IEC 60958 EC 61937 ComponentVideo Output Y 1 0Vp p 75 _2 PB CB PPJCR 0 7Vp p 75 _2 Audio S N 105 dB Distortion 0 0035 Dynamic Range 95 d8 AUDIO FORMAT Digital Dolby Digital DTS MPEG Compressed Digital PCM 16 20 24 bits fs 44 1 48 96 kHz MP3 ISO 9660 24 32 56 64 96 128 256 kbps fs 16 22 05 24 32 44 1 48 kHz WMA 32 1...

Страница 50: ...c 7168 Ndebele South Gallegan 7176 Ndonga Georgian 7565 Nepali German 6869 Northern Sami Gikuyu Kikuyu 7573 North Ndebele Greek 6976 Norwegian Guarani 7178 Norwegian Bokm_il Bokm_l Gujarati 7185 Norwegian Nynorsk Hausa 7265 Nyanja Chichewa Chewa Hebrew 7269 Nynorsk Norwegian Hereto 7290 Occitan post 1500 Proven Hindi 7273 Old Bulgarian Old Slavonic Hiri Motu 7279 Old Church Slavonic Old Hungarian ...

Страница 51: ...69 1053 Everquesst 3007 1010 1017 1018 1033 1051 1070 Filmnet 3028 1079 1088 1090 FranceTelecom 3030 1008 1009 1011 GEC 3011 1002 1003 1009 1011 1014 1016 Gemini 3007 1021 1052 Generalln_rument 3004 3020 3031 3046 1013 1014 1027 1063 1076 1077 Goldstar 3014 3047 1026 1055 1056 1082 Grundig 3035 1024 1053 Hamlin 3052 3067 3050 3057 3068 1015 1021 1036 Hitachi 3004 1063 1069 1076 tasco 3007 1044 err...

Страница 52: ...4039 4040 4049 4037 4053 4088 4013 4015 4019 4026 4005 4061 4050 4022 4048 4004 4006 4008 4011 4035 4041 4008 4034 4043 4045 Lenco Lennox Lupus Luxor Magnavox Manhattan Marantz Maspro Matsui Mediasat Med amarkt Minerva Morgan s Navex Neuhaus Neusat Newhaus Nikko Nokia Nordmende Orbitech Oxford Pace Palladium Palsat Panda Panasonic Philips Phonotrend Pioneer Planet Promax Prosat Quadral Radio shack...

Страница 53: ...4 25462 RELMNGEN BEI HAMBURG GERMANY YAMAHA ELECTRONIQUE FRANCE S A RUE AMBROISE CROIZAT BP70 CROISSY BEAUBOURG 77312 MARNE LA VALLEE CEDEX02 FRANCE YAMAHA ELECTRONICS UK LTD YAMAHA HOUSE 200 RICKMANSWORTH ROAD WATFORD HERTS WD18 7GQ ENGLAND YAMAHA SCANDINAVIA A B J A WETTERGRENS GATA 1 BOX 30053 400 43 VASTRA FROLUNDA SWEDEN YAMAHA MUSIC AUSTRALIA PTY LTD 17 33 MARKET ST SOUTH MELBOURNE 3205 VIC ...

Отзывы: