background image

46

DUPLICATING A CD

Note

New recordings cannot be added to a CD-R or CD-RW disc on
which some tracks have been previously recorded.

The copying conditions are as follows:

• Copy Method:

“Digital Move”

• Copy Level:

0dB

• Copy Speed:

“Best Effort”

R e c o r d i n g

1 %

AUTO

DIG M

REC

CDR

L

R

dB

–30 –10

–6

–2

0

SYNC

DUPLCT

Memo

The OPC (Optimum Power Control) feature may start
automatically depending on disc conditions. In this case, the
message “OPC Adjust” appears on the display until the
adjustment is done (about 10 seconds) before the copy process
starts.

CD TEXT

If a CD to be duplicated has CD TEXT that can be copied, CD
TEXT will be automatically copied at duplication.

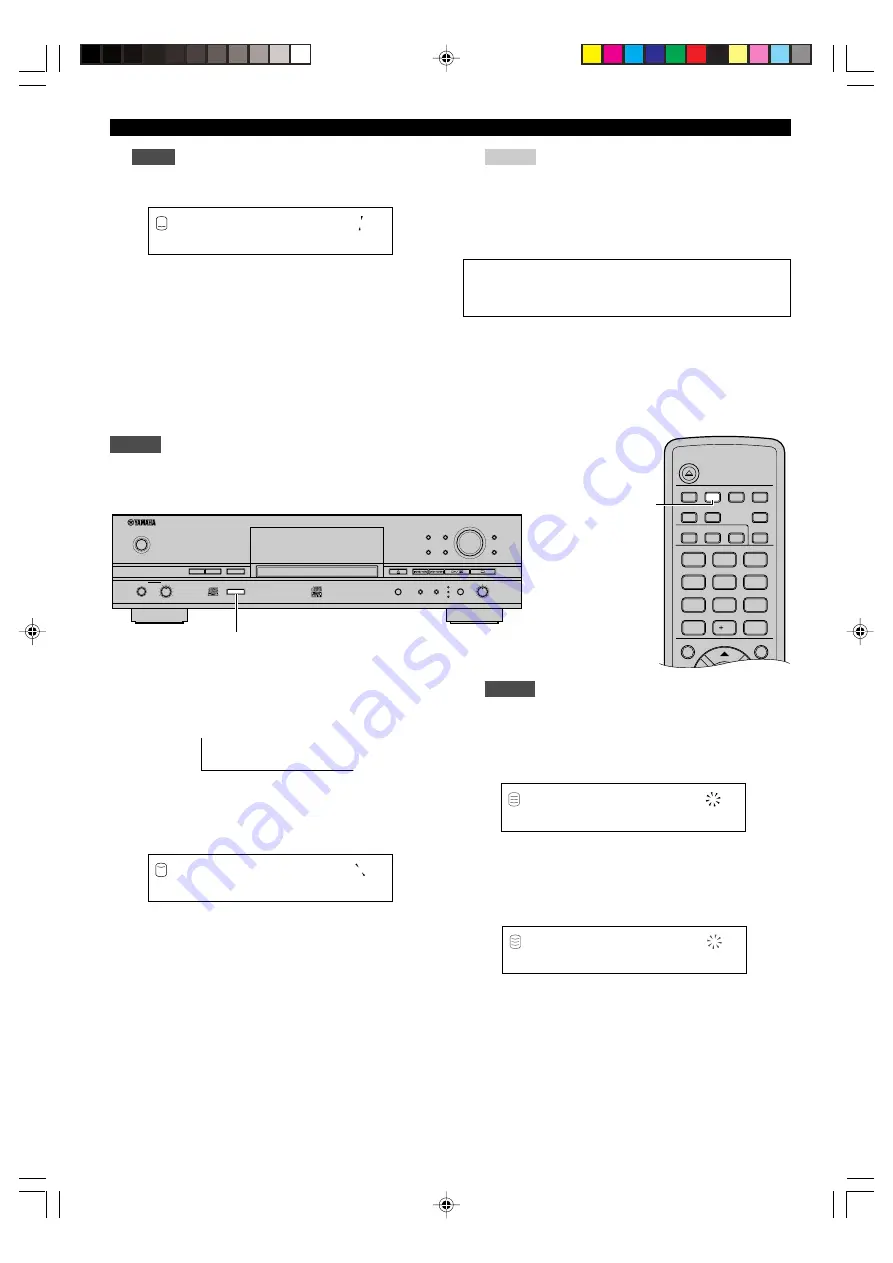
 Duplicating with high quality sounds (Audio Master Quality Recording)

You can duplicate a CD with high quality sound with the Audio Master Quality Recording feature.

Notes

• Audio Master Quality Recording can be used only for duplicating on a new CD-R disc.

• Recordable time is 63 minutes for a 74-minute CD-R disc, and 68 minutes for an 79-minute CD-R disc.

NATURAL SOUND HDD/CD RECORDER

TEXT/TIME

MODE

MULTI JOG

DIGITAL REC LEVEL

PUSH ENTER

TRACK NO.

FINALIZE

ERASE

BOOKMARK

COMPLETE

MENU

CLEAR

MIN

MAX

OPTICAL

ANALOG REC LEVEL

INPUT

REC

COAXIAL

ANALOG

COPY

A.M.Q.R.

CDR

HDD

MIN

MAX

LEVEL

PHONES

POWER

A.M.Q.R.

OPEN/CLOSE

COPY

FINALIZE

REPEAT

1

A B C

2

D E F

3

G H I

4

J K L

5

M N O

6

P Q R

7

S T U

0

SPACE

MODE

MENU

8

V W X

10

SYMBOL

BOOKMARK

9

Y Z

A. M. Q. R.

ERASE

RANDOM

TIMER REC

INTRO

REC

INPUT

TEXT/TIME

A.M.Q.R.

1.

Press A.M.Q.R. while the unit is in the duplicate
standby mode (P.45).

The A.M.Q.R. indicator lights up on the display.

2.

Carry out steps 3 and 4 in “DUPLICATING A CD”
(P.45) to duplicate a CD (copy from a CD to the HDD
and copy from the HDD to a new CD-R or CD-RW
disc).

The copying conditions are as follows:

• Copy Method:

“Digital Move”

• Copy Level:

0dB

• Copy Speed:

Best Effort

A.M.Q.R.

DUPLCT

A M Q R

1 %

A.M.Q.R.

AUTO

DIG M

REC

CDR

L

R

dB

–30 –10

–6

–2

0

SYNC

DUPLCT

Notes

• When total time of the CD to be duplicated exceeds

recordable time on a CD-R disc (63 minutes for a 74-minute
CD-R disc and 68 minutes for an 79-minute CD-R disc), the
following message appears on the display. In this case, Audio
Master Quality Recording cannot be used.

• When a CD-R disc other than a 74-minute, 79-minute or 4x

writing compatible CD-R disc is loaded, or a CD-RW disc is
loaded on this unit, the following message appears on the
display. In this case, Audio Master Quality Recording cannot
be used.

• Once copying starts, no button operation is effective until

copying is completed.

When copying has been completed, the operation of
the HDD and the CD automatically stops.

N o

E n o u g h

S p c

A.M.Q.R.

DIG

REC

TOC 

CD

L

R

dB

–30 –10

–6

–2

0

ALL SYNC

DUPLCT

U n a v a i l a b l e

A.M.Q.R.

DIG

REC

TOC 

CD

L

R

dB

–30 –10

–6

–2

0

ALL SYNC

DUPLCT

104_HD1500(E)38-49.p65

3/22/05, 14:49

46

Содержание CDR-HD1500HDD

Страница 1: ... choix de procédures différents des spécifications de cette brochure peut entraîner une exposition à d éventuelles radiations pouvant être dangereses ACHTUNG Die Verwendung von Bedienungselementen oder Einstellungen oder die Durchführung von Bedienungsvorgängen die nicht in dieser Anleitung aufgeführt sind kann zu einem Kontakt mit gefährlichen Laserstrahlen führen OBSERVERA Användning av kontroll...

Страница 2: ...cturer 12 Use only with the cart stand tripod bracket or table specified by the manufacturer or sold with the apparatus When a cart is used use caution when moving the cart apparatus combination to avoid injury from tip over 13 Unplug this apparatus during lightning storms or when unused for long periods of time 14 Refer all servicing to qualified service personnel Servicing is required when the a...

Страница 3: ...ning the unit OFF and ON please try to eliminate the problem by using one of the following measures Relocate either this product or the device that is being affected by the interference Utilize power outlets that are on different branch circuit breaker or fuse circuits or install AC line filter s In the case of radio or TV interference relocate reorient the antenna If the antenna lead in is 300 oh...

Страница 4: ...and or personal injury YAMAHA will not be held responsible for any damage resulting from use of this unit with a voltage other than specified Do not attempt to modify or fix this unit Contact qualified YAMAHA service personnel when any service is needed The cabinet should never be opened for any reasons When not planning to use this unit for long periods of time i e vacation disconnect the AC powe...

Страница 5: ... this unit Tracks written on CD RW discs can be erased and additional tracks can be recorded after the TOC has been erased Erasure or loss of data Yamaha and suppliers accept no liability for the loss of data written on the HDD and CD R or CD RW discs or any problems caused as a result of using this unit As a precaution it is recommended that the discs are tested after they have been recorded on F...

Страница 6: ...recorder and store in an appropriate case 3 With proper disc maintenance cleaning should not be necessary However should cleaning be required wipe by using a clean dry cloth Do not wipe with a circular motion wipe straight outward from the center Do not try to clean the disc s surface by using any type of disc cleaner record spray antistatic spray or liquid or any other chemical based liquid becau...

Страница 7: ...rce 31 Using an external timer to record 32 Adjusting the recording level 34 Setting the HDD recording mode 35 Adding track markers during recording Manual track marking 37 4 CD R CD RW COPYING COPYING FROM THE HDD ONTO A CD R CD RW DISC 38 Copying all tracks in a group to a disc 38 Copying selected tracks on the HDD 40 Copying high quality sounds Audio Master Quality Recording 41 Setting the CDR ...

Страница 8: ... display feature for easy operations Various edit menus to customize music data on the HDD ABOUT THIS MANUAL Structure This owner s manual is composed of following sections 1 GETTING STARTED This section explains necessary preparations such as remote control and connection Please read this before using this unit 2 BASIC OPERATIONS This section explains frequently used operations such as group trac...

Страница 9: ... 2 OPEN CLOSE COPY FINALIZE REPEAT 1 ABC 2 DEF 3 GHI 4 JKL 5 MNO 6 PQR 7 STU 0 SPACE MODE ENTER MENU COMPLETE TRACK NO WRITE HDD CDR GROUP SKIP CLEAR 8 VWX 10 SYMBOL BOOKMARK 9 YZ A M Q R ERASE RANDOM TIMER REC INTRO REC INPUT TEXT TIME Audio Pin Cables 2 Optical Cable Video Pin Cable Power Cable for U S A model 101_HD1500 E 01 11 p65 3 22 05 14 47 3 ...

Страница 10: ...nd TRACK modes and rotate to select a group disc or album or track In the menu screen rotate to select items or adjust parameters and press to decide e MENU Displays the menu screen corresponding to the current status of the unit r CLEAR Deletes the selected item or clears the setting t PHONES jack Connect headphones P 25 y PHONES LEVEL control Adjusts the headphone volume when connecting headphon...

Страница 11: ...itches input sources OPTICAL COAXIAL and ANALOG P 31 The lamp for the selected input lights up f w d Play Pause Starts playback of the currently selected group or track Pressing the button during playback stops the playback temporarily P 19 In the copy or recording standby mode press the button to start recording g ANALOG REC LEVEL control Adjust the recording level when recording analog sources P...

Страница 12: ...lphabetical numeric buttons Selects track number to be played back or enters titles of albums or tracks 9 MODE Press the button when configuring the settings of the playback recording and copy modes 0 Cursor buttons H G Q W ENTER Normally press ENTER to switch between the GROUP and TRACK modes If the unit is in the GROUP mode press H or G to select a group and press Q or W to select a track If the...

Страница 13: ...cted input lights up p TEXT TIME Switches display information P 18 a INTRO Turns on off the Intro Play mode P 23 s BOOKMARK Adds bookmarks to favorite tracks P 24 d MENU Displays the menu screen corresponding to the current status of the unit f CLEAR Deletes the selected item or clears the setting g HDD CDR Switches the unit between the HDD and CDR drive operation modes P 14 h TRACK NO WRITE Adds ...

Страница 14: ...ts when a disc set in the disc tray has a TOC disc information t Disc indicator Displays the type of a disc set in the disc tray y MULTI JOG status indicator Displays the currently selected MULTI JOG status items or settings controlled by MULTI JOG knob operations 1 HDD mark Lights when the unit is in the HDD operation mode 2 TOTAL indicator Lights when the total time elapsed or remaining time is ...

Страница 15: ...L jack Outputs digital signals DIGITAL OUT OPTICAL jack Outputs digital signals 6 RS 232C terminal This terminal is for connecting a personal computer Information about the PC software English version only is to be announced on the YAMAHA Website http www yamaha co jp english product av 1 HDD slot Open the cover when replacing the HDD 2 VIDEO OUT jacks S VIDEO jack Outputs S video signals VIDEO ja...

Страница 16: ... this unit to an external component connect ANALOG LINE OUT jack of this unit to the analog input jack of the external component To input signals from an external component to this unit connect ANALOG LINE IN jack of this unit to the analog output jack of the external component Be sure to connect L left and R right jacks respectively To connect the turntable directly to this unit first connect it ...

Страница 17: ...le battery cannot be used Do not mix different types of battery Do not attempt to short out the batteries by directly connecting the plus and the minus with a piece of metal Remove the batteries if the remote control will not be used for an extended period of time If the batteries leak dispose of them immediately taking care not to touch the battery fluid If the battery fluid comes into contact wi...

Страница 18: ...Press f to open close the disc tray 3 Press COPY once to set the unit to the copy standby mode The HDD and CDR marks in the display start to blink NATURAL SOUND HDD CD RECORDER TEXT TIME TRACK NO FINALIZE ERA BOOKMARK REC COPY A M Q R CDR HDD MIN MAX LEVEL PHONES POWER f Disc tray POWER The unit starts to read the disc information disc type and disc capacity then Reading appears in the display the...

Страница 19: ...y Intro Play features USEFUL PLAYBACK OPERATIONS P 20 23 To start playback automatically using external timer Starting playback automatically Auto Play P 75 To copy from the HDD to CD R CD RW discs COPYING FROM THE HDD ONTO A CD R CD RW DISC P 38 44 To record external sources on the HDD RECORDING FROM AN EXTERNAL COMPONENT ONTO THE HDD P 31 37 To edit the HDD data albums tracks and discs 5 EDITING...

Страница 20: ...MIN MAX OPTICAL ANALOG REC LEVEL INPUT REC COAXIAL ANALOG COPY A M Q R CDR HDD MIN MAX LEVEL PHONES POWER POWER NATURAL SOUND HDD CD RECORDER TEXT TIME MODE MULTI JOG DIGITAL REC LEVEL PUSH ENTER TRACK NO FINALIZE ERASE BOOKMARK COMPLETE MENU CLEAR MIN MAX OPTICAL ANALOG REC LEVEL INPUT REC COAXIAL ANALOG COPY A M Q R CDR HDD MIN MAX LEVEL PHONES POWER CDR HDD MODE ENTER MENU COMPLETE TRACK NO WRI...

Страница 21: ...hanges as follows When the unit is in the HDD operation mode Disc 1 2 Album 1 2 Bookmark When the unit is in the CDR operation mode Disc Bookmark If you select the TRACK mode in step 1 the item changes as follows Track1 Track2 Track99 3 Start operations playback recording etc for any purpose For details on playback operations refer to PLAYING BACK THE HDD OR CD P 19 For details on recording operat...

Страница 22: ...m sources marked is called bookmark This marking is temporary and cannot be duplicated However an album can be easily created by copying the bookmarked tracks P 54 Track 99 tracks can be recorded onto a disc at maximum However the number of discs tracks to be recorded may be less than 99 for the space availability on the HDD One track must be 4 seconds at shortest and 179 minutes 59 seconds at lon...

Страница 23: ... CD Bookmark Track1 Track2 Track3 Track4 Track99 Track1 Track2 Track3 Track4 Track99 Track1 Track2 Track3 Link to Track1 on the disc Link to Track4 on the disc Link to Track99 on the disc BOOK MARK Bookmark Disc Group When operating CDs including CD R and CD RW you can select disc or bookmark as a group Since the unit can only read one disc at a time the number of discs available on a CD is always...

Страница 24: ...AL G D 0 0 1 1 6 2 4 0 GROUP L R dB 30 10 6 2 0 TOTAL G L I V E A T C R A N E GROUP L R dB 30 10 6 2 0 G P R I D E A N D J O Y TRACK L R dB 30 10 6 2 0 G Display while playing a CD Track number and elapsed time of the track being played Track number and remaining time of the track being played Disc total time Disc remaining time CD TEXT when available Disc title Track title Display while recording...

Страница 25: ... LEVEL INPUT REC COAXIAL ANALOG COPY A M Q R MULTI JOG t e a r y w d 1 ABC 2 DEF 3 GHI 4 JKL 5 MNO 6 PQR 7 STU 0 SPACE MODE ENTER MENU COMPLETE TRACK NO WRITE HDD CDR GROUP SKIP CLEAR 8 VWX 10 SYMBOL BOOKMARK 9 YZ A R Y E T W D Alphabetical numeric buttons Cursor buttons GROUP SKIP buttons To start playback After selecting a group or track P 15 press w d To stop playback Press a Memo If you press ...

Страница 26: ... cannot search by time during the random play P 22 or the intro play P 23 4 Press w d or MODE to return to the normal playback T i m e S e a r c h L R dB 30 10 6 2 0 G D 0 0 1 1 S 5 0 0 TIME L R dB 30 10 6 2 0 G Setting the play style Only when playing sources recorded on the HDD you can set the play style The play style setting changes the range of playback 1 While the unit is in the HDD operatio...

Страница 27: ...et all tracks that belong to the selected group are repeatedly played When intro play is set the beginnings of all tracks that belong to the selected group are played one after another For example if full repeat play is set during the playback of disc 1 all tracks recorded to disc 1 are repeatedly played Disc 1 Disc 2 Album 1 Album 2 Bookmark Group for making a setting G Repeating playback of a tr...

Страница 28: ...peating playback of the selected group Full Repeat You can repeatedly listen to all tracks recorded in a group or a CD or group category 1 Press MODE to enter the playback mode setting then rotate the MULTI JOG knob press H or G on the remote control to display Repeat 2 Press the MULTI JOG knob ENTER on the remote control to enter repeat play setting 3 Rotate the MULTI JOG knob press H or G on the...

Страница 29: ...te control to set the amount of time to play the beginning of each track The playback time can be set in the 1 to 10 seconds range by 1 second steps and in the 10 seconds to 60 seconds range by 5 seconds steps 4 Press the MULTI JOG knob ENTER on the remote control or w d to confirm the selection The unit starts intro play Memo Intro play can be easily started by pressing INTRO on the remote contro...

Страница 30: ...w album by copying the list of tracks with bookmarks Select Mark as the group to be copied See Album Copy P 54 Playing back tracks in the book mark list 1 Press the MULTI JOG knob ENTER on the remote control to turn on the GROUP indicator on the display 2 Rotate the MULTI JOG knob press H or G on the remote control to select Mark 3 Press w d to start playback Tracks are played in the order that bo...

Страница 31: ...the title is being assigned to albums P 55 tracks P 65 or discs P 69 Grp Tr 1 0 00 Dsc 1 MY DISC 1 Dsc 2 MY DISC 2 Dsc 3 CLASSIC Alb 1 MY BEST Alb 2 MY BEST 2 Mark Bookmark Grp Tr 9 0 00 1 Jazz 1 2 Jazz 2 3 Classic 1 4 Classic 2 5 Classic 3 6 Rock 1 7 Rock 2 8 Rock 3 9 Pops 1 10 Pops 2 11 Hip Hop Copy Mode All Synchro Level 0 0dB Method Digital Copy Speed Best Effort D001 1 π 1 0 00 Rec Mode Track...

Страница 32: ...You can specify a disc to where data is copied For details refer to Selecting a target disc P 28 When no disc is specified the unit automatically selects the smallest disc number that does not contain any data 3 Press w d to start copying The progress of the copy process is shown in the display The unit applies the following settings default if the HDD copy menu settings P 29 are never changed Cop...

Страница 33: ...ed to is selected as the group to be copied the MARK indicator lights on the display Press TRACK NO BOOKMARK BOOKMARK on the remote control again to return to the normal copy standby mode 4 Press w d to start copying The progress of the copy process is shown in the display Memo It takes a few seconds for this unit to become ready to start copying after w d has been pressed This unit may create som...

Страница 34: ... copying mode 2 Rotate the MULTI JOG knob press H or G on the remote control to select the copying mode Choose one of the modes listed below All Synchro All synchronized copying mode This mode copies all of the material from a single audio source at the same time as the source programs are being played Track markers are automatically placed between the tracks being recorded Multi Synchro Multi syn...

Страница 35: ...OKMARK COMPLETE MENU CLEAR MIN MAX OPTICAL ANALOG REC LEVEL INPUT REC COAXIAL ANALOG COPY A M Q R MULTI JOG MENU 0 MODE ENTER MENU COMPLETE TRACK NO WRITE HDD CDR GROUP SKIP CLEAR 10 ENTER MENU H G 3 Press the MULTI JOG knob ENTER on the remote control to confirm the copying mode selected If All Synchro is confirmed this unit returns to the HDD copy standby mode If Multi Synchro is confirmed the f...

Страница 36: ...ent is not possible during copying If the red part on the peak level meter lights at the loudest sound levels stop copying to adjust the copying level and then resume copying If the level is adjusted copying is made at maximum 2x speed C o p y M e t h o d DIG REC TOC CD L R dB 30 10 6 2 0 ALL SYNC C o p y L e v e l DIG REC TOC CD L R dB 30 10 6 2 0 ALL SYNC L e v e l 0 0 d B DIG REC LEVEL TOC CD L...

Страница 37: ...etting the HDD recording mode P 35 You can specify a disc to where data is copied For details refer to Selecting a target disc P 28 When no disc is specified the unit automatically selects the smallest disc number that does not contain any data 2 Select the input source to be recorded The lamp for the selected input OPTICAL COAXIAL or ANALOG lights 3 Adjust the recording level The adjustment of th...

Страница 38: ...minute longer than actual recording time for the total recording time Following chart indicates the time flow when this unit makes timer recordings Example To record the program that starts at 9 00 and ends at 10 00 Set the external timer to be turned on at 8 58 Set the external timer to be turned off after 10 03 Set 1 hour 2 minutes for the total recording time on this unit Memo Actual recorded m...

Страница 39: ...recording Other modes cannot be selected when timer recording is made 2 Press and hold REC for approximately three seconds press TIMER REC on the remote control The following screen appears in the display 3 Press t e or r y press E R Q or W on the remote control to switch between hour and minute then rotate the MULTI JOG knob press H or G on the remote control to adjust the total recording time 4 ...

Страница 40: ...djustment is possible in the 12dB to 12dB range by 0 4dB steps Adjust the recording level so that the red part on the peak level meter does not light at the loudest sound levels 4 Press the MULTI JOG knob ENTER on the remote control to return to the previous display Memo The recording level can be adjusted while this unit is in either the recording or recording standby mode Once recording has been...

Страница 41: ...rol to confirm the recording mode selected If Manual Track Synchro or All Synchro is confirmed this unit returns the HDD recording standby mode If Multi Synchro is confirmed following message appears on the display Follow the When Multi Synchro is selected procedure below If Auto Period is confirmed following message appears on the display Follow the When Auto Period is selected procedure below Wh...

Страница 42: ...of silence continues this unit judges it as a track interval and places a track marker Initial setting 2 0 seconds Control range 0 5 to 5 0 seconds End Duration Sets the length of silence no signal that judges the end of playback when recording in the all synchronized recording mode When the set amount of silence continues recording will be stopped Initial setting 12 0 seconds Control range 2 0 to...

Страница 43: ...at the location on the disc corresponding to the time TRACK NO BOOKMARK TRACK NO WRITE on the remote control is pressed Manual track marking is possible after the recording has been performed for 5 seconds from the beginning of the track and a disc cannot contain more than 99 tracks Even if there is time remaining on the disc further recording is impossible once 99 track markers have been placed M...

Страница 44: ...is unit becomes ready for operation When copying onto a CD R or CD RW disc without finalization When copying onto a new CD R or CD RW disc L R dB 30 10 6 2 0 R e a d i n g 1 4 6 8 1 7 GROUP CDR L R dB 30 10 6 2 0 1 GROUP CDR L R dB 30 10 6 2 0 N e w D i s c GROUP CDR L R dB 30 10 6 2 0 0 GROUP CDR L R dB 30 10 6 2 0 The number of recorded tracks Total recorded time 2 Press COPY twice The following...

Страница 45: ...10 6 2 0 ALL SYNC ANLG 0 0 3 1 1 0 0 0 ALBM REC GROUP CDR L R dB 30 10 6 2 0 ALL SYNC ANLG M r k 1 1 0 0 0 MARK REC GROUP CDR L R dB 30 10 6 2 0 ALL SYNC ANLG 0 0 3 1 1 0 0 1 REC GROUP CDR L R dB 30 10 6 2 0 ALL SYNC ANLG Notes If copying is canceled by pressing a only the data that has been recorded on the CD R or CD RW disc before the cancellation remains on the disc When Digital Move P 43 is se...

Страница 46: ... the settings for disc copy For details refer to Setting the CDR copy mode P 42 and Setting the CDR copy menu P 43 3 Rotate the MULTI JOG knob press GROUP SKIP buttons H or G on the remote control to select Mrk Memo You can create a CD with high quality sounds using the Audio Master Quality Recording feature For details refer to Copying high quality sounds Audio Master Quality Recording P 41 4 Pre...

Страница 47: ...g conditions are as follows Copy Method Digital Move Copy Level 0dB Copy Speed Best Effort Notes Once copying starts no button operation is effective until copying is completed Never turn off the power of this unit or unplug the AC power cord during copying When copying has been completed the operation of the HDD and the CD automatically stops A M Q R Notes When total time of the group to be copie...

Страница 48: ...acks from different sources 3 Press the MULTI JOG knob ENTER on the remote control to confirm the CDR copy mode selected If All Synchro or Full Auto is confirmed this unit returns to the CDR copy standby mode If Multi Synchro is confirmed the following message appears on the display Go to step 4 4 Rotate the MULTI JOG knob press H or G on the remote control to select the number of tracks The numbe...

Страница 49: ...ULTI JOG MENU 0 MODE ENTER MENU COMPLETE TRACK NO WRITE HDD CDR CLEAR 10 ENTER H G MENU Copy Method Setting of the copying method Copying may fail if the setting for Copy Method is not correctly made Initial setting Analog Copy Analog Copy This method always makes analog copies Digital Move The data is moved from the HDD to the CD Therefore the track or group data will be deleted from the HDD afte...

Страница 50: ...st Effort Copying is made at Max 8x speed for a CD R disc and 4x speed for a CD RW disc 4x Copy Copying is always made at 4x speed Memo Depending on the condition of the CD R disc the copy speed may drop automatically even when Best Effort is selected When Analog Copy or Auto Dig Anlg is selected in Copy Method P 43 the unit automatically creates an image file on the HDD with 1x or 2x speed before...

Страница 51: ... completed the display changes as follows and this unit becomes ready for operation 2 Press COPY three times The following message appears on the display and this unit enters the duplicate standby mode Duplication has not been started yet at this stage DIG REC L R dB 30 10 6 2 0 ALL SYNC DUPLCT D u p l i c a t e TOC CD DIG REC L R dB 30 10 6 2 0 ALL SYNC DUPLCT 1 π 1 0 0 0 TOC CD L R dB 30 10 6 2 ...

Страница 52: ...EAT 1 ABC 2 DEF 3 GHI 4 JKL 5 MNO 6 PQR 7 STU 0 SPACE MODE MENU 8 VWX 10 SYMBOL BOOKMARK 9 YZ A M Q R ERASE RANDOM TIMER REC INTRO REC INPUT TEXT TIME A M Q R 1 Press A M Q R while the unit is in the duplicate standby mode P 45 The A M Q R indicator lights up on the display 2 Carry out steps 3 and 4 in DUPLICATING A CD P 45 to duplicate a CD copy from a CD to the HDD and copy from the HDD to a new...

Страница 53: ...tray 2 Press FINALIZE The confirmation message appears on the display To cancel finalization press a 3 Press w d to start finalization The level meter shows the finalization progress on the display When finalization is completed the TOC indicator lights and the unit enters the stop mode F i n a l i z e O K CDR L R dB 30 10 6 2 0 When starting finalization During finalization F i n a l i z i n g RE...

Страница 54: ...een finalized 1 Set a CD RW disc in the disc tray then press ERASE repeatedly until Erase ALL appears on the display To cancel erasing press a 2 Press w d to start erasing Erasing flashes on the display and the level meter shows the erasing progress Erasing TOC This operation erases TOC Table of Contents data from a finalized CD RW disc After erasing TOC data you can record another track data onto...

Страница 55: ...ss takes about 20 minutes Notes Erase Last and Erase TOC cannot be applied to a CD RW disc recorded with Full Auto P 42 except for adding track data to a disc without finalization or a CD RW disc recorded with duplication Never turn off the power of this unit during erasing If Check Disc appears on the display during erasing and erasing stops there may be dust or damage on the CD RW disc Check the...

Страница 56: ... track To combine a series of tracks To divide one track into two To eliminate unused track numbers To add fade in to the beginning of a track To add fade out to the end of a track To assign a track title To change a disc number To erase a disc To combine a series of discs To divide one disc into two To eliminate unused disc numbers To assign a disc title To cancel the editing operation s s s s s ...

Страница 57: ...l numeric buttons on the remote control Alphabetical capital letters alphabetical lower case letters and numbers switch each time the buttons are pressed To insert a space press SPACE To use a symbol press SYMBOL to select the desired symbol 2 Select the next character by pressing one of the alphabetical numeric buttons The cursor automatically moves to the next space When you need to use the butt...

Страница 58: ...election is canceled and then this unit returns to the following state This unit returns to the editing menu item selection if having started editing during the stop mode This unit returns to the playback if having started editing during the playback If a is pressed during editing all entry of the selection is canceled and this unit returns to the stop mode A l b u m E d i t L R dB 30 10 6 2 0 Alb...

Страница 59: ...or Y on the remote control to select the track number to where a new track will be added 5 Rotate the MULTI JOG knob press on the remote control to select the disc where the original track is stored EDITING ALBUMS D 0 0 1 1 1 3 GROUP L R dB 30 10 6 2 0 E d i t 0 0 1 GROUP L R dB 30 10 6 2 0 Album to be edited Disc number Track number Track number in the album D 0 0 1 1 1 5 GROUP L R dB 30 10 6 2 0...

Страница 60: ...een appears The number of the album to be moved flashes 2 Rotate the MULTI JOG knob press on the remote control to select the album to be moved 3 Press the MULTI JOG knob ENTER on the remote control to confirm the album to be moved The display scrolls to the left to indicate the number of the album to be moved and the new album number Press CLEAR to cancel the confirmed selection 4 Rotate the MULT...

Страница 61: ...tem selection Album Title You can assign a title to a created album 1 If Album Title is selected P 52 the following screen appears If the edit menu is selected during playback the unit automatically selects the item to be edited In this case skip to step 4 since you do not need to select an item 2 Rotate the MULTI JOG knob press on the remote control to select the album to assign a title to 3 Pres...

Страница 62: ...umber 0 0 1 1 2 TRACK L R dB 30 10 6 2 0 Track to be moved Album to change its track order Track Level You can adjust the sound level of track in an album 1 If Track Level is selected P 52 the following screen appears If the edit menu is selected during playback the unit automatically selects the item to be edited In this case skip to step 6 since you do not need to select an item 2 Rotate the MUL...

Страница 63: ...onfirmed selection 4 Rotate the MULTI JOG knob on the remote control to select the track to adjust its interval 5 Press the MULTI JOG knob ENTER on the remote control to confirm the track The ending of the previous track for 5 seconds and the beginning of the selected track for 5 seconds are repeatedly played Press CLEAR to cancel the confirmed selection Memo If there is no track before the track ...

Страница 64: ... assign a new number 1 If Track Rename is selected at left the following screen appears If the edit menu is selected during playback the unit automatically selects the item to be edited In this case skip to step 6 since you do not need to select an item 2 Rotate the MULTI JOG knob press on the remote control to select the disc that contains the track to be moved 3 Press the MULTI JOG knob ENTER on...

Страница 65: ...ed The following message appears in the display EDITING TRACKS Memo If there is no track before the track that is selected and confirmed No Previous appears on the display and this unit returns to step 4 If the edit menu is selected during playback the unit cancels the edit operation 6 Rotate the MULTI JOG knob press on the remote control to adjust the time length displacement The time length can ...

Страница 66: ...atically selects the item to be edited In this case skip to step 6 since you do not need to select an item 2 Rotate the MULTI JOG knob press on the remote control to select the disc that contains the track to be partially erased 3 Press the MULTI JOG knob ENTER on the remote control to confirm the disc The number of the track to be partially erased flashes Press CLEAR to cancel the confirmed selec...

Страница 67: ...irm the ending point of the partial erase The passage between the point that is 5 seconds before the beginning point and the point that is 5 seconds after the ending point of the partial erase is repeatedly played The following message appears on the display Notes The sound may be interrupted at the joint but it will be played properly after the partial erase is completed The minimum length of a t...

Страница 68: ... the first track is effective for the combined track If there is any track that cannot be copied digitally among the tracks to be combined the combined track cannot be copied digitally either When tracks with different emphasis status have been combined the emphasis status of the first track becomes effective for the combined track Track Divide You can divide a track into two at the selected point...

Страница 69: ... contains 99 tracks Track No Full appears on the display Memo The track numbers following the divided track will be up numbered by one However if there is any unused track number only the tracks up to that number will be up numbered Track Dividing point Passage to be repeatedly played 1 2 4 5 6 1 2 3 4 5 6 1 3 4 6 1 2 3 4 5 6 Before Track Divide Divided into two After Track Divide When Track 1 is ...

Страница 70: ...0 Disc that contains the track to add fade in Track to add fade in F I n 3 0 0 1 TIME L R dB 30 10 6 2 0 Fade in length Playing time of the track Memo Fade in cannot be added to a track that is shorter than 21 seconds The fade in effect becomes ineffective if the following editing is performed to the track which the fade in is added to Erasing a certain part of the track Part Erase Combining the t...

Страница 71: ...ed during playback the unit automatically selects the item to be edited In this case skip to step 6 since you do not need to select an item 2 Rotate the MULTI JOG knob press on the remote control to select the disc that contains the track to assign a title 3 Press the MULTI JOG knob ENTER on the remote control to confirm the disc When the disc has been confirmed the disc number that contains the t...

Страница 72: ...for the editing menu item selection 4 Rotate the MULTI JOG knob press H or G on the remote control to select a menu item then press MULTI JOG knob ENTER on the remote control to confirm the selection The followings are the disc editing menu items Disc Rename P 67 Disc Erase P 67 Disc Combine P 68 Disc Divide P 68 Disc Pack P 69 Disc Title P 69 Disc Pack cannot be selected during playback D i s c E...

Страница 73: ... new disc number is already in use the disc numbers following this renumbered disc will be automatically up numbered by one However if there is any unused disc number only the discs up to that number will be up numbered The original number of the disc that has been renumbered will be available for future use R e n a m e 0 0 1 GROUP L R dB 30 10 6 2 0 Disc to be moved D 0 0 2 0 0 3 GROUP L R dB 30 ...

Страница 74: ... e 0 0 1 GROUP L R dB 30 10 6 2 0 Disc to be the first in the combination Disc to be the first in the combination Disc to be the last in the combination 0 0 1 0 0 2 GROUP L R dB 30 10 6 2 0 Disc Divide You can divide a disc into two at the selected point 1 If Disc Divide is selected P 66 the following screen appears If the edit menu is selected during playback the unit automatically selects the it...

Страница 75: ... to step 4 since you do not need to select an item 2 Rotate the MULTI JOG knob press on the remote control to select the disc to assign a title 3 Press the MULTI JOG knob ENTER on the remote control to confirm the disc to assign a title to The cursor flashes If the selected disc already has a title the title appears on the display 4 Use the MULTI JOG knob press alphabetical numeric buttons on the ...

Страница 76: ...rations has been performed after the editing operation After the editing operation a recording has been made or this unit has been set in the recording pause mode to start recording After the editing operation a copy has been made or this unit has been set in the copy standby mode to start copying Further editing operations have been performed The HDD has been formatted The following message appea...

Страница 77: ...ENU H G INPUT 1 Press MENU while this unit is in the stop mode The display changes for the menu item selection 2 Rotate the MULTI JOG knob press H or G on the remote control to select DAC Mode 3 Press the MULTI JOG knob ENTER on the remote control to enter the DAC mode D A C M o d e L R dB 30 10 6 2 0 4 Press INPUT to select the input sources OPTICAL COAXIAL or ANALOG The lamp for the selected inp...

Страница 78: ...R dB 30 10 6 2 0 U s e d 1 h 7 m L R dB 30 10 6 2 0 A v a i l 2 4 8 h 5 6 m L R dB 30 10 6 2 0 Formatting the HDD HDD Format You can format the HDD in this unit Notes After the HDD has been formatted all data about the recorded tracks and settings will be erased from the HDD After all data on the HDD have been initialized the undo function cannot be applied to any editing operations before formatt...

Страница 79: ...op mode SYSTEM UTILITY S y s U t i l i t y L R dB 30 10 6 2 0 F i r m V e r s i o n L R dB 30 10 6 2 0 System firmware version V 1 0 0 0 J u n 2 L R dB 30 10 6 2 0 CDR drive firmware version C D R W 7 0 6 L R dB 30 10 6 2 0 Model of HDD A B C D E F G H I J K L M L R dB 30 10 6 2 0 Initializing settings Initialize You can initialize the settings that have been changed The OPC data stored in this un...

Страница 80: ...dB 30 10 6 2 0 D i m m e r D a r k L R dB 30 10 6 2 0 Setting the video output VIDEO Output You can switch the on screen display output through the VIDEO OUT jacks on and off 1 Carry out steps 1 to 3 in Checking the firmware version Firm Version P 73 The display changes for the system utility item selection 2 Rotate the MULTI JOG knob press H or G on the remote control to select VIDEO Output 3 Pre...

Страница 81: ...TE The auto play function is set to on or off If the auto play function is set to on the setting will be applied when the power of this unit is turned on the next time This unit plays data on the drive that had been last selected when the power of this unit was last turned off This unit plays in the playback mode such as random play that had been last set when the power of this unit was last turne...

Страница 82: ...that have different emphases have been played The titles appear on the display during the playback of the part that has been recorded stretching over the two discs Your CD or DVD player is not compatible with CD R or CD RW discs The CD R or CD RW disc has not been finalized This unit and or the component connected is being subjected to vibration or impact The CD is dirty Connection has not correct...

Страница 83: ...ing used at an incorrect angle Direct sunlight or lighting of an inverter type of fluorescent lamp etc is striking the remote control sensor Remote control is being used near TV set with a remote control sensor The indoor antenna is used REMEDY Turn off the power of this unit and then turn on again after about one minute P 14 The fan starts to rotate to cool off the temperature inside this unit Im...

Страница 84: ... the finalization of a CD R or CD RW disc If you wish to finalize press w d Finalizing Finalization is being performed The finalization progress is indicated by the level meter Format Really This message confirms starting the format of the HDD after Initialize appears HDD Full This message is displayed when recording to the HDD cannot be performed any further because the recording has been made up...

Страница 85: ... Full One disc can contain up to 99 tracks Recording is attempted on the disc that has reached the maximum number Unavailable The CD R disc whose recordable time is other than 74 minutes or 79 minutes or the CD R disc which does not support 4x writing or the CD RW disc has been loaded when copying in the Audio Master Quality Recording mode Unrecordable In recording or copying onto a CD R or CD RW ...

Страница 86: ...mphasis turns the volume of the upper register up before recording and down while playing back resulting in a decrease in the noise level of the upper register Finalize Finalize is a process to enable audio data recorded onto CD R RW discs to be played back on CD players or other CD RW compatible devices An audio disc created on this unit must be finalized to be played back on other playback devic...

Страница 87: ...ts the albums on the HDD For detailed information on each menu see LIST OF EDIT MENU P 50 or EDITING ALBUMS P 52 57 Edits the tracks on the HDD For detailed information on each menu see LIST OF EDIT MENU P 50 or EDITING TRACKS P 58 65 Edits the discs on the HDD For detailed information on each menu see LIST OF EDIT MENU P 50 or EDITING DISCS P 66 69 Cancels the editing operation Displays the HDD c...

Страница 88: ...RW disc the original data on the HDD is erased when moving is complete RULES OF DIGITAL RECORDING AND NOTES ON SYSTEM Notes on system Number and length of recordable discs and tracks One CD R or CD RW disc or one disc on the HDD can be recorded with up to 99 tracks on them Once 99 tracks have been recorded no further recording is possible even if space for recording is available on the disc The mi...

Страница 89: ...tor jack DIGITAL IN COAXIAL Type Coaxial jack Standard input level 0 5 Vp p 75 Ω Outputs ANALOG LINE OUT PLAY Type Pin jack Standard output level 1 kHz 0 dB 2 0 0 5 Vrms DIGITAL OUT OPTICAL Type Square optical connector jack DIGITAL OUT COAXIAL Type Coaxial jack Standard output level 0 5 Vp p 75 Ω PHONES Standard output level Input 150 Ω shorted 20 dB 300 mV 150 Ω General Power supply U S A model ...

Страница 90: ... choix de procédures différents des spécifications de cette brochure peut entraîner une exposition à d éventuelles radiations pouvant être dangereses ACHTUNG Die Verwendung von Bedienungselementen oder Einstellungen oder die Durchführung von Bedienungsvorgängen die nicht in dieser Anleitung aufgeführt sind kann zu einem Kontakt mit gefährlichen Laserstrahlen führen OBSERVERA Användning av kontroll...

Отзывы: