background image

Installation

^

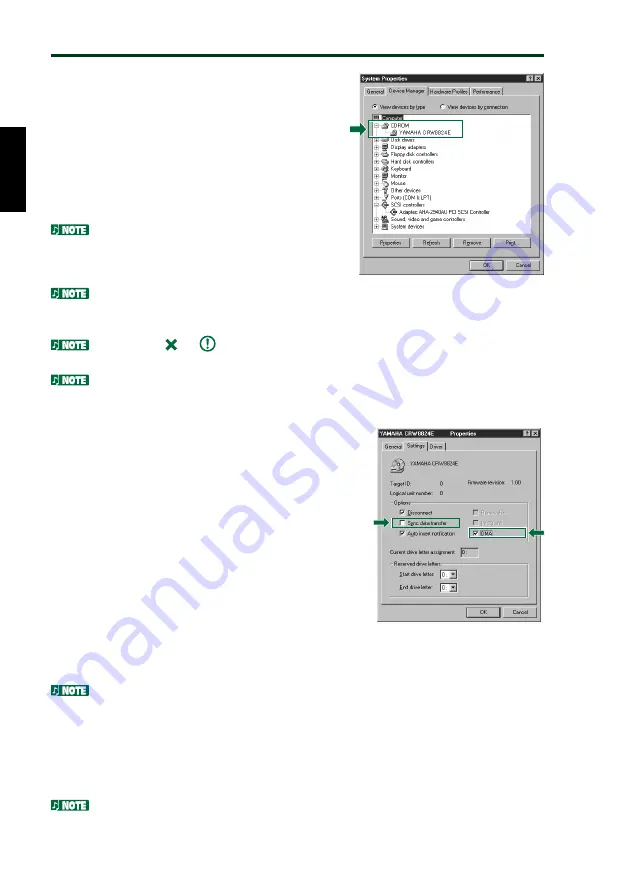
When using Windows 95/98/98SE, after the
computer’s operating system has loaded,
open the “Control Panel” and double-click
on the “System” icon.  Select the “Device
Manager” tab and double-click on “CD-
ROM”.  If the drive has been correctly
installed, it should be listed as shown in the
figure on the right.

When using Windows NT, you can verify by
opening the “Control Panel”, double-clicking
on “SCSI Adapter” and clicking the “Devices”
tab.
For more information on using the
operating system, refer to the documentation
that came with the operating system.
If there is an 

 or 

 mark etc. next to the icon for the CRW8824E drive, this

means that it has not been installed correctly.
For Windows 2000, double-click System in the Control Panel, select the Hardware
tab, and click the Device Manager button in System Properties.

&

When using Windows 95/98/98SE, follow Step

^

 to open the “Device Manager” window, then

double-click the “YAMAHA CRW8824E” icon
to open the “YAMAHA CRW8824E Properties”
window, and click the “Settings” tab to select it.
A screen similar to the one on the right
appears. Make sure that the “Sync data trans-
fer” check box is not checked. (There is no need
to set the “Sync data transfer” check box if it
does not appear.) By checking the “DMA” check
box, you can enable high-speed data transfer
between the CRW8824E and the computer.
However depending on your computer system,
this may cause operation to become unstable. If this occurs, uncheck “DMA.”

Windows NT does not have a “DMA” setting. Nor do you need to set the “Sync data
transfer” parameter, since it will not appear.

Windows 2000 does not have a “Sync data transfer” setting. It will be checked by
default.

*

Install the CD writing software.

Refer to the documentation that came with the CD writing software for further
details.

* This is a screen shown in the Windows 98 

environment.

* This is a screen shown in the Windows 98 

environment.

23

Содержание CD Recordable/Rewritable Drive CRW8824E

Страница 1: ......

Страница 2: ...14 228 3913 Type of Equipment CD Recordable Rewritable Drive Model Name CRW8824E CRW8824E NB This device complies with Part 15 of the FCC Rules Operation is subject to the following conditions 1 this device may not cause harmful interference and 2 this device must accept any interference received including interference that may cause undesired operation See user manual instructions if interference...

Страница 3: ...Diese Leistung wurde in einem Abstand von 200 mm ab der Linsenoberfläche des optischen Sensorblocks gemessen ANSI Klasse Klasse 1 Caractéristiques de la diode laser Matériau GaAIAs Longueur d onde 780 787 nm Durée d émission Continue Puissance de sortie du laser Moins de 44 6 µW Cette valeur de sortie a été mesurée à une distance de 200 mm depuis la lentille sur le bloc capteur optique Classe ANSI...

Страница 4: ...English i OWNER S MANUAL ...

Страница 5: ...se there is an increased risk of personal injury electrical shock damage to the device or fire Please take particular care if small children are present Do not expose the device to rain use it near water or in damp or wet conditions or place containers on it that contain liquids which might spill into any openings Otherwise there is an increased risk of electrical shock fire or personal injury Fol...

Страница 6: ...sc from the tray before transporting the device Otherwise written data may be destroyed When cleaning the device never use benzene paint thinners detergents or chemical impregnated wiping cloths Also do not place vinyl plastic or rubber objects on the device Otherwise the device may be damaged or its front panel may become discolored Use a soft dry cloth to wipe the device Do not rest your weight ...

Страница 7: ...duction of this manual either in part or in full is ex pressly forbidden Precautions forTransportation Before transporting the device always put it back in its original box If the device is transported without adequate packing the internal components may be damaged and cause the device to malfunction Distributing Discs When writing important data or preparing data for distribution to others make s...

Страница 8: ...rks are the property of their respective companies Table of Contents Setup Flowchart 1 Introduction 2 Features of the CRW8824E Drive 2 System Configuration 3 Computer 3 Software 3 Discs 4 Tools 5 Front and Rear of Unit 6 Front Panel 6 Rear Panel 7 Installation 8 First Steps 8 Installing the CRW8824E Drive 9 Operation 24 Loading a Disc 24 Ejecting the Disc 24 Ejecting a Disc in an Emergency 25 Trou...

Страница 9: ...check that the drive is recognized correctly by the computer s OS P 23 STEP 3 Install the CD writing software For details about how to install the software refer to the documentation that came with it STEP 1 Set up the CRW8824E drive 1 Remove the outer casing of computer P 10 2 Set the jumper switches P 14 3 Fit the drive into the computer P 15 STEP 4 Start using the CRW8824E drive Use the drive t...

Страница 10: ... speed This data can be saved in WAVE format in a Windows environment or in AIFF format in a Macintosh environment Digital sound can be recorded with com plete fidelity even when writing at 8X speed Reliable writing Yamaha s proprietary Pure Phase Laser System 1 improves jitter values 2 to allow the signal to be recorded accurately In addition the 4 MB buffer memory and Running OPC 3 technology fu...

Страница 11: ...s CD writing software This software must support the CRW8824E drive for writing to CD R or CD RW For details about how to install and use the software refer to the documentation that came with it When temporarily storing data on a hard disk prior to writing to CD R RW you will need an extra area of 50 100MB free hard disk space When creating an image file of the data on hard disk before writing to...

Страница 12: ...8X and 4X speeds These discs can be read played by a CD RW drive that bears the High Speed CD RW logo or by a device e g CD ROM drive that supports CD RW Compatible with Orange Book Part 3 Vol 2 The Orange Book standard defines how all recordable discs including CD R and CD RW are written Part 2 of the Orange Book standard relates to CD R discs and Part 3 to CD RW discs The standard was named afte...

Страница 13: ...old movies in which the video and audio data has been com pressed using MPEG 1 technology Tools You will need the following tools at hand when installing the CRW8824E drive Phillips Screwdriver You will need to use this when removing the cover of your computer and when mounting the drive You may also need to temporarily remove the sound card to gain access to the CD audio connectors In which case ...

Страница 14: ...one volume control Adjust this control to set a suitable volume level when listening to an audio CD using the headphone jack Slide the knob to the left to decrease the volume and to the right to increase it ON DISC LED This LED is orange when the drive is powered on and green when the drive contains a disc READ WRITE LED This LED is green when data is being read off a disc and orange when data is ...

Страница 15: ... IDE INTERFACE CONNECTOR 1 L G IO OUT 1MASTER jumper switch default setting Plug a plastic shunt into this jumper switch if you are connecting the master CRW8824E using an IDE cable 2SLAVE jumper switch Plug a plastic shunt into this jumper switch if you are connecting the slave CRW8824E using an IDE cable 3CSEL jumper switch If your computer supports the CSEL function plug a plastic shunt into th...

Страница 16: ...A TSO SÄTEESEEN VARNING SYNLIG OCH ELLER OSYNLIG LASERSTRÅLNING NÄR DENNA DEL ÄR ÖPPNAD BETRAKT A EJ STRÅLEN VORSICHT SICHTBARE UND ODER UNSICHTBARE LASERSTRAHLUNG WENN ABDECKUNG GEÖFFNET NICHT DEM STRAHL AUSSETZEN A TTENTION RADIA TION VISIBLE ET OU INVISIBLE LORSQUE L APPAREIL EST OUVERT EVITEZ TOUTE EXPOSITION AU FAISCEAU MADE IN MALA YSIA V565150 1 F COMPLIES WITH 21 CFR CHAPTER 1 SUBCHAPTER J...

Страница 17: ...the computer s existing CD ROM drive CRW8824E As a replacement drive If the casing of your computer does not have a spare 5 25 inch drive bay available such as with many desktop type designs you can replace the computer s existing CD ROM drive with the CRW8824E drive CD ROM drive CRW8824E You cannot replace the computer s existing CD ROM drive with the CRW8824E using the existing cable if the driv...

Страница 18: ...e 2 Remove the outer casing of the computer If you need to remove screws in the process make sure you don t lose them The method for removing the casing and fitting the drive in the drive bay can vary depending on the manufacturer Refer to the documentation that came with your computer for further details 3 Touch a metal part of the computer s chassis or power supply unit to drain any static charg...

Страница 19: ...e the front cover of a vacant 5 25 inch drive bay slot in the computer When you finish this step proceed to Step 7 on page 14 Front panel 5 25 inch drive bay slot Front cover 4 Remove the front panel of the computer Front panel 5 25 inch drive bay slot 11 ...

Страница 20: ...f the devices connected via the IDE cable is called master and the other called slave IDE connectors on the motherboard PRIMARY IDE SECONDARY IDE IDE device slave IDE device slave IDE cable primary IDE cable secondary IDE device master IDE device master 5 Disconnect all the cables connected to the rear of the existing CD ROM drive and also disconnect the audio cable from the sound card or motherbo...

Страница 21: ...e to an IDE cable assign the device as a master and connect it to the end of the cable Example 1 IDE cable Secondary No Device slave IDE cable primary IDE device IDE cable Secondary No device slave slave Connect Remove CRW8824E master Connect CRW8824E IDE cable primary CD ROM Drive e t c slave Remove the CD ROM drive e t c to replace it with the CRW8824E Hard Disk master master Hard Disk master CD...

Страница 22: ...mper switches Plastic shunt Rear Panel The plastic shunts actually contain metal for bridging the two pins of a jumper switch creating an electrical connection between them when attached When removed the jumper switch is set to OFF Store unused plastic shunts in a safe place where they will not be lost Use a pair of long nosed pliers to attach or detach the plastic shunts accordingly However make ...

Страница 23: ...placing Drive 8 Slide the drive backwards into the slot Do not apply excessive force when sliding the drive back into the drive bay slot 8 Slide the CRW8824E drive backwards into the now vacant bay without applying excessive force 15 ...

Страница 24: ...er IDE and audio cables Then tighten the four fastening screws on the sides of the unit by hand to hold the drive in place 9 Leave enough room behind the drive to connect the power IDE and audio cables Then tighten the four fastening screws on the sides of the unit by hand to hold the drive in place 16 ...

Страница 25: ...ection IDE INTERFAC E CONNECTOR DC INPUT 1 5V G 12V CSEL SLAVE MASTER AUDIO OUT R L G Colored line Primary connector Secondary connector 1 If an IDE cable has already been connected to the secondary IDE connector replace it with the included IDE cable If you wish to continue using the IDE device you just removed connect it to an available primary or secondary IDE connector When you connect two IDE...

Страница 26: ...lug is at the top IDE INTERFACE CONNECTOR DC INPUT 1 5V G 12V CSEL SLAVE MASTER AUDIO OUT R L G Sound card Vertically mounted type PH Horizontally mounted type MPC Audio cable Lug You do not need to connect the audio cable to write audio CDs since the audio is passed over the IDE bus It is required to play back audio CDs on the CRW8824E drive via the computer s sound card However if a CD ROM drive...

Страница 27: ...DC INPUT 1 5V G 12V CSEL SLAVE MASTER AUDIO OUT R L G Top Top Bottom 4 pin power cable There may be more than one 4 pin power cable available Any one may be used These connectors are D shaped so it is possible to connect the power cables in only the correct orientation Do not apply excessive force when making this connection 19 ...

Страница 28: ...on Additional Drive Replacing Drive Tighten the four fastening screws on the side of the unit securely using a screwdriver Tighten the four fastening screws on the side of the unit securely using a screwdriver 20 ...

Страница 29: ...Installation Additional Drive Replacing Drive Attach the outer casing of the computer and any screws that were removed Attach the outer casing of the computer and any screws that were removed 21 ...

Страница 30: ...r it up When you power up the computer make sure both LEDs on the panel of the CRW8824E light up together for brief moment Reconnect the computer to the AC outlet and power it up When you power up the computer make sure both LEDs on the panel of the CRW8824E light up together for brief moment 22 ...

Страница 31: ...98 98SE follow Step to open the Device Manager window then double click the YAMAHA CRW8824E icon to open the YAMAHA CRW8824E Properties window and click the Settings tab to select it A screen similar to the one on the right appears Make sure that the Sync data trans fer check box is not checked There is no need to set the Sync data transfer check box if it does not appear By checking the DMA check...

Страница 32: ...l or printing facing upward 3 Press the Eject button to close the tray When a disc is loaded the ON DISC LED is lit up in orange first then changes to green For more details refer to page 32 Do not push or pull the tray using excessive force Doing so can damage the drive or the disc Instead always use the Eject button to open or close the tray Ejecting the Disc 1 2 1 Press the Eject button on the ...

Страница 33: ...mergency If the disc tray fails to open for some reason such as a power outage you can open it manually Manual Eject hole Paper Clip You should attempt to eject a disc manually only as a last resort Malfunc tions may occur if you do this too frequently 1 Power down the computer 2 Find a pin like tool with a diameter of 2mm or less to fit through the Manual Eject hole on the drive s front panel A s...

Страница 34: ...appears while Windows is starting up If the name does not appear check the cable connections for the CRW8824E Check to see if there are any problems with other IDE devices Some problems may occur in the multiple IDE device system due to incompatibilities between the IDE devices and the computer device drivers data transfer speed or other reasons Make sure that the CRW8824E is recognized by the com...

Страница 35: ...ects or fails to read the disc or the ON DISC LED remains lit in orange after the disc has been loaded meaning that the disc has not been recognized P 32 Disconnect the IDE cable from the drive but leave the power cable connected then load a disc There may be problems with the disc itself If the drive fails to recognize a variety of discs including audio CDs CD ROMs and blank CD R RW discs the ON ...

Страница 36: ...off Deactivate the Active Desktop if you are using Internet Explorer 4 or 5 Disable network access Close other applications including screen savers task schedulers etc Errors can occur if you knock the CRW8824E drive while it is writing to disc When using packet writing on a CD RW disc the actual data capacity is 100MB less than that stated on the cover of the disc The difference in capacity is de...

Страница 37: ...signify the beginning and end points of a session They are not part of the data but contain information about the session itself Basically a session consists of a lead in data and a lead out Track at Once TAO This mode is used when writing data to a disc one track at a time More tracks can be added later if there is enough space left on the disc This is why Track at Once mode is sometimes referred...

Страница 38: ...ck 4 Session 1 Session 2 Example CD EXTRA Packet Writing This mode is used when writing to a track of a disc using small blocks of data called packets in a manner similar to a floppy disk This mode is useful when making small incremental backups of data You will need to use software that specifically supports packet writing such as Adaptec s DirectCD 1 2 3 4 5 6 7 8 Packet Same as writing to flopp...

Страница 39: ...es can be found in the CD R area of Yamaha s web site Please check this information regularly The firmware is completely unrelated to the CD writing application software Determining the firmware version of the CRW8824E drive in Windows 95 98 98SE Go to Control Panel System Device Manager tab double click on CD ROM then double click on Yamaha CRW8824E The firmware revision indicated here varies dep...

Страница 40: ...es Status ON DISC LED READ WRITE LED Power on reset Ready no disc Loading disc Ejecting disc Ready disc loaded Seeking Preparing to write Writing Writing test mode Reading Lit Orange Blinking Orange Off Lit Green Blinking Green 32 ...

Страница 41: ...raction 24X max Drive can play CD DA at 1X speed only Video CD 6 9X max Disc session closed 24X max 12X max for packet writing Disc session not closed 8X max CD R 1X 4X 6X 8X Writing Orange Book Part II Ver 3 1 specified WO disc Note When writing at 6X or faster speed use discs made for high speed recording CD RW 2X 4X Writing ReWriting Orange Book Part III Vol 1 Version 2 0 specified RW discs 4X ...

Страница 42: ...lia New Zealand Japan Item Electrical Laser Emission Electrical Emission Electrical Laser Immunity Emission Emission Emission Standards UL1950 21CFR1040 10 FDA Chapter 1 Subchapter J 47CFR15 FCC Part 15 Subpart B CSA C22 2 No 950 ICES 003 EN60950 EN60825 EN55024 EN55022 AS NZ 3548 VCCI Details Information Technology Equipment Class 1 Laser Product Class B Computing Device Information Technology Eq...

Страница 43: ...ont panel 6 11 H headphone jack 6 headphone volume control 6 High Speed CD RW discs 4 I IDE 12 13 IDE cable 12 17 IDE connector 7 J jumper switches 7 14 L lead in 29 lead out 29 loading a disc 24 Long Nosed Pliers 5 lug 18 M manual eject hole 6 25 MASTER 7 12 14 Multisession 29 O ON DISC LED 6 P packet 30 Packet Writing 30 paper clip 25 Phillips Screwdriver 5 primary 12 17 R READ WRITE LED 6 rear ...

Страница 44: ...SLOVAKIA SLOVENIA TURKEY UKRAINE WHITE RUSSIA YUGOSLAVIA URL http www yamaha yste com U S A Yamaha Corporation of America Consumer Products Division 6600 Orangethorpe Ave Buena Park CA 90620 U S A TEL 1 714 522 9011 FAX 1 714 228 3913 URL http www yamaha com CANADA Yamaha Canada Music Ltd 135 Milner Avenue Scarborough Ontario M1S 3R1 CANADA TEL 1 416 298 1331 FAX 1 416 292 0732 AUSTRALIA Yamaha Mu...

Страница 45: ......

Отзывы: