background image

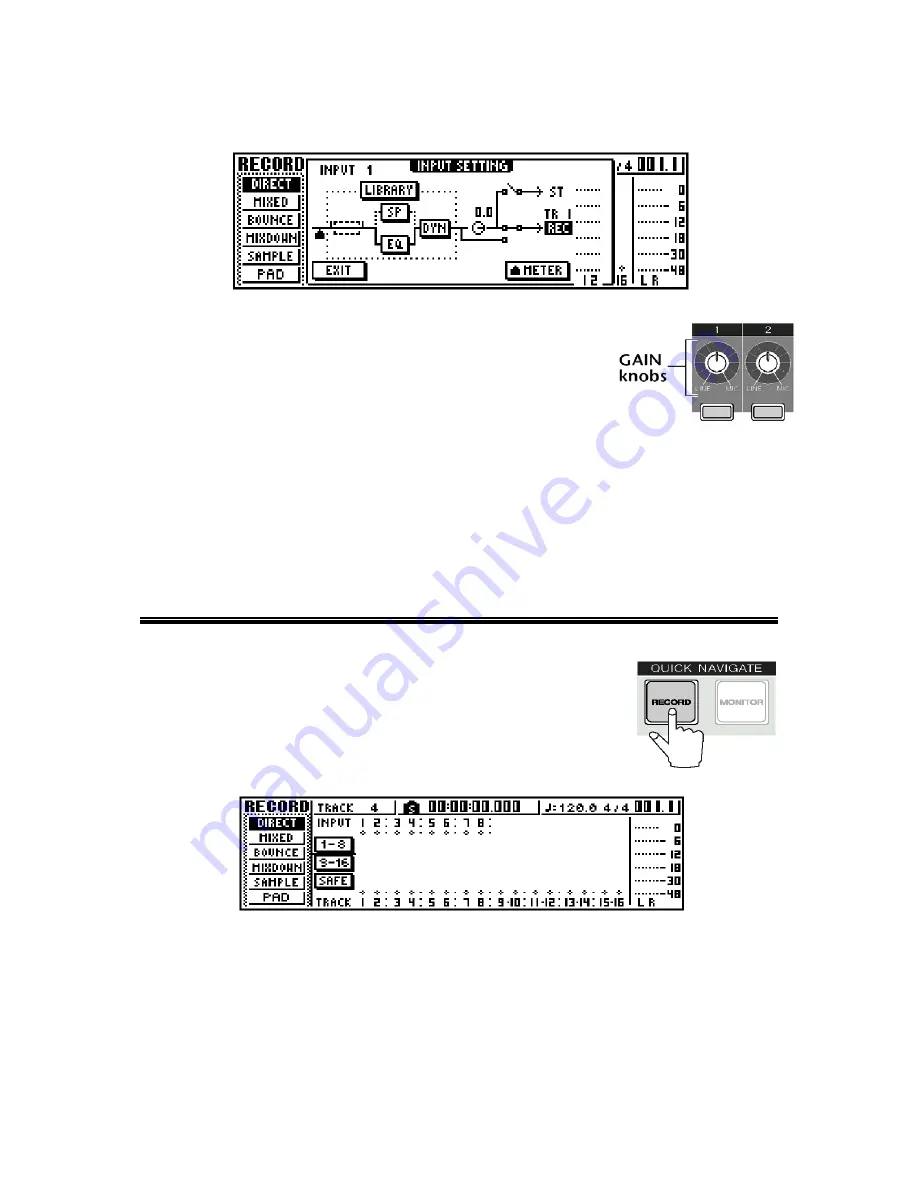
The Input Setting popup window will appear. 


2. 

While playing the instrument, turn the GAIN knob 
up to adjust the input level.  The meter on the 
right hand side of the Input Setting screen should 
be around the –12 to -6 dB mark when the 
instrument is at its maximum level. 


Once you reach the 0 dB mark the signal will become distorted.  Setting the input level at 
around -12 to -6 allows for changes in dynamics during live performance. 


4. 

Turn the MONITOR/PHONES knob up to the desired listening level.  


Assigning the Input Signal to a Track 


1. 

In the Quick Navigate section press the 

[RECORD]

 key until the DIRECT page of the 

RECORD screen is displayed. 


The 

[INPUT SEL]

 keys and the 

[TRACK SEL]

 keys will now be red and blinking. 


2. Press 

the 

[INPUT SEL]

 key for the input channel that you are going to 

record from. 


The 

[INPUT SEL]

 that was pushed will now be solid red, and the remaining 

[INPUT SEL]

 keys will no longer be blinking. 


8

Содержание AW16G Recording 101

Страница 1: ...Recording 101 Yamaha Corporation of America 6600 Orangethorpe Ave Buena Park CA 90620 USA Customer Support 714 522 9000 ...

Страница 2: ...s and or Microphones 3 Turning the Equipment on 5 Recording 6 Creating a New Song 6 Setting the Input Level 7 Assigning the Input Signal to a Track 8 Recording the First Track 9 Punching In and Punching Out 9 Overdubbing 10 Mixdown 12 Setting Basic Levels 13 Adjusting the Panning 14 Panning Guidelines 15 Adjusting the EQ 16 Using the EQ Library 16 ii ...

Страница 3: ...Adjusting the Dynamic Processors 17 Using the Dynamics Library 17 Using the Internal Effects 18 Recording the Stereo Track 19 Creating an Audio CD 20 Glossary 22 iii ...

Страница 4: ...l 20 Gigabyte GB laptop style hard drive There are 8 mono tracks and 4 stereo tracks for a total of 16 recording tracks 36 Channel Mixing Console Within the AW16G there are a total of 36 mixer channels This includes 16 channels for playback of the recorded tracks 8 analog input channels 2 stereo effects return channels and 4 stereo channels for the sample pads Every mixer channel has a 4 band para...

Страница 5: ...ered monitors With Powered Monitors If unpowered monitors are to be used with the AW16G first connect the Monitor Outs of the AW16G to the inputs of the power amp using unbalanced instrument cable Next connect the speaker outputs of the power amp to the inputs of the unpowered monitors using speaker cable For best results 10 16 gauge speaker cable should be used to connect the power amp to the mon...

Страница 6: ...6G With Headphones Step 2 Connect the instruments or microphones The next step would be to connect the instruments or the microphones to the AW16G that you will be recording Typically it is best to start by recording the rhythm instruments first drums and bass guitar and then record the other instruments The final thing recorded is usually the vocals However if you are 3 ...

Страница 7: ...1 4 inch jacks and a special Hi Z input for connecting electric guitars or basses directly to the AW16G Inputs 1 and 2 of the AW16G are the only inputs that can supply phantom power to condenser microphones Either microphones or devices such as keyboards or drum machines can be connected to inputs 3 8 If microphones with XLR outputs are to be connected to inputs 3 8 an XLR to TRS cable or adapter ...

Страница 8: ...such as audio sources and effects processors connected to the AW16G 2 Turn on the AW16G 2 Turn on the AW16G 3 Turn on the monitoring system connected to the AW16Gs Monitor Outputs 3 Turn on the monitoring system connected to the AW16Gs Monitor Outputs This will prevent damage to the speakers If the monitoring system is turned on first then when the AW16G and the other equipment is turned on a loud...

Страница 9: ... song Creating a New Song 1 In the Work Navigate Section press the SONG key until the Song List page is displayed 2 Move the cursor to the NEW button and press the ENTER key next to the jog wheel A popup window will ask you if you want to save the current song 3 Move the cursor to either YES if you want to save the current song or NO if you do not want to save the current song and press the ENTER ...

Страница 10: ...reating a new song the next step is to set the input level for the instrument or other sound source that you will be recording 1 Raise the Stereo Fader the red fader to the 0 position This is all of the way up If the Stereo Fader is already up first lower it and then raise it back up to the 0 position Since the faders are not motorized this ensures that the Stereo Fader is actually at 0 1 Press an...

Страница 11: ...at around 12 to 6 allows for changes in dynamics during live performance 4 Turn the MONITOR PHONES knob up to the desired listening level Assigning the Input Signal to a Track 1 In the Quick Navigate section press the RECORD key until the DIRECT page of the RECORD screen is displayed The INPUT SEL keys and the TRACK SEL keys will now be red and blinking 2 Press the INPUT SEL key for the input chan...

Страница 12: ...multaneously press the PLAY and REC keys in the transport section The PLAY and REC keys will light up and the AW16G will begin recording You are now ready to record To begin recording simultaneously press the PLAY and REC keys in the transport section The PLAY and REC keys will light up and the AW16G will begin recording Punch In Out If you make a mistake while recording you can punch in at the sp...

Страница 13: ... successfully recorded the first track or tracks you can then record additional tracks while listening to your previously recorded tracks This is referred to as overdubbing tracks Before you begin overdubbing you must disengage the previously recorded tracks from being record enabled If you don t you will erase the tracks that you just recorded Disengaging a track from being record enabled 1 In th...

Страница 14: ...ecord enabled Overdubbing Additional Tracks 1 Press and hold the INPUT SEL key for the input that you are going to record from The Input Setting popup window will appear 2 While playing the instrument turn the GAIN knob up to adjust the input level The meter on the right side of the Input Setting screen should be between the 6 to 0dB mark when the instrument is at its maximum level 3 In the Quick ...

Страница 15: ...ording the next track Continue this procedure until you have all of the tracks recorded After you have recorded all of the tracks now proceed to the next step which is mixdown Mixdown Once all of the tracks are recorded it is time to begin the mixdown process Mixdown is the process of mixing the individual recorded tracks down to a stereo track so that it can then be recorded onto an audio CD The ...

Страница 16: ...o 0 dB as possible without going over By setting the drums to read around 12 to 6 dB you are allowing headroom As you bring up the level of the other tracks the level of the L R meters will increase 5 Next raise the fader of the bass tracks until you achieve a good balance between the bass and drum tracks 6 After the raising the fader for the bass track raise the faders of the rhythm instruments T...

Страница 17: ...rong The idea is to just get a good overall balance between all of the instruments and if starting with the vocal works for you then start with the vocal After setting basic levels you should pan the instruments between the left and right outputs to create a stereo image Adjusting the Panning 1 Press the TRACK SEL key of the track that you wish to adjust the panning for 2 Press the red pan knob un...

Страница 18: ...e right An Example of Common Drum Set Panning Bass This is almost always panned straight up the center Guitars Rhythm guitars are usually panned to either the 9 o clock position or the 3 o clock position You can try panning them a little farther out or closer in depending upon the other instruments in the mix Guitar solos are usually panned either straight up the center or just a little off to one...

Страница 19: ...d off the sides Adjusting the EQ The next step in the mixdown process would be to adjust the EQ of any tracks that need it It is very easy to over EQ and ruin a good mix so listen to the tracks first and then if EQ is needed use it sparingly When using EQ is always better to use subtractive EQ rather than additive EQ Subtractive EQ means to take away frequencies Additive EQ means to boost frequenc...

Страница 20: ...adjust the dynamic range of the track For example if a vocal track changes volume drastically throughout the song it would best to use a dynamics processor to make the volume level more consistent throughout the song The type of dynamics processor that would be used to do this is a compressor A dynamics processor may also be used to expand the dynamic range of a track If a track lacks dynamic rang...

Страница 21: ...s After applying EQ and dynamics processing to the tracks you may want to use the internal effects of the AW16G The AW16G has two internal effects processors with forty eight different presets in each effects processor Some examples of the presets in these effects processors would be reverb delay chorus tremolo and pitch shift It is possible to record the tracks with effects but typically they are...

Страница 22: ...any tracks as you want to either or both of the effects processors Recording the Stereo Track After you have recorded all of the tracks and adjusted the EQ dynamics processors and added effects you will need to record your final mix onto the Stereo Track of the AW16G The Stereo Track of the AW16G is in addition to the regular record tracks of the AW16G If you do not record your mix onto the Stereo...

Страница 23: ...RW drive of the AW16G In order to create an audio CD a CD R should be used Most consumer CD players will not read audio recorded on CD RW media It is best to use CD R media designed for digital audio 2 Press the CD key in the Work Navigate section until the CD WRITE screen is displayed 3 Select either TRACK AT ONCE or DISC AT ONCE and press the ENTER key An INIT CD LIST progress message will pop u...

Страница 24: ...you may need to save the song before the AW16G will recognize the stereo track 4 Cursor to the NEW button in the LCD display and press the ENTER key 5 Cursor to the song name and use the JOG DATA wheel to select the desired song 6 Cursor to EXECUTE and press the ENTER key 21 ...

Страница 25: ...s used to reduce the dynamic range of the signal passing through it Condenser Microphone A microphone that has a gold coated plastic diaphragm mounted above a conductive back plate The diaphragm and back plate separated by a small volume of air form an electrical component called a capacitor or condenser A voltage between 9 and 48 volts also known as phantom power is applied to the diaphragm by an...

Страница 26: ...ace 1 024 megabytes is equal to 1 gigabyte Metronome A device used to mark time by means of regularly recurring ticks or flashes at adjustable intervals Mixdown The process of mixing all of the individually recorded tracks down to a single stereo track Overdub To record additional tracks to an existing recording Parametric EQ A multi band variable equalizer offering control of all the parameters o...

Страница 27: ...r to a Tip Ring Sleeve cable connector or jack Also known as balanced 1 4 Inputs 3 8 of the AW16G use TRS jacks XLR Used to refer to a three prong canon cable connector or jack Inputs 1 2 of the AW16G are XLR inputs 24 ...

Отзывы: