background image

22

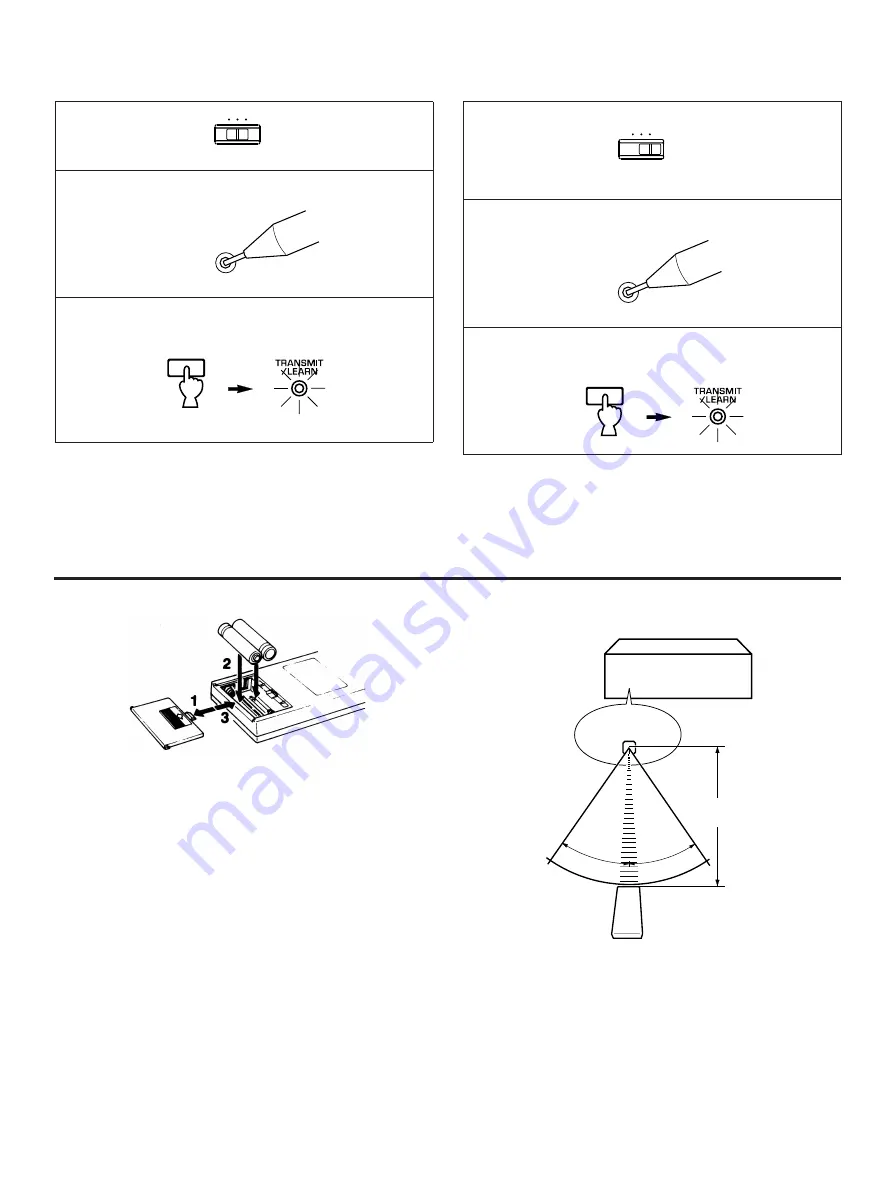
Set to the “USER” position.

Press and hold the CLEAR button using the point  of a
mechanical pencil, etc.

Press and hold the key where the learned function to
be deleted is until the indicator flashes 3 times.

To clear two or more functions, repeat steps 2 and 3.

Note
If a key is not pressed soon after the CLEAR button is pressed,
this unit will automatically return to the status that was in effect
before the CLEAR button was pressed.

Set to the “LEARN” position.

Press and hold the CLEAR button using the point  of a
mechanical pencil, etc.

Press and hold any key until the indicator  flashes 7
times.

To Clear a Learned Function

To Clear All Learned Functions

1

2

3

1

2

3

NOTES ABOUT THE REMOTE CONTROL TRANSMITTER

Battery installation

Battery replacement

If you find that the remote control transmitter must be used
closer to the main unit, the batteries are weak.  Replace both
batteries with new ones.
Notes

Use only “AA”, LR6, AM-3 batteries for replacement.

Be sure the polarities are correct.  (See the illustration inside
the battery compartment.)

Remove the batteries if the remote control transmitter will
not be used for an extended period of time.

If batteries leak, dispose of them immediately.  Avoid
touching the leaked material or letting it come in contact with
clothing, etc.  Clean the battery compartment thoroughly
before installing new batteries.

Remote control transmitter operation range

Notes

There should be no large obstacles between the remote
control transmitter and the main unit.

If the remote control sensor is directly illuminated by strong
lighting (especially an inverter type of fluorescent lamp etc.),
it might cause the remote control transmitter not to work
correctly. In this case, reposition the main unit to avoid
direct lighting.

RS

USER

LEARN

CLEAR

RS

USER

LEARN

CLEAR

30

°

30

°

Remote-control
sensor

Within approximately
7 m (23 feet)

Содержание AV-90PY

Страница 1: ...g instructions in the literature accompanying the appliance Explanation of Graphical Symbols CAUTION Natural Sound Digital Sound Field Processing Amplifier 5 Speaker Configuration 100W 100W 8Ω RMS Output Power 0 08 THD 20 20 000 Hz Front 25W 8Ω RMS Output Power 0 08 THD 20 20 000 Hz Center 25W 25W 8Ω RMS Output Power 0 3 THD 1 000 Hz Rear Digital Sound Field Processor 4 Programs for Digital Sound ...

Страница 2: ...r to operate normally or exhibits a marked change in performance or E The unit has been dropped or the cabinet damaged 16 Servicing The user should not attempt to service the unit beyond those means described in the operating instructions All other servicing should be referred to qualified service personnel 17 Power Lines An outdoor antenna should be located away from power lines 18 Grounding or P...

Страница 3: ...ing section on common operating errors before concluding that your unit is faulty 9 Do not connect audio equipment to the AC outlets on the rear panel if that equipment requires more power than the outlets are rated to provide WARNING CHEMICAL CONTENT NOTICE The solder used in the manufacture of this product contains LEAD In addition the electrical electronic and or plastic where applicable compon...

Страница 4: ...e the acoustics of a variety of actual concert hall theater etc to allow you to accurately recreate one of several actual live performance environments all in your own home Dolby Pro Logic Surround The Dolby Pro Logic Surround Decoder program lets you experience the dramatic realism and impact of Dolby Surround movie theater sound in your own home Dolby Pro Logic gets its name from its professiona...

Страница 5: ...the center speaker and the ambience will be excellent Set the center mode to the NORMAL or WIDE position For details refer to the page 11 4 Speaker Configuration The center speaker is not used in this configuration If the digital sound field program is in the DOLBY PRO LOGIC or ENHANCED the center sound is output from the left and the right front speakers However the sound effect of other programs...

Страница 6: ...yment of a design in which the amplifier functions to supply the signals If the electrical resistance of the voice coil is reduced to zero the movement of the speaker unit would become linear with respect to signal voltage and to accomplish this a special negative impedance output drive amplifier for subtracting output impedance of the amplifier is used By employing negative impedance drive circui...

Страница 7: ...sure all connections are made correctly that is to say L left to L R right to R to and to Also refer to the owner s manual for each component to be connected to this unit Refer to About the accessory terminals on page 8 Compact disc player LD player Video cassette recorder 1 Refer to SETTING OF THE YST SELECTOR on page 9 Turntable Tuner Tape deck 1 Monitor TV Front speakers To AC outlet U S A mode...

Страница 8: ...le with the S mark connect it to this connector by using the cable provided with the turntable This connection allows you to control the turntable from the provided remote control transmitter GND terminal For turntable use Connecting the ground wire of the turntable to this terminal will minimize hum but in some cases better results may be obtained with the ground wire disconnected FRONT OUT termi...

Страница 9: ...ventional speakers YST 1 position YST 2 position To drive YAMAHA Active Servo Processing speakers For detailed information on which type of speakers is appropriate to each position refer to the rear panel of the speakers to be used Notes Incorrect connection or miss setting of the switch could damage this unit and the connected speakers Be absolutely sure that this unit s power is OFF before setti...

Страница 10: ...is important for the best performance of digital sound field processor Set to the position Set to the 0 position Set to the 0 position From the step 4 the adjustment should be done with the remote control transmitter at your listening position The adjustment can be done also with the controllers on the front panel of this unit However the result may not be as satisfactory as from your listening po...

Страница 11: ...ch The display illumination changes as shown below The test tone from the left rear speaker and the right rear speaker will be heard at the same time Note In the step 7 when you select the center mode note the following For 5 speaker configuration NORMAL Select this mode when you use the center speaker smaller sized than the front speakers In this mode the bass tone will be output from the front s...

Страница 12: ...tes Once you have completed these adjustments use only this unit s VOLUME control to adjust listening volume Do not change any other volume settings in this unit If you use external power amplifiers their volume controls may also be adjusted to achieve proper balance In the step 11 if the center mode is in the PHANTOM the sound output level of the center speaker can not be adjusted Because in this...

Страница 13: ...NO Priority order of video sources 1 VCR 1 MON 2 VCR 2 MON TAPE 2 MON and 3 LD TV If you select LD TV TUNER CD or PHONO be sure that TAPE MON and or VCR MON input selectors are not being selected If you select TAPE 1 MON and VCR 1 or 2 MON input selectors at the same time the result will be the visual of the VCR and the sound from the audio tape If you select both LD TV and TAPE MON input selector...

Страница 14: ...g A red selector switch indicator takes priority over an orange indicator Notes There are three ways to dub from tape to tape 1 To record from VCR 2 or tapedeck 2 to VCR 1 press both the VCR 2 MON TAPE 2 MON and VCR 1 MON selector switches so both the indicators are lighted red 2 To record from VCR 2 or tapedeck 2 to tapedeck 1 press both the VCR 2 MON TAPE 2 MON and TAPE 1 MON selector switches s...

Страница 15: ...counter clockwise to decrease the low frequency response TREBLE Turn this clockwise to increase or counter clockwise to decrease the high frequency response Note These controls are effective only on the sound from the front speakers When you listen with headphones Connect the headphones to the PHONES jack You can listen to the main sound through the headphones Adjusting the BALANCE control Adjusti...

Страница 16: ...s reproduced lively and dynamically CONCERT HALL In this program the center seems even more deeply behind the front speaker pair creating an expansive large hall ambience OFF Switch When any program is not used with the selected source press this switch The sound is output only from the front speakers USING DIGITAL SOUND FIELD PROCESSOR DSP This unit incorporates a sophisticated multi program digi...

Страница 17: ...Pro Logic Surround DOLBY PRO LOGIC SURROUND This unit employs the Dolby Pro Logic Surround system This system is similar to professional Dolby Stereo decoders used in movie theaters The Dolby Pro Logic Surround system by employing a four channel system divides the input signals into four levels the left and right main channels the center channel to characterize dialogue and the rear surround sound...

Страница 18: ...seconds 6 CONCERT HALL from 1 to 100 milliseconds Preset value 30 milliseconds By continuously pressing or of the DELAY TIME control the value changes continuously However the value stops changing momentarily at the preset point Note Adding too much delay will cause an unnatural effect with some sources Experiment with the DELAY TIME control to create an effect that you find most suitable Follow t...

Страница 19: ...EO MONO MOVIE ROCK CONCERT or CONCERT HALL the CENTER LEVEL control can not function Once the output level is adjusted the level value will be common among the DOLBY PRO LOGIC and ENHANCED If any digital sound field program is not used the CENTER LEVEL control does not function Adjustment of the CENTER LEVEL If desired you can adjust the sound output level of the rear speakers with this control ev...

Страница 20: ...trol transmitter keys with your component s keys If these keys are identical their function will be the same On each key function refer to the corresponding instruction on your component s manual REMOTE CONTROL TRANSMITTER RS USER LEARN switch Turns the power on off Refer to Speaker balance adjustment in ADJUSTMENTS BEFORE OPERATION Selects center speaker mode Adjusts sound output level at each sp...

Страница 21: ...R position if a new function has not been learned to the key Successful learning to a key results in the erasure of previously learned functions and their replacement by the newly learned ones If there is no more room in the memory area for a function to be learned the TRANSMIT LEARN indicator will flash two times In this case even if some keys are not occupied with functions from other remote con...

Страница 22: ...o the main unit the batteries are weak Replace both batteries with new ones Notes Use only AA LR6 AM 3 batteries for replacement Be sure the polarities are correct See the illustration inside the battery compartment Remove the batteries if the remote control transmitter will not be used for an extended period of time If batteries leak dispose of them immediately Avoid touching the leaked material ...

Страница 23: ...ed on a turntable with an MC cartridge The sound output level of the rear speakers is 0 The monaural sound source is played in the DOLBY PRO LOGIC or ENHANCED The sound output level of the center speaker is 0 The center mode is in the PHANTOM Incorrect sound field program selection No sound field program is selected The turntable and the speakers are too close together or the turntable is not loca...

Страница 24: ...20 kHz Phono MM to REC OUT 1V 0 01 CD TUNER TAPE LD TV VCR to SP OUT 50W 8Ω 0 04 Signal to Noise Ratio IHF A Network Phono MM 5 mV Input Shorted 86 dB CD TUNER TAPE LD TV VCR Input Shorted 95 dB Residual Noise IHF A Network 150 µV Channel Separation Vol 30 dB Phono MM Input shorted 1 kHz 10 kHz 65 dB 50 dB CD TUNER TAPE LD TV VCR Input 5 1 kΩ Terminated 1 kHz 10 kHz 65 dB 50 dB Tone Control Charac...

Страница 25: ...084 RELLINGEN BEI HAMBURG F R OF GERMANY YAMAHA ELECTRONIQUE FRANCE S A 17 RUE DES CAMPANULES LOGNES 77321 MARNE LA VALLEE CEDEX 2 FRANCE YAMAHA ELECTRONICS UK LTD YAMAHA HOUSE 200 RICKMANSWORTH ROAD WATFORD HERTS WD1 7JS ENGLAND YAMAHA SCANDINAVIA A B J A WETTERGRENS GATA 1 BOX 30053 400 43 VÄSTRA FRÖLUNDA SWEDEN YAMAHA MUSIC AUSTRALIA PTY LTD 17 33 MARKET ST SOUTH MELBOURNE 3205 VIC AUSTRALIA Pr...

Отзывы: