background image

55

 En

FM/AM tuning

BA

S

IC


OPERA

T

ION

English

Automatic station preset

You can use the automatic preset tuning feature to store up 
to 40 FM stations with strong signals (A1 to E8: 8 preset 
station numbers in each of the 5 preset station groups) in 
order.

1

Rotate the 

R

INPUT

 selector (or press 

4

TUNER

) to select “TUNER” as the input 

source.

2

Press 

C

BAND

 (or 

7

BAND

) to select “FM” 

as the reception band.

“FM” appears in the front panel display.

3

Press and hold 

F

MEMORY

 (or 

9

MEMORY

) for more than 3 seconds.

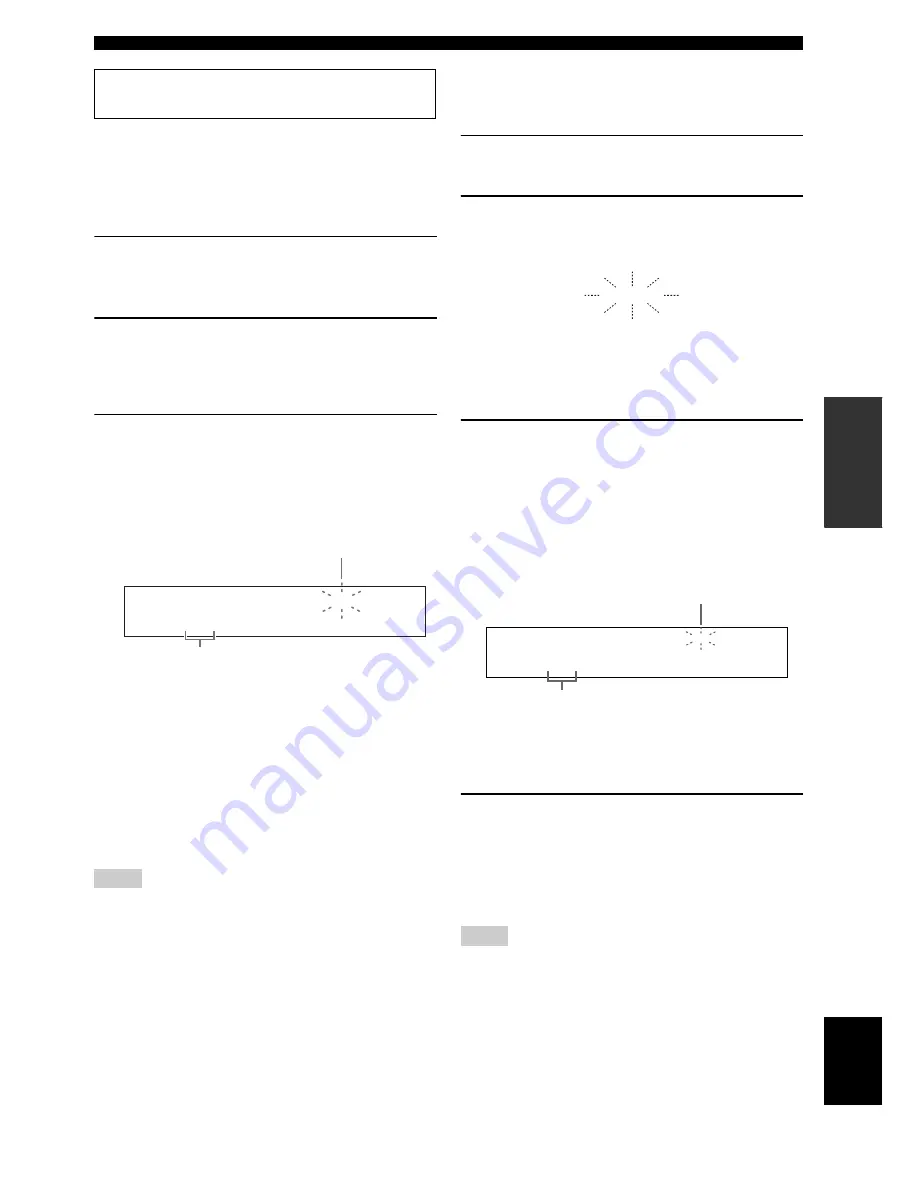
The preset station number as well as the MEMORY 
and AUTO indicators flashes. After approximately 5 
seconds, automatic presetting starts from the current 
frequency and proceeds toward higher frequencies.

When automatic preset tuning is completed, the 
MEMORY indicator disappears.

y

• You can specify the preset number from which this unit stores 

FM stations. Press 

D

A/B/C/D/E

 (or 

8

A-E/CAT. 

l

 / 

h

) and 

then 

E

PRESET/TUNING/CH 

l

 / 

h


(or 

8

PRESET/CH 

k

 / 

n

) repeatedly after you perform step 3 

to select the preset station number under which the first station 
will be stored.

• To cancel the automatic station preset, press 

F

MEMORY

 (or 

9

MEMORY

) again.

• Any stored station data existing under a preset station number is 

cleared when you store a new station under the same preset 
station number.

• If the number of received stations does not reach 40 (E8), 

automatic preset tuning automatically stops after searching for 
all the available stations and copy the stored stations to the rest 
preset station numbers.

• Only FM stations with sufficient signal strength are stored 

automatically by automatic preset tuning. If the station you 
want to store is weak in signal strength or an AM radio station, 
tune into it manually and store it as described in “Manual 
station preset” below.

Manual station preset

Use this feature to store the AM or FM stations with weak 
signals manually.

1

Tune into a station.

See page 53 for tuning instructions.

2

Press 

F

MEMORY

 (or 

9

MEMORY

).

The MEMORY indicator flashes in the front panel 
display for approximately 30 seconds.

y

To cancel the preset memory mode, press 

F

MEMORY

 (or 

9

MEMORY

) again.

3

Press 

E

PRESET/TUNING/CH 

l

 / 

h

 (or 

8

PRESET/CH 

k

 / 

n

) repeatedly to select a 

preset station group and number (A1 to E8) 
while the MEMORY indicator is flashing.

• Press 

E

h

 (or 

8

k

) to select a higher preset 

station group and number.

• Press 

E

l

 (or 

8

n

) to select a lower preset station 

group and number.

y

You can select the preset station group (A to E) by pressing 

D

A/B/C/D/E

 (or 

8

A-E/CAT. 

l

 / 

h

) repeatedly.

4

Press 

F

MEMORY

 (or 

9

MEMORY

) while 

the MEMORY indicator is flashing.

The station band and frequency appear in the front 
panel display with the preset station group and 
number you have selected. The MEMORY indicator 
disappears from the front panel display.

• Any stored station data existing under a preset station number is 

cleared when you store a new station under the same preset 
station number.

• The reception mode (stereo or monaural) is stored along with 

the station frequency.

Before performing the following operations, press 

4

TUNER


on the remote control.

Notes

AUTO

MEMORY

A1:FM 88.9MHz

Flashes

Flash

Notes

MEMORY

Flashes

MEMORY

A1:FM 88.9MHz

The displayed station has been stored as A1.

Flashes

Содержание 6160 - HTR AV Receiver

Страница 1: ...HTR 6160 HTR 6160 AV Receiver OWNER S MANUAL U ...

Страница 2: ...f you are not sure of the type of power supply to your home consult your product dealer or local power company For products intended to operate from battery power or other sources refer to the operating instructions 12 Grounding or Polarization This product may be equipped with a polarized alternating current line plug a plug having one blade wider than the other This plug will fit into the power ...

Страница 3: ...ntion to Article 820 40 of the NEC that provides guidelines for proper grounding and in particular specifies that the cable ground shall be connected to the grounding system of the building as close to the point of cable entry as practical FCC INFORMATION for US customers 1 IMPORTANT NOTICE DO NOT MODIFY THIS UNIT This product when installed as indicated in the instructions contained in this manua...

Страница 4: ... unit with a higher voltage than specified is dangerous and may cause fire damage to this unit and or personal injury Yamaha will not be held responsible for any damage resulting from use of this unit with a voltage other than specified 13 To prevent damage by lightning keep the power cord and outdoor antennas disconnected from a wall outlet or the unit during a lightning storm 14 Do not attempt t...

Страница 5: ...e XM Satellite Radio preset channels 60 Displaying the XM Satellite Radio information 61 SIRIUS Satellite Radio tuning 62 Connecting the SiriusConnect tuner 62 Activating SIRIUS Satellite Radio subscription 63 Basic SIRIUS Satellite Radio operations 63 Setting the SIRIUS Satellite Radio preset channels 65 Setting the Parental Lock 65 Displaying the SIRIUS Satellite Radio information 67 Using iPod ...

Страница 6: ...smission capability x v Color video signal transmission capability High refresh rate and high resolution video signals capability High definition digital audio format signals capability HDCP High bandwidth Digital Content Protection System licensed by Digital Content Protection LLC Analog video to HDMI digital video up conversion composite video S video component video HDMI digital video capabilit...

Страница 7: ...amaha in accordance with a license agreement HDMI the HDMI logo and High Definition Multimedia Interface are trademarks or registered trademarks of HDMI Licensing LLC x v Color x v Color is a trademark of Sony Corporation SILENT CINEMA is a trademark of Yamaha Corporation The XM name and related logos are registered trademarks of XM Satellite Radio Inc Neural Surround name and related logos are tr...

Страница 8: ...ogether Read the packaging carefully as these different types of batteries may have the same shape and color If the batteries have leaked dispose of them immediately Avoid touching the leaked material or letting it come into contact with clothing etc Clean the battery compartment thoroughly before installing new batteries Do not throw away batteries with general house waste dispose of them correct...

Страница 9: ...r cable x 1 Select a monaural RCA cable DVD player x 1 Select DVD player equipped with coaxial digital audio output jack and composite video output jack Video monitor x 1 Select a TV monitor video monitor or projector equipped with a composite video input jack Video cable x 2 Select an RCA composite video cable Digital coaxial audio cable x 1 y You can also connect two subwoofers to this unit In t...

Страница 10: ...IRIUS TRIGGER OUT SPEAKERS DVD SUBWOOFER FRONT SB 8CH ZONE 2 OUT SUB WOOFER SUR BACK SURROUND SINGLE CENTER CENTER FRONT 8CH SURROUND DVD DTV CBL S VIDEO VIDEO DTV CBL DVR DVR MONITOR OUT VCR OUT IN IN OUT 1 2 DVD DVD CD DTV CBL OPTICAL COAXIAL DVD OUT SURROUND BACK BI AMP SURROUND SINGLE CENTER FRONT A AM 12V 15mA MAX GND FRONT B ZONE B ZONE 2 PRESENCE DTV CBL DVD CD MD CD R IN PLAY OUT REC DTV C...

Страница 11: ...A B C 75Ω Make sure that this unit and the DVD player are unplugged from the AC wall outlets DVD DIGITAL INPUT COAXIAL jack DVD VIDEO jack VIDEO MONITOR OUT jack DVD AUDIO AUDIO M DIGITAL INPUT SPEAKERS SB 8CH FRONT 8CH DVD DVD CD OPTICAL COAXIAL SU CENTER FRONT A FRONT B ZONE B ZONE 2 PRESENCE DVD D D R OUT REC DTV CBL DVR VCR OUT IN IN OUT R R L R L 6 5 4 3 IN1 EXTRA SP Digital coaxial audio out...

Страница 12: ...nce See page 22 for details 2 You need to connect the supplied FM and AM antennas to this unit in advance See page 27 for details 3 You must tune into the desired radio station in advance See pages 53 to 56 for tuning information 4 To achieve the best possible reception orient the connected AM loop antenna or adjust the position of the end of the indoor FM antenna y You can change the assigned SCE...

Страница 13: ...es P 40 Using various input sources Basic controls of this unit P 42 Enjoying FM AM radio programs P 53 Enjoying XM Satellite Radio programs P 57 Enjoying SIRIUS Satellite Radio programs P 62 Using your iPod with this unit P 68 Using the Bluetooth components P 70 Using various sound features Using various sound field programs P 48 Using the pure direct mode for high fidelity sound P 52 Customizing...

Страница 14: ...IAL DVD OUT SURROUND BACK BI AMP SURROUND SINGLE CENTER FRONT A AM 12V 15mA MAX GND FRONT B ZONE B ZONE 2 PRESENCE DTV CBL DVD CD MD CD R IN PLAY OUT REC DTV CBL DVR VCR OUT IN IN OUT IN OUT MONITOR OUT FM UNBAL R L R L R L R L 4 3 2 1 IN2 IN1 EXTRA SP Y PR PB Y PR PB A B C 75Ω 1 2 3 4 5 6 7 8 9 0 A B Name Page 1 XM jack U S A and Canada models only 57 SIRIUS jack U S A and Canada models only 62 2...

Страница 15: ...s Surround back left and right speakers The surround back speakers supplement the surround speakers and provide more realistic front to back transitions Subwoofer s The use of a subwoofer with a built in amplifier such as the Yamaha Active Servo Processing Subwoofer System is effective not only for reinforcing bass frequencies from any or all channels but also for reproducing the high fidelity sou...

Страница 16: ...nctions and settings of each speaker are the same as those for the 7 1 channel speaker layout see page 11 Surround left and right speakers Connect the surround speakers to the SURROUND speaker terminals even if you place the surround speakers behind the listening position For the smooth and unbroken sound field behind the listening position place the surround left and right speakers farther back c...

Страница 17: ...adjust the vertical position of dialogues with using the presence speakers see page 73 To use the presence speakers connect the speakers to the EXTRA SP terminal see page 14 and set EXTRA SP ASSIGN to PRESENCE see pages 33 and 85 FR PR PL C FL 0 5 to 1 m 1 to 3 ft 1 8 m 6 ft or higher Speaker indications FL Front left FR Front right C Center PL Front presence left PR Front presence right 0 5 to 1 ...

Страница 18: ...e page 28 4 ohm speakers can be also used as the front speakers For details about the speaker impedance setting see page 106 Note AC OUTLETS SWITCHED 120V 80Hz 100W MAX TOTAL 0 8A MAX TOTAL R L AUDIO MULTI CH INPUT PRE OUT DOCK VIDEO COMPONENT VIDEO HDMI DIGITAL INPUT XM ANTENNA REMOTE SIRIUS TRIGGER OUT SPEAKERS DVD SUBWOOFER FRONT SB 8CH ZONE 2 OUT SUB WOOFER SUR BACK SURROUND SINGLE CENTER CENT...

Страница 19: ...R L R L 4 3 2 1 IN2 IN1 EXTRA SP Surround speakers EXTRA SP terminals see page 14 Left SINGLE Center speaker Left Right Front speakers FRONT A Left Right Subwoofers optional AUDIO MULTI CH INPUT PRE OUT DOCK HDMI DIGITAL INPUT TRIGGER OUT SPEAKERS SUBWOOFER FRONT SB 8CH ZONE 2 OUT SUB WOOFER SUR BACK SURROUND SINGLE CENTER CENTER FRONT 8CH SURROUND 1 2 DVD DVD CD DTV CBL OPTICAL COAXIAL DVD OUT SU...

Страница 20: ...i amplification connections to one speaker system Check if your speakers support bi amplification To make the bi amplification connections use the FRONT and SURROUND BACK BI AMP terminals as shown below To activate the bi amplification connections set BI AMP to ON in ADVANCED SETUP see page 109 When you make the conventional connection make sure that the shorting bars are put into the terminals ap...

Страница 21: ...als with up to 96 kHz of sampling frequency Video jacks This unit has three types of video jacks Connection depends on the availability of input jacks on your video monitor VIDEO jacks For conventional composite video signals transmitted via composite video cables S VIDEO jacks For S video signals separated into the luminance Y and chrominance C video signals transmitted on separate wires of S vid...

Страница 22: ...0 Hz 480p 60 Hz 576p 50 Hz 720p 60 Hz 50 Hz 1080i 60 Hz 50 Hz 1080p 60 Hz 50 Hz 24 Hz Default input assignment of HDMI input jacks HDMI jack and cable plug y We recommend that you use an HDMI cable shorter than 5 meters 16 feet with the HDMI logo printed on it Use a conversion cable HDMI jack DVI D jack to connect this unit to other DVI components Do not disconnect or connect the cable or turn off...

Страница 23: ...e input signals is as follows 1 HDMI 2 COMPONENT VIDEO 3 S VIDEO 4 VIDEO Digital video signals input at one of the HDMI IN jacks cannot be output from analog video output jacks The analog component video signals with 480i NTSC 576i PAL of resolution are converted to the S video or composite video signals and output at the S VIDEO MONITOR OUT and VIDEO MONITOR OUT jacks The analog component video s...

Страница 24: ...e connected video monitor is compatible with the automatic audio and video synchronization feature automatic lip sync feature this unit adjusts the audio and video timing automatically see page 92 Connect the video monitor to the HDMI OUT jack of this unit to use the feature Connecting a TV monitor or projector Make sure that this unit and other components are unplugged from the AC wall outlets No...

Страница 25: ...L INPUT COAXIAL jack Connecting a DVD player Connecting other components Notes Make sure that this unit and other components are unplugged from the AC wall outlets AC OUTLETS SWITCHED 120V 80Hz 100W MAX TOTAL 0 8A MAX TOTAL R L AUDIO MULTI CH INPUT PRE OUT DOCK VIDEO COMPONENT VIDEO HDMI DIGITAL INPUT XM ANTENNA REMOTE SIRIUS TRIGGER OUT SPEAKERS DVD SUBWOOFER FRONT SB 8CH ZONE 2 OUT SUB WOOFER SU...

Страница 26: ... in Audio out VCR S video out S video in Video in Video out Audio out Video in Component video out DVD recorder or PVR S video out Audio in R L AUDIO MULTI CH INPUT PRE OUT DOCK VIDEO COMPONENT VIDEO HDMI DIGITAL INPUT XM ANTENNA SIRIUS SPEAKERS DVD SUBWOOFER FRONT SB 8CH ZONE 2 OUT SUB WOOFER SUR BACK SURROUND SINGLE CENTER CENTER FRONT 8CH SURROUND DVD DTV CBL S VIDEO VIDEO DTV CBL DVR DVR MONIT...

Страница 27: ...Notes R L AUDIO MULTI CH INPUT PRE OU HDMI DIGITAL INPUT XM ANTENNA REMOTE SIRIUS TRIGGER OUT SPEAKERS FRONT SB 8CH ZONE 2 OUT SUB WOOFER S SURROUND CENTER FRONT 8CH SURROUND DVD DVD CD DTV CBL OPTICAL COAXIAL DVD OUT SURROUND BACK BI AMP SURROUND CENTER FRONT A AM 12V 15mA MAX GND FRONT B ZONE B ZONE 2 PRESENCE DTV CBL DVD CD MD CD R IN PLAY OUT REC DTV CBL DVR VCR OUT IN IN OUT IN OUT FM UNBAL R...

Страница 28: ...T jacks depending on the settings for SPEAKER SET see page 85 1 FRONT PRE OUT jacks Front channel output jacks 2 SURROUND PRE OUT jacks Surround channel output jacks 3 SUR BACK PRE OUT jacks Surround back channel output jacks When you only connect one external amplifier for the surround back channel connect it to the SINGLE jack When BI AMP is set to ON this unit outputs the front channel audio si...

Страница 29: ... you connect at least a 5 1 channel speaker system before using this feature 1 The analog audio input jacks assigned as FRONT in MULTI CH see page 95 Connecting a Yamaha iPod universal dock or Bluetooth adapter This unit is equipped with the DOCK terminal on the rear panel that allows you to connect a Yamaha iPod universal dock such as YDS 10 sold separately or Bluetooth adapter such as YBA 10 sol...

Страница 30: ...nput at the DOCK terminal on the rear panel take priority over the ones input at the VIDEO AUX jacks To reproduce the source signals input at these jacks select V AUX as the input source REMOTE TRIGGER OUT 12V 15mA MAX IN OUT FM UNBAL 75Ω Yamaha component CD or DVD player etc Remote control in Remote control out Infrared signal receiver or Yamaha component Using the VIDEO AUX jacks on the front pa...

Страница 31: ...e connected even if an outdoor AM antenna is connected to this unit Connecting the wire of the AM loop antenna y The wire of the AM loop antenna does not have any polarity and you can connect either end of the wire to AM or GND terminal Assembling the supplied AM loop antenna Connecting the FM and AM antennas Notes XM ANTENNA REMOTE SIRIUS TRIGGER OUT OPT DV AM GND F Z FM UNBAL 1 75Ω Indoor FM ant...

Страница 32: ...E ON OFF to turn on this unit This unit turns on and the advanced setup menu appears in the front panel display 3 Rotate the NPROGRAM selector to select SP IMP SP IMP and the current speaker impedance setting 8Ω MIN appear in the front panel display 4 Press MTONE CONTROL repeatedly to select 6Ω MIN 5 Press LSYSTEM OFF to save the new setting and turn off this unit The setting you made is reflected...

Страница 33: ...und You can also turn on the main zone by pressing SSCENE or 6SCENE buttons Set the main zone to the standby mode Press KMAIN ZONE ON OFF or ISTANDBY to set the main zone to the standby mode In the standby mode this unit consumes a small amount of power in order to receive infrared signals from the remote control y Press LSYSTEM OFF to set the main zone and Zone 2 see page 104 to the standby mode ...

Страница 34: ... when you run AUTO SETUP and when the speaker settings set in AUTO SETUP are used without any modifications see page 32 7 Tuner indicators Lights up when this unit is in the FM AM XM Satellite Radio or SIRIUS Satellite Radio tuning mode see pages 53 to 67 8 96 24 indicator Lights up when a DTS 96 24 signal is input to this unit 9 MUTE indicator and VOLUME level indicator The MUTE indicator flashes...

Страница 35: ...n this unit is in the automatic setup procedure see page 32 or in the BASIC MENU in MANUAL SETUP see page 87 Presence speaker indicators Light up or flash according to the setting of EXTRA SP ASSIGN when this unit is in the automatic setup procedure see page 32 or in the BASIC MENU in MANUAL SETUP see page 85 y You can make settings for the presence and surround back speakers automatically by runn...

Страница 36: ...ed from this unit This unit and the video monitor are turned on This unit is selected as the video input source of the video monitor The connected subwoofer is turned on and the volume level is set to about half way or slightly less The crossover frequency controls of the connected subwoofer is set to the maximum The room is sufficiently quiet y If you connect two subwoofers to this unit the volum...

Страница 37: ...ettings Select UNDO to undo the last AUTO SETUP settings and restore the previous settings Select DEFAULT to reset the AUTO SETUP parameters to the initial factory settings RELOAD or UNDO is available only when you have previously run AUTO SETUP and confirmed the results RELOAD or UNDO is not available when you change the setting of BI AMP in the advanced setup see page 109 or EXTRA SP ASSIGN in B...

Страница 38: ...of speakers connected to this unit in the following order Front Back Subwoofer Speaker distance DIST Displays the speaker distance from the listening position in the following order Closest speaker distance Farthest speaker distance Speaker level LVL Displays the speaker output level in the following order Lowest speaker output level Highest speaker output level The signal output at the SUBWOOFER ...

Страница 39: ... Select SET to confirm the AUTO SETUP results Select CANCEL to cancel the AUTO SETUP results 14 Press 8ENTER to confirm your selection The following screen appears Disconnect the optimizer microphone from this unit The optimizer microphone is sensitive to heat Keep it away from direct sunlight and do not place it on top of this unit AUTO SETUP RESULT SP 3 4 0 1 DIST 14 0 17 0ft LVL 9 0 6 5dB SET C...

Страница 40: ...Check the warning messages to correct your speaker settings Warnings differ from errors in that warnings do not cancel the AUTO SETUP procedure 1 Make sure the pointer is pointing at WARNING and then press 8ENTER to display the detailed information about the warning The number on the right of WARNING indicates the number of warning messages 2 Press 8l h repeatedly to toggle between the warning dis...

Страница 41: ...on on the front panel starts to flash and the name of the currently assigned SCENE template appears in the front panel display 2 Rotate the RINPUT selector or press 5AMP and then press 8l h to select the desired template 3 Press the SSCENE or 6SCENE button again to confirm the selection The selected SCENE template is assigned to the SCENE button Once the desired SCENE templates are assigned to the...

Страница 42: ... Listening CD Hi fi Listening CD Listening CD Music Listening XM Listening Dock Listening DVD Live Viewing DVD Movie Viewing DVD Viewing Disc Hi fi Listening Music Disc Listening Disc Listening DVR Viewing TV Viewing Action Game Playing RPG Playing DVD V AUX DTV CBL TUNER FM AM DOCK CD DVD DVR Video sources DVD video Recorded video TV programs Video games iPod or Bluetooth component Radio programs...

Страница 43: ...sic sources on your DVD player as the background music CD Hi fi Listening CD Pure Direct Select this SCENE template when you enjoy the high fidelity sound of the music discs on your CD player CD Listening CD STEREO 7ch Stereo Select this SCENE template when you play back music discs on your CD player CD Music Listening CD STEREO 2ch Stereo Select this SCENE template when you play back music source...

Страница 44: ...sired SCENE templates are assigned to the corresponding 6SCENE buttons you need to set the input source of the SCENE template on the remote control See page 41 for details You can create a customized SCENE template for each SCENE button and if you create another customized SCENE template this unit overwrites the old customized SCENE template with the new one The newly created template is only avai...

Страница 45: ...of the customized SCENE template on the remote control If you customize the input source of the selected SCENE template you must set the input source of the SCENE template on the remote control to operate the input source component correctly Press and hold the 6SCENE button and the desired input selector button 4 for 3 seconds y Press the 6SCENE button again to operate the input source component U...

Страница 46: ... 89 5 Rotate the NPROGRAM selector or press BPROG l h repeatedly to select the desired sound field program The name of the selected sound field program appears in the front panel display See page 48 for details about sound field programs Sound field programs cannot be selected when the component connected to the MULTI CH INPUT jacks is selected as the input source see page 43 y Choose a sound fiel...

Страница 47: ...s The active front speaker set changes as follows FRONT A and B or FRONT B setting is not available when EXTRA SP ASSIGN is set to PRESENCE ZONE 2 or NONE see page 85 Turn off the volume level of this unit when you switch the front speaker setting Using the Zone B feature When you set EXTRA SP ASSIGN to ZONE B see page 85 you can use the speakers connected to the EXTRA SP speaker terminals in anot...

Страница 48: ... y You can select the amount of time that the current status is displayed in the OSD by using the OSD AMP parameter in OPTION MENU see page 96 To turn off the status screen press ODISPLAY again The OSD signal is not output at the DVR and VCR VIDEO OUT jacks and will not be recorded Before performing the following operations press 5AMP on the remote control Selecting audio input jacks AUDIO SELECT ...

Страница 49: ...rce For example you can enjoy listening to classical music while viewing beautiful scenery from the video source on the video monitor Press the input selector buttons 4 on the remote control to select a video source and then an audio source y You can also select MULTI CH as the audio source see page 43 Press 5AMP and then press EMULTI CH IN Set the BGV parameter in the MULTI CH menu to the desired...

Страница 50: ...gnal front surround LFE For example a multi channel soundtrack with 3 front channels 2 surround channels and LFE is displayed as 3 2 0 1 BITRATE The number of bits passing a given point per second FLAG Flag data encoded in DTS Dolby Digital or PCM signals that cue this unit to automatically switch decoders Surround EX etc SET MENU AUTO SETUP MANUAL SETUP A SIGNAL INFO Up Down ENTER Enter p p Notes...

Страница 51: ...ont panel display changes as shown below The SLEEP indicator flashes while you are switching the amount of time for the sleep timer Once the sleep timer is set the SLEEP indicator lights up in the front panel display and the display returns to the selected sound field program Canceling the sleep timer Press TSLEEP on the remote control repeatedly until SLEEP OFF appears in the front panel display ...

Страница 52: ... Select a sound field program based on your listening preference not merely on the name of the program etc For audio music sources y For audio music sources we also recommend that you use the Pure Direct mode see page 52 The available sound field parameters differ depending on the settings of the speakers DIALG LIFT is available only when EXTRA SP ASSIGN in SPEAKER SET is set to PRESENCE see page ...

Страница 53: ...his sound field has been suitable for action games such as car racing and FPS games It uses the reflection data that limits the effects range per channel in order to offer a powerful playing environment with a being there feeling by enhancing various effects tones while maintaining a clear sense of directions Roleplaying Game This sound field has been suitable for role playing and adventure games ...

Страница 54: ... hours of viewing Mono Movie This program is provided for reproducing monaural video sources such as a classic movie in an atmosphere of a good old movie theater The program produces the optimum expansion and reverberation to the original audio to create a comfortable space with a certain sound depth Note Program Descriptions 2ch Stereo Use this program to mix down multi channel sources to 2 chann...

Страница 55: ...ough ordinary headphones SILENT CINEMA activates automatically whenever you connect headphones to the PHONES jack while listening to sound field programs see page 48 When activated the SILENT CINEMA indicator lights up in the front panel display SILENT CINEMA does not activate when the component connected to the MULTI CH INPUT jacks is selected as the input source see page 43 SILENT CINEMA is not ...

Страница 56: ...eld program displaying the OSD adjusting the SET MENU parameters except for level settings operating video functions video conversion etc The Pure Direct mode is automatically canceled whenever this unit is turned off y The front panel display turns on momentarily when an operation is performed Use this feature to adjust the balance of bass and treble for the front left and right speaker channels ...

Страница 57: ...e automatic tuning mode AUTO TUNING appears in the front panel display for a moment The AUTO indicator appears in the front panel display Manual tuning mode MANUAL TUNING Use this feature if the signal from the station you want to select is weak and you cannot tune by using the automatic tuning When this unit is in the manual tuning mode MANUAL TUNING appears in the front panel display for a momen...

Страница 58: ...e range of the FM AM tuning WRONG STATION appears in the front panel display and then this unit automatically tunes into the last selected station Use this feature to store up to 40 stations FM AM stations A1 to E8 8 preset station numbers in each of the 5 preset station groups Preset the desired stations to this unit by using the automatic or manual preset tuning features in advance see Automatic...

Страница 59: ...FM stations with sufficient signal strength are stored automatically by automatic preset tuning If the station you want to store is weak in signal strength or an AM radio station tune into it manually and store it as described in Manual station preset below Manual station preset Use this feature to store the AM or FM stations with weak signals manually 1 Tune into a station See page 53 for tuning ...

Страница 60: ... more than 3 seconds E1 and the MEMORY indicator flash in the front panel display 3 Select preset station A5 using DA B C D E and EPRESET TUNING CH l h A5 and the MEMORY indicator flash in the front panel display See Using station preset feature on page 54 4 Press BEDIT again EXCHANGE E1 A5 appears in the front panel display and the assignments of the two preset stations are exchanged Before perfo...

Страница 61: ...TENNA or CHECK XM TUNER appears in the front panel display the connection and setting of the antenna Home Dock or XM Mini Tuner may not correct see page 114 XM Satellite Radio tuning XM Satellite Radio online information For U S customers http www xmradio com For Canadian customers http www xmradio ca Note XM READY legal disclaimer XM monthly service subscription sold separately XM Mini Tuner and ...

Страница 62: ... display and the XM Satellite Radio information such as channel number channel name category artist name or song title for the currently selected channel appears in the front panel display y When you select XM as the input source this unit automatically recalls the previously selected channel The XM Satellite Radio signals cannot be output at the AUDIO OUT REC jacks If a status message or an error...

Страница 63: ...e Radio preset channels on page 60 y The initial factory setting of all preset channels A1 to E8 is 001 Preview 1 Press BSEARCH MODE or MSRCH MODE repeatedly to select PRESET SEARCH 2 Press DCATEGORY or 8A E CAT l h repeatedly to change the preset channel group A to E 3 Press EPRESET TUNING CH l h or 8PRESET CH k n repeatedly to change the preset channel number 1 to 8 y You can also select the pre...

Страница 64: ...EPRESET TUNING CH l h or 8PRESET CH k n repeatedly to select a preset channel group and number A1 to E8 while the MEMORY indicator is flashing The preset channel number appears in the front panel display y You can select the preset station group A to E by pressing DA B C D E or 8A E CAT l h repeatedly 4 Press FMEMORY or 9MEMORY to set the selected XM Satellite Radio channel as a preset channel whi...

Страница 65: ...the signals NO SIGNAL appears in the front panel display Displaying the XM Satellite Radio information in the OSD Press ODISPLAY The following screen is displayed in the OSD 1 Search mode see page 58 2 Channel category 3 Song title 4 Antenna reception level 5 Channel number name 6 Artist name y To turn off the OSD press ODISPLAY again XM status messages also appear in the OSD You can select the am...

Страница 66: ... of the antenna for the best reception differs depending on the area Refer to the instruction manuals supplied with the SiriusConnect tuner for the installation of the antenna You can mount it indoors or outdoors Use the ANTENNA INFO information in the front panel or SIRIUS Information screen in the video monitor see page 67 to check the antenna reception level and adjust the orientation of the an...

Страница 67: ...play y When you select SIRIUS as the input source this unit automatically recalls the previously selected channel The SIRIUS Satellite Radio signals cannot be output at the AUDIO OUT REC jacks When you have not activated your subscription yet you can only select 184 or 000 If a status message or an error message appears in the front panel display or in the OSD see the SIRIUS Satellite Radio sectio...

Страница 68: ...adio preset channels on page 65 1 Press BSEARCH MODE or MSRCH MODE repeatedly to select PRESET SEARCH 2 Press DCATEGORY or 8A E CAT l h repeatedly to change the preset channel group A to E 3 Press EPRESET TUNING CH l h or 8PRESET CH k n repeatedly to change the preset channel number 1 to 8 y You can also select the preset channel number directly by pressing the numeric buttons 1 to 8 G Direct numb...

Страница 69: ...selected SIRIUS Satellite Radio channel as a preset channel while the MEMORY indicator is flashing A colon appears next to the preset channel number for confirmation and the MEMORY indicator turns off in the front panel display Once you set a new preset channel the one previously stored in the same preset channel group and number is cleared You can use the Parental Lock feature to limit the access...

Страница 70: ...ER to lock the selected channel Check mark appears before the locked channel y When you select the locked channel and press 8ENTER this unit unlocks the selected channel 11 Repeat steps 9 and 10 to lock the channels you want 12 Press 9RETURN to exit from the PARENTAL LOCK screen 13 Press MMENU to exit from the setup menu This unit is tuned into the last channel you select in the PARENTAL LOCK scre...

Страница 71: ...signals ACQUIRING appears in the front panel display When an information is unavailable appears Displaying the SIRIUS Satellite Radio information in the OSD Press ODISPLAY on the remote control The following screen is displayed in the OSD 1 Search mode see page 63 2 Channel category 3 Song title 4 Composer name 5 Antenna reception level 6 Channel number name 7 Artist name y To turn off the OSD pre...

Страница 72: ...he DOCK terminal of this unit as long as this unit is turned on You can also select whether this unit charges the battery of the stationed iPod or not when this unit is in the standby mode by selecting the STANDBY CHARGE parameter in INPUT MENU see page 94 The DOCK indicator turns on while this unit charges the battery of the connected iPod when this unit is in the standby mode You can control you...

Страница 73: ...NTER to begin playback of the selected song Choices Playlists playlists Artists artists Albums albums Songs songs Genres genres Composers composers Settings settings Playlists Songs Artists Albums Songs Albums Songs Songs Genres Artists Albums Songs Composers Albums Songs Settings Shuffle Repeat Shuffle Shuffle Use this feature to set this unit to play songs or albums in random order Choices Off S...

Страница 74: ...icator flashes in the front panel display y To cancel the pairing press CBAND or 7BAND again If the Bluetooth adapter is not connected to the DOCK terminal of this unit No BT adapter appears in the front panel display 4 Check that the Bluetooth component detects the Bluetooth adapter If the Bluetooth component detects the Bluetooth adapter YBA 10 YAMAHA example appears in the Bluetooth device list...

Страница 75: ...omposite video signal on your VCR The analog audio signals input at the DOCK terminal can be output at the analog AUDIO OUT REC jacks for recording Check the copyright laws in your country to record from CDs radio etc Recording of copyrighted material may infringe copyright laws y Do a test recording before you start an actual recording 1 Turn on all the connected components 2 Rotate the RINPUT se...

Страница 76: ...of each sound field parameter see page 74 When you set a sound field parameter to a value other than the initial factory settings an asterisk mark appears by the sound field parameter name in the OSD Repeat steps 3 and 4 as necessary to change other sound field program parameter settings The available sound field parameters for some of the sound field programs may be displayed on more than one pag...

Страница 77: ...ected sound field program is too weak You cannot recognize any difference between the sound field programs Decrease the value of DSP LEVEL The sound is vague You feel that the additional sound effect is excessive Control range 6 dB to 3 dB Adjusting the vertical dialogue position DIALG LIFT Use this feature to adjust the vertical position of the dialogues in movies The ideal position of the dialog...

Страница 78: ...from the source sound by adjusting the delay between the direct sound and the first reflection heard by the listener The smaller the value the closer the sound source seems to the reflection face y When you adjust the initial delay parameters we also recommend that you adjust the corresponding room size parameters likewise This adjustment is especially effective for the CINEMA DSP programs Control...

Страница 79: ...justment is especially effective for the CINEMA DSP programs Control range 0 1 to 2 0 LIVENESS S LIVENESS SB LIVENESS Liveness Surround and surround back sound field liveness Adjusts the reflectivity of the virtual walls in the hall by changing the rate at which the early reflections decay The early reflections of a sound source decay much faster in a room with acoustically absorbent wall surfaces...

Страница 80: ... direct sound and the beginning of the reverberation sound The larger the value the later the reverberation sound begins A later reverberation sound makes you feel as if you are in a larger acoustic environment Control range 0 to 250 ms REV LEVEL Reverberation level Adjusts the volume of the reverberation sound The larger the value the stronger the reverberation becomes Control range 0 to 100 Soun...

Страница 81: ...eft and right channels are redirected to the subwoofer in the following cases LFE BASS OUT is set to BOTH see page 85 FRONT SP is set to SMALL see page 86 and LFE BASS OUT is set to SWFR see page 85 CT LEVEL SL LEVEL SR LEVEL SB LEVEL PL LEVEL PR LEVEL 7ch Stereo only 7 channel stereo center surround left surround right surround back presence left and presence right levels Adjusts the volume level...

Страница 82: ... any sources PLIIx Movie PLII Movie Dolby Pro Logic IIx or Dolby Pro Logic II processing for movie sources The Pro Logic IIx decoder is not available when SUR B L R SP is set to NONE see page 86 PLIIx Music PLII Music Dolby Pro Logic IIx or Dolby Pro Logic II processing for music sources The Pro Logic IIx decoder is not available when SUR B L R SP is set to NONE see page 86 PLIIx Game PLII Game Do...

Страница 83: ...usic only Pro Logic IIx Music and Pro Logic II Music center width Moves the center channel output completely towards the center speaker or towards the front left and right speakers A larger value moves the center channel output towards the front left and right speakers Control range 0 center channel sound is output only from the center speaker to 7 center channel sound is output only from the fron...

Страница 84: ...gnals 85 FRONT SP Selects the size of the front speakers 86 CENTER SP Selects the size of the center speaker 86 SUR L R SP Selects the size and number of the surround speakers 86 SUR B L R SP Selects the size and number of the surround back speakers 86 CROSS OVER Selects the crossover frequency of all the speakers set to SML or SMALL in SPEAKER SET see page 86 87 SUBWOOFER PHASE Switches the phase...

Страница 85: ...EST Selects whether this unit outputs the test tone while making adjustments of GEQ or not 90 B LFE LEVEL SPEAKER Adjusts the speaker LFE level 91 HEADPHONE Adjusts the headphone LFE level 91 C DYNAMIC RANGE SPEAKER Adjusts the amount of the dynamic range compression of the speakers 91 HEADPHONE Adjusts the amount of the dynamic range compression of the headphones 91 D LIPSYNC HDMI AUTO Selects wh...

Страница 86: ...ter such as YBA 10 sold separately with a Bluetooth component see page 70 95 BGV Selects the video source played back in the background of the sources input at the MULTI CH INPUT jacks 95 INPUT CH Selects the number of channels input from an external decoder 95 FRONT Selects the analog jacks at which the front channel signals from an external decoder are input when you set INPUT CH to 8CH 95 Menu ...

Страница 87: ...ult decoder mode for the input sources connected to the DIGITAL INPUT jacks when you turn on the power of this unit 98 EXTD SUR Designates the extended decoder mode for the input sources connected to the DIGITAL INPUT jacks when you turn on the power of this unit 98 E HDMI SET S AUDIO Selects whether to play back HDMI audio signals on this unit or on another HDMI component connected to the HDMI OU...

Страница 88: ...select and enter the desired menu The following displays are examples where SOUND MENU is selected 5 Press 8k n repeatedly and then press 8ENTER to select and enter the desired submenu The following display is an example where LFE LEVEL is selected 6 Press 8k n to select the desired parameter and then 8l h to change the parameter settings Press 8h to increase the value Press 8l to decrease the val...

Страница 89: ...eakers set to SMALL 2 Always output the low frequency signals of the front channels 3 Output the low frequency signals if the speakers are set to LARGE 4 Outputs the low frequency signals of the speakers set to SMALL or NONE 1 BASIC MENU Choice Descriptions ZONE2 Select this setting when you use the Zone 2 speakers see page 104 FRONT B Select this setting when you use another front speaker system ...

Страница 90: ...e Descriptions LARGE Select this setting when the center speaker is large SMALL Select this setting when the center speaker is small NONE Select this setting when you do not use the center speaker The center channel signals are directed to the front left and right speakers A SPEAKER SET FRONT SP SMALL LARGE A SPEAKER SET CENTER SP NONE SMALL LARGE Choice Descriptions LARGE Select this setting when...

Страница 91: ... 10 0 dB to 10 0 dB Control step 0 5 dB Initial setting FR L FR R SWFR PR L PR R 0 dB CNTR SUR L SUR R SBL SBR 1 0 dB y If your subwoofer can adjust the output volume and the crossover frequency set the volume to about half way or slightly less and set the crossover frequency to the maximum Set TEST TONE to ON to output the test tone for the SPEAKER LEVEL setting see page 88 The available speaker ...

Страница 92: ...ut on or off for the SPEAKER SET SP LEVEL and SP DISTANCE settings y If you use a handheld sound pressure level meter hold at arm s length and point upwards so that the meter is in the listening position With the meter set to the 70 dB scale and to C SLOW calibrate each speaker to 75 dB This function is automatically turned off if you exit from BASIC MENU Choice Functions meters m Adjusts speaker ...

Страница 93: ...ature is useful to avoid the unexpected loud sound by mistake For example the original volume range is 80 0 dB to 16 5 dB However when MAX VOL is set to 5 0 dB the volume range becomes 80 0 dB to 5 0 dB Control range 30 0 dB to 15 0 dB 16 5 dB Control step 5 0 dB When this unit is in the auto setup procedure the volume level is automatically set to 0 dB regardless of the current MAX VOL setting Th...

Страница 94: ...sted only when GEQ is selected in EQ TYPE SELECT Test tone TEST Use this feature to make adjustments of GEQ while listening to a test tone To select TEST press 8k n repeatedly in the graphic equalizer screen 3 SOUND MENU Choice Functions AUTO PEQ Uses the parametric equalizer adjusted in AUTO SETUP see page 33 GEQ Adjusts the built in 7 frequency band graphic equalizer so that the tonal quality of...

Страница 95: ...amount of dynamic range compression to be applied to your speakers or headphones This setting is effective only when this unit is decoding bitstream signals Speakers SPEAKER Adjusts the dynamic range compression for the speakers Headphones HEADPHONE Adjusts the dynamic range compression for the headphones Note p p B LFE LEVEL SPEAKER 0dB HEADPHONE 0dB Up Down Adjust Choice Functions MIN AUTO MIN A...

Страница 96: ... the audio delay that this unit sets automatically and the value of the audio delay that you set in AUTO This unit stores the value of offset and applies the value to other automatic lip sync compatible video monitors Manual delay MANUAL Use this feature to adjust the delay of the sound output manually to synchronize audio with video images when you set HDMI AUTO to OFF Control range 0 to 240 ms C...

Страница 97: ...ou cannot select a specific item more than once for the same type of jack An asterisk appears to the right of the input output jack names that have been changed from their previous settings The currently assigned input source for the selected input output jack appears in the OSD Current DTV CBL in the display example above 4 INPUT MENU Input source Parameter A SIRIUS U S A and Canada models only I...

Страница 98: ...hen you select DTS and digital audio signals are input this unit always activates the DTS decoder and only plays back the DTS digital audio signals DECODER MODE is only available when the digital audio input jacks HDMI OPTICAL and or COAXIAL are assigned to the selected input source SIRIUS Satellite Radio parental lock PARENTAL LOCK Use this feature to set the code number for locking the desired S...

Страница 99: ...H INPUT jacks Input channels INPUT CH Use this setting to select the number of channels input from an external decoder see page 25 Choices 6CH 8CH If the connected component outputs discrete 6 channel audio signals Select 6CH If the connected component outputs discrete 8 channel audio signals Select 8CH Also set FRONT see below to the analog audio jacks at which the front left and right channel si...

Страница 100: ...reen after you perform a certain operation Front panel display scroll FL SCROLL Use this feature to set the mode to display the XM Satellite Radio information SIRIUS Satellite Radio information or iPod menu such as song title or channel name in the front panel display 5 OPTION MENU Note ENTER p 5 OPTION MENU A DISPLAY SET B VIDEO SET C MEMORY GUARD D INIT CONFIG E HDMI SET F ZONE2 SET Up Down Ente...

Страница 101: ...nventional signals input at the composite video or S video jacks cannot be converted or may be output abnormally In such cases set VIDEO CONV to OFF Memory guard C MEMORY GUARD Use this feature to prevent accidental changes to sound field program parameter and other system settings You can change the following parameters even if MEMORY GUARD is set to ON EXTD SUR in SOUND MENU see page 92 DECODER ...

Страница 102: ... HDMI input jacks to the HDMI out jack only when this unit is turned on even if S AUDIO is set to OTHER Available audio video signals depend on the specification of the connected video monitor Refer to the instruction manual of each connected component Choice Functions AUTO Automatically detects the type of input signals and selects the appropriate audio input jack select setting LAST Automaticall...

Страница 103: ...he power of this unit next time The MAX VOL setting does not affect the output level at the ZONE 2 OUT jacks Zone 2 Initial volume INI VOL Use this feature to set the volume level of Zone 2 when the power of this unit is turned on Choices OFF MUTE 80 0 dB to 16 5 dB Control step 0 5 dB The MAX VOL setting takes priority over the INI VOL setting When you select FRONT B PRNS Zone B or NONE in EXTRA ...

Страница 104: ... TV column on page 101 y You can control more than one TV by setting the appropriate remote control code for any input source selector buttons other than 4DTV CBL In such a case you can control the buttons highlighted above 1 and 2 when you press the input source selector button Remote control features Controlling this unit a TV or other components Notes REC SUR DECODE STRAIGHT INFO PURE DIRECT PA...

Страница 105: ...SLEEP ENHANCER l PROG h 8 10 7 0 9 6 5 4 3 2 1 ENT SRCH MODE MENU VOLUME TITLE ENTER BAND LEVEL DISPLAY INFO RETURN MEMORY 2 8 9 7 3 4 6 5 1 Remote control DVD player recorder VCR Digital TV Cable TV LD player CD player MD CD recorder Tuner 1 AV POWER Power 1 Power 1 Power 2 Power 1 Power 1 Power 1 2 TITLE Title Band 3 PRESET CH k Up VCR channel up Up Preset up 1 8 Tuning up PRESET CH n Down VCR c...

Страница 106: ...s within 30 seconds in step 2 the setup process is canceled If this happens repeat the setup procedure Resetting all remote control codes Use this feature to clear all the remote control codes previously set and reset all of them to the initial factory settings 1 While pressing and holding 5AMP on the remote control press 2AV POWER for more than 3 seconds 5AMP flashes twice 2 Press the numeric but...

Страница 107: ...nearest authorized Yamaha dealer or service center about the Zone 2 connections that best meet your requirements Some Yamaha models are able to connect directly to the REMOTE jacks of this unit If you own these products you may not need to use an infrared signal emitter Up to 6 Yamaha components can be connected as shown below Using the external amplifier Connect the amplifier receiver in the seco...

Страница 108: ...n a Yamaha iPod universal dock such as YDS 10 sold separately connected to the DOCK terminal of this unit when V AUX is selected as the input source see page 68 You must complete each step while the ZONE2 indicator is flashing in the front panel display Otherwise the Zone 2 mode is automatically canceled and this unit returns to the normal operation mode In this case repeat the Zone 2 selection pr...

Страница 109: ... details about the iPod operations see Using iPod on page 68 Select V AUX as the input source to use Bluetooth component features in Zone 2 For details about the Bluetooth component operations see Using Bluetooth components on page 70 Set Zone 2 to the standby mode Press HZONE 2 ON OFF to set Zone 2 to the standby mode y Press LSYSTEM OFF to set the main zone and Zone 2 to the standby mode simulta...

Страница 110: ...lay 4 Press MTONE CONTROL repeatedly to change the selected parameter setting 5 Press LSYSTEM OFF to save the new setting and set this unit to the standby mode y The settings you made are reflected next time you turn on this unit Speaker impedance SP IMP Use this feature to set the speaker impedance of this unit so that it matches that of your speakers Choices 8Ω MIN 6ΩMIN Select 8ΩMIN to set the ...

Страница 111: ...ognition Choices ID1 ID2 Select ID1 when the remote control TUNER ID code is set to 5007 Select ID2 when the remote control TUNER ID code is set to 5016 Setting remote control TUNER ID codes You need to set the remote control TUNER ID library code for the remote control 1 While pressing and holding 4TUNER on the remote control press 2AV POWER for more than 3 seconds 5AMP flashes twice 2 Press the ...

Страница 112: ...emote control SIRIUS ID code is set to 5017 Select ID2 when the remote control SIRIUS ID code is set to 5018 Setting remote control SIRIUS ID codes You need to set the remote control SIRIUS ID code for the remote control 1 While pressing and holding KSIRIUS on the remote control press 2AV POWER for more than 3 seconds 5AMP flashes twice 2 Press the numeric buttons G to enter the code number 5017 o...

Страница 113: ...de setting SCENE IR Use this feature to output the remote control signals at the REMOTE OUT jack automatically when this unit is in the SCENE mode Choices ON OFF Select ON when the component connected to the REMOTE OUT jack is the Yamaha component and has the capability of the SCENE control signals This unit automatically sends the remote control signals to the component Select OFF when the compon...

Страница 114: ...riate input source with the INPUT selector on the front panel or the input selector buttons on the remote control 42 43 Speaker connections are not secure Secure the connections 14 The front speakers to be used have not been selected properly Select the front speakers by pressing ASPEAKERS on the front panel repeatedly 43 The volume is turned down Turn up the volume The sound is muted Press JMUTE ...

Страница 115: ...SSIGN is set to a setting other than ZONE2 Set EXTRA SP ASSIGN to ZONE2 85 FRONT B speakers cannot be activated EXTRA SP ASSIGN is set to a setting other than FRONT B Set EXTRA SP ASSIGN to FRONT B 85 No sound from the center surround or surround back speakers when the FRONT B speakers are activated EXTRA SP ASSIGN is set to ZONE B Set EXTRA SP ASSIGN to FRONT B 85 Presence speaker settings are no...

Страница 116: ... AC wall outlet and then plug it in again after about 30 seconds No sound is heard from the connected HDMI component The HDMI component does not accept the multi channel audio signals Convert the multi channel audio signals to the 2 channel audio signals at the source component such as a DVD player CHECK SP WIRES appears in the front panel display Speaker cables are short circuited Make sure all s...

Страница 117: ...signal is too weak Use a high quality directional FM antenna Use the manual tuning method 53 Previously preset stations can no longer be tuned into This unit has been disconnected for a long period Preset the stations again 54 AM The desired station cannot be tuned into with the automatic tuning method The signal is weak or the antenna connections are loose Tighten the AM loop antenna connections ...

Страница 118: ... is not properly aimed Check for antenna obstructions and reposition the XM antenna to get better signal reception Use the ANTENNA INFO information in the front panel or XM Information screen in the video monitor to check the antenna reception level See instructions supplied with the XM Mini Tuner and Dock for antenna installation information 57 OFF AIR The XM channel you selected is not currently...

Страница 119: ... complete The period of the subscription is end Contact SIRIUS Satellite Radio to renew the subscription 63 F W UPDATING The SiriusConnect tuner is updating the firmware Wait until the updating is complete CALL SIRIUS CALL 888 539 SIRIUS TO SUBSCRIBE The selected channel is not subscribed Contact SIRIUS Satellite Radio to subscribe the selected channel URL https activate siriusradio com Phone 1 88...

Страница 120: ...ely connected to the DOCK terminal of this unit Station your iPod back in a Yamaha iPod universal dock such as YDS 10 sold separately connected to the DOCK terminal of this unit 25 Unable to play This unit cannot play back the songs currently stored on your iPod Check that the songs currently stored on your iPod are playable Store some other playable music files on your iPod Status message Cause R...

Страница 121: ... back channel signal is detected Connect the surround back speaker to the LEFT SURROUND BACK SPEAKERS terminal if you only have one surround back speaker 14 E 5 NOISY Background noise is too loud Try running AUTO SETUP in a quiet environment Turn off noisy electric equipment like air conditioners or move them away from the optimizer microphone E 6 CHECK SUR Surround back speakers are connected tho...

Страница 122: ...ons for proper polarity or 14 W 2 OVER 24m 80ft The distance between the speaker and the listening position is over 24 m 80 ft Bring the speaker closer to the listening position W 3 LEVEL ERROR The difference of volume level among speakers is excessive Readjust the speaker installation so that all speakers are set in locations with similar conditions Check the speaker connections 14 Use speakers o...

Страница 123: ...e without making any changes press LSYSTEM OFF on the front panel 1 Press LSYSTEM OFF on the front panel to set this unit to the standby mode 2 Press and hold MTONE CONTROL and then press KMAIN ZONE ON OFF to turn on this unit This unit turns on and the advanced setup menu appears in the front panel display 3 Rotate the NPROGRAM selector to select INIT 4 Press MTONE CONTROL repeatedly to select AL...

Страница 124: ...und sound system that gives you completely independent multi channel audio With 3 front channels front L R and center and 2 surround stereo channels Dolby Digital provides 5 full range audio channels With an additional channel especially for bass effects called LFE Low Frequency Effect the system has a total of 5 1 channels LFE is counted as 0 1 channel By using 2 channel stereo for the surround s...

Страница 125: ...ES decoder that enables 6 1 channel reproduction by adding the surround back channel to the existing 5 1 channel format DTS Express DTS Express is an advanced audio technology for the optional feature on Blu ray Disc or HD DVD which offers high quality low bit rate audio optimized for network streaming and Internet applications DTS Express is used for the Secondary Audio feature of Blu ray Disc or...

Страница 126: ...alog signal per very small unit of time Standing for Pulse Code Modulation the analog signal is encoded as pulses and then modulated for recording Sampling frequency and number of quantized bits When digitizing an analog audio signal the number of times the signal is sampled per second is called the sampling frequency while the degree of fineness when converting the sound level into a numeric valu...

Страница 127: ... a room with virtually any size at all This ability to create sound fields at will is exactly what Yamaha has done with the digital sound field processor CINEMA DSP Since the Dolby Surround and DTS systems were originally designed for use in movie theaters their effect is best felt in a theater having many speakers designed for acoustic effects Since home conditions such as room size wall material...

Страница 128: ...al Noise IHF A Network Front L R 150 µV or less Channel Separation 1 kHz 10 kHz CD etc 5 1 kΩ shortened to Front L R 60 dB 45 dB or more Volume Control MUTE 80 dB to 16 5 dB Tone Control Front L R BASS Boost Cut 10 dB 50 Hz BASS Turnover Frequency 350 Hz TREBLE Boost Cut 10 dB 20 kHz TREBLE Turnover Frequency 3 5 kHz Filter Characteristics fc 40 60 80 90 100 110 120 160 200 Hz H P F FRONT SP CENTE...

Страница 129: ...anada models 400 W 500 VA Russia model 440 W Standby Power Consumption U S A and Canada models 0 8 W or less Russia model 0 1 W or less AC Outlets U S A and Canada models 2 Total 100 W maximum Russia model 2 Total 50 W maximum Dimensions W x H x D 435 x 171 x 393 mm 17 1 8 x 6 3 4 x 15 1 2 in Weight 11 8 kg 26 lbs 4 oz Specifications are subject to change without notice ...

Страница 130: ... message 116 BT Error Bluetooth status message 116 C C DYNAMIC RANGE Sound menu 91 C MEMORY GUARD Option menu 97 C SP DISTANCE Basic menu 88 C IMAGE Decoder parameter 79 Cable plugs 17 CALL SIRIUS SIRIUS Satellite Radio status message 115 CAT SEARCH SIRIUS tuning 64 CAT SEARCH XM tuning 59 Category Search mode SIRIUS tuning 64 CD player connection 23 Cellar Club Sound field program 49 CENTER PRE O...

Страница 131: ...peaker settings 85 Extra speaker assignment Auto setup parameter 33 Extra speaker assignment Speaker settings 85 F F ZONE2 SET Option menu 99 F W UPDATING SIRIUS Satellite Radio status message 115 FL SCROLL Display settings 96 FM antenna 27 FM antenna connection 27 FM tuning 53 Front input Input menu 95 Front panel display 30 Front panel display scroll Display settings 96 FRONT PRE OUT jack connec...

Страница 132: ...ck 65 PARENTAL LOCK Input menu 66 PHONES jack 45 PL LEVEL Sound field parameter 77 Playing video sources in the background 45 PLII Game Decoder type 78 PLII Movie Decoder type 77 78 PLII Music Decoder type 78 PLIIx Game Decoder type 78 PLIIx Movie Decoder type 77 78 PLIIx Music Decoder type 78 Power cable connection 28 PR LEVEL Sound field parameter 77 Presence left speaker level Sound field param...

Страница 133: ...us message 115 SUBWOOFER PHASE Speaker settings 87 Subwoofer phase Speaker settings 87 SUBWOOFER PRE OUT jack connection 24 Supplied accessories 2 Support audio HDMI set 98 SUR L R SP Speaker settings 86 SUR B L R SP Speaker settings 86 SUR BACK PRE OUT jack connection 24 Surround back left right speakers Speaker settings 86 Surround back sound field initial delay Sound field parameter 74 Surround...

Страница 134: ...volume Zone 2 settings 99 Zone 2 settings Option menu 99 Zone B 43 ZONE2 indicator 31 ASPEAKERS or 4DVD example indicates the name of the parts on the front panel or the remote control Refer to the attached sheet or the pages at the end of this manual for the information about each position of the parts ...

Страница 135: ...IRECT SCENE AUDIO SELECT EFFECT PROGRAM INPUT ON OFF MAIN ZONE PRESET TUNING CH BAND SPEAKERS MEMORY CATEGORY A B C D E ZONE 2 ON OFF ZONE CONTROL EDIT SEARCH MODE 1 2 3 4 OPTIMIZER MIC R L AUDIO OPTICAL VIDEO AUX VIDEO SVIDEO VOLUME INFO A B C D E F G H I J K L M N O P Q R S ...

Страница 136: ... PROG h TV MUTE TV INPUT TV VOL TV CH POWER AMP STANDBY POWER MUTE POWER 8 10 7 0 9 6 5 4 3 2 1 ENT DVD V AUX DOCK VCR B DTV CBL DVR CD MD CD R TUNER SRCH MODE MENU VOLUME TITLE ENTER BAND LEVEL DISPLAY RETURN MEMORY AV TV SCENE 4 3 2 1 A XM SIRIUS INFO 1 H J I K L M N O P Q R S t 2 4 5 6 7 8 9 0 B C E A F G D 3 ...

Страница 137: ...M 2072 Teac 2074 Tec 2076 Technics 2030 Technika 2096 Technosonic 2096 Tevion 2072 2074 Thomson 2085 2109 Tokai 2076 Toshiba 2026 2044 2048 2056 2073 2108 2111 United 2078 Voxson 2078 Wharfedale 2074 Xlogic 2074 Yakumo 2077 Yamada 2077 Yamaha 2000 2001 2003 2030 2101 Yukai 2078 Zenith 2038 2047 2073 DVD Recorder Apex 2024 JVC 2070 LG 2071 Panasonic 2020 2065 2066 2067 Philips 2019 2061 2062 2063 P...

Страница 138: ...213 0218 Elman 0215 Elta 0200 0208 Emerson 0060 0061 0062 0064 0128 0205 Envision 0060 0061 Erres 0213 0217 ESA 0080 Etron 0208 Euro Feel 0206 Euroline 0217 Euroman 0200 Euromann 0206 0207 0213 Europhon 0200 0204 0207 0213 0215 Fenner 0208 Ferguson 0212 0217 0226 Fidelity 0200 0207 0210 Finlandia 0210 Finlux 0204 0205 0207 0213 0215 0217 Firstline 0200 0207 0208 0213 0214 Fisher 0064 0127 0128 020...

Страница 139: ...gnavox 0124 Phoenix 0200 0205 0213 0217 Phonola 0200 0205 0213 0217 Pilot 0060 Pioneer 0012 0013 0060 0061 0098 0109 0117 0128 0181 0182 0194 0195 0211 0213 0216 0217 0250 Plantron 0206 0213 Polaroid 0075 Poppy 0208 Portland 0060 0061 Prandoni Prince 0204 0210 Precision 0207 Prima 0208 0211 Profex 0208 Profi Tronic 0213 Proline 0213 Proscan 0057 Prosonic 0200 0207 0217 Protech 0206 0207 0208 0213 ...

Страница 140: ...ba 0146 0237 1029 1066 Zenith 0154 1037 VCR Admiral 1008 1013 Adventura 1005 Aiwa 1005 1042 1043 1044 1066 Akai 1007 1043 Akiba 1050 Akura 1043 1050 Alba 1044 1050 American High 1004 Amstrad 1042 Anitech 1050 ASA 1045 1046 Asha 1002 1014 Asuka 1042 1045 1046 1050 Audio Dynamics1000 Audiovox 1003 Baird 1042 1043 1047 Basic Line 1044 1050 Baur 1046 Beaumark 1002 1014 Bell Howell 1001 Blaupunkt 1046 ...

Страница 141: ...1002 1003 1004 1005 1008 Rex 1043 RFT 1046 Roadstar 1045 1050 1066 Saba 1043 Saisho 1044 1050 Salora 1047 Samsung 1002 1014 1021 1027 1052 1068 1070 Sanky 1008 Sansui 1007 1011 1013 1043 Sanyo 1001 1002 1014 1047 SBR 1046 Schaub Lorenz 1042 1043 1047 Schneider 1042 1044 1045 1046 1050 Scott 1012 Sears 1001 1003 1004 1010 SEG 1050 SEI Sinudyne 1046 Seleco 1043 Sentron 1050 Sharp 1008 1023 1028 1053...

Страница 142: ...ERMANY YAMAHA ELECTRONIQUE FRANCE S A RUE AMBROISE CROIZAT BP70 CROISSY BEAUBOURG 77312 MARNE LA VALLEE CEDEX02 FRANCE YAMAHA ELECTRONICS UK LTD YAMAHA HOUSE 200 RICKMANSWORTH ROAD WATFORD HERTS WD18 7GQ ENGLAND YAMAHA SCANDINAVIA A B J A WETTERGRENS GATA 1 BOX 30053 400 43 VÄSTRA FRÖLUNDA SWEDEN YAMAHA MUSIC AUSTRALIA PTY LTD 17 33 MARKET ST SOUTH MELBOURNE 3205 VIC AUSTRALIA 2008 All rights rese...

Страница 143: ...T SCENE AUDIO SELECT EFFECT PROGRAM INPUT ON OFF MAIN ZONE PRESET TUNING CH BAND SPEAKERS MEMORY CATEGORY A B C D E ZONE 2 ON OFF ZONE CONTROL EDIT SEARCH MODE 1 2 3 4 OPTIMIZER MIC R L AUDIO OPTICAL VIDEO AUX VIDEO SVIDEO VOLUME INFO A B C D E F G H I J K L M N O P Q R S 00_sheet_HTR 6160_U book Page 1 Monday December 10 2007 2 19 PM Black process 45 0 240 0 LPI ...

Страница 144: ...NPUT TV VOL TV CH POWER AMP STANDBY POWER MUTE POWER 8 10 7 0 9 6 5 4 3 2 1 ENT DVD V AUX DOCK VCR B DTV CBL DVR CD MD CD R TUNER SRCH MODE MENU VOLUME TITLE ENTER BAND LEVEL DISPLAY RETURN MEMORY AV TV SCENE 4 3 2 1 A XM SIRIUS INFO 1 H J I K L M N O P Q R S t 2 4 5 6 7 8 9 0 B C E A F G D 3 WN67540 Printed in Malaysia ...

Отзывы: