background image

7-25

BRKT

E

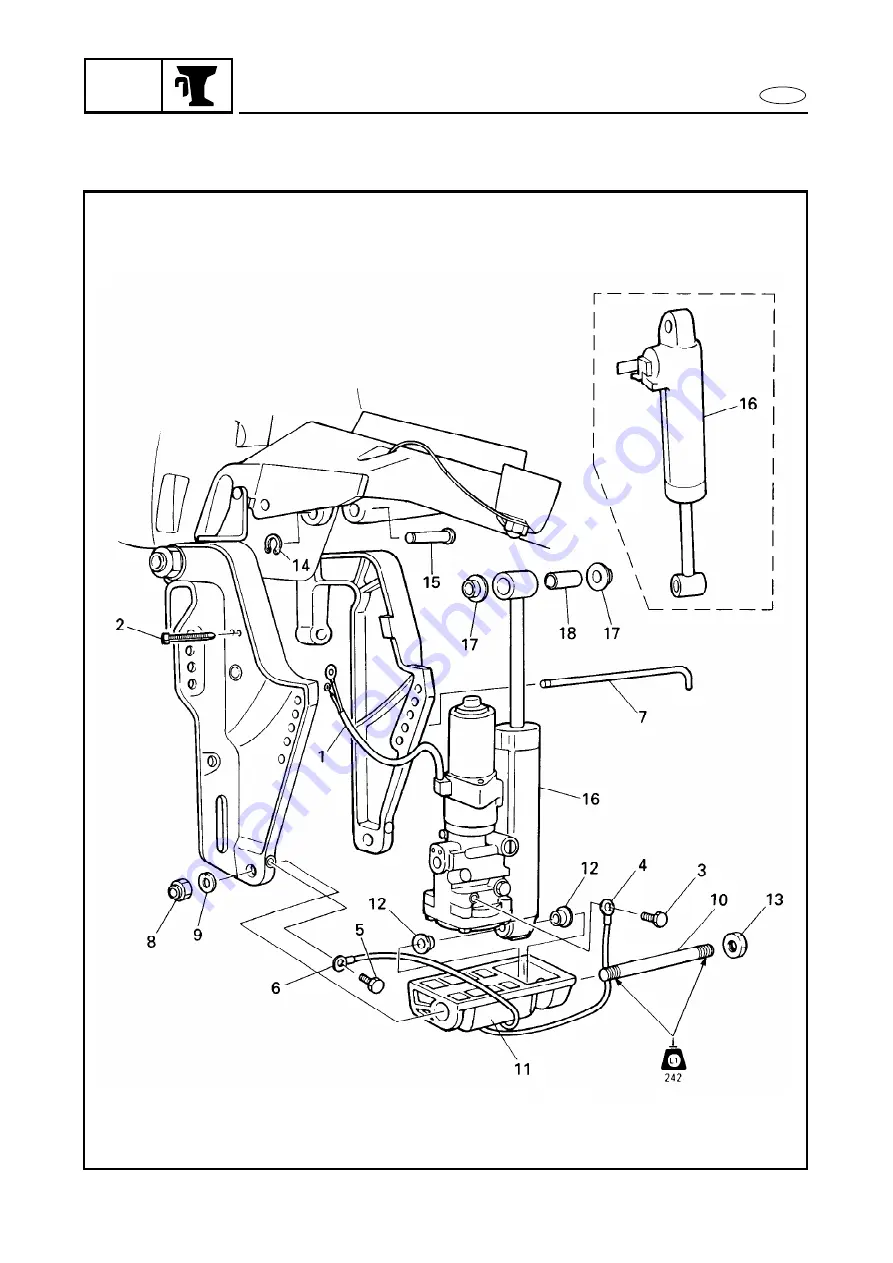
TILT UNIT REMOVAL

TILT UNIT REMOVAL

EXPLODED DIAGRAM

Содержание 40ER

Страница 1: ...LIT 18616 01 81 290320 SERVICE MANUAL 40V 50H WORLD WIDE 40W 50W USA CANADA ...

Страница 2: ...els may differ in detail from the descriptions and illustrations given in this publica tion Use only the latest edition of this manual Authorized Yamaha dealers are notified periodically of modifications and significant changes in specifications and procedures and these are incorporated in successive editions of this manual A10001 0 40V 50H SERVICE MANUAL 1997 Yamaha Motor Corporation USA 1st Edit...

Страница 3: ...ch Section MODEL INDICATION Multiple models are shown in this manual These indications are noted as follows THE ILLUSTRATIONS Some illustrations in this manual may differ from the model you have This is because a pro cedure described may relate to several models though only one may be illustrated The name of model described will be mentioned in the description REFERENCES These have been kept to a ...

Страница 4: ...VMO 40VWH 40VE 40VEO 40VEHTO 40VET Starting system Manual Manual Manual Manual Manual Electric Electric Electric Electric Electric Control system Tiller Tiller Tiller Remote Tiller Remote Remote Tiller Remote Trim Tilt system Manual tilt Hydro tilt Manual tilt Manual tilt Hydro tilt Manual tilt Manual tilt PTT PTT Lubrication system Pre Mixed Pre Mixed Oil injection Oil injection Pre Mixed Pre Mix...

Страница 5: ...e contents and notes of the job For the meanings of the symbols refer to the next page s 4 The REMOVAL AND INSTALLATION CHART 4 is attached to the exploded diagram and explains the job steps part names notes for the jobs etc 5 The SERVICE POINTS other than the exploded diagram explains in detail the items diffi cult to explain in the exploded diagram or REMOVAL AND INSTALLATION CHART the Service p...

Страница 6: ... to J in an exploded diagram indicate grade of lubricant and location of lubrication point G Apply Yamaha 2 stroke outboard motor oil H Apply Yamaha gear case lubricant I Apply molybdenum disulfide oil J Apply water resistant grease Yamaha grease A Yamaha marine grease Symbols K to N in an exploded diagram indicate grade of sealing or locking agent and location of application point K Apply Gasket ...

Страница 7: ...ATION 1 SPECIFICATIONS 2 SPEC PERIODIC INSPECTION AND ADJUSTMENT 3 FUEL SYSTEM 4 FUEL POWER UNIT 5 POWR LOWER UNIT 6 LOWER BRACKET UNIT 7 BRKT ELECTRICAL SYSTEM 8 ELEC TROUBLE ANALYSIS 9 GEN INFO INSP ADJ TRBL ANLS A30000 0 ...

Страница 8: ......

Страница 9: ...SERIAL NUMBER 1 1 STARTING SERIAL NUMBERS 1 1 SAFETY WHILE WORKING 1 2 FIRE PREVENTION 1 2 VENTILATION 1 2 SELF PROTECTION 1 2 OILS GREASES AND SEALING FLUIDS 1 2 GOOD WORKING PRACTICES 1 3 DISASSEMBLY AND ASSEMBLY 1 4 SPECIAL TOOLS 1 5 MEASURING 1 6 REMOVAL AND INSTALLATION 1 8 ...

Страница 10: ... 4 Serial number STARTING SERIAL NUMBERS The starting serial number blocks are as fol lows Model Approved model code Starting serial No Model Approved model code Starting serial No World wide USA CANADA World wide USA CANADA 40VMH C40MH 6H4 S 010262 50HMHO 6H5 S 190662 L 310801 50HMHD L 310380 40VMHD L 560290 50HMO S 260189 40VMHO 40MH S 191877 50HMDO L 560258 L 491566 50HWHD L 850194 40VMO S 2902...

Страница 11: ...eavier than air and is deadly if inhaled in large quantities Engine exhaust gases are harmful to breathe When test running an engine indoors maintain good ventilation SELF PROTECTION Protect your eyes with suitable safety glasses or safety goggles when using com pressed air when grinding or when doing any operation which may cause particles to fly off Protect hands and feet by wearing safety glove...

Страница 12: ...iled wiping rag in one s pocket 4 Hands and any other part of the body which have been in contact with lubri cants or lubricant contaminated cloth ing should be thoroughly washed with hot water and soap as soon as practica ble 5 To protect the skin the application of a suitable barrier cream to the hands before working is recommended 6 A supply of clean lint free cloths should be available for wip...

Страница 13: ... parts with compressed air on dis assembling them 2 Oil the contact surfaces of moving parts on assembly 3 After assembly check that moving parts operate normally 4 Install bearings with the manufacturer s markings on the side exposed to view and liberally oil the bearings 5 When installing oil seals apply a light coating of water resistant grease to the outside diameter ...

Страница 14: ...l tools recommended by Yamaha will aid the work and enable accu rate assembly and tune up Improvisations and use of improper tools can cause damage to the equipment NOTE For U S A and Canada use part number starting with YB YU or YW For others use part number starting with 90890 ...

Страница 15: ...0 Thickness gauge YU 26900 9 N A Shimming 11 Pinion height gauge N A 90890 06702 Pinion shimming 12 Digital caliper N A 90890 06704 Pinion shimming Forward shimming 13 Gauge block YB 34432 9 N A Pinion shimming 14 Adapter plate YB 34432 10 N A Pinion shimming 15 Gauge base YB 34432 11 N A Pinion shimming 16 Clamp YB 34432 17 N A Pinion shimming 17 Shimming plate N A 90890 06701 Forward shimming 18...

Страница 16: ...1 7 GEN INFO E SPECIAL TOOLS ...

Страница 17: ...il seal 10 Needle bearing remover YB 06112 90890 06614 Propeller shaft needle bearing 11 Needle bearing installer YB 06111 90890 06614 Propeller shaft needle bearing 12 Bearing outer race puller clow N A 90890 06535 Reverse gear bearing 13 Stopper guide stand N A 90890 06538 Reverse gear bearing Forward gear outer bearing 14 Slide hammer set YB 06096 N A Reverse gear bearing Drive shaft outer bear...

Страница 18: ...1 9 GEN INFO E SPECIAL TOOLS ...

Страница 19: ...gear outer bearing 26 Shift rod wrench YB 06052 N A Shift rod 27 Tilt cylinder wrench YB 06175 2B 90890 06544 PTT 28 Bearing depth plate N A 90890 06603 Propeller shaft needle bearing Drive shaft needle bear ing 29 Driver rod SL N A 90890 06602 Drive shaft needle bearing 30 Driver rod SS N A 90890 06604 Propeller shaft needle bearing 31 Driver rod L YB 06071 90890 06605 Bearing and oil seal 32 Dri...

Страница 20: ......

Страница 21: ...PEC CHAPTER 2 SPECIFICATIONS GENERAL SPECIFICATIONS 2 1 MAINTENANCE SPECIFICATIONS 2 7 ENGINE 2 7 LOWER 2 9 ELECTRICAL 2 10 DIMENSION 1 2 13 DIMENSION 2 2 15 TIGHTENING TORQUE 2 17 SPECIFIED TORQUE 2 17 GENERAL TORQUE 2 18 ...

Страница 22: ... 000 Full throttle operating range rpm 4 500 5 500 Maximum fuel con sumption L US gal Imp gal h at rpm 18 5 4 9 4 1 at 5 500 ENGINE Type 2 stroke L Number of cylinder 3 Total displacement cm3 cu in 698 42 6 Bore Stroke mm in 67 0 66 0 2 64 2 60 Compression ratio 6 00 Number of carburetor 3 Intake system Reed valve Scavenging system Loop charge Control system Tiller control Remote control Tiller co...

Страница 23: ... tilt system Manual tilt Tilt angle degree 8 12 16 20 24 8 12 16 20 24 Tilt up angle degree 66 69 66 Trim angle degree at 12 transom 4 20 Shallow water crushing angle degree Tilt angle 18 Tilt angle 18 Tilt angle 18 Steering angle degree left right 40 40 DRIVE UNIT Gear shift position F N R Gear ratio 1 85 24 13 Gear type Spiral bevel gear Clutch type Dog clutch Propeller direction Clockwise Prope...

Страница 24: ...ANCE Output ISO kW hp rpm 29 4 40 5 000 Full throttle operating range rpm 4 500 5 500 Maximum fuel con sumption L US gal Imp gal h at rpm 18 5 4 9 4 1 at 5 500 ENGINE Type 2 stroke L Number of cylinder 3 Total displacement cm3 cu in 698 42 6 Bore Stroke mm in 67 0 66 0 2 64 2 60 Compression ratio 6 00 Number of carburetor 3 Intake system Reed valve Scavenging system Loop charge Control system Remo...

Страница 25: ...system Manual tilt Power trim tilt Manual tilt Power trim tilt Tilt angle degree 8 12 16 20 24 Tilt up angle degree 66 69 Trim angle degree at 12 transom 4 20 Shallow water crushing angle degree Tilt angle 18 Steering angle degree left right 40 40 DRIVE UNIT Gear shift position F N R Gear ratio 1 85 24 13 Gear type Spiral bevel gear Clutch type Dog clutch Propeller direction Clockwise Propeller dr...

Страница 26: ...MANCE Output ISO kW hp rpm 36 8 50 5 000 Full throttle operation range rpm 4 500 5 500 Maximum fuel con sumption L US gal Imp gal h at rpm 22 5 8 4 8 at 5 500 ENGINE Type 2 stroke L Number of cylinder 3 Total displacement cm3 cu in 698 42 6 Bore Stroke mm in 67 0 66 0 2 64 2 60 Compression ratio 6 00 Number of carburetor 3 Intake system Reed valve Scavenging system Loop charge Control system Tille...

Страница 27: ...anual tilt Hydro tilt Manual tilt Hydro tilt Manual tilt Power trim tilt Tilt angle degree 8 12 16 20 24 8 12 16 20 24 Tilt up angle degree 66 69 66 69 Trim angle degree at 12 transom 4 20 4 20 Shallow water crush ing angle degree Tilt angle 18 Steering angle degree left right 40 40 DRIVE UNIT Gear shift position F N R Gear ratio 1 85 24 13 Gear type Spiral bevel gear Clutch type Dog clutch Propel...

Страница 28: ... 0 002 0 003 2nd mm in 0 03 0 07 0 001 0 003 Over size piston mm in Diameter 1st 1 mm in 67 25 2 648 2nd mm in 67 50 2 657 PISTON PIN Diameter mm in 17 995 18 000 0 7085 0 7087 PISTON RING 1st Type mm in Keystone Dimensions B T mm in 2 0 2 6 0 08 0 10 End gap installed mm in 0 40 0 60 0 016 0 024 Limit mm in 0 80 0 031 PISTON RING 2nd Type mm in Keystone Dimensions B T mm in 2 0 2 6 0 08 0 10 End ...

Страница 29: ...W model M model E W model Identification mark 63B00 63D00 62W00 62X00 Float height mm in 15 0 1 0 0 59 0 04 Valve seat size mm in 1 2 0 05 Main jet M J 115 118 M 125 130 Main nozzle M N mm in 3 0 0 12 3 2 0 13 3 0 0 12 Main air jet M A J 160 130 140 Pilot jet P J 60 62 Pilot air jet P A J 75 90 80 Pilot screw P S turns out 1 1 2 1 4 1 5 8 1 4 1 3 8 1 4 Starter jet S J mm in 1 0 0 04 1 0 0 04 Elect...

Страница 30: ... 10 1 4 14 3 10 3 4 16 3 10 3 4 17 3 10 3 8 13 3 10 5 8 12 3 11 1 8 13 3 11 1 4 14 3 11 3 8 12 3 11 5 8 11 3 11 3 4 10 3 12 1 4 9 3 10 1 4 14 3 10 1 4 15 3 10 1 4 16 3 10 5 8 13 3 11 1 4 14 3 11 1 2 13 3 12 11 3 12 12 Test propeller 1 90890 01611 90890 01611 rpm r min 4 900 5 100 5 250 5 450 Test propeller 2 YB 1611 YB 1611 rpm r min 4 900 5 100 5 250 5 450 POWER TRIM AND TILT Fluid type ATF Dexir...

Страница 31: ...0 5 0 0 12 0 20 Rating Sec 30 RECTIFIER REGURATOR Output peak voltage R B cranking V 8 5 1 500 r min V 25 3 500 r min V 25 NEUTRAL SWITCH Length a on mm in 18 5 19 5 0 73 0 77 Length b off mm in 19 5 20 5 0 77 0 81 FUSE Rating V A 12 10 THERMO SWITCH Pink lead On temperature C F 90 96 194 0 204 8 Off temperature C F 76 90 168 0 194 0 THERMO SWITCH Orange lead On temperature C F 38 52 100 4 125 6 O...

Страница 32: ...tage minimum B O B W B Y B cranking V 125 1 500 r min V 140 3 500 r min V 110 Lighting coil output peak voltage minimum G G W cranking V 9 0 1 500 r min V 25 3 500 r min V 25 CDI UNIT Over revolution limiter revolution limit rpm 5 800 6 200 Over heat controlled revolution rpm 1 600 2 400 IGNITION COIL Type Single Primary coil resistance Ω color 0 18 0 24 B W B Secondarily coil resistance kΩ color ...

Страница 33: ...2 12 SPEC E MAINTENANCE SPECIFICATIONS ...

Страница 34: ...2 13 SPEC E MAINTENANCE SPECIFICATIONS DIMENSION 1 ...

Страница 35: ... 31 4 822 32 4 822 32 4 L 910 35 8 937 36 9 UL 1 010 39 8 1 040 40 9 1 040 40 9 L7 mm in 433 17 0 401 15 8 418 16 5 387 15 2 H4 S mm in 408 16 1 410 16 1 410 16 1 L 535 21 1 537 21 1 UL 649 25 6 651 25 6 651 25 6 H9 mm in 683 26 9 671 26 4 696 27 4 688 27 1 H12 S mm in 118 4 6 118 4 6 L 171 6 7 UL 219 8 6 219 8 6 W5 mm in 340 13 4 A1 degree 40 A2 degree 62 65 A3 degree 4 T1 mm in 600 23 6 ...

Страница 36: ...2 15 SPEC E MAINTENANCE SPECIFICATIONS DIMENSION 2 MANUAL TILT MODEL HYDRO TILT PTT MODEL ...

Страница 37: ... 208 8 2 254 10 0 B3 mm in 121 5 4 8 163 5 6 4 B4 mm in 32 1 3 50 8 2 0 B5 mm in 131 5 5 2 180 7 1 B6 mm in 245 9 6 355 14 0 B9 mm in 25 1 0 18 5 0 7 B11 mm in 90 5 3 6 B12 mm in 57 2 2 B13 mm in 122 4 8 B14 mm in 156 6 1 D1 mm in 10 5 0 4 13 0 5 D2 mm in 26 1 0 55 5 2 2 C1 mm in 30 1 2 C2 mm in 66 2 6 C3 mm in 69 2 7 ...

Страница 38: ...4 0 29 572 LT Propeller shaft housing Bolt M8 2 16 1 6 11 Pinion nut Nut M12 1 75 7 5 54 Water inlet Bolt M6 1 5 0 5 3 6 242 LT BRACKET Tiller handle mounting Nut M10 2 38 3 8 27 Steering friction mounting Nut 7 8 UNF 2 20 2 0 14 Tiller handle pivot Bolt M12 1 38 3 8 27 Muffler Bolt M2 8 21 2 1 15 572 LT Exhaust manifold Bolt M3 8 21 2 1 15 Exhaust guide Bolt M4 8 21 2 1 15 Clamp bracket manual ti...

Страница 39: ...ions for special compo nents or assemblies are given in applicable sections of this manual To avoid causing warpage tighten multifastener assemblies in crisscross fashion in progressive stages until the specified torque is reached Nut A Bolt B General torque specifications Nm m kg ft lb 8 mm M5 5 0 0 5 3 6 10 mm M6 8 0 0 8 5 8 12 mm M8 18 1 8 13 14 mm M10 36 3 6 25 17 mm M12 43 4 3 31 ...

Страница 40: ......

Страница 41: ...ment 3 2 Throttle cable adjustment 3 3 Shift cable adjustment 3 4 Start in gear protection adjustment 3 5 Idle speed adjustment 3 5 OIL INJECTION SYSTEM 3 6 Oil tank water drain 3 6 Oil pump link adjustment 3 6 POWER TRIM AND TILT SYSTEM 3 7 Power trim and tilt fluid 3 7 LOWER UNIT 3 8 Gear oil 3 8 Lower unit leakage check 3 8 GENERAL 3 9 Anode 3 9 Battery 3 9 Spark plug 3 10 Grease points 3 11 ...

Страница 42: ... Exhaust leakage Inspection Cooling water passage Cleaning CONTROL SYSTEM Throttle link Inspection Adjustment 3 2 Throttle cable Inspection Adjustment 3 3 Shift cable Inspection Adjustment 3 4 Start in gear projection Inspection Adjustment 3 5 Idle speed Inspection Adjustment 3 5 OIL INJECTION SYSTEM Oil tank water drain hose Cleaning 3 6 Oil pump link Inspection Adjustment 3 6 POWER TRIM AND TILT...

Страница 43: ...the full retarding stopper a Check the CDI unit indicator so that it aligns with the specified marking on the plate Full retarded position ATDC 7 Turn the magneto control lever so that it contacts the full advance adjusting screw b Check the CDI unit indicator so that it aligns with specified marking on the plate Full advanced position BTDC 25 2 Adjust Ignition timing Adjustment steps Adjust the l...

Страница 44: ...tor aligns with the specified marking on the plate Full retarded position ATDC 7 Connect the magneto control rod Turn the magneto control lever so that it contacts the full advance adjusting screw 4 Adjust the full advance adjusting screw so that the CDI unit indicator aligns with the specified marking on the plate Full advanced position BTDC 25 Checking steps Set the shift lever to the forward po...

Страница 45: ...an 8 mm 0 31 in NOTE Put the UP mark upward Shift cable adjustment 1 Check Shift operation Incorrect Adjust 2 Adjust Shift cable joint position 3 Check Shift operation Unsmooth operation Repair Adjustment steps Set the shift handle 1 in neutral Align the center of the set pin 2 with the mark a on the bracket Adjust the position of the cable joint until its hole aligns with the set pin Install the ...

Страница 46: ...r case Tighten the lock nut Idle speed adjustment NOTE Before adjusting the idle speed be sure to adjust the throttle link 1 Measure Idle speed Out of specification Adjust 2 Adjust Idle speed Idle speed 800 50 rpm Measuring steps Start the engine and allow it to warm up for a few minutes Attach the tachometer to the high ten sion lead of the cylinder 1 Tachometer YU 08036 A 90890 06760 Adjustment ...

Страница 47: ...op screw in or out until specified idle speed is obtained Turning in Idle speed becomes higher Turning out Idle speed becomes lower While lightly pushing the throttle lever of the lower carburetor in the direction of the arrow full closed tighten the throttle lever securing screw of the upper and middle carburetors by turn ing the screws counterclockwise OIL INJECTION SYSTEM Oil tank water drain 1...

Страница 48: ...e valve Check the clearance a between the oil pump lever and full open side stopper Adjustment steps Loosen the lock nut Remove the oil pump link joint at the pump Fully open the carburetor throttle valve Set the oil pump lever 1 mm off the full open side stopper Adjust the position of the link joint until its hole aligns with the oil pump set pin Connect the link joint Check that the throttle val...

Страница 49: ...plug 1 Remove the drain plug then the oil level plug 2 and drain the oil thor oughly Place the outboard motor in an upright position Fill the gear oil through the drain hole until it overflows at the level hole Recommended oil GEAR CASE LUBE USA or Hypoid gear oil SAE 90 Oil capacity 430 cm3 14 5 US oz 15 1 Imp oz Refit the oil level plug and then oil drain plug Checking steps Attach the tester to...

Страница 50: ...attery electrolyte is poisonous and dan gerous causing severe burns etc It con tains sulfuric acid Avoid contact with skin eyes or clothing Antidote EXTERNAL Flush with water INTERNAL Drink large quantities of water or milk Follow with milk of magnesia beaten egg or vegetable oil Call physician immedi ately EYES Flush with water for 15 minutes and get prompt medical attention Batteries produce exp...

Страница 51: ... Worn Damaged Replace Insulator color 2 Distinctly different color Check the engine condition 2 Clean Spark plug Clean the spark plug with a plug cleaner or wire brush 3 Inspect Spark plug type Color guide Normal Medium to light tan color Whitish color Lean fuel mixture Plugged fuel mixture Air leak Wrong setting Blackish color Electrical malfunction Defective spark plug Defective ignition system ...

Страница 52: ...park plug NOTE Before installing the spark plug clean the gasket surface and the plug surface NOTE If a torque wrench is not available a good estimate of the correct torque is a further 1 4 to 1 2 turns b on finger tightened a spark plug T R Spark plug 25 Nm 2 5 m kg 18 ft lb Grease points 1 Apply Water resistant grease ...

Страница 53: ...RETOR 4 7 EXPLODED DIAGRAM 4 7 REMOVAL AND INSTALLATION CHART 4 8 SERVICE POINTS 4 9 Carburetor inspection 4 9 Carburetor assembly 4 10 PRIME STARTER 4 11 EXPLODED DIAGRAM 4 11 REMOVAL AND INSTALLATION CHART 4 12 SERVICE POINTS 4 13 Fuel enrichment pump inspection 4 13 Fuel enrichment valve inspection 4 13 OIL TANK 4 15 EXPLODED DIAGRAM 4 15 REMOVAL AND INSTALLATION CHART 4 16 OIL LINE LAYOUT 4 17...

Страница 54: ...4 1 FUEL E FUEL JOINT FUEL FILTER AND FUEL PUMP FUEL JOINT FUEL FILTER AND FUEL PUMP EXPLODED DIAGRAM ...

Страница 55: ...t 1 5 Clip 2 6 Fuel hose joint filter 1 7 Fuel hose filter pump 1 8 Nut 1 9 Fuel filter 1 10 Clip 2 11 Fuel hose filter pump 1 12 Fuel hose pump joint pipe 1 13 Bolt with washer 2 6 40 mm 14 Fuel pump ass y 1 15 Fuel pump gasket 1 FUEL FILTER DISASSEMBLY 1 Body cover 1 2 Filter cup 1 3 O ring 1 4 Filter element 1 FUEL PUMP DISASSEMBLY 5 Screw with washer 3 6 Body 1 7 Diaphragm 1 8 Gasket 1 9 Body ...

Страница 56: ...4 3 FUEL E FUEL JOINT FUEL FILTER AND FUEL PUMP FUEL LINE LAYOUT M model 1 Fuel pump 2 Fuel filter W E model 1 Fuel pump 2 Fuel filter 3 Electrothermal valve ...

Страница 57: ...re for 10 sec Replace Measuring steps Attach the Mity vac Mity vac YB 35956 90890 06756 Apply the specified pressure Specified pressure 50 kPa 0 5 kg cm2 7 1 psi Fuel filter inspection 1 Inspect Filter element Filter cup Crack Leak Clog Replace Contamination Clean Fuel pump inspection 1 Inspect Body Crack Leak Damage Replace 2 Inspect Seat valve Crack Distortion Replace 3 Inspect Diaphragm Damage ...

Страница 58: ...4 5 FUEL E CARBURETOR REMOVAL CARBURETOR REMOVAL EXPLODED DIAGRAM ...

Страница 59: ...4 Bolt 1 15 Electrothermal valve lead black 1 16 Electrothermal valve lead blue 1 17 Accelerator lever rod 1 18 Oil pump link rod 1 Oil injection model 19 Link joint 1 20 Choke link rod 1 M model 21 Link joint 1 22 Choke lever joint 2 23 Link joint 4 24 Bolt 6 6 95 mm 25 Carburetor bracket 1 26 Carburetor ass y 3 27 Gasket 3 Reverse the removal steps for installation NOTE Disconnect the hose at th...

Страница 60: ...4 7 FUEL E CARBURETOR CARBURETOR EXPLODED DIAGRAM ...

Страница 61: ...screw 1 7 Spring 1 8 Stopping screw 1 Middle carburetor only 9 Spring 1 10 Screw with washer 4 4 14 mm 11 Float chamber 1 12 Float chamber packing 1 13 Screw 1 4 mm 14 Arm pin 1 15 Float 1 16 Needle valve 1 17 Needle valve clip 1 18 Valve seat 1 19 O ring 1 20 Main jet 1 21 Main nozzle 1 22 Cap 1 23 Pilot jet 1 24 Carburetor body 1 Reverse the removal steps for installation CAUTION Do not damage t...

Страница 62: ...ously affect performance Carburetor inspection 1 Inspect Carburetor body Crack Damage Replace Contamination Clean 2 Inspect Pilot screw Bend Wear Replace 3 Inspect Main jet Pilot jet Main nozzle Contamination Replace 4 Inspect Needle valve Grooved wear Replace 5 Inspect Float Crack Damage Replace 6 Inspect Collar 1 Wear Damage Replace ...

Страница 63: ...Measure Float height a Out of specification Fold the tab b to adjust float arm height NOTE The float should be resting on the needle valve but not compressing the needle valve Take measurement at the end surface of the float opposite to its pivoted side 3 Adjust Pilot screw Float height a 15 0 1 0 mm 0 59 0 04 in Adjustment steps Screw in the pilot screw until it is lightly seated Back out by the ...

Страница 64: ...4 11 FUEL E PRIME STARTER PRIME STARTER EXPLODED DIAGRAM ...

Страница 65: ... Carburetor ass y Refer to CHARBURETOR REMOVAL 1 Screw with washer 2 4 10 mm 2 Electrothermal valve 1 3 Clip 1 4 Fuel enrichment hose 1 5 Clip 2 6 Fuel hose cover chamber 1 7 Screw with washer 4 8 Pump cover ass y 1 9 Diaphragm gasket 2 10 Diaphragm 1 11 Valve body 1 12 Screw 2 M3 13 Seat valve 2 14 Nut 2 15 O ring 1 Reverse the removal steps for installation ...

Страница 66: ...end Damage Replace 2 Measure Fuel enrichment valve resistance Out of specification Replace NOTE When measuring the resistance of 10 Ω or less using the digital tester the correct measurement cannot be obtained Refer to Lower resistance measurement section in chapter 8 3 Measure Piston valve height a No change Replace Fuel enrichment valve resistance Blue Black 2 32 3 48 Ω at 20 C 68 F Checking ste...

Страница 67: ...4 14 FUEL E PRIME STARTER ...

Страница 68: ...4 15 FUEL E OIL TANK OIL TANK EXPLODED DIAGRAM ...

Страница 69: ...0 Bolt with washer 1 11 Oil tank ass y 1 OIL TANK DISASSEMBLY 1 Oil level sensor 1 2 Oil strainer 1 3 Strainer gasket 1 4 Oil tank cap 1 5 Hook 1 6 Hook band 1 7 Filler tube band 1 8 Filler tube 1 9 Special washer 2 0 Ball chain 1 A Special washer 1 B Protector 2 C Oil return hose 1 D Check valve 1 E Oil return hose 1 F Clip 1 G Oil inlet hose 1 H Clip 1 I Oil drain hose 1 J Collar 3 K Grommet 3 L...

Страница 70: ...4 17 FUEL E OIL TANK OIL LINE LAYOUT 1 Electrothermal valve EM E model 2 Oil level sensor 3 Oil drain hose 4 Oil tank 5 Oil pump ...

Страница 71: ...Crack Replace Oil strainer inspection 1 Inspect Oil strainer Crack Clog Replace Contamination Clean Check valve inspection 1 Check Check valve operation Does not function Replace NOTE Check the operation of the check valve to ensure the air is blown only in the arrow direction ...

Страница 72: ...4 19 FUEL E OIL PUMP OIL PUMP EXPLODED DIAGRAM ...

Страница 73: ...se 1 3 Clip 1 4 Oil return hose 1 5 Clip 1 6 Plate washer 1 7 Link joint 1 8 Clip 3 9 Oil delivery hose 1 1 250 mm 10 Oil delivery hose 2 1 180 mm 11 Oil delivery hose 3 1 90 mm 12 Bolt 1 13 Bolt 1 14 Oil pump 1 15 O ring 1 Reverse the removal steps for installation NOTE Disconnect the joint at the pump side NOTE When connecting the hose feed oil into it while taking care not to allow air to enter...

Страница 74: ...tion 5 6 Spiral spring inspection 5 6 Starter rope inspection 5 6 Starter rope installation 5 7 Sheave drum installation 5 7 Spiral spring setting 5 7 Recoil starter checking 5 7 FLYWHEEL MAGNETO AND MAGNETO BASE 5 9 EXPLODED DIAGRAM 5 9 REMOVAL AND INSTALLATION CHART 5 10 SERVICE POINTS 5 11 Flywheel magneto removal 5 11 ELECTRICAL UNIT REMOVAL 5 13 EXPLODED DIAGRAM 5 13 REMOVAL AND INSTALLATION ...

Страница 75: ...ylinder body inspection 5 29 Piston to cylinder clearance 5 30 Oil pump driven gear inspection 5 30 Cylinder body and crankcase installation 5 30 CRANK SHAFT AND PISTON 5 31 EXPLODED DIAGRAM 5 31 REMOVAL AND INSTALLATION CHART 5 32 SERVICE POINTS 5 33 Piston pin clip removal 5 33 Piston pin and small end bearing removal 5 33 Piston ring removal 5 33 Bearing removal 5 33 Piston inspection 5 33 Pist...

Страница 76: ...5 1 POWR E POWER UNIT REMOVAL POWER UNIT REMOVAL EXPLODED DIAGRAM ...

Страница 77: ...n wire lead coupler 1 9 PTT motor lead 2 PTT model 10 PTT switch lead coupler 1 11 Choke lever rod 1 M model 12 Start in gear projection wire 1 13 Clip 1 14 Shift cable 1 15 Clip 1 16 Throttle cable 1 17 Bolt 2 18 Fitting plate ass y 1 19 Pilot water hose 1 20 Fuel hose Fuel joint Fuel filter 1 21 Bolt with washer 1 6 45 mm 22 Bolt with washer 1 6 20 mm 23 Screw 2 24 Apron 1 25 Bolt with washer 6 ...

Страница 78: ...5 3 POWR E RECOIL STARTER RECOIL STARTER EXPLODED DIAGRAM ...

Страница 79: ... 6 Drive pawl spring 1 7 Bolt with washer 1 6 30 mm 8 Stay 1 9 Rope roller 1 0 Collar 1 A Nut 1 B Bolt with washer 2 6 12 mm C Nut 1 D Bolt with washer 1 6 20 mm E Plane washer 1 F Bushing 1 G Sheave drum 1 H Spiral spring 1 I Starter case 1 J Cover 1 K Starter handle 1 L Damper 1 M Seal 1 N Rope guide 1 O Rope 1 2 095 mm Reverse the removal steps for installation NOTE Disconnect the wire at the b...

Страница 80: ...ng the sheave drum be sure to turn the sheave drum upside down to prevent the spiral spring from popping up at you NOTE Insert a slotted head screwdriver into the hole in the sheave drum and remove the spiral spring from the sheave drum by pushing the spring Spiral spring removal 1 Remove Spiral spring 1 WARNING Be careful so that the spiral spring does not pop out when removing it Remove it by al...

Страница 81: ...lace them as a set Bushing inspection 1 Inspect Bushing Crack Damage Replace Sheave drum inspection 1 Inspect Sheave drum Crack Damage Replace Spiral spring inspection 1 Inspect Spiral spring Broken Bent Damage Replace Starter rope inspection 1 Inspect Starter rope Fray Wear Damage Replace NOTE When replacing the rope cut it to the speci fied length and burn the rope end so that it will not travel...

Страница 82: ... sheave drum Place the rope at the cutaway Sheave drum installation 1 Install Sheave drum 1 NOTE Position the inner end of the spiral spring on the retainer post of the sheave drum Spiral spring setting 1 Set Spiral spring NOTE Wind up the spring 2 1 2 turns counter clockwise with the starter rope Recoil starter checking 1 Check Starter operation Unsmooth operation Repair ...

Страница 83: ...5 8 POWR E RECOIL STARTER ...

Страница 84: ...5 9 POWR E FLYWHEEL MAGNETO AND MAGNETO BASE FLYWHEEL MAGNETO AND MAGNETO BASE EXPLODED DIAGRAM ...

Страница 85: ...er to RECOIL STARTER 1 Screw 1 6 40 mm 2 Screw 2 6 35 mm 3 Washer 3 4 Flywheel cover 1 5 Collar 3 6 Bolt E model 3 8 14 mm 7 Bolt M model 3 8 20 mm 8 Starter pulley E model 1 9 Starter pulley M model 1 10 Packing 1 11 Flywheel nut 1 12 Washer 1 13 Screw with washer 1 5 10 mm 14 Timing plate 1 15 Flywheel magneto 1 16 Woodruff key 1 17 Bolt 3 6 18 mm 18 Base ass y 1 19 Gasket 1 Reverse the removal ...

Страница 86: ...ly slip off Flywheel holder YB 06139 90890 06522 Å ı 2 Remove Flywheel magneto Å For USA and CANADA ı Except for USA and CANADA CAUTION Keep the nut side flush with the crank shaft end until the flywheel comes off the tapered portion of the crankshaft To prevent damage to the engine or tools screw in the flywheel magneto puller set bolts evenly and completely so that the puller plate is parallel t...

Страница 87: ...5 12 POWR E FLYWHEEL MAGNETO AND MAGNETO BASE ...

Страница 88: ...5 13 POWR E ELECTRICAL UNIT REMOVAL ELECTRICAL UNIT REMOVAL EXPLODED DIAGRAM Å ...

Страница 89: ...oupler 7 6 Bolt with washer 2 7 Fitting plate ass y 1 8 Battery cable 1 9 Bolt with washer 2 10 PTT switch coupler 1 PTT model 11 PTT motor lead 2 Sky blue and light green leads 12 Bolt with washer 4 6 30 mm 13 Bolt with washer 1 8 25 mm 14 Electrical unit 1 15 Magneto control rod 1 16 Bolt with washer 2 17 CDI unit 1 18 Bolt 1 19 Magneto control lever 1 20 Spring 1 21 Accelation cam 1 Reverse the...

Страница 90: ...5 15 POWR E ELECTRICAL UNIT ELECTRICAL UNIT EXPLODED DIAGRAM ...

Страница 91: ...nit Refer to ELECTRICAL UNIT REMOVAL 1 Fuse 1 2 Clamp 1 3 Bolt with washer 1 4 Clamp 1 5 Bolt with washer 1 6 Rectifier regurator 1 7 Nut 2 8 Spring washer 1 9 Bracker 1 10 Relay holder 1 11 Starter relay 1 12 Bolt with washer 2 PTT model 13 Bolt with washer 1 14 Bolt with washer 2 15 PTT relay 1 16 Bracket 1 17 Collar 3 18 Grommet 3 Reverse the removal steps for installation ...

Страница 92: ...5 17 POWR E REED VALVE AND CHECK VALVE REED VALVE AND CHECK VALVE EXPLODED DIAGRAM ...

Страница 93: ...itch stay 1 WH EHTO model 5 Intake manifold ass y 1 6 Screw with washer 6 5 14 mm 7 Reed valve ass y 3 8 Valve plate gasket 2 9 Reed valve plate 1 10 Clip 6 Oil injection model 11 Oil delivery hose 1 1 250 mm 12 Oil delivery hose 2 1 180 mm 13 Oil delivery hose 3 1 90 mm 14 Check valve 3 REED VALVE DISASSEMBLY 1 Screw with washer 4 2 Valve stopper 2 3 Reed valve 2 4 Reed valve body 1 Reverse the r...

Страница 94: ...ed valve inspection 1 Inspect Reed valve Crack Damage Replace 2 Measure Valve bending a Out of specification Replace 3 Measure Valve stopper height b Out of specification Replace Valve bending limit 0 2 mm 0 01 in Valve stopper height 6 0 0 2 mm 0 24 0 01 in ...

Страница 95: ...5 20 POWR E REED VALVE AND CHECK VALVE ...

Страница 96: ...5 21 POWR E CYLINDER HEAD THERMOSTAT AND EXHAUST COVER CYLINDER HEAD THERMOSTAT AND EXHAUST COVER EXPLODED DIAGRAM ...

Страница 97: ...hermostat cover 1 9 Thermostat cover gasket 1 10 Thermostat 1 EXHAUST COVER REMOVAL Oil tank ass y Refer to OIL TANK in chapter 4 11 Clip 1 12 Pilot water hose 1 13 Bolt with washer Bolt with washer 14 13 6 35 mm Oil injection model 14 Exhaust outer cover 1 15 Outer cover gasket 1 16 Exhaust inner cover 1 17 Inner cover gasket 1 CYLINDER COVER DISASSEMBLY 1 Bolt with washer 4 6 25 mm 2 Cylinder he...

Страница 98: ...N Do not scratch the fitting surfaces of the cylinder and cylinder cover 2 Measure Cylinder head warpage Use a straightedge and thickness gauge Out of specification Resurface or replace Warpage limit 0 1 mm 0 004 in Resurfacing steps Place a 400 600 grit wet sandpaper on the surface plate Resurface the head using a figure eight sanding pattern NOTE Rotate the head several times to avoid removing t...

Страница 99: ...asure Valve opening temperature Valve lift Out of specification Replace Water temperature Valve lift Below 48 52 C 118 126 F 0 mm 0 in Above 60 C 140 F Min 3 mm 0 12 in Measuring steps Suspend thermostat in a vessel Place reliable thermometer in a water Heat water slowly Observe thermometer while stirring water continually ...

Страница 100: ...5 25 POWR E CRANKCASE AND CYLINDER BODY CRANKCASE AND CYLINDER BODY EXPLODED DIAGRAM ...

Страница 101: ...1 Clip 8 2 Drain less hose 1 200 mm 3 Drain less hose 1 310 mm 4 Drain less hose 1 360 mm 5 Drain less hose 1 240 mm 6 Bolt with washer 6 6 mm 7 Bolt with washer 8 8 mm 8 Crank case 1 9 Cylinder body 1 10 Dowel pin 2 CRANK CASE DISASSEMBLY 1 Bolt with washer 2 6 14 mm 2 Engine hanger 1 3 Bolt with washer 3 6 25 mm 4 Stay left 1 5 Bolt with washer 1 6 20 mm 6 Bolt with washer 2 8 25 mm 7 Stay right...

Страница 102: ...5 27 POWR E CRANKCASE AND CYLINDER BODY EXPLODED DIAGRAM ...

Страница 103: ...CASE AND CYLINDER BODY REMOVAL AND INSTALLATION CHART Step Procedure Part name Q ty Service points D Hose nipple 1 E Hose joint 3 F Check valve 2 G Check valve 2 H Hose joint 1 Reverse the removal steps for installation ...

Страница 104: ...er NOTE Do not scratch the fitting surfaces of the cyl inder and exhaust cover 3 Measure Cylinder bore D Use cylinder gauge Out of specification Rebore or replace NOTE Measure the cylinder bore D in parallel Then find the average of the measurement A 10 mm 0 4 in below the cylinder top B 5 mm 0 2 in above the exhaust port C 5 mm 0 2 in below the scavenging port Standard Wear limit Cylinder bore D ...

Страница 105: ...shaft and piston NOTE Align the piston ring end gaps with the respective locating pins Fit the bearing and the labyrinth seal locating pins in the cylinder body 2 Apply Gasket maker Onto the connecting surfaces of the crankcase and cylinder body NOTE Clean the connecting surfaces of the crankcase and cylinder body before apply ing the Gasket maker Gasket maker should be so applied that it does not...

Страница 106: ...5 31 POWR E CRANK SHAFT AND PISTON CRANK SHAFT AND PISTON EXPLODED DIAGRAM ...

Страница 107: ... 13 Oil pump drive gear 1 Oil injection model 14 Spacer 1 Pre mixed model OIL SEAL HOUSING DISASSEMBLY 1 O ring 1 2 Oil seal 1 3 Oil seal 2 Reverse the removal steps for installation NOTE Remove the crankshaft by lightly tapping it with a plastic hammer CAUTION Always use the new clip CAUTION The washer should be placed with their convex sides facing the piston CAUTION Do not a mixture of new and ...

Страница 108: ...nd needle bearings are reused they should be marked with No 1 2 and 3 so that they are not confused Piston ring removal 1 Remove Piston ring NOTE Remove the piston ring from the piston by opening the ring to the least possible width Bearing removal 1 Remove Bearing NOTE Hold the bearing with the bearing separa tor and forth out the crankshaft with a press Piston inspection 1 Measure Piston diamete...

Страница 109: ...ce Piston pin boss inside diameter 18 008 18 015 mm 0 7090 0 7093 in Piston pin and small end bearing inspection 1 Inspect Piston pin Small end bearing Signs of heat discoloration Replace Scratch Damage Replace 2 Measure Piston pin diameter Use a micrometer Out of specification Replace Piston pin diameter 17 995 18 000 mm 0 7085 0 7087 in 3 Check Free play when the piston pin is inserted in the pi...

Страница 110: ...on ring into the cylinder Push the ring with the piston crown End gap Top 0 40 0 60 mm 0 016 0 024 in 2nd 0 40 0 60 mm 0 016 0 024 in End gap limit Top 0 80 mm 0 031 in 2nd 0 80 mm 0 031 in Measuring point 20 mm 0 8 in 3 Measure Side clearance Use a thickness gauge Out of specification Replace piston and or ring Side clearance Top 0 04 0 08 mm 0 002 0 003 in 2nd 0 03 0 07 mm 0 001 0 003 in ...

Страница 111: ...3 95 mm 2 122 2 124 in Crank width B 32 88 33 10 mm 1 294 1 303 in Runout limit 0 03 mm 0 001 in 3 Measure Axial play Out of specification Replace Axial play limit 2 0 mm 0 08 in 4 Inspect Crankshaft bearing Pitting Rumbling Replace CAUTION Do not spin bearing with air blower this can damage the bearing Also take care not to scratch the bearing balls when cleaning 5 Inspect Oil pump drive gear Cra...

Страница 112: ...ly NOTE Piston rings should be replaced as a set Crankshaft and piston installation 1 Install Small end bearing needle 2 Install Piston 1 Piston pin 2 Piston pin clip 3 CAUTION Do not allow the clip open ends to meet the piston pin slot NOTE Mold mark a faces in the same direction as the UP mark on the piston When no piston is replaced be sure to re install the pistons in their original cylin der ...

Страница 113: ......

Страница 114: ...se gear inspection 6 8 Bearing inspection 6 8 Propeller shaft housing inspection 6 8 Dog clutch inspection 6 8 Propeller shaft inspection 6 8 Propeller shaft housing assembly 6 9 DRIVE SHAFT FORWARD GEAR AND SHIFT ROD 6 11 EXPLODED DIAGRAM 6 11 REMOVAL AND INSTALLATION CHART 6 12 EXPLODED DIAGRAM 6 13 REMOVAL AND INSTALLATION CHART 6 14 SERVICE POINTS 6 15 Pinion nut removal 6 15 Forward gear disa...

Страница 115: ...A AND CANADA 6 19 Pinion gear shim 6 19 Forward gear shim 6 21 Reverse gear shim 6 22 SHIM SELECTION EXCEPT FOR USA AND CANADA 6 23 Pinion gear shim 6 23 Forward gear shim 6 25 Reverse gear shim 6 26 BACKLASH MEASUREMENT 6 26 Forward gear 6 27 Reverse gear 6 28 ...

Страница 116: ...6 1 LOWR E LOWER UNIT REMOVAL LOWER UNIT REMOVAL EXPLODED DIAGRAM ...

Страница 117: ...model 14 Spring washer 4 15 Plane washer 4 16 Lower unit 1 17 Dowel pin 2 18 Extension 1 X model 19 Dowel pin 2 20 Stud bolt 4 Reverse the removal steps for installation NOTE If the propeller nut does not align with the propeller shaft hole when the nut is tightened to specification turn it in fur ther so that they align NOTE Insert the drive shaft into the crankshaft If the splines will not come ...

Страница 118: ...6 3 LOWR E WATER PUMP WATER PUMP EXPLODED DIAGRAM ...

Страница 119: ...y 1 8 Cartridge plate 1 9 Plate gasket 1 10 Pin 2 11 Water seal cover 1 12 Water seal rubber 1 Reverse the removal steps for installation NOTE When installing the water pump housing align the hole in it with the projection in the insert cartridge NOTE When installing the cartridge turn the drive shaft clockwise SERVICE POINTS Water pump housing inspection 1 Inspect Water pump housing Crack Damage ...

Страница 120: ...6 5 LOWR E PROPELLER SHAFT AND REVERSE GEAR PROPELLER SHAFT AND REVERSE GEAR EXPLODED DIAGRAM ...

Страница 121: ...shim 3 Ball bearing 1 4 O ring 1 5 O ring 2 6 Oil seal 2 7 Needle bearing 1 8 Propeller shaft housing 1 PROPELLER SHAFT DISASSEMBLY 9 Cross pin ring 1 0 Cross pin 1 A Shift plunger 1 B Shift slider 1 C Spring 1 D Dog clutch 1 E Propeller shaft 1 Reverse the removal steps for installation As required NOTE Install the bearing with its manufacture s marks or numbers facing outward NOTE Install the be...

Страница 122: ...2 Stopper guide plate 90890 06501 4 Center bolt 90890 06504 5 Å ı Propeller shaft housing disassembly 1 Remove Reverse gear 2 Remove Ball bearing 1 Å For USA and CANADA ı Except for USA and CANADA Bearing separator YB 06219 90890 06534 Stopper guide plate 90890 06501 Bearing puller 90890 06535 Stopper guide stand 90890 06538 Slide hammer set YB 06096 2 Stopper guide plate 90890 06501 3 Bearing pul...

Страница 123: ... Inspect Tooth Dog Wear Damage Replace Bearing inspection 1 Inspect Bearing Pitting Rumbling Replace Propeller shaft housing inspection 1 Clean Propeller shaft housing Use a soft brush and solvent 2 Inspect Propeller shaft housing Crack Damage Replace Dog clutch inspection 1 Inspect Dog clutch Wear Damage Replace Propeller shaft inspection 1 Inspect Propeller shaft Wear Damage Replace ...

Страница 124: ...ADA ı Except for USA and CANADA Depth a 3 0 3 5 mm 0 12 0 14 in Depth b 23 0 23 5 mm 0 91 0 93 in Driver rod YB 06071 1 90890 06604 3 Needle bearing attachment YB 06111 2 90890 06614 4 Bearing depth plate 90890 06603 5 Å ı 2 Install Oil seal Depth a 4 0 4 5 mm 0 16 0 18 in Oil seal installer YB 06168 Driver rod YB 06071 ...

Страница 125: ...6 10 LOWR E PROPELLER SHAFT AND REVERSE GEAR ...

Страница 126: ...6 11 LOWR E DRIVE SHAFT FORWARD GEAR AND SHIFT ROD DRIVE SHAFT FORWARD GEAR AND SHIFT ROD EXPLODED DIAGRAM ...

Страница 127: ...ousing ass y 1 5 Plane washer 1 6 Forward gear ass y 1 7 Shift rod ass y 1 8 Shift cam 1 DRIVE SHAFT OIL SEAL HOUS ING DISASSEMBLY 1 Oil seal cover 1 2 O ring 1 3 Oil seal 2 4 Drive shaft oil seal housing 1 SHIFT ROD DISASSEMBLY 5 O ring 1 6 Shift rod oil seal housing 1 7 O ring 1 8 Oil seal 1 9 Circlip 1 0 Shift rod 1 LOWER CASE DISASSEMBLY A Drive shaft bearing outer race 1 B Pinon gear shim C D...

Страница 128: ...6 13 LOWR E DRIVE SHAFT FORWARD GEAR AND SHIFT ROD EXPLODED DIAGRAM ...

Страница 129: ...NSTALLATION CHART Step Procedure Part name Q ty Service points F Forward gear shim G Screw 1 H Water inlet cover 1 1 I Water inlet cover 2 1 J Nut 1 K Hose nipple 1 L Bolt with washer 1 M Anode 1 N Lower case 1 Reverse the removal steps for installation As required ...

Страница 130: ...ve shaft holder YB 06079 90890 06517 1 Pinion nut wrench 90890 06505 2 Socket adapter 90890 06506 3 Bearing separator YB 06219 90890 06534 Lower case disassembly 1 Remove Drive shaft bearing outer race 1 Å For USA and CANADA ı Except for USA and CANADA Slide hammer set YB 06096 2 Stopper guide plate 90890 06501 3 Bearing puller 90890 06535 4 Stopper guide stand 90890 06538 5 Å ı ...

Страница 131: ...cept for USA and CANADA Slide hammer set YB 06096 1 Bearing outer race puller 90890 06523 2 Bearing outer race puller claw 90890 06532 3 Stopper guide stand 90890 06538 4 Å ı Pinion and forward gear inspection 1 Inspect Tooth Dog Wear Damage Replace Drive shaft inspection 1 Inspect Drive shaft Wear Damage Replace Shift cam inspection 1 Inspect Shift cam Wear Damage Replace Bearing inspection 1 Ins...

Страница 132: ...ck Damage Replace Lower case assembly 1 Install Forward gear shim 1 Forward gear bearing outer race 2 Bearing installer YB 41446 90890 06626 Driver rod YB 06071 90890 06605 2 Install Drive shaft needle bearing Å For USA and CANADA ı Except for USA and CANADA Depth a 182 5 183 mm 7 19 7 20 in Bearing installer YB 06063 1 90890 06614 4 Driver rod YB 06071 2 90890 06602 5 Driveshaft needle bearing de...

Страница 133: ... 90890 06606 2 Depth a 0 0 0 5 mm 0 00 0 02 in Bearing installer YB 06167 90890 06628 Driver rod YB 06071 90890 06605 Forward gear assembly 1 Install Forward gear Taper roller bearing Å For USA and CANADA ı Except for USA and CANADA Bearing installer YB 06270 A 1 90890 06640 2 Å ı Pinion nut installation 1 Install Pinion nut Drive shaft holder YB 06079 90890 06517 1 Pinion nut wrench 90890 06505 2...

Страница 134: ...ness T3 by selecting shims until the specified measure ment M is obtained with the special tool 1 Calculate Specified measurement M NOTE P is the deviation of the lower case dimen sion from standard It is stamped on the trim tab mounting surface of the lower case in 0 01 mm units If the P mark is missing or unreadable assume a P mark of 0 and check the backlash when the unit is assembled If the P ...

Страница 135: ...h a 0 50 mm shim 3 Install Pinion Pinion nut 4 Check Specified measurement M Out of specified measurement Adjust NOTE Check the fit between the shimming gauge and lower surface of the pinion Perform the same measurement at three points on the pinion nut 5 Adjust Shim s Remove or add Gauge block YB 34432 9 3 Adapter plate YB 34432 10 4 Gauge base YB 34432 11 5 Clamp YB 34432 17 6 T R Pinion nut 75 ...

Страница 136: ...adable assume an F mark of 0 and check the backlash when the unit is assembled If the F value is negative then subtract the F value from the measurement Example If F mark is 5 then M 0 06 mm 5 100 0 06 0 05 mm 0 11 mm If F mark is 5 then M 0 06 mm 5 100 0 06 0 05 mm 0 01 mm 2 Install Shimming gauge Bearing 1 Shim s 2 NOTE Tighten the nut four turns after contact with the spring If the original shi...

Страница 137: ...late Thickness gauge YU 26900 9 4 Adjust Shim s Remove or add Available shim thickness 0 05 0 08 0 12 0 30 and 0 50 mm Reverse gear shim NOTE Find reverse gear shim thickness T2 by backlash measurement Measure the backlash with the original shim s If the original shim s is unavailable start with a 0 50 mm shim Available shim thickness 0 05 0 08 0 12 0 30 and 0 50 mm ...

Страница 138: ...shaft so that the shaft is at the center of the hole Tighten the wing nuts 1 4 turn after con tacting the fixing plate 2 Install Pinion Pinion nut 3 Measure Measurement M NOTE Measure the fit between the pinion height gauge and lower surface of the pinion Perform the same measurement at three points on the pinion 4 Calculate Pinion gear shim thickness T3 Pinion height gauge 90890 06702 T R Pinion ...

Страница 139: ...ative then subtract the P value from the measurement Example If M is 11 70 mm and P mark is 5 then T3 11 70 mm 11 30 5 100 0 40 0 05 mm 0 45 mm If M is 11 70 mm and P mark is 5 then T3 11 70 mm 11 30 5 100 0 40 0 05 mm 0 35 mm 5 Select Pinion gear shim Example If T3 is 0 44 mm then pinion gear shim 0 45 mm If T3 is 0 39 mm then pinion gear shim 0 40 mm Calculated numeral at 1 100th place Rounded n...

Страница 140: ...f the lower case dimen sion from standard It is stamped on the trim tab mounting surface of the lower case in 0 01 mm units If the F mark is missing or unreadable assume an F mark of 0 and check the backlash when the unit is assembled If the F value is negative then subtract the F value from the measurement Example If M is 22 30 mm and F mark is 5 then T1 22 75 mm 5 100 22 30 0 45 0 05 mm 0 50 mm ...

Страница 141: ...h measurement Measure the backlash with the original shim s If the original shim s is unavailable start with a 0 50 mm shim BACKLASH MEASUREMENT NOTE Do not install the water pump compo nents when measuring the backlash Both forward and reverse gear backlashes should be measured If both the forward and reverse gear back lashes are large than specified the pinion may be too high If both forward and...

Страница 142: ... R Center bolt 5 Nm 0 5 m kg 3 6 ft lb Set the lower unit upside down Attach the backlash indicator on the drive shaft 18 mm in diameter Backlash indicator YB 6265 90890 06706 Attach the dial gauge on the gear case and make the dial gauge stem contact the mark on the indicator Backlash adjusting plate YB 07003 Dial gauge YU 03097 90890 01252 Magnet base YU 34481 90890 06705 While pulling the drive...

Страница 143: ... 0 12 0 30 and 0 50 mm Reverse gear 1 Measure Reverse gear backlash Out of specification Adjust Backlash 0 71 0 98 mm 0 028 0 039 in Measuring steps Load the reverse gear by installing the propeller with the front side facing backward and tighten the propeller nut T R Propeller nut 5 Nm 0 5 m kg 3 6 ft lb Attach the backlash indicator on the drive shaft 18 mm in diameter Backlash indicator YB 6265...

Страница 144: ...base YU 34481 90890 06705 While pulling the drive shaft slowly turn the drive shaft clockwise and counterclockwise then measure the backlash when the drive shaft stops at each direction Reverse gear backlash Shim thickness Less than 0 71 mm To be decreased by 0 85 mea surement 0 56 More than 0 98 mm To be increased by measurement 0 85 0 56 Available shim thickness 0 05 0 08 0 12 0 30 and 0 50 mm ...

Страница 145: ......

Страница 146: ...ASSEMBLY 7 7 EXPLODED DIAGRAM 7 7 REMOVAL AND INSTALLATION CHART 7 8 SERVICE POINTS 7 8 Throttle arm inspection 7 8 Throttle shift ass y inspection 7 8 Cam plate inspection 7 8 Bushing inspection 7 8 SHIFT ACTUATOR AND BOTTOM COWLING 7 9 EXPLODED DIAGRAM 7 9 REMOVAL AND INSTALLATION CHART 7 10 UPPER CASE REMOVAL 7 11 EXPLODED DIAGRAM 7 11 REMOVAL AND INSTALLATION CHART 7 12 SERVICE POINTS 7 12 Rub...

Страница 147: ... PUMP HOUSING AND MOTOR REMOVAL 7 27 EXPLODED DIAGRAM 7 27 REMOVAL AND INSTALLATION CHART 7 28 SERVICE POINTS 7 28 TILT CYLINDER 7 29 EXPLODED DIAGRAM 7 29 REMOVAL AND INSTALLATION CHART 7 30 SERVICE POINTS 7 31 Tilt cylinder disassembly 7 31 Inner cylinder disassembly 7 31 Tilt rod inspection 7 31 Tilt cylinder inspection 7 31 Tilt piston inspection 7 31 Spring inspection 7 31 Free piston inspect...

Страница 148: ...7 1 BRKT E TILLER HANDLE REMOVAL TILLER HANDLE REMOVAL EXPLODED DIAGRAM ...

Страница 149: ...ler 1 EHTO TH model 12 Trim sensor lead coupler 1 13 Extension wire lead coupler 1 14 Clip 1 15 Shift cable 1 16 Clip 1 17 Throttle cable 1 18 Bolt 2 19 Fitting plate ass y 1 20 Clamp 1 M model 21 Engine stop switch lead 1 22 Main switch lead 1 23 Extension wire lead 1 24 Nut 2 25 Tiller handle ass y 1 STEERING FRICTION DISASSEMBLY 1 Bolt with washer 2 2 Plane washer 2 3 Friction plate ass y 1 4 C...

Страница 150: ...7 3 BRKT E TILLER HANDLE TILLER HANDLE EXPLODED DIAGRAM ...

Страница 151: ...orter cable 10 Shift cable 1 Longer cable 11 Bolt with washer 2 6 16 mm 12 Cable bracket 1 13 Screw with washer 2 14 Shift lever cover 1 15 Bolt with washer 4 16 Screw 1 17 Handle grip ass y 1 18 Plain washer 1 19 Spring 1 20 Bushing 1 21 Bolt with washer 1 22 Shift lever 1 23 Bushing 1 24 Washer 1 25 Cotter pin 1 26 Friction knob 1 27 Nut 1 28 Bolt with washer 4 6 16 mm 29 Link ass y 1 30 Frictio...

Страница 152: ...7 5 BRKT E TILLER HANDLE EXPLODED DIAGRAM ...

Страница 153: ...or installation SERVICE POINTS Control cable inspection 1 Inspect Throttle cable Shift cable Kink Fray Stick Replace Bushing inspection 1 Inspect Bushing Wear Crack Damage Replace Shift lever inspection 1 Inspect Shift lever Wear Crack Damage Replace Friction piece inspection 1 Inspect Friction piece Wear Crack Damage Replace Steering handle inspection 1 Inspect Steering handle Wear Crack Damage R...

Страница 154: ...7 7 BRKT E LINK ASS Y DISASSEMBLY LINK ASS Y DISASSEMBLY EXPLODED DIAGRAM ...

Страница 155: ...ew 2 7 Spring guide 1 8 Roller 1 9 Actuator 1 10 Spring 1 11 Circlip 1 12 Cam plate 1 13 Bushing 1 14 Frame 1 15 Stopper 1 Neutral opening limit model Reverse the removal steps for installation SERVICE POINTS Throttle arm inspection 1 Inspect Tooth Wear Damage Replace Throttle shift ass y inspection 1 Inspect Throttle shift Wear Bent Damage Replace Cam plate inspection 1 Inspect Cam plate Wear Cra...

Страница 156: ...7 9 BRKT E SHIFT ACTUATOR AND BOTTOM COWLING SHIFT ACTUATOR AND BOTTOM COWLING EXPLODED DIAGRAM ...

Страница 157: ...nsor lead 1 PTT model 6 Grommet 1 7 Bolt 4 6 30 mm 8 Plane washer 4 9 Bottom cowling ass y 1 10 Seal rubber 1 11 Collar 4 12 Grommet 4 13 Grommet 1 SHIFT ACTUATOR ASS Y 1 Plug screw 1 2 Spring 1 3 Ball 1 4 Clip 1 5 Clip 1 6 Bushing 1 7 Plane washer 1 8 Shift rod lever 1 9 Cotter pin 1 0 Plane washer 1 A Shift actuator 1 B Bushing 1 C Shift rod 1 Reverse the removal steps for installation NOTE Disc...

Страница 158: ...7 11 BRKT E UPPER CASE REMOVAL UPPER CASE REMOVAL EXPLODED DIAGRAM ...

Страница 159: ...olt with washer 4 8 30 mm 3 Lower mount housing 2 4 Mount damper 2 5 Nut 2 6 Nut 2 7 Plane washer 2 12 8 22 5 mm 8 Lead wire 1 9 Plane washer 2 12 8 22 5 mm 10 Upper case ass y 1 11 Lower rubber mount 2 12 Washer 2 13 Plane washer 2 13 34 mm 14 Mounting bolt 2 15 Bolt with washer 3 8 35 mm 16 Upper rubber mount 1 17 Plate 1 18 Plane washer 2 19 Mounting bolt 2 Reverse the removal steps for install...

Страница 160: ...7 13 BRKT E UPPER CASE AND EXHAUST MANIFOLD UPPER CASE AND EXHAUST MANIFOLD EXPLODED DIAGRAM ...

Страница 161: ... y Refer to UPPER CASE REMOVAL 1 Bolt with washer 2 2 Upper case 1 3 Dowel pin 2 EXHAUST MANIFOLD REMOVAL 4 Muffler seal 1 5 Seal rubber 1 6 Bolt with washer 4 8 30 mm 7 Exhaust guide 1 8 Grommet 1 9 Water tube 1 10 Seal rubber 1 11 Washer 1 12 Upper case gasket 1 13 Bolt with washer 3 8 30 mm 14 Exhaust manifold 1 15 Exhaust manifold gasket 1 16 Muffler 1 Reverse the removal steps for installatio...

Страница 162: ...7 15 BRKT E CLAMP BRACKET CLAMP BRACKET Manual tilt EXPLODED DIAGRAM ...

Страница 163: ...11 Bolt 1 12 Collar 1 13 Cap 2 14 Self lock nut 1 15 Clamp bracket plate 1 16 Clamp bracket 2 ass y 1 17 Plane washer 1 18 Shallow water drive lever 1 Shallow water drive model 19 Spring 1 20 Tilt lever 1 21 Swivel bracket ass y 1 22 Plane washer 1 23 Clamp bracket 1 ass y 1 24 Clamp bracket bolt 1 25 Self lock nut 1 26 Bushing 2 CLAMP BRACKET DISASSEMBLY 1 Circlip 1 2 Plane washer 1 3 Clamp brack...

Страница 164: ...7 17 BRKT E CLAMP BRACKET CLAMP BRACKET Hydro tilt Power trim and tilt EXPLODED DIAGRAM ...

Страница 165: ...e nipple 1 9 Wire lead 1 10 Tilt rod ass y 1 11 Nut 1 12 Plane washer 1 13 Stud bolt 1 14 Clamp bracket spacer ass y 1 15 Nut 1 16 Cap 2 17 Self lock nut 1 18 Clamp bracket 2 1 19 Plane washer 1 20 Swivel bracket ass y 1 21 Plane washer 1 22 Clamp bracket 1 1 23 Bushing 2 24 Clamp bracket bolt 1 25 Self lock nut 1 ANODE REMOVAL 1 Bolt with washer 1 2 Wire lead 1 3 Bolt with washer 1 PTT model 4 Wi...

Страница 166: ...7 19 BRKT E STEERING BRACKET STEERING BRACKET EXPLODED DIAGRAM ...

Страница 167: ...removal Upper case ass y Refer to UPPER CASE REMOVAL 1 Flange bolt 1 Manual tilt model 2 Seal rubber 1 3 Circlip 1 4 Lower mount housing 1 5 Steering bracket 1 6 Plane washer 1 7 Bushing 1 8 O ring 1 9 Bushing 1 10 Friction piece 1 Manual tilt model 11 Bushing 1 12 O ring 1 13 Bushing 1 14 Swivel bracket ass y 1 Reverse the removal steps for installation ...

Страница 168: ...7 21 BRKT E SWIVEL BRACKET SWIVEL BRACKET EXPLODED DIAGRAM ...

Страница 169: ... 2 1 3 Rod joint 3 4 Clip 1 5 Tilt lever shaft 1 6 Tilt lever 1 2 Shallow water drive model 7 Tilt lock rod 3 1 2 8 Tilt lock rod 4 1 9 Clip 1 Shallow water drive model 10 Pin 1 11 Lever 1 1 12 Spring 1 13 Lever 2 1 14 Spring 2 15 Clip 1 16 Tilt lock plate shaft 1 17 Washer 2 18 Spring 1 Shallow water drive model 19 Collar 1 20 Tilt lock ass y 1 21 Shallow water drive lever 1 Shallow water drive m...

Страница 170: ...7 23 BRKT E SWIVEL BRACKET DISASSEMBLY SWIVEL BRACKET DISASSEMBLY EXPLODED DIAGRAM ...

Страница 171: ...tep for removal Upper case ass y Refer to UPPER CASE REMOVAL Clamp bracket Refer to CLAMP BRACKET Steering bracket Refer to STEERING BRACKET 1 Bolt with washer 1 6 10 mm 2 Spring hook 1 3 Spring 1 4 Spring pin 2 5 Distance collar ass y 1 6 Tilt support lever 1 1 7 Bushing 1 8 Bushing 1 9 Tilt support lever 2 1 10 Bushing 2 11 Swivel bracket 1 Reverse the removal steps for installation ...

Страница 172: ...7 25 BRKT E TILT UNIT REMOVAL TILT UNIT REMOVAL EXPLODED DIAGRAM ...

Страница 173: ...T motor lead Trim sensor lead 3 Bolt with washer 1 6 10 mm 4 Wire lead 1 5 Bolt with washer 1 6 Wire lead 1 7 Tilt rod ass y 1 8 Nut 1 9 Plane washer 1 10 Stud bolt 1 11 Clamp bracket spacer ass y 1 12 Bushing 2 13 Nut 1 14 Crip 2 15 Shaft pin 1 16 Tilt unit 1 17 Bushing 2 18 Collar 1 Reverse the removal steps for installation NOTE Turn the tilt support lever toward clamp bracket and support the o...

Страница 174: ...7 27 BRKT E TILT CYLINDER PUMP HOUSING AND MOTOR REMOVAL TILT CYLINDER PUMP HOUSING AND MOTOR REMOVAL EXPLODED DIAGRAM ...

Страница 175: ...sing ass y 1 Reverse the removal steps for installation WARNING When removing the plug screw PTT unit should be fully tilt up positioned SERVICE POINTS WARNING The PTT unit should be fully tilt up posi tioned all the tilt rod should be fully lengthen for disassembly to cancel the internal pressure and prevent the hydrau lic fluid from spurting out After removing the tilt motor or oil reser voir do...

Страница 176: ...7 29 BRKT E TILT CYLINDER TILT CYLINDER EXPLODED DIAGRAM ...

Страница 177: ...54 7 47 7 mm 6 O ring 1 58 5 54 5 mm 7 Inner cylinder end screw 1 8 Tilt rod sub ass y 1 9 Trim piston 1 10 O ring 1 50 7 43 7 mm 11 Backup ring 1 12 O ring 1 35 7 28 7 mm 13 O ring 1 39 0 35 0 mm 14 Circlip larger 1 15 Valve plate 1 16 Spring 2 17 Stopper plate 1 18 Circlip smaller 1 19 Free piston 1 20 O ring 1 35 7 28 7 mm 21 Circlip 1 22 Valve seal 1 23 Inner cylinder 1 Reverse the removal ste...

Страница 178: ...formed Tilt rod inspection 1 Inspect Tilt rod Bend Excessive corrode Replace Rust lightly Polish with 400 600 abrasive paper Tilt cylinder inspection 1 Inspect Tilt cylinder Crack Excessive corrosion Replace 2 Inspect Cylinder inner Scratch on the cylinder inner wall Replace Tilt piston inspection 1 Inspect Tilt piston Excessive scratch Replace Spring inspection 1 Inspect Spring Crack Deformation ...

Страница 179: ... cylinder end screw Tilt cylinder wrench YB 06175 2B 90890 06544 Tilt cylinder assembly 1 Install Ball 1 Tilt cylinder 2 NOTE Apply the grease to the balls to prevent them from falling down To find any ball that may fall turn the inner cylinder unit upside down to install the tilt cylinder 2 Fill ATF Dexiron type 2 to tilt cylinder 3 Tighten Tilt cylinder end screw Tilt cylinder wrench YB 06175 2B...

Страница 180: ...7 33 BRKT E PUMP HOUSING PUMP HOUSING EXPLODED DIAGRAM ...

Страница 181: ...w 2 10 Retaining plate 1 11 Spring 1 8 8 4 3 mm 12 Valve support pin 1 13 Valve seat 1 14 Spring 1 8 8 21 8 mm 15 Valve seat 1 16 Valve support pin 1 17 Valve seat 1 18 O ring 1 13 7 10 7 mm 19 Filter 1 20 Main valve 2 21 O ring 2 17 1 12 3 mm 22 O ring 2 14 5 11 5 mm 23 Shuttle piston 1 24 O ring 1 12 6 8 8 mm 25 Circlip 1 26 Valve body 1 27 O ring 1 10 6 6 8 mm 28 O ring 1 9 6 5 8 mm 29 Valve se...

Страница 182: ...7 35 BRKT E PTT MOTOR PTT MOTOR EXPLODED DIAGRAM ...

Страница 183: ...ER PUMP HOUS ING AND MOTOR REMOVAL 1 Screw 3 2 Stator 1 3 Armature ass y 1 4 Plane washer 1 5 O ring 1 55 8 52 0 mm 6 Brush ass y 1 7 Screw with washer 2 8 Lead wire 1 9 Brush ass y 1 10 Cover plate 1 11 Circuit breaker 1 12 Brush spring 2 13 Base 1 14 Oil seal 1 Reverse the removal steps for installation NOTE When installing the armature hold the armature shaft to prevent the armature coming off ...

Страница 184: ... Clean NOTE Remove all particles of metal with com pressed air 3 Measure Commutator diameter Out of specification Replace Commutator diameter Limit 21 mm 0 83 in 4 Inspect Armature coil continuity Out of specification Replace Armature coil continuity Commutator segments Continuity Segment Laminations Discontinuity Segment Shaft Discontinuity ...

Страница 185: ...cification Replace Brush length a Limit 3 5 mm 0 14 in 8 Inspect Base Crack Damage Replace 9 Inspect Stator bushing Base bushing Wear Damage Replace the stator or the base 10 Inspect Base oil seal Wear Damage Replace Motor assembly 1 Check Motor operation Out of specification Repair Motor operation Blue Green Clockwise Green Blue Counterclockwise ...

Страница 186: ...age measurement 8 8 Low resistance measurement 8 8 IGNITION SYSTEM 8 9 IGNITION SPARK GAP 8 10 CDI SYSTEM PEAK VOLTAGE 8 10 SPARK PLUG 8 12 SPARK PLUG CAP 8 12 ENGINE STOP SWITCH 8 13 MAIN SWITCH 8 14 IGNITION CONTROL SYSTEM 8 15 THERMO SWITCH 8 16 OIL LEVEL SENSOR 8 16 WARNING LAMP 8 17 OIL LEVEL WARNING LAMP 8 18 CDI UNIT 8 18 STARTING SYSTEM 8 19 BATTERY 8 20 WIRING HARNESS 8 20 WIRING CONNECTI...

Страница 187: ... Armature inspection 8 25 Brush holder inspection 8 26 Cover inspection 8 27 CHARGING SYSTEM 8 28 CHARGING SYSTEM PEAK VOLTAGE 8 29 FUSE 8 29 BATTERY 8 29 ENRICHMENT CONTROL SYSTEM 8 30 LIGHTING COIL 8 30 ELECTROTHERMAL VALVE 8 30 RECTIFIER REGULATOR 8 30 POWER TRIM AND TILT CONTROL SYSTEM 8 31 BATTERY 8 32 FUSE 8 32 PTT SWITCH 8 32 PTT RELAY 8 32 TRIM SENSOR 8 33 ...

Страница 188: ...8 1 ELEC E ELECTRICAL COMPONENTS ELECTRICAL COMPONENTS OIL INJECTION MODEL 1 Electrothermal valve 2 Oil level sensor L Blue B Black ...

Страница 189: ...ting coil 5 Pulser coil 6 CDI unit 7 Ignition coil 8 2P consent 9 Rectifier regulator 0 Thermo switch Å To engine stop switch ı To 6 Ç To 6 Î To 6 To 1 Ï To 2 Ì To 4 Europe model B Black Br Brown B O Black Orange B W Black White B Y Black Yellow L Blue O Orange O G Orange Green P Pink Y R Yellow Red W White ...

Страница 190: ...l 6 Pulser coil 7 CDI unit 8 Starter relay 9 Ignition coil 0 Fuse A Thermo switch B Rectifier regulator C Starter motor B Black Br Brown B O Black Orange B W Black White B Y Black Yellow L Blue O Orange O G Orange Green P Pink Y R Yellow Red W White Å To wire harness ı To 5 Ç To 7 Î To remote control To 3 Ï To 1 Ì To battery Ó To 2 Single lamp model ...

Страница 191: ...r relay 0 P T T relay A Ignition coil B Fuse C Thermo switch D Rectifier regulator E Starter motor Å To P T T motor ı To trim meter Ç To wire harness Î To 6 To 8 Ï To 0 Ì To remote control Ó To 4 È To 2 Ô To battery To 3 Ò To 1 ET model B Black Br Brown B O Black Orange B W Black White B Y Black Yellow L Blue Lg Light green O Orange O G Orange Green P Pink Sb Sky blue Y R Yellow Red W White ...

Страница 192: ...ead 4 Battery cable 5 Extension wire harness 6 Neutral switch B Black Br Brown B O Black Orange B W Black White B Y Black Yellow L Blue O Orange O G Orange Green P Pink Y R Yellow Red W White Å To trim sensor ı To oil level sensor Ç To starter motor and starter relay Î To starter relay To 10P coupler ...

Страница 193: ...COMPONENTS E EO MODEL 1 Starter motor 2 Rectifier regulator 3 Ignition coil 4 Fuse 5 Starter relay a Bracket b Ground terminal B Black Br Brown B O Black Orange B W Black White B Y Black Yellow L Blue O Orange O G Orange Green P Pink Y R Yellow Red W White ...

Страница 194: ...L 1 Starter motor 2 Rectifier regulator 3 Ignition coil 4 Starter relay 5 P T T relay 6 Fuse a Bracket b Ground terminal B Black Br Brown B O Black Orange B W Black White B Y Black Yellow L Blue O Orange O G Orange Green P Pink Y R Yellow Red W White ...

Страница 195: ...age measurement NOTE The coil output varies greatly at cranking speed Cranking a cold engine with the plugs in and a weak battery does not enable proper readings Low resistance measurement When measuring a resistance of 10 Ω or less using the digital tester the correct measurement cannot be obtained because of the tester s internal resistance To obtain the correct value subtract this internal resi...

Страница 196: ...Charge coil 4 Pulser coil 5 Main switch 6 Engine stop switch 7 10P coupler 8 7P coupler 9 CDI unit Å Manual starter model ı Electrical starter model Br Brown L Blue W R White Red W B White Black W G White Green B O Black Orange B W Black White B Y Black Yellow W White B Black ...

Страница 197: ...AGE WARNING While taking CDI unit check be careful not to touch any connection of lead wires of the Digital tester NOTE If there is no spark or the spark is weak continue with the CDI test If a good spark is obtained the problem is not with the CDI system but possibly the spark plug or other component is defec tive Spark gap 9 mm 0 35 in Checking steps Adjust the spark gap to specification by turn...

Страница 198: ...e 3 pins test harness 3 pins test harness YB 06443 90890 06757 Connect the tester to the measurement terminal Set the tester dial to specification Range Crank or start the engine V 2 Measure Charge coil output test 2 Below specification Replace charge coil Beyond specification Measure pulser coil output Charge coil output Br L 145 V cranking 160 V 1 500 r min 130 V 3 500 r min Measuring steps Conn...

Страница 199: ...0 r min Measuring steps Disconnect the pulse coil couple Con nect the 3 pins test harness 3 pins test harness YB 06443 90890 06757 Connect the tester to the measurement terminal Set the tester dial to specification Range Crank or start the engine V SPARK PLUG CAP 1 Inspect Spark plug cap Loosen Tighten Crack Damage Replace 2 Measure For Canada and Europe Spark plug cap resistance Out of specificat...

Страница 200: ...se to the spread core wires and bend the spring end for clamping Install the plug cap spring into the spark plug cap Replacement steps For Canada and Europe Remove the spark plug cap by turning the cap counterclockwise Install the spark plug cap by turning the cap clockwise until it stops ENGINE STOP SWITCH 1 Check Continuity Out of specification Replace Checking leads color White Black Remove the...

Страница 201: ...8 14 ELEC E IGNITION SYSTEM MAIN SWITCH 1 Check Continuity Out of specification Replace Checking leads color Switch position White Black Red Yellow Brown OFF ON START ...

Страница 202: ...Warning lamp 4 Oil level sensor 5 Oil level warning lamp 6 Oil level sensor 7 Meter Å Pre mixed model ı Oil injection and warning lamp model Ç Oil injection and oil level warning lamp model Î Oil injection and meter warning lamp model Y R Yellow Red P Pink O Orange O G Orange Green B Black ...

Страница 203: ...b 26 34 C 78 8 93 2 F Pink P Black B a 90 96 C 194 0 204 8 F b 76 90 C 168 0 194 0 F Measuring steps Suspend thermostat in a vessel Place reliable thermometer in a water Heat water slowly Observe thermometer while stirring water continually OIL LEVEL SENSOR 1 Measure Oil level sensor continuity Out of specification Replace Float position Checking leads color 1 G 2 B 3 P 4 G R a ON a OFF b OFF b ON...

Страница 204: ...ing diode lighting No lighting Replace CAUTION Use only originally pen light battery 1 5 V other than batteries such as alkaline battery higher voltage one will be burnt the diode NOTE LED has an direction for electrical current Therefore try reverse connection if there is no lighting Battery voltage 1 5 V Yellow Red lead Positive terminal Pink lead Negative terminal ...

Страница 205: ...her voltage one will be burnt the diode NOTE LED has an direction for electrical current Therefore try reverse connection if there is no lighting Battery voltage 1 5 V Green LED Yellow Red lead Positive terminal Green lead Negative terminal Yellow LED Yellow Red lead Positive terminal Black lead Negative terminal Red LED Yellow Red lead Positive terminal Green Red lead Negative terminal CDI UNIT R...

Страница 206: ...ARTING SYSTEM STARTING SYSTEM 1 Fuse 2 10P coupler 3 7P coupler 4 Main switch 5 Starter motor 6 Battery 7 Neutral switch 8 Starter relay Å Except for remote control model ı Remote control model B Black Br Brown R Red ...

Страница 207: ...ce WIRING CONNECTION 1 Check Wiring connection Poor connection Correct ENGINE STOP SWITCH Refer to IGNITION SYSTEM MAIN SWITCH Refer to IGNITION SYSTEM NEUTRAL SWITCH 1 Check Continuity Out of specification Replace Length Checking leads color Brown Brown Free a 18 5 19 5 mm 0 73 0 77 in Push b 19 5 20 5 mm 0 77 0 81 in ...

Страница 208: ...ration Does not function Replace Checking steps Connect the tester between the termi nals of the starter relay as shown Connect a 12 V battery Brown lead 1 Positive terminal Black lead 2 Negative terminal Check that there is continuity between the starter relay terminals FUSE 1 Check Fuse Blown Replace Fuse rating 12 V 10 A ...

Страница 209: ...8 22 ELEC E STARTING SYSTEM ...

Страница 210: ...8 23 ELEC E STARTER MOTOR STARTER MOTOR EXPLODED DIAGRAM ...

Страница 211: ... 1 2 Pinion stopper 1 3 Spring 1 4 Pinion 1 5 Through bolt 2 6 Front cover 1 7 Washer 1 25 1 0 mm 8 Washer 2 25 0 15 mm 9 Washer 1 25 2 0 mm 10 Starter ass y 1 11 Armature ass y 1 12 Washer 1 16 0 25 mm 13 Nut 1 14 Spring washer 1 15 Plain washer 1 16 Bushing 1 17 O ring 1 18 Bushing 1 19 Screw 2 20 Brush holder 1 21 Brush 1 22 Rear cover 1 23 O ring 2 Reverse the removal steps for installation NO...

Страница 212: ...mage Replace 2 Check Clutch movement Damage Replace NOTE Rotate the pinion clockwise and check that it freely Also try to rotate the pinion coun terclockwise and confirm that it locks Armature inspection 1 Inspect Commutator Dirty Clean with 600 abrasive paper 2 Measure Commutator diameter Out of specification Replace Commutator diameter Limit 29 mm 1 14 in ...

Страница 213: ... Out of specification Replace Commutator under cut Limit 0 2 mm 0 01 in 5 Inspect Armature coil continuity Out of specification Replace Armature coil continuity Commutator segments Continuity Segment Laminations Discontinuity Segment Shaft Discontinuity Brush holder inspection 1 Measure Brush length a Out of specification Replace Brush length a Limit 9 0 mm 0 35 in ...

Страница 214: ...C E STARTER MOTOR 2 Check Brush holder continuity Out of specification Replace Brush holder continuity Brush holder 1 Base 2 Discontinuity Cover inspection 1 Inspect Cover bushing Wear Damage Replace the cover ...

Страница 215: ...8 28 ELEC E CHARGING SYSTEM CHARGING SYSTEM 1 Rectifier regulator 2 Lighting coil 3 Battery 4 Fuse G Green G W Green White R Red B Black ...

Страница 216: ...RTING SYSTEM BATTERY Refer to GENERAL in chapter 3 Rectifier regurator input electrical model 8 5 V cranking 25 V 1 500 r min 25 V 3 500 r min Measuring steps Connect the tester to the rectifier regu lator as shown Set the tester dial to specification Range Crank or start the engine Lighting coil output 9 0 V cranking 25 V 1 500 r min 25 V 3 500 r min Measuring steps Connect the tester to the ligh...

Страница 217: ...TROL SYSTEM 1 Rectifier regulator 2 Lighting coil 3 Electrothermal valve G Green G W Green White L Blue B Black LIGHTING COIL Refer to CHARGING SYSTEM ELECTROTHERMAL VALVE Refer to PRIME STARTER in chap ter 4 RECTIFIER REGULATOR Refer to CHARGING SYSTEM ...

Страница 218: ...ONTROL SYSTEM POWER TRIM AND TILT CONTROL SYSTEM 1 P T T motor 2 P T T relay 3 P T T switch 4 3P coupler Black 5 10P coupler 6 Fuse 7 Battery Å Bottom cowl P T T switch model ı To remote control R Red Lg Light green Sb Sky blue B Black ...

Страница 219: ...ut of specification Replace 2 Check Relay operation Does not function Replace PTT relay continuity Sky blue Sb Black B Light green Lg Black B Continuity Terminal 1 Terminal Terminal 2 Terminal Continuity Terminal 1 Terminal Terminal 2 Terminal Discontinuity Checking steps Connect the tester between the termi nals of the PTT relay as shown Connect a 12 V battery Light green Lg lead Positive termina...

Страница 220: ...Sky blue Sb lead Positive terminal Black B Negative terminal Check that there is continuity between the PTT relay terminals TRIM SENSOR 1 Measure Trim sensor resistance Out of specification Replace NOTE Turn the lever and measure the resistance changing gradually Trim sensor resistance Pink P Black B 360 540 Ω Orange O Black B 800 1200 Ω ...

Страница 221: ...E 1 2 3 4 5 6 7 8 9 TRBL ANLS CHAPTER 9 TROUBLE ANALYSIS TROUBLE ANALYSIS 9 1 TROUBLE ANALYSIS CHART 9 1 ...

Страница 222: ... obtained 8 Engine is free from any Hull problem TROUBLE ANALYSIS CHART Trouble mode Check elements ENGINE WILL NOT START ROUGH IDLING ENGINE STALLS ENGINE WILL NOT STOP POOR PERFORMANCE OVERHEATING LOOSE STEERING LOOSE TILT HOLDING TILT MOTOR WILL NOT RUN HARD SHIFTING IRREGULAR WARNING INDICATION POOR BATTERY CHARGING Relative part Reference Chapter FUEL SYSTEM Fuel hose 4 Fuel joint 4 Fuel filt...

Страница 223: ...ef valve 7 Fluid passage 7 PTT motor 7 PTT control system 8 ELECTRICAL Ignition system 8 Starting system 8 Enrichment control system 8 Ignition control system 8 Charging system 8 Trouble mode Check elements ENGINE WILL NOT START ROUGH IDLING ENGINE STALLS ENGINE WILL NOT STOP POOR PERFORMANCE OVERHEATING LOOSE STEERING LOOSE TILT HOLDING TILT MOTOR WILL NOT RUN HARD SHIFTING IRREGULAR WARNING INDI...

Страница 224: ...YAMAHA MOTOR Corporation USA Printed in U S A Printed on recycled paper ...

Отзывы: