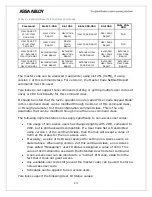
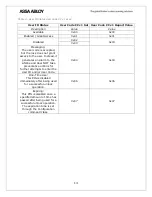


24
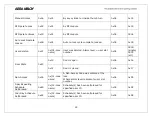
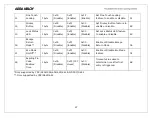
Door Lock needs
Time set
0x82
0x00
Power to the lock was restored and the
locks RTC was cleared. The controller
should set the time to ensure proper
logging.
0x08
0x01
Low Battery
Alarms*
0xA7
0x(Current
%)
Low Battery
Starting at 4.0V
(0x8002 & 0x8004)
;
4.6V
(0x8109, 0x810A, 0x8103 &
0x8104)
0x08
0x0A
0xA8
0x(Current
%)
Critical Battery Level
Starting at 3.9V
(0x8002 & 0x8004)
; 4.4V
(0x8109,
0x810A, 0x8103 & 0x8104)
0x08
0x0B
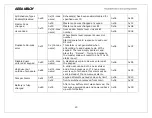
Integrated BLE
Lock**
0xE2
0x0000
Integrated BLE Lock
0x06
0x03
0x0001
Integrated BLE Auto Relock
0x06
0x03
Integrated BLE
Unlock**
0xE3
0x0000
Integrated BLE Unlock
0x06
0X04
0x0001
Integrated BLE Auto Unlock
0x06
0X04
Homekit BLE
Lock**
0xE4
0x0000
Integrated Homekit BLE Lock
0x06
0x03
Homekit BLE
Unlock**
0xE5
0x0000
Integrated Homekit BLE Unlock
0x06
0X04
*The Yale lock also supports a 3
rd
low battery alarm: too low to operate. This alarm is sent out as a Battery Report
(with value = 0xFF) through the Battery Command Class. This is the last low battery alarm level before the product
stops functioning. Starting at 3.8V (0x8002 & 0x8004); 4.2V (0x8109 ,0x810A, 0x8103 & 0x8104)
**Only supported by YRD410/420/430/450
Содержание real Living YRC226
Страница 8: ...Changing Handing if necessary continued 3 8 P N Rev G YRL EMICL TSINSTL FUL...
Страница 14: ...14 P N Rev G YRL EMICL TSINSTL FUL 8 Installing Lock Chassis 10 32 x 1 1 2 PPHMS Inside of Door x2 UP...
Страница 16: ...16 P N Rev G YRL EMICL TSINSTL FUL Testing Deadbolt Latchbolt Operation Outside of Door...
Страница 17: ...17 P N Rev G YRL EMICL TSINSTL FUL 10 Remove Battery Cover Loosen screw to remove cover...
Страница 22: ...22 P N Rev G YRL EMICL TSINSTL FUL Testing Final Latchbolt Operation Outside of Door Inside of Door...
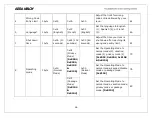
Страница 35: ...35 P N Rev G YRL EMICL TSINSTL FUL Programming Troubleshooting Symptom Suggested Action...