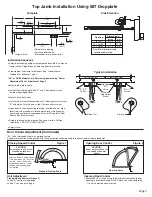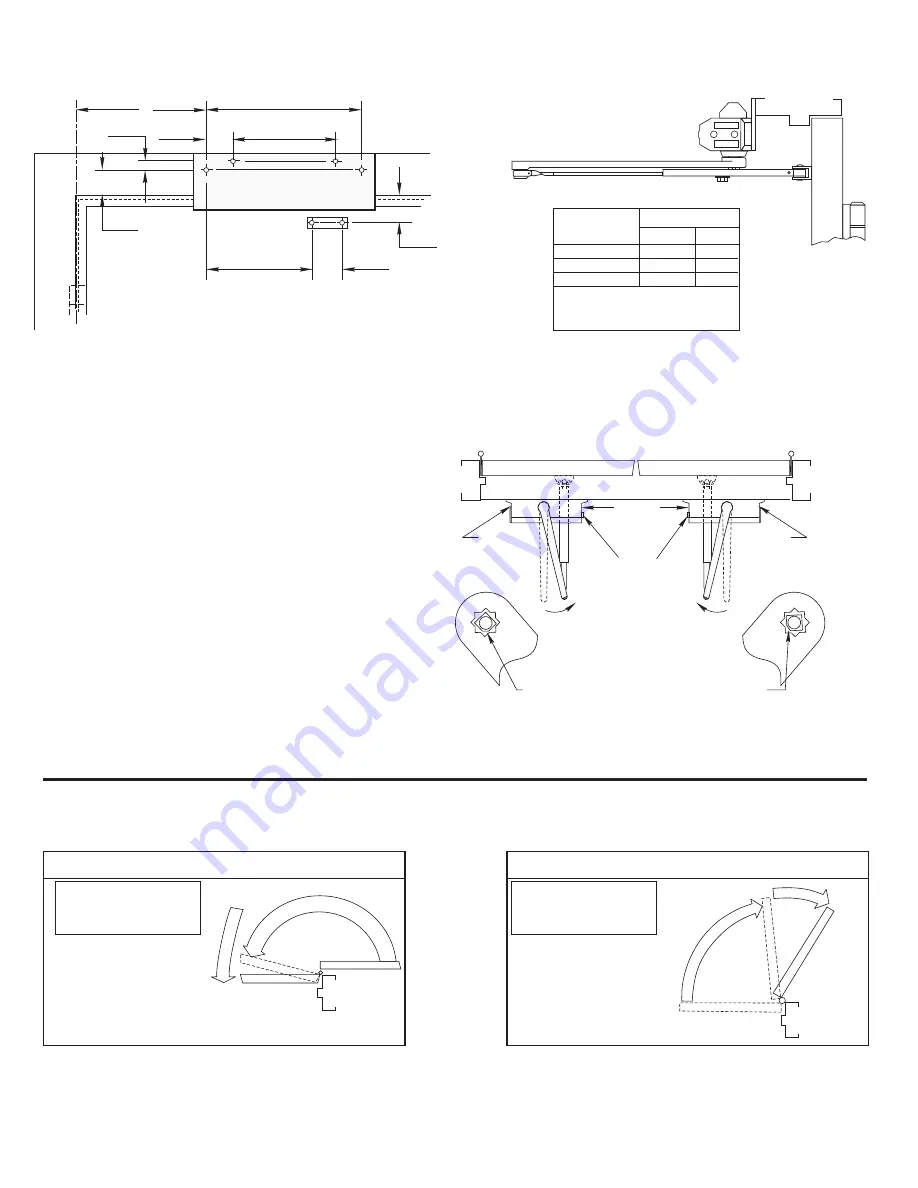
Top Jamb Installation Using 587 Dropplate
Page 3
7
(178)
1/2
(13)
7/8
(22)
5
(127)
1-3/4
(44.5)
1-3/4
(44.5)
C
L
A
Installation Sequence
!
!
!
!
!
!
!
!
!
Select door opening angle using template above. Mark 4 holes on
frame face for Dropplate and 2 holes on door for arm shoe.
Prepare door and frame for fasteners. See “Preparation for
Fasteners” at bottom of Page 2.
Mount drop plate to frame.
Install closer to drop plate with “S” and “L” adjustment valves
toward hinge edge of door.
Mount arm shoe to door.
Install main arm onto closer pinion shaft, indexing main arm mark
“S” with pinion flat as shown at right. Fasten with arm screw.
Screw pinion cap onto pinion shaft by hand or with a Phillips
screw driver - DO NOT OVER TIGHTEN.
Adjust closer.
!
251 or 251BF Models Only. Set closing power using “Power
Adjustment Chart” at bottom of Page 2.
Open door to allow connecting rod to be inserted into arm slide.
Insert rod and close door. Preload main arm by rotating away
from hinge until forearm is perpendicular (at 90° angle) to door.
Secure with forearm screw.
Door Closer Adjustment (Continued)
“DA” suffix (Delayed Action) is an optional feature.
A separate instruction will be packed with these instructions showing valve locations and adjustment procedures.
Closing Speed Control
CAUTION:
DO NOT BACK VALVES OUT OF
CLOSER OR A LEAK WILL
RESULT
Attention: Adjust Closing Speed
Time to between 4 to 7 seconds
from 90°. Use of the door by
handicapped, elderly or small
children may require greater
closing time.
Standard Closing Cycle
CLOSED
SWEEP
L
A
T
C
H
10°
Unit Adjustment
Closing Speed Controls (Figure 1)
!
!
Valve “S” controls sweep range.
Valve “L” controls latch range.
Opening Door Control
Opening Cycle
O
P
E
N
IN
G
Opening Door Control
!
Backcheck (”BC”) valve controls the hydraulic resistance to door
opening in backcheck range. NEVER close this valve completely
– it is not to provide a positive stop.
BACKCHECK
Template
Hinge or Pivot
Side Elevation
Typical Installation
Right Hand Door
Left Hand Door
Figure 2
Figure 1
CAUTION:
DO NOT BACK VALVES OUT OF
CLOSER OR A LEAK WILL
RESULT
• Do not scale drawing.
• Left hand door shown.
• Dimensions are in inches (mm).
Opening
To 100°
101° to 120°
121° to 180°
Dimension A
inches
8-1/2
7
4-1/2
mm
216
177.8
114
* Door/Wall/Hardware/Jamb
conditions permitting
Optional
“BC”
Valve
“S” & “L”
Valves
Power
Adjustment
Screw
Preload
Preload
Pinion Flat
“S” & “L”
Valves
1
2
3
4
Z
Y
S
Pinion Flat
1
2
3
4
Z
Y
S
4
(101.6)
1-1/2
(38.1)


