Clean
WARNING
Cleaning solvents can be flammable and toxic and
can cause skin irritation. When using cleaning
solvents, always follow the solvent manufac-
turer’s recommended safety precautions.
WARNING
Compressed air is used for cleaning and drying
purposes, or for cleaning restrictions. Wear pro-
tective clothing (goggles/shields, gloves, etc.).
Make sure the path of the compressed air is away
from all personnel to avoid injury.
1.
Clean metal parts in solvent. Remove all traces of
old lubricant and dirt. Clean nonmetal parts with
warm soapy water and a lint free cloth.
2.
After cleaning, dry parts with compressed air. DO
NOT dry parts with a cloth.
Inspect
1.
Inspect for loose, burned, missing, cracked or
damaged hardware.
2.
Inspect all parts for dents, holes, bends, burrs,
rust, corrosion or marred finishes.
3.
Replace all defective or damaged parts.
Assemble
NOTE:
This procedure is for installation of all compo-
nents of steering column assembly. Not all compo-
nents are removed for a repair procedure. Do only
those steps of procedure necessary to install required
component.
NOTE:
PerformStep 1 only for lift trucks manufac-
tured before January, 2012.
1.
Lubricate horn contact slip rings with a small
amount of conductive grease (Yale P/N
582014302).
2.
Install fastener, connector bracket and connector,
two horn contacts and four screws.
See Figure 12, for lift trucks manufactured before
January 2012.
See Figure 13, for lift trucks manufactured after
January 2012.
3.
Assemble lower shaft and upper shaft, secure
with spit pin.
See Figure 12, for lift trucks manufactured before
January 2012.
See Figure 13, for lift trucks manufactured after
January 2012.
4.
Install two pivot bolts, two bushings, two nuts and
bracket onto housing.
See Figure 12, for lift trucks manufactured before
January 2012.
See Figure 13, for lift trucks manufactured after
January 2012.
5.
Install gas spring and two pins on housing.
See Figure 12, for lift trucks manufactured before
January 2012.
See Figure 13, for lift trucks manufactured after
January 2012.
Install
NOTE:
Lubricate spline end of lower shaft with multi
purpose grease, see
Periodic Maintenance Manual
for your lift truck.
NOTE:
Perform Step 1 for lift trucks equipped with
gas or LPG engines.
1.
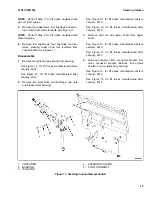
Install steering column, four bushings and four
bolts on cowl standoffs. Tighten bolts to
38 N•m (28 lbf ft). See Figure 11.
NOTE:
Perform Step 2 for lift trucks equipped with
diesel engines.
2.
Install four isolators, steering column, four isola-
tors, four bushings, and four bolts on cowl stand-
offs. Tighten bolts to 38 N•m (28 lbf ft). See Fig-
ure 11.
3.
Install floor plate, floor mats, and steering column
covers. See section Hood, Seat, and Side Covers
Replacement.
4.
Install steering wheel and hex nut on steering col-
umn, tighten hex nut to 40 to 54 N•m (30 to
40 lbf ft). Connect electrical wiring and install horn
button. See Figure 10.
Steering Column
0100 YRM 1243
16
Содержание GDP100VX
Страница 13: ...Figure 7 Gas Spring Installation 0100 YRM 1243 Hood Seat and Side Covers Replacement 9 ...
Страница 36: ...Figure 25 GM 4 3L LPG Engine and Transmission with Single Hydraulic Tank Engine Replacement 0100 YRM 1243 32 ...
Страница 38: ...Figure 26 GM 4 3L LPG Engine and Transmission with Dual Hydraulic Tanks Engine Replacement 0100 YRM 1243 34 ...
Страница 40: ...Figure 27 Cummins QSB 3 3L Diesel Engine and Transmission Engine Replacement 0100 YRM 1243 36 ...
Страница 52: ...Figure 33 Cummins 4 5L Diesel Engine and Transmission Engine Replacement 0100 YRM 1243 48 ...
Страница 57: ...Thank you very much for your reading Please Click Here Then Get More Information ...

