background image

52

WIRES-X Setup Menus 

3

 Rotate   or touch the screen to select 

[2 SEARCH 

SETUP]

4

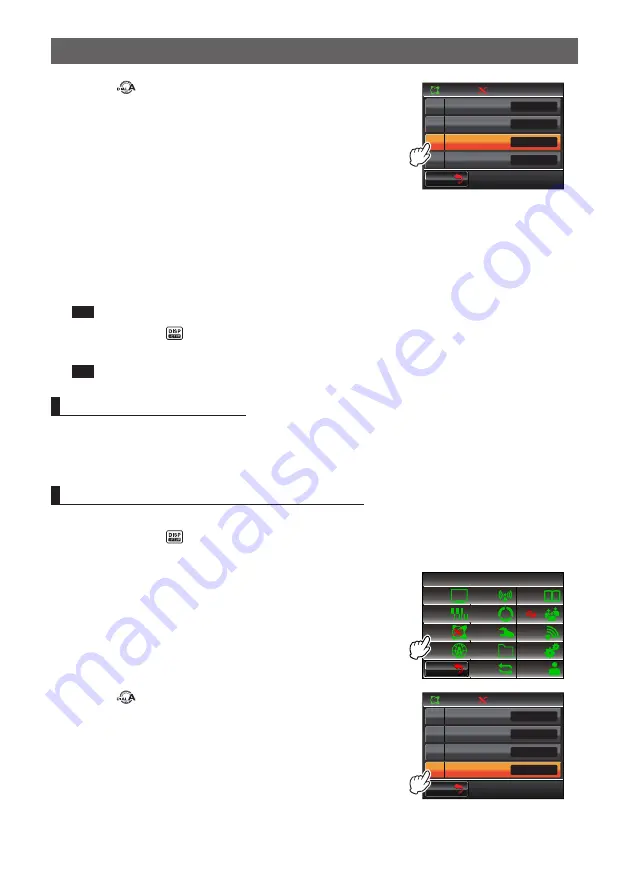
 Touch 

[2 SEARCH SETUP]

 to select “HISTORY” or 

“ACTIVITY”


Each time you touch the Search Setup item, the setting 
switches between “HISTORY” and “ACTIVITY”.
HISTORY: Displays the list sorted in order of the 

connected destination that your station 
most recently connected to.

ACTIVITY: Displays the list sorted in order of the room 

with the most nodes connected. Nodes 
come after rooms.

 Tip 

  The default setting is “HISTORY”.

$#%-

$#%-

5'#4%*5'672

24'5'6(4'37'0%;

*+5614;

'&+6%#6')14;6#)

9 4'5

3

(4'

6

2

4

9 Ჰ 4'5

0

#

/

7 .

#

Ჹ 

Ż

5

  Press and hold   for 1 second or more.

  The screen will return to the previous screen.

 Tip 

  You can also go back to the previous screen by touching 

[BACK]

 twice.

Editing a category name

You can enter names for  5 categories where nodes and rooms can be  registered. Up to 
16 character may be used for each category name.
For details, refer to “Registering category name” (page 17).

Deleting the registered nodes and rooms

You can delete nodes and rooms registered in the 5 categories.

1

  Press and hold   for 1 second or more

  The setup menu will appear.

2

 Touch 

[WIRES]

  The menu list will appear.

$#%-

$#%-

6:4:

5'672/'07

4'5'6
%.10'

%10(+)

9 Ჰ 4'5

5%#0

&+52.#;

5+)0#.+0)

#245

126+1 0

5&%#4&

/'/14;

&#6#

%#..5+)0

3

 Rotate   or touch the screen to select 

[4 REMOVE 

ROOM/NODE]

4

 Touch 

[4 REMOVE ROOM/NODE]

  The category list will appear.

$#%-

$#%-

5'#4%*5'672

24'5'6(4'37'0%;

*+5614;

'&+6%#6')14;6#)

9 Ჰ 4'5

Ჹ 

Ż

4'/18'411/01&'

Ż

Содержание FTM-400XD

Страница 1: ...ng our product This instruction manual explains information related to the WIRES X Function For information on basic operation of the transceiver refer to the operation manual enclosed in the product...

Страница 2: ...node 24 Viewing text data and images of the WIRES X server INT NEWS 26 Viewing information of a node or room on the Internet 28 Viewing imported data from memory 29 Sorting imported data 30 Listening...

Страница 3: ...the input field moves left or right when touched ENT The entered characters are confirmed and the screen returns to the previous screen when touched BACK The screen returns to the previous screen when...

Страница 4: ...u to have analog digital communications with stations outside the VHF UHF VHFVcommunication range using WIRES X In digital communication mode you can search for and contact stations by call signs or k...

Страница 5: ...transmissions receptions Digital node Node which is a transceiver or repeater compatible with digital communications in C4FM Continuous 4 level FM format With this type of node you can communicate usi...

Страница 6: ...encies some may not be published due to the wishes of owners Room Round QSO Room WIRES X system community space to which multiple nodes can connect simultaneously In addition to voice communications y...

Страница 7: ...dio messages emergency News Station Audio files Text data Images INT news Audio messages emergency News Station Audio files Text data Images Connecting to a node allows you to access data in the local...

Страница 8: ...ons and analog stations confirm whether the node is an analog station or a digital station When the local node is a digital station Connect from your device in digital mode Nodes on the Internet can c...

Страница 9: ...press the to re establish connection to the local node Tip When a local node cannot be found the X will disappear in 20 seconds 76 5 12 8 53 5 7 6 5 7 4 5 0 9 7 3 6 Tip When the detected local node is...

Страница 10: ...node or room Searching from the node room list 1 Touch on the connection destination screen The menu list of the local node will appear 76 5 12 8 53 5 7 6 5 7 4 5 0 9 7 3 6 2 Rotate or touch the scree...

Страница 11: ...ected will appear and the node room list will remain displayed 116 0 6 81 2 7 0 0 5 6 1 1 4 6 5 4 612 Searching by node or room name 1 Touch on the connection destination screen The category list of y...

Страница 12: ...the room columns in the search results the number of activities the number of nodes connecting to each room appears on the right side 116 3 9 4 6 7 1 2 5 8 0 5RCEG CRU 06 5 Turn or touch the screen to...

Страница 13: ...ode or room on the Internet to display the last connected node or room Continue turning to return to the current connection destination display 76 5 12 8 53 5 7 6 5 7 4 5 0 9 7 3 6 5 7 2 The current c...

Страница 14: ...3 6 P4 LAM P DTMF MICROPHONE MH 48 ABC JKL TUV GHI PQRS DEF MIC MNO WXYZ PTT MIC 4 Release PTT The device will switch to receiving mode Tip Even when browsing data in a node or room on the Internet u...

Страница 15: ...0 7 5 Rotate or touch the screen to select PRESET FREQUENCY 6 Touch PRESET FREQUENCY The frequency number will become orange Tip The default setting is 145 780 5 4 5 672 24 5 6 4 37 0 5614 6 6 14 6 9...

Страница 16: ...hannel to make the preset channel available in advance 2 Press and hold for 1 second or more The WIRES icon will appear on the left side of the frequency indication and P and X will flash alternately...

Страница 17: ...4 37 0 5614 6 6 14 6 9 4 5 3 4 6 2 4 9 4 5 0 7 Connecting to a registered node or room You can register names of nodes and rooms on the Internet and sort them into 5 categories Registering category na...

Страница 18: ...een Tip You can enter up to 16 characters numerals and symbols 3 9 4 6 7 1 2 5 8 0 5RCEG 06 57 CRU 8 Touch ENT The screen will return to the category name setting screen The entered category name will...

Страница 19: ...5 7 6 5 7 4 5 0 9 7 1 6 5 7 2 3 Touch ADD The category list of your own station will appear 57 2 4 0 0 95 56 6 10 1 0 95 06 0 95 1 4 Rotate or touch the screen to select a category 5 Touch the selecte...

Страница 20: ...d on the right end of the room row in the search results 57 5 0 521465 1 176 114 4 1 3 4 6 5 4 612 4 Rotate or touch the screen to select the connection destination 5 Touch the connection destination...

Страница 21: ...mode Tip For details refer to Switching the communication mode in the basic operating manual 3 Press for a second while pressing PTT on the microphone and then press again after pressing the DTMF ID k...

Страница 22: ...and key Various display functions Confirming the digital node location When the signal from the local node you are connected to contains GPS location information it may be displayed on the FTM 400DR D...

Страница 23: ...WIRES X connection destination screen touch the frequency indication to display the dual band screen Touch the frequency indication again to go back the connection destination screen 76 5 12 8 53 5 7...

Страница 24: ...t data and images of the local node 1 On the connected destination screen touch the local node name The menu list of the local node will appear 76 5 12 8 53 5 7 6 5 7 4 5 0 9 7 3 6 2 Touch NEWS STATIO...

Страница 25: ...screen When the microSD card does not have enough free space data cannot be imported In such a case Insufficient SD Memory will appear and then the screen will return to the data type select screen 0...

Страница 26: ...next page Not available on the last page Viewing text data and images of the WIRES X server INT NEWS You can import text information and images provided by Yaesu on the WIRES X server onto the FTM 40...

Страница 27: ...eft side of the tag will flash 06 0 95 8GT 7 74 4GNGCUG 0GYU 2TQFWEVU 0GYU 2TQFWEVU 0GYU PHQTOCVKQP 4 612 06 0 95 8GT 7 74 4GNGCUG 0GYU 2TQFWEVU 0GYU 2TQFWEVU 0GYU PHQTOCVKQP 4 612 After data import c...

Страница 28: ...Rotate or touch the screen to select DOWNLOAD 5 Touch DOWNLOAD The data type select screen will appear 0 95 56 6 10 190 1 72 1 0 1 6 5 1 0 6 Rotate or touch the screen to select MSG or PICT 7 Touch MS...

Страница 29: ...ss to display the sender s location information at the time the data was imported Cautions z z When the category list or data list appears if connection to the node or room on the Internet is released...

Страница 30: ...data in the data display screen 1 Display the data that you want to delete 2 Touch DEL A screen to confirm whether or not to delete the data will be displayed 2 4 QQF OQTPKPI 4 61 3 Touch OK The dele...

Страница 31: ...ening to audio messages You can play and listen to audio data transmitted received by a local node or a node or room on the Internet Audio data is categorized into the following 2 types EMERGENCY Emer...

Страница 32: ...logical order 4 0 0 95 56 6 10 1 0 95 06 0 95 3 6 5 0 9 7 1 4 Rotate or touch the screen to select desired audio data 5 Touch the selected audio data Audio playback will start and the icon on the left...

Страница 33: ...he data type select screen will appear 0 95 56 6 10 190 1 72 1 3 6 5 0 9 7 5 Rotate or touch the screen to select VOICE 6 Touch VOICE The data list will appear 0 95 56 6 10 5 2 6 81 3 6 5 0 9 7 7 Rota...

Страница 34: ...S X server Listening to emergency information 1 On the connected destination screen touch the name of the local node The menu list of the local node will appear 76 5 12 8 53 5 7 6 5 7 4 5 0 9 7 3 6 2...

Страница 35: ...f the WIRES X server will appear on the screen again 06 0 95 4 0 0 95 56 6 10 Listening to a normal message 1 On the connected destination screen touch the name of the local node The category list of...

Страница 36: ...select the desired audio data 9 Touch the selected audio data Audio playback starts and the icon on the left corner of the tag will flash 06 0 95 8GT 8 1 8GT 81 5CORNG 4 0 4 9 4 5 81 6 25 9 4 5 81 6...

Страница 37: ...l appear 4 0 0 95 56 6 10 1 0 95 06 0 95 0 1 6 5 1 0 1 4 Rotate or touch the screen to select the desired audio data 5 Touch the selected audio data Audio playback will begin and the icon on the left...

Страница 38: ...the screen to select DOWNLOAD 5 Touch DOWNLOAD The data type select screen will appear 0 95 56 6 10 190 1 72 1 0 1 6 5 1 0 6 Rotate or touch the screen to select VOICE 7 Touch VOICE The data list wil...

Страница 39: ...g manual You can also transmit photos taken with the camera that is built into the optical speaker microphone MH 85A11U For details on how to take photos refer to Taking Pictures with the Optical Came...

Страница 40: ...2 3 6 41 61 61 0 2 61 10 Touch The character input screen will appear 2 4 3 6 61 72 1 6 6 5 8 11 Touch the character keys to enter a message The character you have just touched will appear on the top...

Страница 41: ...low steps 1 to 5 in Creating and transmitting a message to display the data type select screen 2 Rotate or touch the screen to select MSG or PICT 3 Touch MSG or PICT The data list will appear Tip The...

Страница 42: ...r and then the screen will return to the data type select screen 0 95 56 6 10 5 2 6 81 3 6 5 0 9 7 Transmitting data to a node or room on the Internet Creating and transmitting a message 1 Display the...

Страница 43: ...image 1 Display the menu list of the node or room on the Internet 4 0 0 95 56 6 10 1 0 95 06 0 95 0 1 6 5 1 0 1 2 Rotate or touch the screen to select NEWS STATION 3 Touch NEWS STATION The upload down...

Страница 44: ...utine message You can listen to the message anytime you want as long as the message is not deleted from the node or room Transmitting data to a local node Transmitting emergency information 1 Display...

Страница 45: ...6 0 95 3 6 5 0 9 7 1 Transmitting a routine message 1 Display the menu list of the local node 4 0 0 95 56 6 10 1 0 95 06 0 95 3 6 5 0 9 7 1 2 Rotate or touch the screen to select NEWS STATION 3 Touch...

Страница 46: ...pressing PTT LOCK P3 P2 P1 7 1 4 8 2 0 5 9 B A C D 3 6 P4 LAM P DTMF MICROPHONE MH 48 ABC JKL TUV GHI PQRS DEF MIC MNO WXYZ PTT MIC 4 0 3 6 5 0 9 7 72 1 The maximum storage time for audio is one minu...

Страница 47: ...o a local node to transmit a message Returning to the connection status display temporarily Press in the screen at the bottom of each menu layer EMERGENCY NEWS STATION LOCAL NEWS and INT NEWS to retur...

Страница 48: ...ns z z The GM function needs to be activated in a digital station that is used for the local node as well z z Before using the GM function press to change the communication mode of Band A upper sectio...

Страница 49: ...you want to register the local node 8 Touch the selected group Tip To create a new group and register the local node touch NEW GROUP After the character input screen appears input the group name and...

Страница 50: ...lect how to set the transmit frequency used for connecting to a local node 1 Press and hold for 1 second or more The setup menu will appear 2 Touch WIRES The menu list will appear 6 4 5 672 07 4 5 6 1...

Страница 51: ...nts within the currently displayed frequency range Press once again to display the kHz indication and the frequency indication will light up 8 Touch PRESET FREQUENCY The frequency will be set and the...

Страница 52: ...more The screen will return to the previous screen Tip You can also go back to the previous screen by touching BACK twice Editing a category name You can enter names for 5 categories where nodes and r...

Страница 53: ...on The delete confirmation screen will appear 4 18 411 01 9 4 5 4 0 57 6174 0 3 6 9 Touch OK The connection destination will be deleted and then the connection destination list will appear on the scre...

Страница 54: ...2015 Yaesu Musen Co Ltd 1510 D0 All rights reserved No portion of this manual may be reproduced without the permission of YAESU MUSEN CO LTD...

Отзывы: