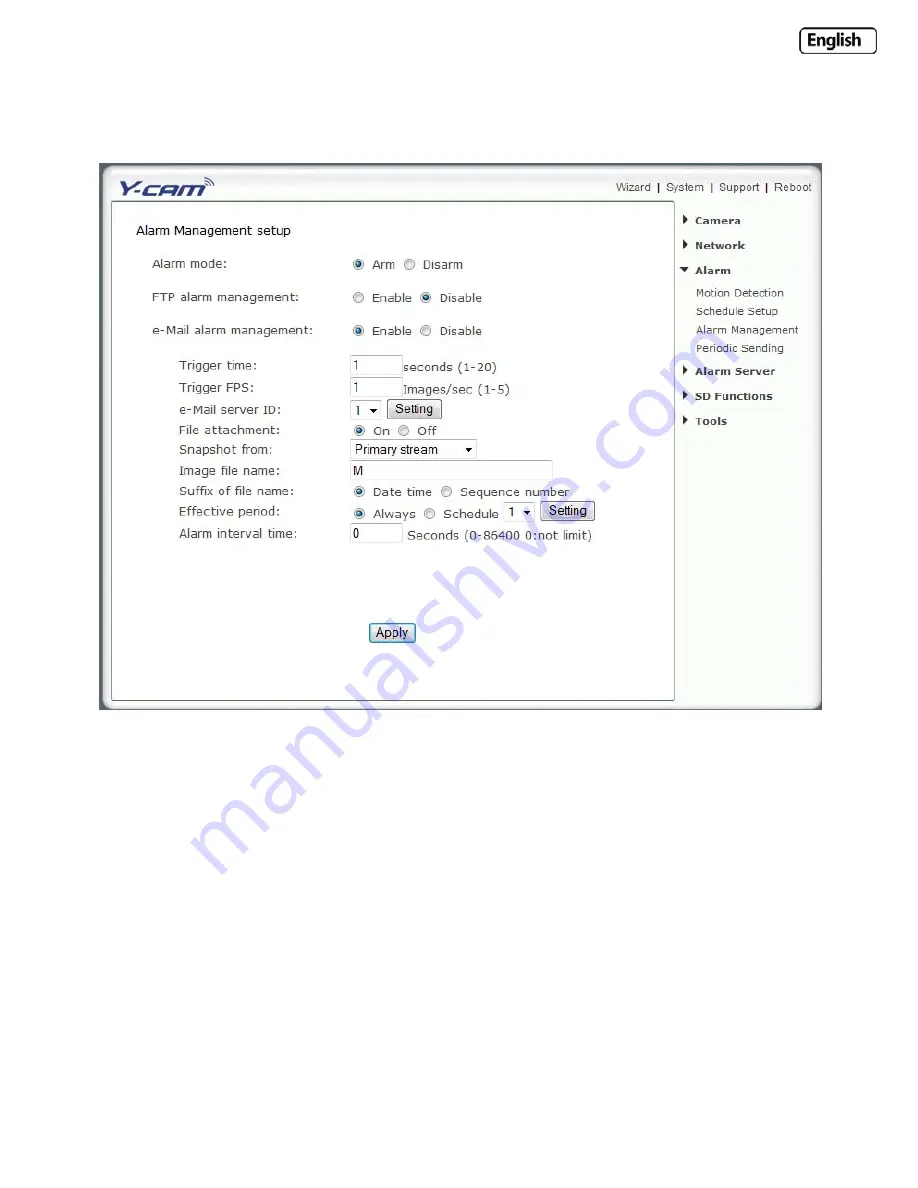
Y-cam Black SD Скачать руководство пользователя страница 47


Page


47


6.36


Alarm


Management

 ‐ 

Email


The


Y

cam


can


also


be


configured


to


send


an


email


when


the


Motion


Detection


alarm


is


triggered.


[Email


Alarm


Management]


Enable/Disable


sending


of


e

mails


on


motion


detection.


[Trigger


Time]


The


number


of


seconds


that


the


camera


should


keep


sending


images


when


an


alarm


is


triggered.


[Trigger


FPS]


The


number


of


frames


per


seconds


that


the


camera


should


keep


sending


images


at


when


an


alarm


is


triggered.


[e

Mail


Server


ID]


Select


the


e

mail


server


number


from


the


list.


[File


attachment]


Select


if


you


would


like


a


snapshot


of


the


camera


view


attached


to


the


e

mail.


[Snapshot


From]


Select


the


stream


from


which


it


should


get


the


snapshot.


[Image


file


name]


Any


name


for


the


Image.


[

Suffix


of


file


name]


Image


file


name


suffix


can


be


either


date


and


time


or


a


sequence


number.


Effective


Period:


[Always]


Always


trigger


the


alarm


upon


motion


detection.


[Schedule]


Trigger


the


alarm


according


to


the


schedule.


[Alarm


interval


time]


Number


of


seconds


for


which


the


camera


should


stop


sending


e

mail


alerts


after


the


first


set.


Setting


the


time


to


0


disables


this


feature.


Click


Apply


to


confirm


your


settings.


Содержание Black SD

Страница 1: ...efore attempting to install or operate this product This User pdated v4 16 User Manual English cam Knight SD Y cam White SD Y cam Bullet m Each cameras model name can be found on the reverse of the camera Please retain this manual for your future reference Manual is a work in progress and is constantly being u You are invited to check the website regularly for updated versions ...

Страница 2: ...13 4 0 Y CAM SOFTWARE INSTALLATION 14 4 1 Y CAM SOFTWARE INSTALLATION FOR PC 14 4 11 MANUALLY SETTING TCP IP SETTINGS FOR A CAMERA 16 4 2 Y CAM SOFTWARE INSTALLATION FOR MAC 18 4 3 FINDING YOUR CAMERA WITH Y CAM SETUP 19 5 0 WELCOME TO YOUR Y CAM 20 5 1 USER INTERFACE INTERNET EXPLORER 21 5 2 USER INTERFACE FIREFOX AND SAFARI 23 6 0 Y CAM SETTINGS 24 6 01 WIZARD EASY SETUP 26 6 1 CAMERA MENU 27 6 ...

Страница 3: ...T INTERVAL 58 6 55 SD FILE FTP SENDING 59 6 56 BROWSE SD CARD 60 6 57 SD FORMAT 61 6 6 TOOLS MENU 62 6 61 SYSTEM IDENTITY 62 6 62 USER MANAGEMENT 63 6 63 DATE TIME 64 6 64 BACKUP AND RESET 65 6 65 FIRMWARE UPGRADE 66 6 7 SYSTEM MENU 68 6 8 SUPPORT MENU 69 U 6 9 REBOOT 70 7 0 ADVANCED SETTINGS 71 7 1 PORT FORWARDING 71 7 2 PROXY SERVER SETTING 72 7 3 ENABLING ACTIVE X IN INTERNET EXPLORER 73 7 4 RE...

Страница 4: ...protection against harmful interference in a residential installation this equipment generates uses and can radiate radio frequency energy and if not installed and used in accordance with the instructions may cause harmful interference to radio communications However there is no guarantee that interference will not occur in a particular installation If this equipment does cause harmful interferenc...

Страница 5: ... supply authentication CCC Mark China power supply authentication When using the power adapter make sure your power rating is compatible with that of the device to avoid potential damage 1 4 Maintenance 1 Ensure that the Y cam and its power source have sufficient ventilation 2 Do not shake strike or drop the product 3 Keep the camera dry and dustless and avoid exposing it to direct sunlight 4 Do n...

Страница 6: ...work requirements Network Connection 10 100 Mbps Ethernet card Wireless router if wireless connectivity required Broadband Connection Minimum 128kb s upload speed if internet access to your Y cam is required PC Requirements Processor Intel Pentium III 800MHz or Higher Pentium IV 2GHz or higher recommended Memory RAM 128Mb 256Mb or higher recommended Operating System Windows 2000 XP Vista Windows 7...

Страница 7: ...on The Y cam comes with a built in microphone for audio monitoring as well as video monitoring Sound captured by the Y cam is transmitted to the client s PC Two way audio communication with Y cam Bullet only using Internet Explorer from a Windows PC By connecting amplified speakers not supplied to the camera you can send audio to the camera which will be broadcasted on the connected speakers This ...

Страница 8: ...176x144 OSD On Screen Display The OSD function can display system name date and time or a user defined message in the top left hand corner of video stream MicroSD Card Recording Using the built in microSD card slot the Y cam no longer needs to be connected to a network or Internet to store streaming video or motion alerts Use this camera anywhere and store video or snapshots straight to microSD ca...

Страница 9: ...Page 9 2 2 Y cam Bullet at a glance ...

Страница 10: ...Notes and Information 1 There is a limit to the number of rewrites possible on any MicroSD memory card If you notice the card becoming slow or sluggish after a reasonable usage you will probably need to replace the microSD memory card Try to never buy a second hand card for this very reason 2 If the card is not recognized by the Y cam try formatting the microSD card via your computer and then tryi...

Страница 11: ...Inserting a microSD card into the Y cam Bullet requires you to remove the front section of the camera For this reason it is advised not to do this once the camera has been mounted in a wall or in a non easily accessible place Unscrew the front part of the camera and lift of the from the lens array Be careful not to break the lens or infrared LEDs The microSD card slot is situated behind the lens T...

Страница 12: ...imited viewing options so this is not recommended 3 1 Connecting your Y cam into a Router Switch Using the standard Ethernet network cable plug this in to the network connection socket on the Y cam at one end and plug the other end in to a spare port on your router switch Using the Power Adaptor supplied plug one end in to the Power Connection socket on the Y cam Plug the other end in to an electr...

Страница 13: ...g IP settings 4 In the IP Address Field type in the number 192 168 1 20 5 In the Subnet Mask type in 255 255 255 0 6 In the Default Gateway type 192 168 1 150 The camera will automatically assign itself this IP address when no DHCP server is present 7 Leave DNS server settings blank 8 Click OK then Close to apply these settings 9 Turn the power on to the Y cam 10 The Connectivity Status indicator ...

Страница 14: ...p utility to assign an IP address to each camera 4 1 Y cam Software Installation for PC 1 Insert the Installation CD into your CD ROM drive and the installation screen should appear automatically See image below If it does not click Start then Run In the text field enter D autorun exe if D is the letter of your CD ROM Drive 2 Click on install software and the following screen will be displayed Cli...

Страница 15: ... want to change the default folder click Change to replace otherwise click Next 4 Click Install to install the Y cam Setup utility 5 Click Finish to end the installation You should now find a Y cam icon on your Desktop ...

Страница 16: ...k on Setup button and the following setup interface will pop up 3 Enter a unique name for the camera the location optional and leave the default port number as 80 Obtain an IP address automatically and Obtain DNS server address automatically are selected by default if you are confident enough to enter your own settings you can do so by selecting Use the following IP address and follow the guidelin...

Страница 17: ... the camera is 192 168 1 150 This can be changed to any IP address on your IP range For example if the IP address of your PC is 192 198 1 52 then the IP address of your camera should be unique and on the same subnet i e 192 198 1 X where X is any number between 1 and 255 except 52 Ensure the IP address you chose is not the same as other network devices on your network as this will result in confli...

Страница 18: ...the check box next to Block UDP Traffic is un ticked then click Ok 5 Quit System Preferences and test the Y cam Setup software again OSX 10 5 Leopard 1 Click on System Preferences 2 Click on Security in the Personal section 3 Select the Firewall tab 4 Select Allow all incoming connections 5 Close the window and wait for a few seconds around 30 seconds for the system to update the adapter settings ...

Страница 19: ...era so if your camera isn t displayed wait a few moments and then click Refresh to search for cameras again Setup Select the required camera and click Setup to configure the network settings for the camera Open Select the required camera and click Open to access the camera via a web browser same as double click Exit Click Exit to exit the Camera Setup window Anytime you lose the IP address of your...

Страница 20: ...s the camera so it may be worth writing down the address that is displayed in your web browsers address bar It should look something like http 192 168 1 50 8150 this is your cameras internal IP address Clicking either Live View or Settings will bring up a Login panel similar to the below screenshot The default username and password for any Y cam is Username admin Password 1234 These are case sensi...

Страница 21: ...prompted to install an ActiveX Control Please follow the on screen instructions to download and install this control You will then view the following screen The two links at the top of the screen are Home and Settings Home takes you back to your Y cam Homepage Settings will take you to the cameras internal settings Please view the next page for an explanation of the Operating Bar settings ...

Страница 22: ...ton to record video and audio if enabled This will save the file in ASF format on your PC 6 Recording options Click this button to set the recoding parameters You can set record path video file size and select whether to star recording automatically when motion is detected and the length of the recording in seconds 7 Image size There are three Image Size options 640x480 320x240 160x120 Please note...

Страница 23: ...ro Installed on your system to record videos if you are using a browser other than Internet Explorer The links at the top of the screen are Home Settings Secondary Stream and Motion JPEG Home takes you back to your Y cam Homepage Settings will take you to the cameras internal settings Secondary Stream This is set via your settings and is useful if you need a lower resolution stream for certain dev...

Страница 24: ... below On first install or after a reset Upon first entering the Settings menu or if you ever reset the camera you should see a screenshot like the above urging you to change the Admin password for your camera This is highly recommended to stop unauthorised access to your camera Please note Keep this password safe The only way to recover from a lost password is to reset the camera back to its defa...

Страница 25: ... add access for another user with an easier to remember password you can set that up later Once you have typed your password twice press Save The system will then make you login again and you should see the following screen ...

Страница 26: ... right of the screen The Quick setup interface will pop up Follow the simple instructions on the screen and enter the required details clicking next to proceed to the Next page With this Wizard you will be able to setup the Name of Camera Quality of Picture you wish to view Time Zone System Time WiFi Setup TCP IP Setup This should help you get your camera setup and working very quickly at a basic ...

Страница 27: ... 60Hz This should be set according to the mains frequency of the country the camera is being used in For UK this would be 50Hz Image rotation Display images upside down useful if you have installed the camera upside down Moonlight Mode Turns on or off Moonlight mode The Moonlight feature superimposes frames in order to brighten the image being viewed This is also known as frame integration Power L...

Страница 28: ...ality of the audio being transmitted The most commonly used mode is 32 Kbit s AMR bit rate Determines the quality of the audio being transmitted to mobile phones using 3GPP Note Higher bit rates are useful in noisy conditions although lower bit rates provide reasonable quality for voice frequencies Once you have set your required settings click Apply ...

Страница 29: ...similar to the first two streams but is purely for mobile viewing and has a fixed resolution Stream Setting Options Preset There are five pre programmed stream profiles for quick set up Please choose the one according to your bandwidth Image size Three image resolutions available 640 x 480 VGA 320 x 240 QVGA 160 x 120 The mobile stream has a fixed image size of 176x144 Frame rate Twelve options 1 ...

Страница 30: ...ects the quality of the snapshot to be uploaded to an FTP Server It can be from 20 to 100 where 100 is the best quality Audio Enable or disable the audio of the associated stream RTSP authentication Enable or disable MPEG4 RTSP authentication RealPlayer can be used to view the live stream from the Y cam but RealPlayer does not support authentication so the authentication of MPEG4 RTSP should be di...

Страница 31: ...ect unless the camera is synchronized to a time and date server on the internet This is accessible under the Tools menu and will be covered in more detail in the manual Display system name Set the OSD to display the System Name of the camera The system name can be modified from the System Identity page accessible under the Tools menu and will be covered in more detail in the manual Display the tex...

Страница 32: ...e On turns the IR LEDs on permanently and ignores the light level in the room resulting in a Black White mode When Off is selected the IR LEDs are kept in the off state even if the light level of the room is too dark to produce a good quality image This may be useful if the LEDs are reflecting off a nearby surface and obstructing your view Black and white mode Auto switches the video from colour t...

Страница 33: ... talk to your WiFi Wireless Router To set this up you will need to know The name of your WiFi Wireless Network The password or key to log on to your WiFi wireless network How your network is protected None WEP64 bit WEP128 bit WPA PSK or WPA2 PSK your router will contain these details If the camera is connected to your router or your computer directly Wireless Setup Options SSID Type the ID of the...

Страница 34: ...nter this twice so it matches Security Mode Options Authentication Select the type of authentication that your router requires Key type Select the WEP WPA key type Either in hexadecimal Hex or ASCII characters Note Most routers provide WEP keys in Hex format Encryption type Select either TKIP or AES for your default encryption setting WEP WPA key Type the encryption key that matches that of your r...

Страница 35: ...You will then need to setup your computer To do this follow the instructions below 1 On your computer click on Start then Control Panel 2 Double click the Network Connections icon then double click on your Wireless network connection icon 3 Click View Wireless Networks and select ycam from the list If you do not see an the Y cam connection make sure the camera is powered on and has the above setti...

Страница 36: ...e the subnet mask Required Default gateway Type the default gateway Required Primary DNS IP address Type the IP address of the primary DNS server Required Secondary DNS IP address Type the IP address of the secondary DNS server if necessary Optional HTTP port number The default HTTP port number is 80 RTSP port range In order to view video over RTSP the router should be setup to forward port number...

Страница 37: ...tocol over Ethernet PPPoE dial up Enable or disable for PPPoE connection Service name Enter your ISP name or class of services that are configured on the PPPoE service This field may be left empty User name Type your user name Password Type your password Re type password Re confirm password Click Apply to confirm your settings ...

Страница 38: ...e for the rest of the options to appear Service Provider Select a provider from the drop down list then click Register This will take you to the service provider s website where you can register your own personal host name Please follow the instructions on the provider s site and then return to this page to enter the details Host Name Enter the host name you have registered E g yourname dtdns net ...

Страница 39: ...Refer to your router manual for further details External HTTP RTSP port range By default this port range is 8150 8350 The ports are assigned in order so if you only have one camera attached to your system the chosen port will be 8150 for the first camera 8151 for the second and so on Every camera will remember its port and it will automatically use this port if still available whenever it is power...

Страница 40: ...few moments your Camera Homepage should be displayed You can then login to view your camera or change your settings as normal To confirm your own external camera address stay within the Settings menu and click on System at the top right of the screen This will list various settings of your camera Under UPNP Port Forwarding it should list your cameras hostname and port Note If you have only just re...

Страница 41: ...round 3 Digital Input Connect to GND to activate or deactivate by software setting 2 Digital Output With a maximum load of 1A and maximum voltage of 60VDC this output uses an open collector NPN Darlington transistor with the emitter connected to the GND pin If used with an external relay a diode must be connected in parallel with the load for protection against voltage transients 1 Auxiliary DC Po...

Страница 42: ...r active low or High for active high Digital Output Enable or Disable the digital output Digital outputs active state is Open to switch off the transistor when motion is detected or Grounded to switch on the transistor when motion is detected Once you have edited the settings you need click Apply to save the settings ...

Страница 43: ... alarm Sensitivity Set the measurable difference between two sequential images that would indicate motion Note Sliding the Sensitivity bar to the left will decrease the sensitivity of the motion detection i e More movement is required to trigger the alarm The best way to configure these settings is to adjust the settings and have someone walk in front of the camera until your feel you are getting ...

Страница 44: ...he alarm Sensitivity Set the measurable difference between two sequential images that would indicate motion Note Sliding the Sensitivity bar to the left will decrease the sensitivity of the motion detection i e More movement is required to trigger the alarm The best way to configure these settings is to adjust the settings and have someone walk in front of the camera until your feel you are gettin...

Страница 45: ...up to 4 schedules and you can use these to send alarms to different places such as emails FTP or SD Schedule Setup Options Schedule ID Select the ID you can save up to four schedules and use them for different purposes Everyday Activate the alarm daily on specified times Un ticking this box will display the days of the week See screenshot Always Always activate the alarm Range Activates the alarm ...

Страница 46: ...is triggered FTP Server ID Select the FTP Server number from the list set under Alarm Server Remote path Path where to save the image file on to the FTP server Snapshot From Select the stream from which it should get the snapshot Image file name A name for the Image Suffix of file name Image file name suffix can be either date and time or a sequence number Effective Period Always Always trigger th...

Страница 47: ...ct the e mail server number from the list File attachment Select if you would like a snapshot of the camera view attached to the e mail Snapshot From Select the stream from which it should get the snapshot Image file name Any name for the Image Suffix of file name Image file name suffix can be either date and time or a sequence number Effective Period Always Always trigger the alarm upon motion de...

Страница 48: ...t the FTP Server number from the list Remote path Path where to save the image file on the FTP server Snapshot From Select the stream from which it should get the snapshot Image file name A name for the Image Suffix of file name Image file name suffix can be either a date and time a number sequence or null Effective Period Always Always trigger the alarm upon motion detection Schedule Trigger the ...

Страница 49: ... number from the list File attachment Select if you would like a snapshot of the camera view attached to the e mail Snapshot From Select the stream from which it should get the snapshot Image file name A name for the Image Suffix of file name Image file name suffix can be either date and time or a sequence number Effective Period Always Always trigger the alarm upon motion detection Schedule Trigg...

Страница 50: ...get the snapshot Image file name A name for the Image Suffix of file name Image file name suffix can be either date and time or a sequence number FTP automatic Sending Enable this if you want to upload all the images present in buffer to an FTP Server FTP Server ID Select the FTP Server number from the list Remote path Path where to save the image file on the FTP server Estimate Sending time The t...

Страница 51: ...ent FTP servers These servers can be individually connected to either upload on motion detection or upload periodically These functions are available under the Alarm menu FTP Server ID Select the ID of the FTP server You can connect to up to four FTP Servers FTP server name Type the name or IP address of the FTP server FTP server port The port number of the FTP server default is 21 Anonymous Enabl...

Страница 52: ... not allow e mail relaying Check with your system administrator or Internet service provider for more details SMTP server port The port number of the e mail server default is 25 Secure SSL Connection Select whether your SMPT server requires an SSL connection Authentication Select whether authentication is required by the SMTP server User name Password Type the user name and password of the e mail ...

Страница 53: ...u use any other SMTP server other than their own British Telecom BT are a good example of this 6 421 Y cam with Gmail Servers The SMTP server name and port that Google Mail uses requires a Secure SSL connection and Authentication to work For your Y cam to be able to use the Gmail servers use these settings SMTP Server Name smtp gmail com SMTP Server Port 465 or 587 if using TLS Secure SSL Connecti...

Страница 54: ... of motion trigger Alarm Mode Activate Deactivates the motion detection alarm Record on Alarm Enable Disable recording videos on MicroSD upon motion detection Record Time The number of seconds that the camera should keep recording video after motion stops If there is any motion within this time the camera will keep recording until there is no motion for the duration of this parameter It can be fro...

Страница 55: ...fective Period Always Always trigger the alarm upon motion detection Schedule Trigger the alarm according to the schedule Click Apply to confirm your settings Note Some users use the SDs Record on Alarm function when the camera is being used standalone If so you should change the Wireless mode to Adhoc otherwise the camera will continuously try to find a local network and may auto reboot itself ...

Страница 56: ...d keep saving images when an alarm is triggered Trigger FPS The number of frames per seconds that the camera should keep saving images at when an alarm is triggered Snapshot From Select the stream from which it should get the snapshot Image file name A name for the Image Suffix of file name Image file name suffix can be either date and time or a sequence number Effective Period Always Always trigg...

Страница 57: ...ideo file Suffix of file name Video file name suffix can either be date time a sequence number or date time with record time length Split Time of Record file This specifies the maximum duration of one file When the recording time exceeds this parameter the camera will split the video into a number of files Effective Period Always Always trigger the alarm upon motion detection Schedule Trigger the ...

Страница 58: ...Interval Time Time interval between snapshots Snapshot From Select the stream from which it should get the snapshot Image file name Any name for the Image Suffix of file name Image file name suffix can be either date and time or a sequence number Effective Period Always Always trigger the alarm upon motion detection Schedule Trigger the alarm according to the schedule Click Apply to confirm your s...

Страница 59: ... Sending Period Select where the files should be uploaded to the FTP Server Always Always upload the contents of MicroSD onto FTP Server Schedule Upload the files according to the schedule File Period Always Always trigger the alarm upon motion detection Schedule Trigger the alarm according to the schedule FTP Upload Bandwidth Available bandwidth to be used to upload the contents of the microSD ca...

Страница 60: ...h were recorded on the MicroSD upon motion detection Snapshot on Alarm Enables you to view and delete snapshots which were recorded on the MicroSD upon motion detection Continuous Record Enables you to view and delete all the videos recorded on the MicroSD according to the continuous record schedule Snapshot at Interval Enables you to view and delete all the snapshots which were recorded on the Mi...

Страница 61: ...ard upon first insertion of a card Status If the MicroSD card is in the slot it will read as Ready Total It shows the size of the MicroSD card Used It shows the used space on the MicroSD card Available It shows what free space is available for storage Format It is used to erase all the data on the microSD card Note Regardless of space available the Y cam can only record up to 1 000 video files and...

Страница 62: ...System Name Type a name to easily identify the Y cam System Contact Type the contact name of the administrator of the Y cam This is useful in large organisations System Location Type the location of the Y cam Useful when using a multi camera viewer program Tip The information you fill in can be displayed on the camera It can help to distinguish different Network Cameras in the network ...

Страница 63: ... then enter the new password for that user twice and click Save To delete a user Click on the user name then click Delete Note A maximum of 16 users are allowed to access the camera simultaneously As the number of simultaneous users increases the overall performance will decrease This is dependent on the network bandwidth not the camera Please tick Allow anonymous access if you wish to share video...

Страница 64: ...zone for the device location Choose your time zone Date and Time format Select the format of the date and time Auto time setting SNTP Enable or disable the auto time setting to update to the server below Time server Type the SNTP server name There are suggestions included Note 1 If the SNTP server is not found the Y cam s time will be synchronized with the PC time 2 The Y cam has a built in RTC Re...

Страница 65: ...econfigure the camera Backup Click Backup to backup the current configuration of the Y cam for future reference Once you have your camera setup as you require this is recommended Browse Click Browse to search for a backup configuration you wish to upload to the camera then click Restore Note Do not turn off the power during the Reset Backup or Restore functions since this might corrupt the camera ...

Страница 66: ...atest firmware store it in a place that is easily to get to The firmware is in a ZIP file which is a compressed file format You will need to move or copy the file from this compressed folder some versions of Windows will allow you to do this but if not you will need a program like WinZIP or WinRAR to unzip the file to a standard folder This is very important as the firmware will not update properl...

Страница 67: ...u may want to backup your settings before the upgrade You may also want to make a note of your settings before upgrade The backup restore configuration may not work between firmware upgrades so always make a note before starting If the update hasn t worked after 15 20 minutes restart the camera via the side button on the camera If you camera is unresponsive you will need to contact either your pla...

Страница 68: ...information about your Y cam This is a very useful screen as it shows you what parts of your Y cam are properly or incorrectly setup Use it to find your DDNS address static IP internal IP gateway and much more It also shows you which Users are currently viewing the camera and from what IP address they come from ...

Страница 69: ...ase If you want support directly from Y cam please use the following link http www y cam com cms support php We offer free support by support ticket or by email and there is also a comprehensive FAQ section on our website If you wish to speak to a technical support representative please call 0906 6800 215 Open 9 30 am to 5 30pm Monday to Friday Charges of 25p a minute apply ...

Страница 70: ...e 70 6 9 Reboot Click Reboot to restart the Y cam Rebooting the camera will retain all the settings and configurations A reboot is necessary sometimes such as when you insert a microSD card into the camera ...

Страница 71: ...our ISP in order to open the appropriate ports If your ISP does not pass traffic on port 80 you will need to change the camera s default port number from 80 to a different number such as 8000 Viewing Your Camera To access the Y cam from a computer on your local network simply enter the IP Address of the Camera followed by a colon and the camera s port number It is not necessary to enter the colon ...

Страница 72: ...f image quality and delays in refresh intervals Consult your ISP or network administrator for further details Start Internet Explorer Select Tools Internet Options Connections tab and click LAN Settings Verify that the Use a proxy server check box is not checked When not checked click Cancel Your proxy server settings should not cause any problems If it is checked click Advanced Under exceptions e...

Страница 73: ... 1 Open a new Internet Explorer window 2 From the menu bar select Tools and then select Internet options 3 From the Internet Options window select the Security tab 4 Click on the Custom Level button 5 Scroll down to the section labelled ActiveX controls and plug ins Select the option buttons so that they match the window below and then click OK to exit the window ...

Страница 74: ...correct new firmware for your camera from http www y cam com and save this to your hard disk 2 Unzip uncompress the firmware to a directory on your PC Copy the firmware MFW file to an easy to access place such as C firmware 3 Write down the full name of the firmware MFW filename 4 Connect the camera via the Crossover Cable directly to your computer 5 Open Network Settings and make a note of your c...

Страница 75: ... LED will stop flashing This means the firmware is being loaded 17 Please wait until the LED starts flashing again this means the firmware has finished installing 18 Turn the power off to the camera 19 Unplug the crossover cable 20 Restore your TCP IP Settings to their previous state as in step 5 Your camera should now be restored to its factory default settings and be working again you can procee...

Страница 76: ...eneric MJPEG camera please use the path of your camera with stream jpg on the end of it This will instruct the software to extract the Motion JPEG video stream from the specified path in the Y cam All current Y cam models support this method 7 7 Alternative methods of accessing the video stream You can also access video images from the network camera in the following ways Motion JPEG server push i...

Страница 77: ...ture Live view Please note that you need the admin password to make any changes to these settings If you are using firmware v4 16 and above and are accessing your camera from an iPhone you can now access the MJPEG stream compatible with iPhone by putting iphone on the end of your cameras address so http CameraIPaddress Port iphone For some mobile phones you do not need to enter mobile on the end o...

Страница 78: ...does not appear 1 Check that your Internet Explorer settings allow you to download and install ActiveX controls 2 Maximum 16 users are allowed to access the camera simultaneously through network 3 Network traffic may prevent the viewing interface from appearing quickly Wait for a while 4 Refresh the page The colour of the picture is strange 1 Confirm the colour setting of PC is 16 bits or more 2 I...

Страница 79: ... Please contact your place of purchase or Y cam Technical Support Motion Detection triggers unexpectedly Motion detection is based on changes in pixel in the image This means that if there are sudden changes in the lighting motion detection may be triggered mistakenly Lower the sensitivity setting to avoid problems What do the changes to the LED light mean Amber Steady for connection to a 10 100 M...

Страница 80: ...network system in which devices communicate with each other by first going through the wireless router IP Address The unique 32 bit number assigned to each computer connected to the Internet IP numbers are used by the TCP IP protocol to route packets of data to their destinations JPEG A standard image format used widely for photographs also known as JPG Network Camera A stand alone device which al...

Отзывы: