background image

62

63

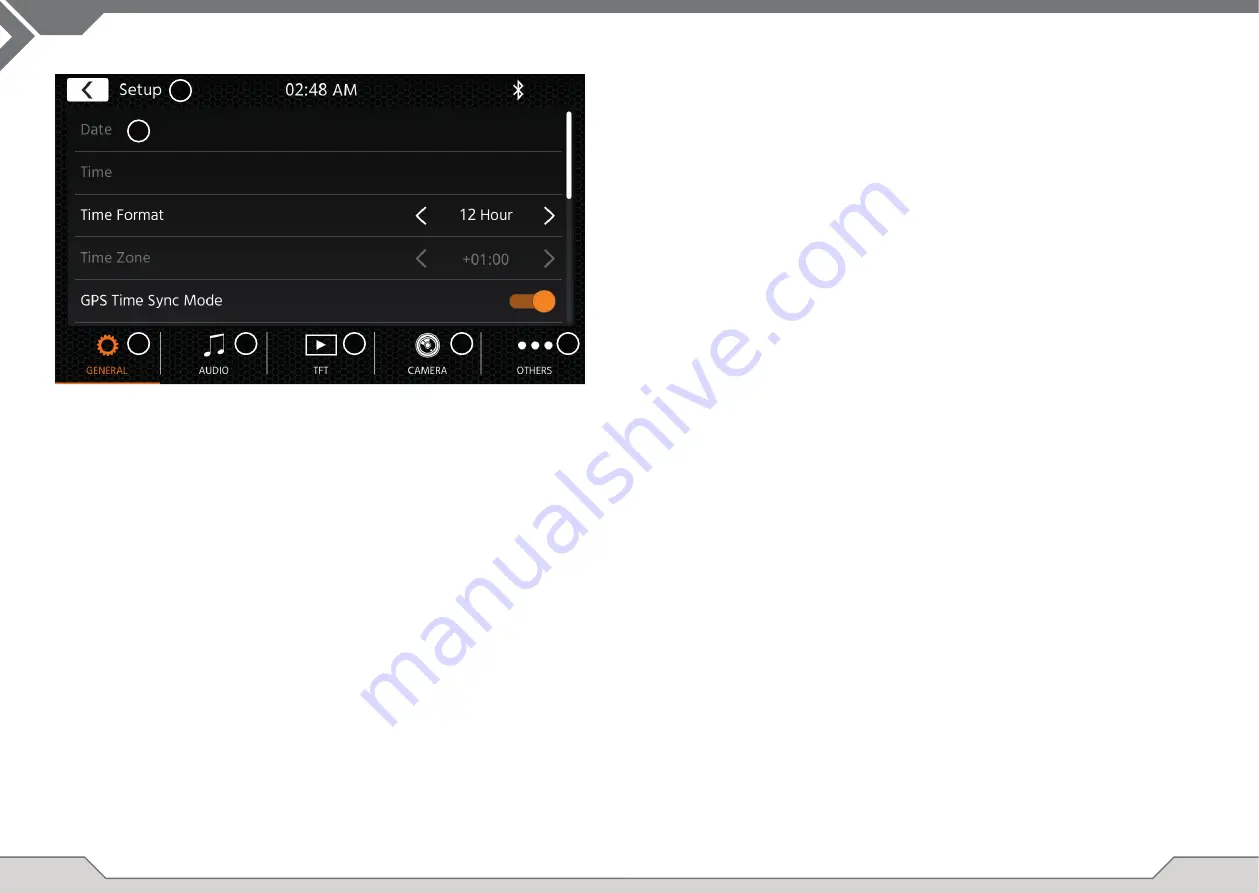
Pulsanti di funzionamento:

1.  Indietro 

 Premere per tornare alla schermata iniziale.

2.  Area liste 

 L'area liste mostrata varia in base alla categoria selezionata in quel momento. 


 Per visualizzare altre impostazioni, è possibile scorrere la lista verso l'alto o il basso 
oppure selezionare una categoria diversa nell'area inferiore.

3.  Generale 

Contiene impostazioni generali quali lingua, data e ora, assegnazione tasti ALT.


 3(a)  Premere la data per impostarne una manualmente (solo qualora la modalità 

Sincronizza fosse disattivata).


 3(b)  Premere l'orario per impostarlo manualmente (solo qualora la modalità 

Sincronizza fosse disattivata).


 3(c)  12/24: Premere i tasti freccia per scegliere tra il formato a 12 o 24 ore.


 3(d)  Fuso orario: Premere i tasti freccia per impostare il fuso orario (solo qualora la 

modalità Sincronizza fosse disattivata).


 3(e)  Modalità sincronizzazione orario (DAB+): Premere per attivare/disattivare 

questa impostazione.


 3(f)  ALT, pressione rapida: Premere i tasti freccia per assegnare una funzione diversa.


 3(g)  ALT, pressione lunga: Premere i tasti freccia per assegnare una funzione diversa.


 3(h)  Bip: Premere per attivare/disattivare questa impostazione (la riproduzione di un 

segnale acustico a ogni pressione dei tasti).


 3(i)  Android Link: Premere per attivare/disattivare questa impostazione*


 3(j)  WebLink: Premere per attivare/disattivare questa impostazione*


 3(k)  Lingua: Premere i tasti freccia per selezionare la lingua.


 3(l)  Microfono: Premere i tasti freccia per cambiare il microfono selezionato.


 3(m)  Sfondo: Premere per selezionare uno sfondo diverso.

4.  Audio 

 Contiene le impostazioni per regolare l'audio e i suoni.


 4(a)  Bilanciamento: Premere i tasti freccia per spostare la posizione centrale a 

IMPOSTAZIONI DEL DISPOSITIVO

sinistra o a destra.


 4(b)  Fader: Premere i tasti freccia per spostare la posizione centrale in avanti o indietro.


 4(c)   Equalizzatore: 


 Toccare per aprire EQ. Qui è possibile selezionare diverse impostazioni 
predefi nite dell'equalizzatore o modifi care manualmente le bande di frequenza 
a piacimento.


 Bilanciamento e Fader possono essere anche regolati visivamente oppure è 
possibile regolare i valori LPF, i livelli del subwoofer e l'intensità.


4(d)  Navi Mixer: Premere per attivare o disattivare il mixaggio della voce del 

navigatore e dell'audio di sottofondo.


4(e)  Volume all'avvio: Premere il tasto +. Qui è possibile modifi care individualmente 

tutte le sorgenti disponibili a livello di volume all'avvio.


 È possibile applicare l'ultimo volume utilizzato o impostare un volume fi sso da 
usare all'avvio.

5.  TFT 

 Qui è possibile regolare le impostazioni a livello di schermo, come la modalità 
Luminosità e i valori relativi.


5(a)  Luminosità giorno TFT: Premere i tasti freccia per impostare il valore della 

modalità Giorno.


5(b)  Luminosità notte TFT: Premere i tasti freccia per impostare il valore della 

modalità Notte.


5(c)  Modalità Dimmer: Premere i tasti freccia per impostare questo valore.


 Auto: la luminosità viene regolata in modo automatico con l'attivazione dei fari 
anteriori del veicolo (Notte).


 Giorno: la luminosità è costantemente impostata sul valore della modalità Giorno.


 Giorno: la luminosità è costantemente impostata sul valore della modalità Notte.


5(d)  StandBy automatico del touchscreen: Qualora sia impostato un tempo di 

inattività, lo schermo si disattiverà se non viene utilizzato (l'audio continuerà a 
essere riprodotto in sottofondo).

6.  Telecamera 

 Consente di regolare le impostazioni della telecamera collegata per la visuale posteriore.


6(a)  Telecamera per visuale posteriore: Premere i tasti freccia per regolare questo valore.


6(b)  Muto in retromarcia: Premere per modifi care il valore (volume 50%, muto 0% o 

100% nessuna disattivazione volume)


6(d)  Ritardo in retromarcia: Premere i tasti freccia per modifi care il tempo del ritardo 

con cui la visuale della telecamera si chiude in automatico dopo aver disinserito 
la retromarcia. 6(e) Immagine da telecamera: Premere i tasti freccia per 
regolare questo valore (normale oppure orizzontale a specchio).

7.  Varie 

 Qui è possibile consultare le informazioni sulla versione del software dell'unità, 
caricare le impostazioni di fabbrica o regolare i comandi sul volante (solo se il veicolo 
è collegato a tramite Tasto1/Tasto2 [miniISO] ma non tramite un'interfaccia IR-Stalk).


7(a)  Impostazioni di fabbrica: Premere il tasto + e confermare qualora si desideri 

riportare l'unità alle impostazioni di fabbrica.


7(b)  Versione software: Premere il tasto + per visualizzare la versione del software di 

sistema dell'unità.


7(c)  Assegnazione comandi sul volante: Premere il tasto + per aprire la schermata 

di assegnazione SWC per la modalità chiave analogica (non per la modalità 
interfaccia stalker IR)

Nota:

*  Questa funzionalità diventerà disponibile tramite un futuro aggiornamento del software, se qualora non 

fosse presente al lancio sul mercato

1

2

3

4

5

6

7

Содержание ARGO X-F270

Страница 1: ...Car Specific Infotainer X F270 ARGO Series X F270 USER MANUAL MANUALE D USO User Manual BENUTZERHANDBUCH MANUEL DE L UTILISATEUR...

Страница 2: ...d devices pose a serious risk for the driver and passengers during an accident Protect the unit from water and other liquids that could enter the housing A short circuit or even a fire could result To...

Страница 3: ...to perform a power reset B MAP MicroSD slot for navigationssoftware optional not included in this set C MIC internal microphone for handsfree functions D IR IR lense for remote control DEVICE SUPPORT...

Страница 4: ...compatible vehicle the VOICE button will invoke or close CAMERA view if cam is connected to device SWC re Assignment In case of using the existing mini ISO connector at your compatible vehicle you can...

Страница 5: ...of navigation voice and background audio 4 e Startup volume Press more key Here you can change individually all available sources in regard of startup volume You can choose to apply the last used volu...

Страница 6: ...ia the Home Screen Source Icon You can also directly switch from the DAB source to FM source via the FM key in lower right corner of the DAB source Inthelowersectionyoucanchangethecategorywhichwillals...

Страница 7: ...iPod can be accessed among other ways thru their home screen icon and BT music with a connected phone via the Bluetooth source to play audio BT USB iPod or video USB only Playing files is similar for...

Страница 8: ...on to look up a contact A contact can be operated like a folder and be tapped to open its containing numbers Tap on the line number to initiate a call attempt Use the orange back button on top left po...

Страница 9: ...the NAV slot on found on upper left side of the device see Front View Chapter For the Navigation source UI operation a quick start guide is provided you can also download a navigation manual PDF from...

Страница 10: ...duct is changed erased made illegible or removed The same applies if the receipt or invoice is incomplete and or illegible when presented Is XZENT liable for other defects or damage XZENT will repair...

Страница 11: ...in Fehlerhaft montierte Ger te stellen bei einem Unfall ein ernsthaftes Risiko f r Fahrer und Beifahrer dar Sch tzen Sie das Ger t vor Wasser und anderen Fl ssigkeiten die in das Geh use gelangen k nn...

Страница 12: ...hren siehe Kapitel Ger teeinstellungen 7 BT Dr cken Sie um die Bluetooth Quelle zu ffnen A RESET Dr cken Sie um einen Power Reset durchzuf hren B MAP MicroSD Steckplatz f r Navigationssoftware optiona...

Страница 13: ...t rke des aktuell aktiven Audiokanals zu ndern 4 Kamera Sprache Wenn sich die Taste VOICE in Ihrem kompatiblen Fahrzeug befindet wird die CAMERA Ansicht aufgerufen oder geschlossen wenn die Kamera an...

Страница 14: ...rgrundton zu aktivieren oder zu deaktivieren 4 e Startlautst rke Dr cken Sie die Taste Weitere Hier k nnen Sie alle verf gbaren Quellen in Bezug auf die Startlautst rke individuell anpassen Sie k nnen...

Страница 15: ...Startbildschirm aufrufen Sie k nnen auch ber die UKW Taste in der rechten unteren Ecke der DAB Quelle direkt von der DAB zur UKW Quelle wechseln Im unteren Bereich k nnen Sie die Kategorie ndern die a...

Страница 16: ...Symbol und BT Musik mit einem angeschlossenen Telefon ber die Bluetooth Quelle zugegriffen werden um Audio BT USB iPod oder Video nur USB wiederzugeben Die Wiedergabe von Dateien ist f r alle Quellen...

Страница 17: ...m einen Kontakt zu suchen Ein Kontakt kann wie ein Ordner bedient und mit Antippen ge ffnet werden um seine enthaltenen Nummern zu ffnen Tippen Sie auf die Zeilennummer um einen Anruf zu starten Verwe...

Страница 18: ...ks des Ger tes siehe Kapitel Frontan sicht F r den Umgang mit der Benutzeroberfl che der Navigationsquelle steht eine Kurzanleitung zur Verf gung Sie k nnen auch ein Navigationshandbuch PDF von unsere...

Страница 19: ...wenn die Modell Serien UUID Produkt nummer auf dem Produkt ge ndert gel scht unkenntlich gemacht oder entfernt wurde Gleiches gilt wenn der Kassenbeleg oder die Rechnung nicht nur unvollst ndig und o...

Страница 20: ...euvent tre tr s importantes Les appareils mal mont s pr sentent un risque majeur pour le conducteur et les passagers en cas d accident Prot gez l appareil de l eau et des autres liquides qui pourraien...

Страница 21: ...A R INITIALISATION Appuyez pour effectuer une r initialisation de l alimentation B CARTE Port MicroSD du logiciel de navigation en option pas inclus dans cet ensemble C MIC microphone interne destin e...

Страница 22: ...u d appel actif la fonctionnalit de t l phone du bouton prend effet 3 Volume Ces boutons sont pris en charge et permettent de changer le niveau de volume du canal audio actif actuel 4 Cam ra Voix S il...

Страница 23: ...d Navi Mixer Appuyez sur le commutateur pour activer ou d sactiver le m lange de la voix de navigation et le fond sonore 4 e Volume de d marrage Appuyez sur la touche Plus Ici vous pouvez changer de...

Страница 24: ...t via l ic ne Source de l cran d accueil Vous pouvez galement passer directement de la source DAB la source FM par l interm diaire de la touche FM plac e dans le coin inf rieur droit de la source DAB...

Страница 25: ...eur cran d accueil et la musique BT l aide d un t l phone connect via la source Bluetooth pour lire l audio BT USB iPod ou la vid o USB uniquement La lecture des fichiers est similaire pour toutes les...

Страница 26: ...re utilis comme un dossier et tre appuy pour ouvrir son contenu num rique Appuyez sur le num ro de ligne pour effectuer une tentative d appel Utilisez le bouton Retour orange dans la position sup rieu...

Страница 27: ...nt Un guide de d marrage rapide est fourni avec le fonctionnement de l interface utilisateur de la source de navigation Vous pouvez galement t l charger un manuel de navigation PDF partir de notre sit...

Страница 28: ...d autres d fauts ou dommages XZENT r parera ou remplacera les produits uniquement s ils sont couverts par les termes de cette garantie XZENT n est pas responsable des pertes ou dommages mat riels ou...

Страница 29: ...tilizzare esclusivamente gli accessori di montaggio forniti Le forze di accelerazione in caso di incidente possono essere enormi In caso di incidente i dispositivi montati in modo non corretto rappres...

Страница 30: ...rgente Bluetooth A RESET Premere per effettuare il ripristino B MAPPA Slot per scheda MicroSD per il software di navigazione facoltativo non incluso in questo set C MIC Microfono interno per funzioni...

Страница 31: ...lume del canale audio attivo in quel momento 4 Telecamera Voce Se presente sui veicoli compatibili il pulsante VOICE richiamer o chiuder la visuale della TELECAMERA se la telecamera collegata al dispo...

Страница 32: ...Volume all avvio Premere il tasto Qui possibile modificare individualmente tutte le sorgenti disponibili a livello di volume all avvio possibile applicare l ultimo volume utilizzato o impostare un vo...

Страница 33: ...FM nell angolo in basso a destra della sorgente DAB Nella sezione in basso possibile cambiare la categoria che si occuper anche di aggiornare di conseguenza l area principale della sorgente 1 2 3 4 5...

Страница 34: ...incipale e musica BT con un telefono collegato tramite la sorgente Bluetooth per riprodurre audio BT USB iPod o video solo USB La riproduzione dei file avviene in modo simile per tutte le sorgenti ed...

Страница 35: ...ella e toccarlo per aprire e visualizzarne i numeri che contiene Toccare il numero desiderato per avviare un tentativo di chiamata Utilizzare il pulsante Indietro arancione in alto a sinistra della sc...

Страница 36: ...tro dell unit vedere il capitolo Pannello frontale Per il funzionamento dell interfaccia utente della sorgente Navigazione viene fornita una guida di avvio rapido ma inoltre possibile scaricare il man...

Страница 37: ...rimosso Lo stesso vale se la ricevuta o la fattura incompleta e o illeggibile al momento della presentazione XZENT responsabile per altri difetti o danni XZENT riparer o sostituir i prodotti solo se c...

Страница 38: ...rf gbar www xzent com siehe Link Dokumente zur Produktkonformit t im Fussbereich REMARQUES ACR Br ndli V geli AG d clare par la pr sente que le type d quipement radio X F270 est conforme la directive...

Страница 39: ...XZENT by ACR AG Bohrturmweg 1 Bad Zurzach Switzerland www xzent com...

Отзывы: