XYZ Printing da Vinci 1.1 Plus Скачать руководство пользователя страница 10

V1

P 10

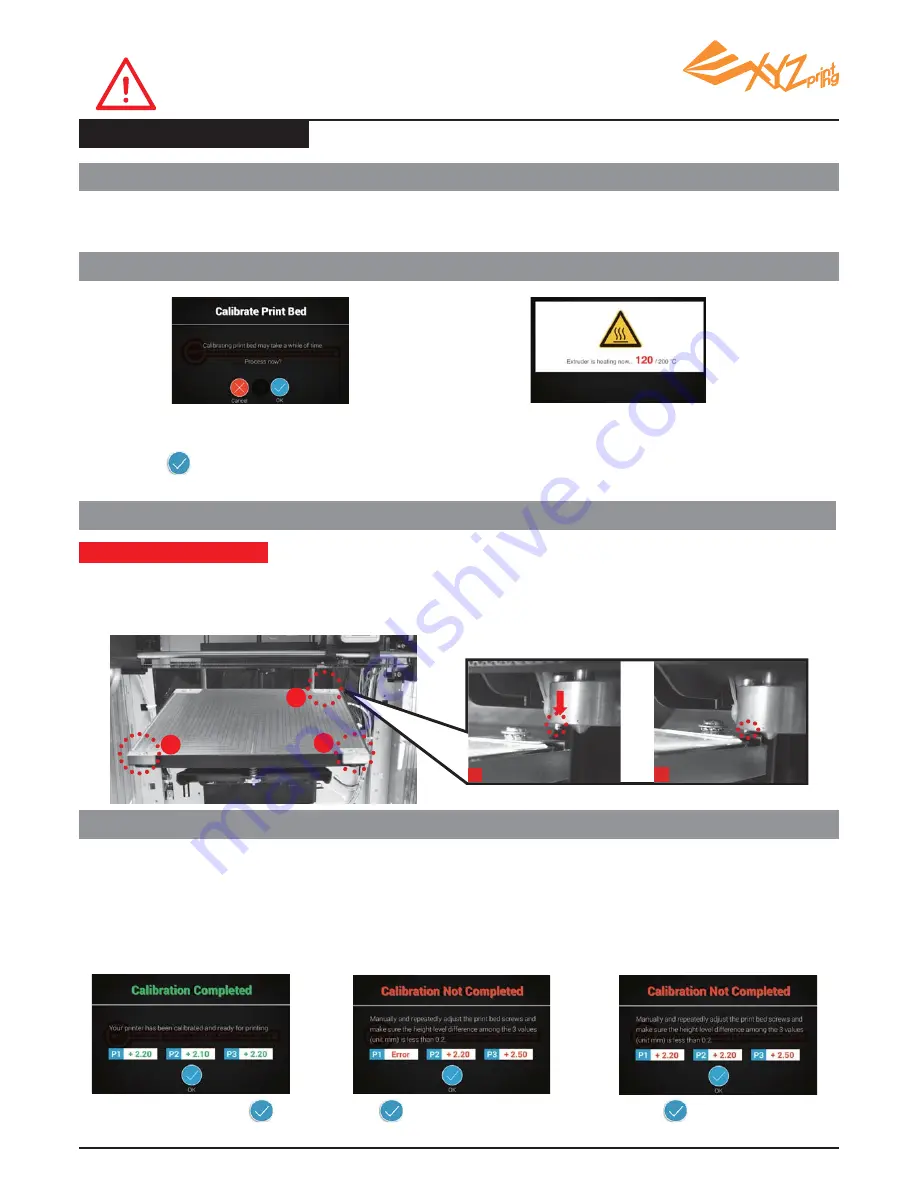
Select "Setting">"Printer Settings"> 
"Maintenance" >"Calibrate Print Bed"  and 
press         to perform calibration.

The printer starts automatic measurement.
Wait for 2~3 minutes and verify the data shown.

Note: During the measurement process, the print bed 

and extruder module will be heated.

Care should be taken during operation!

The print bed is leveled; 

adjustment to the print bed is 

not required.

Skip step 5 & 6, and press           to 
finish.

Press         and proceed step 5 and 6.

1."Calibration Completed”
- ready to print

2."Calibration Not Completed” 

and "Error" is shown - cleaning & 

leveling is required

3."Calibration Not Completed”
- leveling is required

The detecting point is too 

high/low for detection or the 

pin/measurement point is

covered by molten plastic.

Unleveled print bed may 

affect printout quality. Please 

level the printbed based on 

the value of P1, P2 and P3.


Press          and proceed step 6.


In XYZware, select “About” > “Firmware Update”.

This print bed has been calibrated by our professional technician 

before shipment. Do not adjust the platform yourself unless 

necessary, or contact the customer service center.

1.Check for fi rmware update

3.Wait for detecting

2.Activate Calibration

Print Bed Calibration

The printer measures the distance between the detecting pin and 3 measurement points at the corners of the 

print bed to check if the platform is leveled. When the height of the 3 points are no more than ±0.2 from each 

other, the print bed is leveled.

What does “detecting” do:

4.Check the detecting result on the display

1

3

2

B

A

Содержание da Vinci 1.1 Plus

Страница 1: ...V1 P 1 da Vinci 1 1 Plus Quick Guide ENG 02 08 09 10 11 12 Product Manual XYZware Print Bed Leveling and Product Specification Support Details...

Страница 2: ...s it may be hot and include moving parts Please keep the front door closed during printing to avoid injury Important Safety Instruction for Use of Maintenance Tools The maintenance tools provided shou...

Страница 3: ...er and remove the cushions by the extruder Remove the tape on the print bed Remove the cardboard Remove the cardboard Remove the cushions by the print bed Remove the bottom screw and plastic piece und...

Страница 4: ...the filament Network Status Display online status of Wi Fi or Ethernet network Settings View the printer status and system settings Function Guidelines Home menu basic operation introduction Print fr...

Страница 5: ...ide hole please cut the tip of the filament off at a 45 angle with a cutting pliers filament loading will be easier Top cover Cartridge Guide Hole 1 Remove the filament stopper and tape 2 Install the...

Страница 6: ...n the size of the printing object previewed on screen and press to print 1 2 4 6 3 5 Select Print Sample on the screen Select a sample to print and tap to print Remove the printed object when the prin...

Страница 7: ...and switch among different categories tap on the desired model for a zoomed in preview Caution Before printing any model from any media always remember to apply glue to the printing area on the printi...

Страница 8: ...the extruder module please first unload filament by following the steps above And then press on the black rubber fixers on either ends of the filament tube You may also follow the instructions on the...

Страница 9: ...tly XYZware virtualizes the printing platform on the screen You may move rotate and resize the object s in the software and send the file for printing via USB flash drive or PC Note Some instruction a...

Страница 10: ...low for detection or the pin measurement point is covered by molten plastic Unleveled print bed may affect printout quality Please level the printbed based on the value of P1 P2 and P3 Press and proce...

Страница 11: ...r value indicates the higher the detected point is 2 Turn the 3 turning screws at location a b c under the print bed to level the platform 5 Clean the detecting pin 6 Level the print bed When finishin...

Страница 12: ...Communications Commission FCC Statement You are cautioned that changes or modifications not expressly approved by the part responsible for compliance could void the user s authority to operate the equ...

Отзывы: