8-3
Remove and discard the authorized cleaning solution, then rinse the bottle thoroughly with authorized rinsing agent (see
Section 8.1). Next, add authorized rinsing agent to the bottle, reinstall the Buffer bottle inside the bottle tray.
From the Service screen, Module tab, touch [Off] to prime the buffer pump for 3 to 5 minutes to rinse the tubing. After 3 to
5 minutes, touch [On] to turn the pump off.
Empty the buffer bottle.
Remove the Buffer Cap Assembly. From the Service screen, Module tab, touch [Off] to flush the line with air. After 1
minute, touch [On] to turn the pump off. Wipe the buffer cap and steel tubes with a clean laboratory tissue.
Fill the buffer bottle with fresh buffer.
From the Service screen, Module tab, touch [Off] to prime the fresh buffer through the tubing and sipper. After 2 minutes,
touch [On] to turn the pump off.
8.3.3 Bottle Cap Cleaning
Clean the buffer and calibrator bottle caps using one of the authorized cleaning solutions (see Section 8.1). Rinse with
authorized rinsing agent and dry the bottle caps. Dry the SMA connector thoroughly with a lint-free tissue. For best
results, let air dry for 2 hours.
8.3.4 Sample Module Cleaning
For applications requiring more frequent cleaning of the sample module, including stir bar and O-rings, clean as described
in Section
Preventive Maintenance – 6 months or 1000 Hours
8.4
Before performing maintenance on the 2500 Analyzer,
ALWAYS
go to the Service screen to prevent the analyzer from
attempting to calibrate.
Perform the maintenance procedures in this section every 6 months or 1000 hours sample ready, whichever occurs first.
Depending on application and use, more frequent maintenance may be required.
The YSI 2588 Preventive Maintenance Kit contains all supplies necessary.
8.4.1 Sample Module Cleaning
It is necessary to periodically clean the sample modules.
From the Service screen, [Sipper] tab, touch the button under Location. Select [Station 1-P96] to move the sipper away
from the sample module.
Grasp the hand hold in the right side cover of the instrument and pull up and out to remove the cover.
Lift the cover off the left side of the instrument.
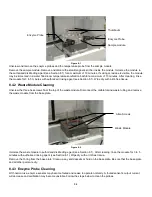
Unscrew the three thumbnuts on top of each sample module.
Содержание YSI 2500
Страница 1: ...USER MANUAL 525021 YSI 2500 Biochemistry Analyzer OPERATIONS AND MAINTENANCE MANUAL...
Страница 34: ...5 11 8 The Stat sample results are displayed on the Run Stat tab Stat sample results...
Страница 88: ...13 1 13 Notices Declaration of Conformity 13 1...
Страница 96: ...17 1 17 Appendix D Line Power Cord and Plug Wiring United Kingdom United States Europe...


