background image

Oxi 3310

Firmware update

61

ba75804e08

10/2017

9

Firmware update

General information

Available firmware updates are provided on the Internet.
With the "Firmware Update " program and a PC you can update the 
firmware of the Oxi 3310 to the newest version. 

For the update you have to connect the meter to a PC. 

For the update via the USB interface, the following is required:

a free USB interface (virtual COM port) on the PC 

the driver for the USB interface (on the enclosed CD-ROM)

the USB cable (included in the scope of delivery of the Oxi 3310).

Program installation

Program start


Firmware update

After switching the meter off and on you can check whether the meter 
has taken over the new software version (see page 52).

1

Install the downloaded firmware update on a PC.

An update folder is created in the Windows start menu. 
If an update folder already exists for the meter (or meter type), 
the new data is displayed there.

2

In the windows start menu, open the update folder and start the 
firmware update program.

3

Using the USB interface cable, connect the Oxi 3310 to a USB 
interface (virtual COM port) of the PC. 

4

Switch on the Oxi 3310.

5

In the firmware update program, start the update process with 
OK.

6

Follow the instructions of the firmware update program.
During the programming process, a corresponding message 
and a progress bar (in %) are displayed. 
The programming process takes approx. three minutes. A ter-
minatory message is displayed after a successful programming 
process. The firmware update is completed. 

7

Disconnect the Oxi 3310 from the PC. 
The Oxi 3310 is ready for operation again.

Содержание WTW Oxi 3310

Страница 1: ...OPERATING MANUAL ba75804e08 10 2017 Oxi 3310 DISSOLVED OXYGEN D O METER...

Страница 2: ...2 ba75804e08 10 2017 Oxi 3310 Copyright 2017 Xylem Analytics Germany GmbH Printed in Germany...

Страница 3: ...modes 18 4 2 2 Navigation 19 4 2 3 Navigation example 1 Setting the language 21 4 2 4 Example 2 on navigation Setting the date and time 23 4 3 Sensor independent settings 25 4 3 1 System 25 4 3 2 Data...

Страница 4: ...4 8 Reset 46 4 8 1 Resetting the measurement settings 46 4 8 2 Resetting the system settings 47 5 Maintenance cleaning disposal 49 5 1 Maintenance 49 5 1 1 Replacing the batteries 49 5 2 Cleaning 50...

Страница 5: ...Oxi 3310 Contents 5 ba75804e08 10 2017...

Страница 6: ...and reliably The Oxi 3310 provides the maximum degree of operating comfort reli ability and measuring certainty for all applications The proven OxiCal calibration procedure supports you in your work...

Страница 7: ...menu for system settings On Off Switches the meter on or off M Selects the measured parameter CAL CAL_ Calls up the calibration procedure Displays the calibration data STO STO_ Saves a measured value...

Страница 8: ...ensor symbol calibration evaluation calibration interval 5 Measured temperature with unit 6 Status line 7 Softkeys and date time 3 2 4 5 6 7 1 HOLD AR 25 0 7 92 C O2 mg l 15 03 2014 08 00 Menu USB out...

Страница 9: ...connect D O sensors to the meter that cannot return any voltages or currents that are not allowed SELV and current circuit with current limiting Almost all customary D O sensors fulfill these conditio...

Страница 10: ...Overview Oxi 3310 10 ba75804e08 10 2017...

Страница 11: ...necessary safety precautions to take when handling chemicals Safety instructions Safety instructions in this operating manual are indicated by the warn ing symbol triangle in the left column The signa...

Страница 12: ...al safety The smooth functioning and operational safety of the meter can only be guaranteed if the generally applicable safety measures and the specific safety instructions in this operating manual ar...

Страница 13: ...ou are in any doubt please contact the supplier of the meter Obligations of the purchaser The purchaser of this meter must ensure that the following laws and guidelines are observed when using dangero...

Страница 14: ...Safety Oxi 3310 14 ba75804e08 10 2017...

Страница 15: ...ith USB drivers detailed operating manual Software MultiLab Importer 3 2 Initial commissioning Perform the following activities Insert the supplied batteries Switch on the meter Set the date and time...

Страница 16: ...pletion The energy saving feature switches off the meter if no key is pressed during the adjusted interval How to set the switch off interval see sec tion 4 3 1 3 2 3 Setting the date and time 1 Place...

Страница 17: ...4 3 1 The automatic switchoff function switches off the meter if no key is pressed for an adjustable period The automatic switchoff function is not active if the meter is supplied with power via a co...

Страница 18: ...1 and section 4 2 2 4 2 1 Operating modes The instrument has the following operating modes Measuring The measurement data of the connected sensor are shown in the measured value display Calibration Th...

Страница 19: ...ings and dialogs in procedures contain further sub elements The selection is made with the keys The current selection is displayed with a frame Submenus The name of the submenu is displayed at the upp...

Страница 20: ...cannot be selected Example Note The principles of navigation are explained in the two following sections by reference of examples Setting the language section 4 2 3 Setting the date and time see secti...

Страница 21: ...e instrument is in the measuring mode 2 Using F1_ Menu open the Storage config menu The instrument is in the setting mode 3 Select the System submenu with The current selection is displayed with a fra...

Страница 22: ...e setting mode for the Language with ENTER 8 Select the required language with General Interface Clock Service information Reset System 15 03 2014 08 00 Back Language Deutsch Beep Off Illumination On...

Страница 23: ...alues Therefore check the time at regular intervals Note After a fall of the supply voltage empty batteries the date and time are reset Setting the date time and date format The date format can be swi...

Страница 24: ...nge and confirm the setting with and ENTER The time is set 7 If necessary set the Date and Date format The setting is made similarly to that of the time 8 To make further settings switch to the next h...

Страница 25: ...ependent system settings to the default con dition Settings To open the Storage config menu press the F1_ Menu key in the measured value display After completing the settings switch to the measured va...

Страница 26: ...on 4 4 3 The measured parameter flashes on the display as soon as the measured value is outside the stability range when you switch over between the measured parameters with M when the automatic Stabi...

Страница 27: ...n When a grounded PC is connected measurements cannot be per formed in grounded media as incorrect values would result The USB interface is not galvanically isolated Temperature measurement The D O se...

Страница 28: ...ty correction on or off and enter the salinity in the menu for calibration and measurement settings see section 4 4 3 Stability control AutoRead The stability control function AutoRead continually che...

Страница 29: ...arameter flashes The HOLD AR status indicator appears as soon as a stable measured value is recognized Note You can prematurely terminate the Stability control function manually with ENTER at any time...

Страница 30: ...tic Stability control Settings The settings are available in the menu for measurement and calibration settings To open the settings display the required parameter in the measured value display and pre...

Страница 31: ...ement e g Winkler titration For details see section 4 4 4 Sal correction On Off Manual salt content correc tion for concentration mea surements Salinity 0 0 70 0 Salinity or salinity equivalent for th...

Страница 32: ...g to DIN EN 25813 or ISO 5813 At the same time the rel ative slope is adapted to the comparison measurement by a correc tion factor When the correction multiplier is active the Factor indicator appear...

Страница 33: ...to calibrate the instrument Note The sponge in the air calibration vessel must be moist not wet Leave the sensor in the air calibration vessel for a time long enough to adjust Display Calibration reco...

Страница 34: ...4 Start the measurement with ENTER The measured value is checked for stability stability control The AR status indicator is displayed The measured parame ter flashes 5 Wait for the end of the AutoRead...

Страница 35: ...is checked for stability stability control The AR status indicator is displayed The measured parame ter flashes 5 Wait for the end of the AutoRead measurement or accept the calibration value with ENT...

Страница 36: ...ata stor age Display Displays the calibration record Further options Scroll through the cali bration records with Output the displayed calibration record to the interface with F2 USB output Quit the d...

Страница 37: ...sured value of the connected sensor Measured temperature value of the connected sensor AutoRead info AR appears with the measured value if the AutoRead criterion was met while storing stable measured...

Страница 38: ...cess and switch to the measured value dis play confirm No Then you can e g store the data from the memory to a PC see section 4 5 3 and subsequently erase the memory see section 4 5 4 1 Press the STO...

Страница 39: ...the STO_ key The menu for automatic data storing appears Specified entire storing duration Max available storing dura tion Graphical display of the memory usage ID number 1 Interval 30 s Duration 180...

Страница 40: ...ode If the automatic storing function is active the meter provides an energy saving mode Eco mode to avoid unnecessary energy consumption The energy saving mode switches off functions of the meter tha...

Страница 41: ...y can be shown on the display and output to the interface Editing the data memory The memory is edited in the menu Storage config Data storage To open the Storage config menu press the F1_ Menu key in...

Страница 42: ...put the displayed dataset to the interface with F2 USB output Quit the display with F1 Back Data storage Manual data storage Erase Erases the entire manual measurement data memory Note All calibration...

Страница 43: ...play and move to the next higher menu level with F1 Back 4 5 4 Erasing the measurement data memory How to erase the measurement data memory is described in section 4 5 3 DISPLAYING AND EDITING THE MEA...

Страница 44: ...on records Data Control Operation description Currentmeasured values of all con nected D O sen sors Manual With F2 USB output Simultaneously with every manual storing process see section 4 5 1 Automat...

Страница 45: ...and CD ROM drive Microsoft Windows for details see enclosed installation CD Driver directory 4 7 MultiLab Importer With the aid of the MultiLab Importer software you can record and eval uate measureme...

Страница 46: ...a reset The following settings for D O measurements are reset to the default settings with the Reset function The sensor settings are reset under the Reset menu item in the menu for calibration and m...

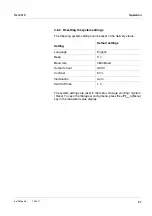
Страница 47: ...t to the delivery status The system settings are reset in the menu Storage config System Reset To open the Storage config menu press the F1_ Menu key in the measured value display Setting Default sett...

Страница 48: ...Operation Oxi 3310 48 ba75804e08 10 2017...

Страница 49: ...maintenance 5 1 1 Replacing the batteries Caution Make sure that the poles of the batteries are positioned correctly The signs on the batteries must correspond to the signs in the battery compartment...

Страница 50: ...etone or similar detergents that contain solvents Re move any splashes immediately 5 3 Packing This meter is sent out in a protective transport packing We recommend Keep the packing material The origi...

Страница 51: ...Oxi 3310 Maintenance cleaning disposal 51 ba75804e08 10 2017...

Страница 52: ...sor contaminated Clean D O sensor and replace it if necessary Cause Remedy Cleaning interval expired Recalibrate the measuring system Cause Remedy Batteries almost empty Replace the batteries see sect...

Страница 53: ...Oxi 3310 What to do if 53 ba75804e08 10 2017...

Страница 54: ...alkali manganese batteries type AA Rechargeable batter ies 4 x 1 2 V NiMH rechargeable batteries type AA no charging function Operational life Up to 800 h without 100 h with illumination USB interface...

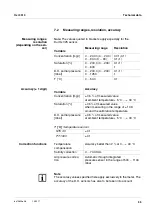
Страница 55: ...uration 0 200 0 0 200 0 600 0 1 1 1 D O partial pressure mbar 0 200 0 0 200 0 1250 0 1 1 1 T C 0 50 0 0 1 Accuracy 1 digit Variable Accuracy Concentration mg l 0 5 of measured value at ambient tempera...

Страница 56: ...Technical data Oxi 3310 56 ba75804e08 10 2017...

Страница 57: ...g system e g the displayed value to the correct value or a value that is regarded as correct Often this expression is also used when the measuring system is adjusted at the same time see adjusting D O...

Страница 58: ...conductivity Salt content General designation for the quantity of salt dissolved in water Slope relative Designation used by WTW in the D O measuring technique It ex presses the relation of the slope...

Страница 59: ...re update 61 I Initial commissioning 15 16 Initialize 46 K Keys 7 M Measured value display 19 Measurement data memory Edit 41 Erase 41 Memory locations 37 Measurement dataset 37 Measuring 28 Menu for...

Страница 60: ...Lists Oxi 3310 60 ba75804e08 10 2017...

Страница 61: ...version see page 52 1 Install the downloaded firmware update on a PC An update folder is created in the Windows start menu If an update folder already exists for the meter or meter type the new data...

Страница 62: ...Firmware update Oxi 3310 62 ba75804e08 10 2017...

Страница 63: ......

Страница 64: ...buildings factories and farms In more than 150 countries we have strong long standing relationships with customers who know us for our powerful combination of leading product brands and applications...

Отзывы: