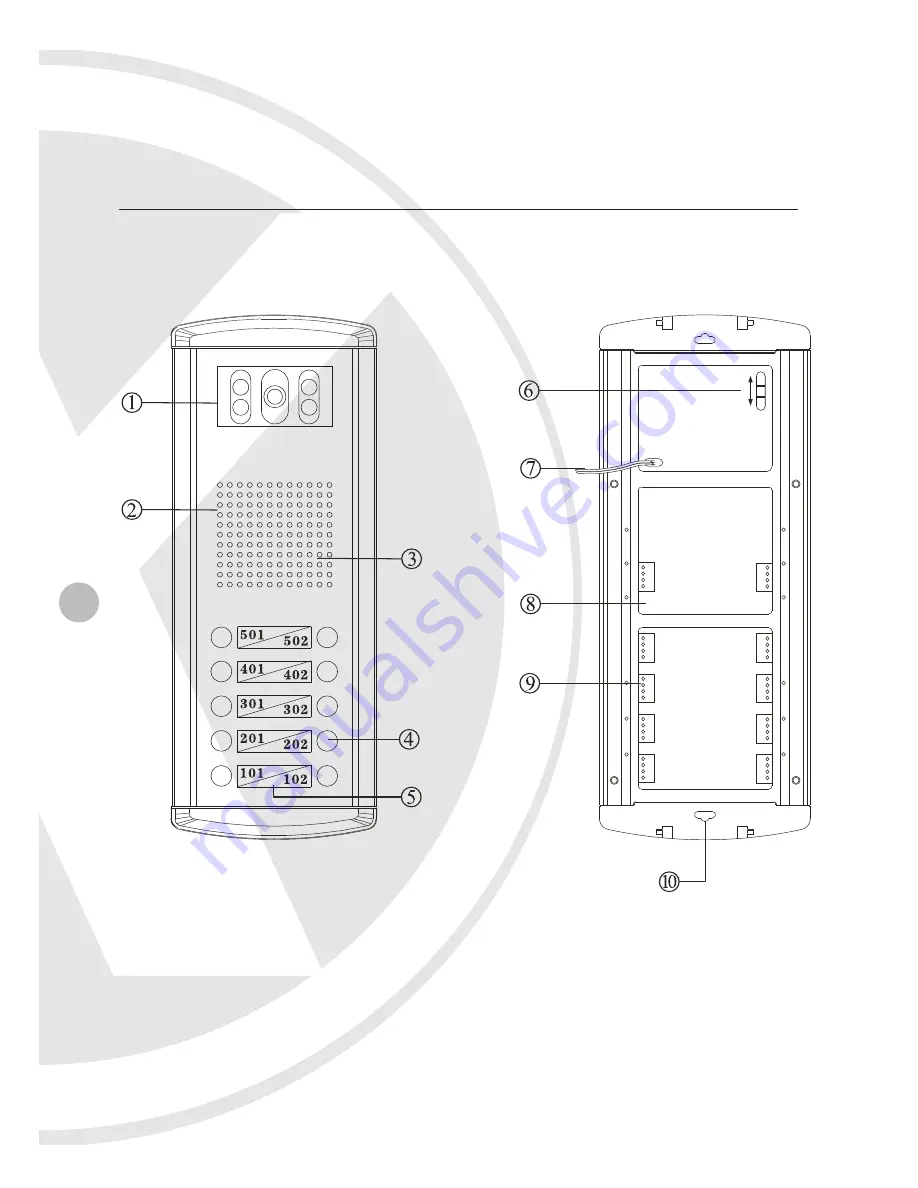
1. CMOS Camera2. Speaker3. Microphone4. Apartment Call Buttons5. Apartment Door Number
6. Camera Angle Adjust7. Release connection wire8. External Power (optional)9. Wiring Terminal Block10. Fixing hole
XAM110
Front
Back
6
Страница 1: ...carefully and identify that all the parts are present Do not cut the cables this will void the warranty Make sure you use only the recommended power supply Damage caused to the unit by incorrect volta...
Страница 2: ...m reliability They can be used together with any one of the B W Phone Monitors or Intercom Handsets in the B W Door Entry Range They include a 1 3 image sensor with Nightvision LEDs 4 8 10 12 or 16 ca...
Страница 3: ...ogy allows the video output to be wired to a CCTV monitor or system Power is supplied by the Video Door Entry Monitor making installation simple Compatible with Xvision Door Entry Monitors One monitor...
Страница 4: ...eaker 3 Microphone 4 Apartment Call Buttons 5 Apartment Door Number 6 Camera Angle Adjust 7 Release connection wire 8 External Power optional 9 Wiring Terminal Block 10 Fixing hole XAM104 Front Back 5...
Страница 5: ...mera 2 Speaker 3 Microphone 4 Apartment Call Buttons 5 Apartment Door Number 6 Camera Angle Adjust 7 Release connection wire 8 External Power optional 9 Wiring Terminal Block 10 Fixing hole XAM108 Fro...
Страница 6: ...mera 2 Speaker 3 Microphone 4 Apartment Call Buttons 5 Apartment Door Number 6 Camera Angle Adjust 7 Release connection wire 8 External Power optional 9 Wiring Terminal Block 10 Fixing hole XAM110 Fro...
Страница 7: ...mera 2 Speaker 3 Microphone 4 Apartment Call Buttons 5 Apartment Door Number 6 Camera Angle Adjust 7 Release connection wire 8 External Power optional 9 Wiring Terminal Block 10 Fixing hole XAM112 Fro...
Страница 8: ...mera 2 Speaker 3 Microphone 4 Apartment Call Buttons 5 Apartment Door Number 6 Camera Angle Adjust 7 Release connection wire 8 External Power optional 9 Wiring Terminal Block 10 Fixing hole XAM116 Fro...
Страница 9: ...nting bracket 4 Attach the main body of the unit to the back cover and open the small covers on the two sides Insert the securing screw into the into the hole in the tab to hold the unit in place Note...
Страница 10: ...cause the unit to malfunction 4 Do not touch the internal components Do not touch the internal components of the unit There are no user serviceable parts inside 5 Avoid contact with water Install the...
Страница 11: ...er W White Video Intercom Audio Phone to Video Door Monitor Connection R Red Audio B Blue GND Y Yellow Power W White Video Note If you are adding Intercom Phones to your system you will not need to us...
Страница 12: ...XAM104 Wiring Diagram R Red Audio B Blue GND Y Yellow Power W White Video XAM108 Wiring Diagram R Red Audio B Blue GND Y Yellow Power W White Video 12...
Страница 13: ...XAM110 Wiring Diagram R Red Audio B Blue GND Y Yellow Power W White Video XAM112 Wiring Diagram R Red Audio B Blue GND Y Yellow Power W White Video 13...
Страница 14: ...XAM116 Wiring Diagram R Red Audio B Blue GND Y Yellow Power W White Video 14...
Страница 15: ...M104 108 110 112 116 Camera Type B W Image Sensor 1 3 CMOS Nightvision Yes Installation 4 wire cabling Communication Type Hands Free Max Wiring Distance 50m 165 feet 22AWG 0 65mm 4 wires Operating Tem...
Страница 16: ...or any Xvision product please contact your local distributor LIMITED WARRANTY This product is supplied with a 1 Year warranty The Warranty excludes products that have been misused including accidental...