


SPECIFICATIONS
OPERATION
Timber Sanding
WARNING!
Prior to operating the
sander ensure you have a firm grip on the
rear handle and that the sanding belt is
not in contact with the workpiece. Apply
firm pressure when sanding. Excessive
pressure can damage the workpiece and
sander or cause the belt to ‘track off’.
WARNING!
Always wear eye, ear and
breathing protection when sanding.
1. Firmly grasp the sander in front of you and away from
your body.
2. To commence sanding, gently place the rear heel of
the belt sander on your workpiece. Ensure that the
sanding belt is not in contact with your workpiece
prior to starting the sander.
3. Start the sander and let the motor build up to
maximum speed. Gradually lower it onto the
workpiece with a slight forward movement. This helps
to prevent gouging.
4. The correct technique is a back and forth motion with
most of the sanding being done on the backwards
pulling movement. Do not apply a lot of pressure on
the unit. Allow the sander to do the work.
5. Upon completion of the sanding operation, remove
the sander from the workpiece. Turn off the sander by
depressing and then releasing the On/Off Switch.
Input Power:
810W
Input Voltage:
230-240V ~ 50Hz
Belt Speed:
380m/min
Belt Size:
533 x 76mm
Tool Weight:
3.2kg
PROPER USE
This tool is intended for use in a DIY (Do It Yourself)
context or for hobbyist purposes. It is not built for
continuous daily use in a trade or professional capacity.
Before using the machine, carefully read these
instructions, especially the safety rules to help ensure
that your machine always operates properly.
Before attempting to operate the machine, familiarise
yourself with the controls and make sure you know how
to stop the machine quickly in an emergency.
Save these instructions and the other documents
supplied with this machine for future reference.
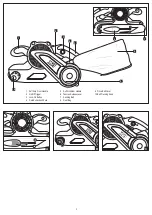
Installing Sanding Belts
When installing a belt, ensure you have the correct size
for your belt sander, and correct grit for your workpiece.
Belts have arrows marked on them to assist in fitting
them to the belt sander in the correct direction. Belts are
also marked with a grit rating.
1. Place the belt sander on its left side on a flat surface.
2. Pull out the belt Tension Release Lever. Push it
towards the front of the sander until it locks into place.
The Front Roller will retract.
Fig. A
3. Gently place the belt over the front and rear rollers.
The arrows on the inside of the belt are to be aligned
with the arrow marked on the belt sander.
WARNING!
The arrows on the belt must be
aligned with the markings on the belt sander.
Incorrect fitment could cause the belt to break.
Belts are not covered by the warranty.
4. Once the belt is in place, return the belt Tension
Release Lever to its original position.
Removing Sanding Belts
1. Place the belt sander on its left side on a flat surface.
2. Pull out the belt Tension Release Lever. Push it
towards the front of the sander until it locks into place.
3. With the belt sander still on its left side, gently slide
the belt off the unit. Use two hands to ease both sides
off simultaneously.
SETUP
WARNING!
Ensure the tool is turned off
and disconnected from the power supply
before performing any of the following
operations.
WARNING!
Prior to sanding, please check
that workpieces to be sanded are free of nails,
screws and staples as these may damage the
sander and/or result in personal injury.
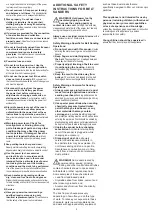
Tracking Adjustment
WARNING!
Ensure body parts, cords,
workpieces and any loose items are clear
of the sanding belt before performing the
tracking adjustment operation.
It is necessary to ensure the belt is tracking correctly,
in a straight line, to avoid the belt ‘tracking off’ the belt
sander’s rollers.
1. Turn the sander upside down and hold it firmly with
one hand. Press the On/Off Switch to start the sander
and observe the tracking of the sanding belt.
2. If the belt tracks outward, turn the Belt Tracking
Knob clockwise. If the belt tracks inward turn the Belt
Tracking Knob counter clockwise.
Fig. B
3. Adjust the belt until its outer edge is even with the
outer edge of the front and rear rollers. Make sure the
belt does not rub against the Rear Guide Strip. Once
the belt stabilises you can begin operation.
Note:
Always check your belt after it has been used as
it may require further adjustment.
Dust Extraction
To capture dust and debris, it is best to attach the Dust
Bag.
1. To attach the Dust Bag, simply slide the dust bag
Adaptor over the Dust Extraction Port on the rear of
the sander housing.
2. To remove the Dust Bag, simply pull the dust bag
Adaptor out of the Dust Extraction Port.
Note:
For the dust bag to work at its optimum level,
empty when it becomes 1/3 full. This allows air to flow
through the bag freely, increasing its effectiveness.
4
On/Off Switch
1. To turn the sander on, depress the On/Off Trigger.
2. To turn the sander off, release the On/Off Trigger.
Lock-On Button
The belt sander has been designed with a Lock-On
Switch to reduce user fatigue during long periods of use.
1. Follow the instructions above to turn the sander on,
then depress the Lock-On Switch. Release the On/Off
Trigger first then release the Lock-On Switch.
Fig. C
2. To release the Lock-On Switch and turn off the
sander, simply depress the On/Off Trigger.
Note:
It is recommended to disengage the Lock-On
Switch prior to unplugging the tool from the mains
power. This will ensure the Lock-On Switch is not
engaged when the sander is next used and avoid
accidental starting of the belt sander.
WARNING!
Always pick up the sander
before pulling the On/Off Trigger. Failure to do
so may result in loss of control over the tool
and /or serious injury.
CONTROLS


