XtremeAIR Pro-X Series Скачать руководство пользователя страница 8

www.XtremeAirUsa.com

                                                                    PAGE 

8


RANGE HOOD OPERATION 


BEFORE YOU BEGIN

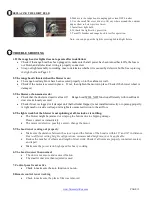
 (important): this machine is equipped with TOUCH SENSITIVE CONTROL, so please 

                        1. DO NOT PRESS. Only TOUCH & HOLD DOWN 1 SECOND for every change makes. 
                        2. TOUCH A WHOLE BUTTON only, please see below picture wrong vs. right 


NOTE:  For  best  results,  start  the  range  hood  before  cooking  and  allow  it  to  operate  several  minutes  after  the 
cooking is completed to clear all smoke and odors from the kitchen.   

Step 10: Install baffle filters 

 
Install baffle filters; refer to left picture for the following three steps:   

1.Angle baffle filter toward back of hood.   
2.Lift a baffle filter up above horizontal level.   

3.

Slide forward into slot behind the front of hood.


To remove the baffle, please reverse the process.   

Step 9: Install oil tunnel or oil container (not available for all models) 

 
Drop oil tunnel into recess support near rear of hood. Refer to the left picture


RIGHT: a whole button is   
              covered by a finger 

WRONG: Only half of a button   
                is covered by a finger 

RIGHT 

VS. 

WRONG 


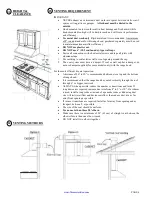
Step 7: Secure the hood-continue 

Secure the hood by using 1 7/8” provided screws though the back of the hood to 
the studs (use stud finder to find the stud and use 1/8” drill bit to drill though the 
back of the hood) 

CAUTION: Make certain the range hood is secure before releasing!   


Step 8: Connect ductwork 


Connect the exhaust on the hood to the ductwork about.    Use aluminum tape to make all joints 

secure and tight. 


Oil Tunnel   
Side View 

Baffle Installation Side View 

10

Содержание Pro-X Series

Страница 1: ...www XtremeAirUsa com PAGE 1 Under Cabinet Range Hood IMPORTANT READ AND SAVE THESE INSTRUCTIONS FOR RESIDENTIAL INDOOR USE ONLY INSTALLATION GUIDE USER S MANUAL PRO X ULTRA SERIES ...

Страница 2: ...r explosive materials in adjacent cabinets or surrounding areas Disclaimer The manufacturer and or distributor reseller decline all responsibility in the event of failure to observe the instructions provided for installation maintenance and suitable use of the product The manufacturer and or distributor reseller shall NOT be responsible for any injury due to negligence and the warranty of the unit...

Страница 3: ...iring must be properly installed insulated and grounded Before servicing or cleaning unit turn power OFF and un plugged OPERATION Use high settings on cooking range only when necessary Keep all fan baffle spaces filter grease tunnel oil container and grease laden surfaces clean Grease should not be allowed to accumulate on fan baffle spaces filter grease tunnel and oil container Never allow the fi...

Страница 4: ... system must have a damper If roof or wall cap has a damper do not use damper supplied for some models only with the range hood For the most efficient quiet operation A distance of 26 to 30 is recommended between stove top and the bottom of range hood It is recommended that the range hood be vented vertically through the roof through 6 or bigger vent work ALWAYS when possible reduce the number or ...

Страница 5: ...ANSI NFPA 70 latest edition or CSA Standards C22 1 94 Canadian Electrical Code Part 1 and C22 2 No 0 M91 latest edition and all local codes and ordinances TOOL MATERIAL YOU WILL NEED PARTS SUPPLIED Except UL14 PX10 PX12 PX11 ALL Ultra Series 05 06 07 1 Remote Control for all Pro x Series only except PX11 Baffle Filters Instruction manual Pencil or Marker Phillip Powered Screwdriver Stud Finder Mea...

Страница 6: ...CK IN STEP 1 Protect the cook top Put a thick protective covering over counter top cook top or range to protect from damage or dirt STEP 2 Create work station OPTIONAL 08 09 Have 2 pieces 2 x 4 x 20 on both sides of stove plywood on top of them to protect cook top or stove from damage or dirt This plywood will also create a comfortable work station for easy to installing ...

Страница 7: ...abinet TIP optional since the hood is heavy use cabinet jack is highly recommended Step 3 Prepare ductwork single outlet Make sure you have a 15amp 120V 60Hz single outlet on the left or right of the duct pipe usually is on of cabinet width Make sure duct pipe is ready to hook up to the range hood before beginning installation 8 diameter duct and roof or wall cap depending on where you will be ven...

Страница 8: ...izontal level 3 Slide forward into slot behind the front of hood To remove the baffle please reverse the process Step 9 Install oil tunnel or oil container not available for all models Drop oil tunnel into recess support near rear of hood Refer to the left picture RIGHT a whole button is covered by a finger WRONG Only half of a button is covered by a finger RIGHT VS WRONG Step 7 Secure the hood co...

Страница 9: ...gain to clear the screen Touch light button to validate To check time touch light button Note The clock display is only for PX10 Touch Light button to turn the lights on or off 1 While the range hood is on and the blower is running in normal mode touch Power Off Delay button to activate delay off timer 2 Adjust to desired period of delay of timer by touching or button quickly 1 15 minutes Timer be...

Страница 10: ...uch and hold down for 1 2 seconds Option 2 Touch and hold down power sign 1 for 1 2 seconds the blower will be running at the same speed as last used Note The system saves user configurations settings such as timer and blower motor speed will remain the same the next time it is turned on B Adjusting blower speed Touch and hold down for increase Touch and hold down for decrease C Turning off the bl...

Страница 11: ...lease note that turning off the system will not reset the Power On Elapsed Digital Timer F AUTOMATIC SHUT OFF MACHINE WILL AUTOMATICLY SHUT OFF AFTER APPROX 2 HOURS FOR THOSE MANUFACTURED AFTER AUGUST 2012 ONLY 3 TYPE 3 SOFT PRESS BUTTON CONTROL For All Ultra Series SPECIFICATION Body Design Seamless Stainless Steel Satin Finish Power Rating 120V 60Hz USA Canada standard General Input Power 184W 9...

Страница 12: ...t the blower is not spinning at all is stuck or is rattling The blower might be jammed or scraping the bottom due to shipping damage Please contact us immediately The motor is defective possibly seized change the motor 5 The hood is not venting out properly Make sure the distance between the stove top and the bottom of the hood is within 26 and 30 in distance Due to different ceiling height config...

Страница 13: ...ol scoring pads which will scratch and damage the stainless steel surface For heavier soil use liquid degrease such as Formula 409 or Fantastic brand cleaner If hood looks splotchy stainless steel hood use a stainless steel cleaner to clean the surface of the hood Avoid getting cleaning solution onto or into the control panel Follow directions of the stainless steel cleaner CAUTION Do not leave on...

Страница 14: ...www XtremeAirUsa com PAGE 14 ...

Отзывы: