


15
Need help or have any questions? Call us at 1-714-963-0329 or send us an Email at [email protected]
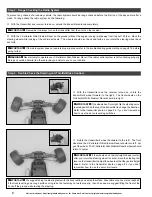
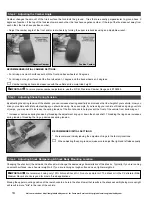
Step 5: Adjusting the Slipper Clutch
The slipper clutch is a traction control device that uses two metal plates and a series of fiber pads to control how much power is
transmitted from the engine to the gear box and drive-train. Adjusting the slipper clutch allows you to fine tune how your vehicle reacts
when giving it throttle. Driving the vehicle with the slipper clutch too tight will usually result in the vehicle doing wheelies or spinning out
of control instead of accelerating. Driving the vehicle with the slipper clutch too loose will result in very poor or no acceleration at all.
●
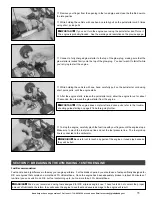
To adjust the slipper clutch you simply turn the hex nut either in to tighten the clutch (less slip) or out to loosen the clutch (more slip).
After making each adjustment, accelerate the vehicle for a short distance while carefully watching the slipper clutch. Ideally the clutch
should slip for about the first foot after acceleration.
RECOMMENDED INITIAL SETTINGS:
●
Initially no adjustments should be necessary. The slipper clutch is preset. If you do
adjust the slipper clutch, make adjustments in 1/4-turn increments until you are satisfied
with the result.
✦
✦
✦
✦
✦
IMPORTANT
✦
✦
✦
✦
✦
Running the slipper clutch too loose can cause the fiber pads to wear out
very quickly and replacement under this circumstance will not be covered under warranty.
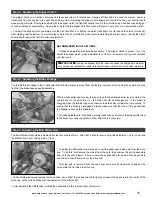
With the transmitter and receiver turned on, and the throttle/brake trim lever centered, the
vehicle should roll smoothly (i.e., the brake should be disengaged). If the brake is
dragging when the throttle trigger is at neutral, the brake disc will wear out very quickly. To
ensure that the brake is disengaged, always make sure that there is a 1/8" gap between
the linkage collar and the brake lever.
●
To make adjustments to the brake, simply loosen the set screw in the wheel collar next
to the brake lever and reposition it, then retighten the set screw.
The throttle/brake linkage in the X-Cellerator Nitro Stadium Racer is preset from the factory; however, after running the vehicle you may
find that the brake linkage needs adjusting.
Step 6: Adjusting the Brake Linkage
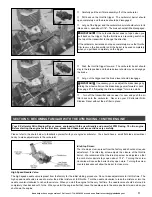
Step 7: Adjusting the Ball Differential
The ball differential should be adjusted after the first couple of runs. After that, it should require very little adjustment - only to fine-tune
the differential to your driving style or track.
●
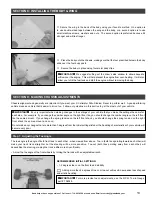
To adjust the differential you will need to pull the passenger's side axle from the drive
cup. To do this, first remove the wheel from the axle, then remove the shock assembly
from only the shock tower. Second, lower the suspension arm down as far as possible
and the axle should come out of the drive cup.
●
After the axle is removed from the drive cup, use a small screwdriver to pop out the
nylon plate that is inside the drive cup.
●
While holding the opposite wheel with one hand, use a 5/64" (2mm) hex wrench to tighten or loosen the hex screw in the center of the
drive cup, until you're satisfied with the operation of the differential.
●
After adjusting the differential, reinstall the assemblies in the reverse order of removal.


