


d)
When not in use, idle tools should be stored in a place out of reach of visitors and children.
e)
Maintain careful manipulation with the tool. Check for deflecting or jamming of turning parts, damaged
parts or other conditions which may influence operating with the tool.
f)
Keep tools sharp and clean for better and safer performance. Properly serviced tools are less likely to
become covered in impurities and are better controlled.
g)
Use equipment recommended by the producer of your model only. Modifications and accessories used at
one tool may be dangerous when used with another model.
Warranty does not apply for accessories!
USING
Preparing The Circular Saw
Warning! Do not use abrasive wheels. Only use saw blades recommended.
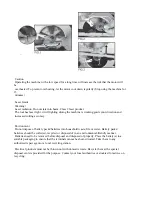
Blade Replacement and Installation .
FIGS.1-3
-Press and hold the spindle lock button ○,17 . The spindle may rotate slightly before the spindle lock fully engages.
-Loosen the saw blade locking hex. bolt ○,10anti-clockwise.
-Remove the hex.bolt ○,10 and the saw blade locking flange ○,9 .If the rear flange 9.1 is removed for cleaning,
ensure it is replaced in its correct orientation.
-Slide the lower blade guard ○,6 back using tab 6.1 and hold.
-Ensure the specification of the replacement blade conforms with the machine(i.e.outer diameter,width,rpm and
type. e.g. woodcutting etc.). Before fitting the new blade wipe and drop of oil inner and outer flanges where the
arbor locates.
-Insert the new blade.
Note: Install the blade with the direction of rotation arrow matching the direction of rotation arrows on the
machine. The teeth face upward at the front of the saw.
-Reassemble the locking flange and secure the locking hex.bolt ○,10 firmly.
Note:This saw is not designed to cut metal or masonry. It is intended for cutting wood and analogous materials
only.
1.
Trigger switch.
2.
Safety release button.
3.
Rear handle.
4.
Auxilary handle.
5.
18V Li-ion battery pack.
(
Sold separately
)
6.
Lower blade guard (pendulum).
7.
Cutting depth adjustment knob.
8.
Dust extraction outlet.
9.
Saw blade locking flange.
10.
Saw blade locking hex. bolt.
11.
Parallel guide.
12.
Parallel locking knob.
13.
Angle adjustment locking knob.
14.
Hex key storage location.
15.
Blade.
16.
Baseplate.
17.
Laser guide.


