XtendLan XL-RAID-526SA Скачать руководство пользователя страница 7

Quick Installation Guide


7


V. Installing Hardware


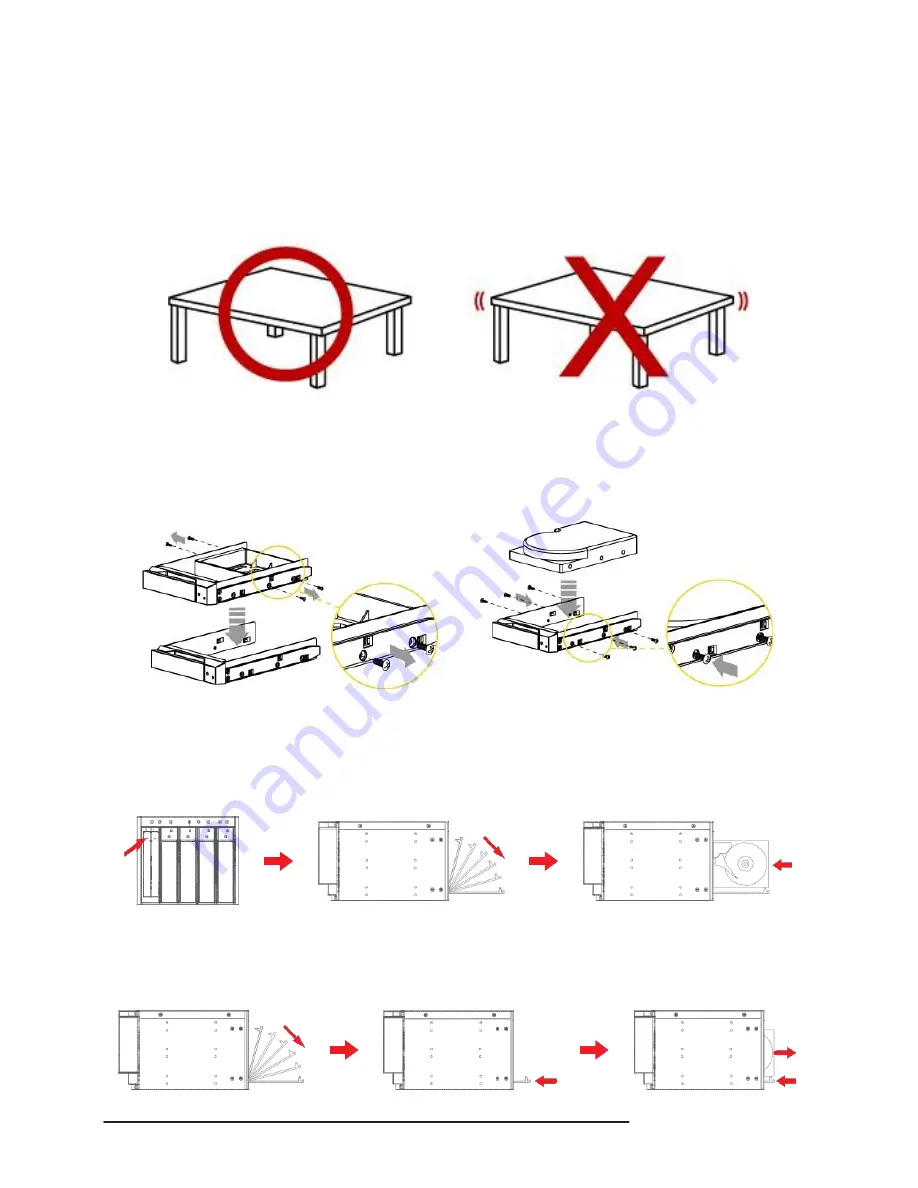
Please install the hardware of XL-RAID-526SA by following the procedures below:


1. First unpack the product. Then take out the host and put it onto a leveled and firm surface. Make 

sure the airflow of the radiation fan is not blocked and there is enough space around the host for 
heat dispersing. (Keep the product away from water or environment that may cause damage to the 
product.)


2. HDD Installation


1) 3.5” HDD Installation


Mount a 3.5” hard drive on the HDD tray and fix with the screws from the accessory kit into 4 
positions. Avoid unnecessary damage caused by the movement of the hard disk. After hard drive 
installation is complete, re-insert HDD trays into XL-RAID-526SA properly, and close the handle.


2) 2.5” HDD Installation


Push the tray panel as the direction of the arrow, the front panel will automatically bounce and 

open to 90 degrees. Install hard drives into XL-RAID-526SA HDD slot (the HDD bottom is 
toward to right side) and make sure the HDD is properly fix to the right position and then cover 
the front panel.


※ 

If you want to exchange the hard drives in the future, please open up the front panel to 90° and push 

the panel into the end of body gently, then the HDD will be pushed out by the ejection device. 

Always be assure of the front panel has been pulled out entirely before closing it.


Содержание XL-RAID-526SA

Страница 1: ...XL RAID 526SA User Manual ...

Страница 2: ...uggest you to first read this manual Although the information in the manual have been carefully confirmed before publication but the actual product specifications will base according to delivery For any updated information related to product specifications please inquire our support ...

Страница 3: ... 9 1 Setting RAID for 2 5 HD 9 2 Setting RAID for 3 5 HD 9 3 Hard Disk Formatting 11 Chapter 2 System Manager 16 1 System GUI 16 2 GUI for 2 5 HD 16 2 1 RAID Information 16 2 2 Firmware Upgrading 17 3 GUI for 3 5 HD 18 3 1 Basic Mode 18 3 2 Advanced Mode 22 ...

Страница 4: ...eed LED 3 SATA Port For 2 5 HDD 4 LED 1 2 5 HDD Link LED 4 4 Pin Big Power Connector corresponds to two 2 5 HDD 5 LED 2 3 5 HDD Link LED corresponds to the first 3 5 HDD from left 6 LED 3 3 5 HDD Link LED corresponds to the 2nd 3 5 HDD from left 7 LED 4 3 5 HDD Link LED corresponds to the 3rd 3 5 HDD from left 8 LED 5 3 5 HDD Link LED corresponds to the 4th 3 5 HDD from left 9 2 5 HDD Tray LED 10 ...

Страница 5: ...ively Red Lights On HDD Idling Blue Lights On Blue Lights On Blue Lights On RAID Failed Blue Lights On Blue Lights On Red Lights On Buzzer Alarm Red Blinks HDD Formatting Blue Lights On Blue Lights On Blue Blinks HDD Access Blue Lights On Blue Lights On Purple Blinks Blue Blinks Rebuilding Blue Lights On Blue Lights On Purple Lights On Source Blue Blinks Source Purple Red Blink Alternatively Targe...

Страница 6: ... Certifications CE FCC IV Precautions Before Application 1 We suggest you to use brand new hard drives with the same brand and model number for the best performance When any of the hard drives is failed please ensure that the capacity of the new hard drive is the same or bigger than the original one 2 Please ensure that the hard drives are free of bad sector before using otherwise it may cause sys...

Страница 7: ...ns Avoid unnecessary damage caused by the movement of the hard disk After hard drive installation is complete re insert HDD trays into XL RAID 526SA properly and close the handle 2 2 5 HDD Installation Push the tray panel as the direction of the arrow the front panel will automatically bounce and open to 90 degrees Install hard drives into XL RAID 526SA HDD slot the HDD bottom is toward to right s...

Страница 8: ...ected 3 XL RAID 526SA has two SATA ports one for 2 x 2 5 HDD RAID1 and another one for 4 x 3 5 HDD RAID Mode please make sure two of them are well connected to motherboard or SATA card 4 For the RAID settings of 3 5 hard drives please use the GUI included in the CD to proceed as for 2 5 HDDs which will be automatically created as RAID 1 mode 5 The OS of your PC will automatically detect the hardwa...

Страница 9: ...nly install one 2 5 s HD please use the slot at the right side of the 2 5 slot Otherwise the system will display the errors 3 When you replace the 2 5 HD please remember to use products with capacity equivalent to or larger the currently used one 4 Format the disk in the host Once formatting is completed you can then use the device For details of the procedure please refer to Chapter 1 3 Formattin...

Страница 10: ... even if one HD is damaged the system can keep running Once the damaged HD is replaced with a new one the data will be re configured automatically If the capacities of the four HDs are different from each other you can use the HD with the lowest capacity as the basis for adding E CLONE The four HDs are written synchronously to back up the data If one HD is damaged the system can keep running with ...

Страница 11: ... Hard Disk Formatting 1 To format the disk right click My Computer When the options in the menu appear select Manage 2 As shown below click Disk Management and the unformatted disk will appear like the one in red frame ...

Страница 12: ...12 RAID Setting 3 Right click Disk 1 and three options will appear Then please select Initialize Disk 4 Click OK ...

Страница 13: ...RAID Setting 13 5 Click Next 6 Click Next ...

Страница 14: ...14 RAID Setting 7 Click Next 8 Select Perform a quick format then click Next ...

Страница 15: ...er above procedures are completed click Finish 10 The system will then format the disk Once the formatting is done the following interface will appear 11 Once the formatting process is completed the disk can be put into use ...

Страница 16: ...f GUI Software RAID_GUI exe for 2 5 HD only and RAIDGuide Manager for 3 5 HD only is equipped 2 GUI for 2 5 HD 2 bay You can install GUI exclusively used for SR2045 to watch the state of RAID Software RAID_GUI exe can be installed through the CD 2 1 RAID Information Connect the device to PC Once the GUI software detects two 2 5 HDs the related information will appear ...

Страница 17: ...Manager 17 2 2 Firmware Upgrading 1 You may upgrade the firmware through GUI Click Load Firmware to select the firmware to be upgraded 2 After selecting the firmware click Start Upgrade to start the upgrading ...

Страница 18: ...used for JMb393 to set RAID level and other advanced functions The software RAIDGuide Manager can be installed through the CD After the system accesses GUI two options Basic Mode and Advanced Mode will be available 3 1 Basic Mode 1 RAID and Disk Information Once GUI is reached the number of 3 5 HD and detailed data currently installed in XL RAID 526SA will appear If any RAID has been created the r...

Страница 19: ...System Manager 19 Basic Information of HDD RAID Status ...

Страница 20: ...ck this interface all information of events that happened in XL RAID 526SA will appear 3 Basic RAID Configuration In this interface you can set RAID level for details Chapter 1 2 Setting RAID for 3 5 HD 3 bay and delete RAID Select RAID Mode ...

Страница 21: ...1 If you select the item for password when you set the RAID level it can prevent the RAID configuration from being deleted Once the password is set it must be entered before the RAID item is deleted RAID Finish Status ...

Страница 22: ...and send the related information to designated mailbox through email After the related items are set you can test whether the email can be properly sent You can also set the item as to be saved for access in the future 2 Advanced RAID Configuration With this item you can not only configure the regular RAID settings but also select different HDs and set their respective RAID In other words multiple...

Страница 23: ...System Manager 23 3 Firmware Information In this interface you can view the information of the firmware version and upgrade the firmware ...

Страница 24: ...tings In this interface you can set the waiting time for RAID group and the priority level when data are re configured for RAID group The higher the priority level is the more functions will be mobilized for data re configuration ...

Отзывы: