XtendLan XL-ICA-370M2 Скачать руководство пользователя страница 6


2.1 Open/Close Preview 


2.2 Full-screen Preview 

Click the full-screen icon 

  in the lower right corner to preview in full screen. In the preview window, 

right click (or Esc key) to exit from full screen display. 


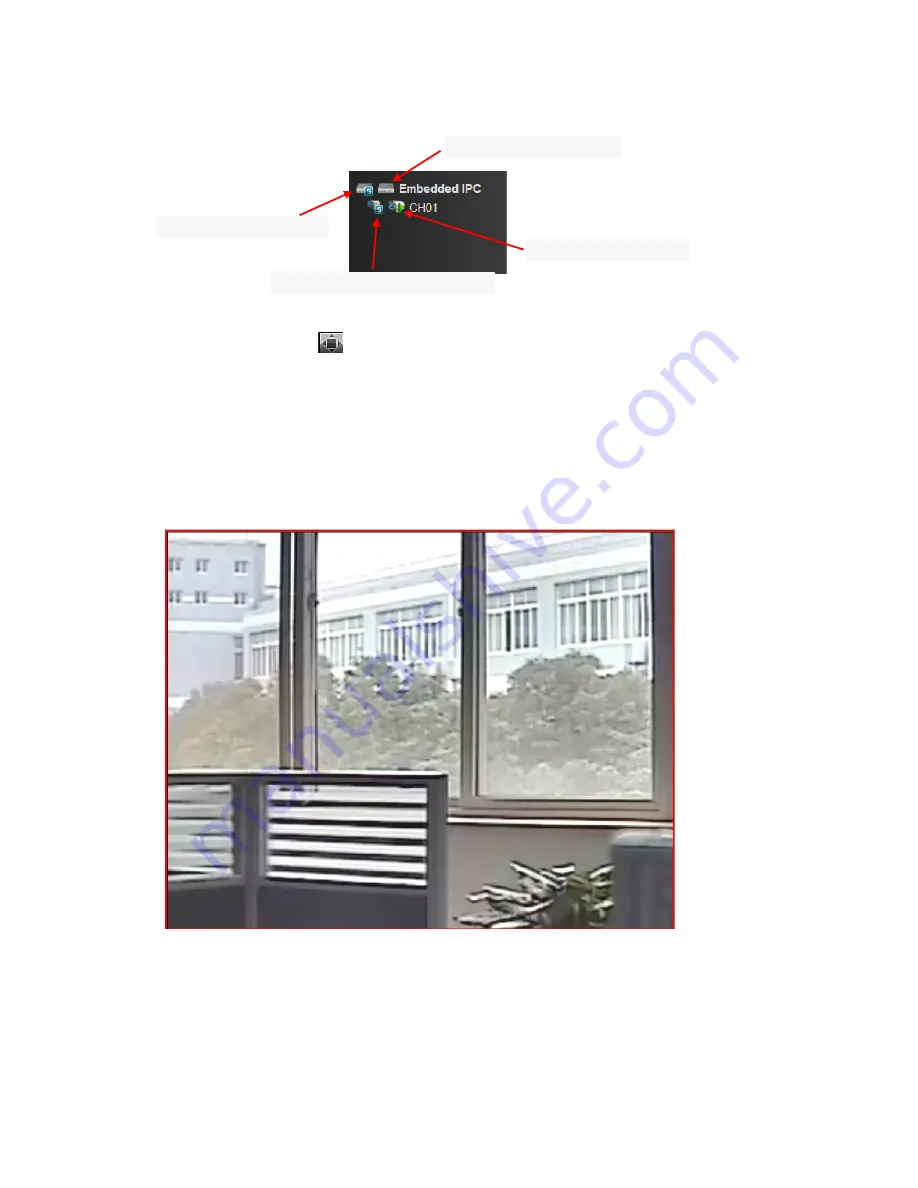
2.3 Electronic Zoom-in 

Use  your  mouse  to  select  the  preview  channel  to  be  zoomed  in  by  scrolling  the  mouse  wheel,  as  shown  in  the 

following figure:   


Click to open all the sub stream 


Click to open a single device sub stream 


Click to open all the equipment 


Click to open a single device 


Содержание XL-ICA-370M2

Страница 1: ...XL ICA 370M2 Network camera User manual...

Страница 2: ...0 4 1 2 RS232 11 4 1 3 Decoder 11 4 1 4 DST Setting 11 4 2 Channel Parameters 12 4 2 1 Display Settings 12 4 2 2 Video Settings 12 4 2 3 Video Parameters 13 4 2 4 Schedule Record 13 4 2 5 Motion Detec...

Страница 3: ...line User display current online user information 22 4 6 System Management 22 4 6 1 System Update 23 4 6 2 Auto Reboot 23 4 6 3 Stream Info 23 4 6 4 HD Disk 23 4 6 5 Restore 23 4 6 6 Local Setting 24...

Страница 4: ...tion to be strictly followed Please use web cameras in an environment within allowable temperature 10 C to 55 C and humidity Check if the power supply works normally before operation Do not furiously...

Страница 5: ...utomatically you can choose to manually install it Then you can Input user name admin default setting Input password null default setting Select language Chinese or English Click Submit as shown in th...

Страница 6: ...indow right click or Esc key to exit from full screen display 2 3 Electronic Zoom in Use your mouse to select the preview channel to be zoomed in by scrolling the mouse wheel as shown in the following...

Страница 7: ...point by using direction keys on the PTZ control to rotate the camera to the desired location and then select a preset number from the preset point drop down list and then pressing button Call a pres...

Страница 8: ...ized Call a locus Call a locus by selecting a locus number from the Locus drop down list and clicking button Currently only one locus is supported Delete a locus Delete a locus by selecting a locus nu...

Страница 9: ...plays searched images and videos double click to display files Note You can change video or image storage path which will be detailed later 3 2 Review Playback Image To review playback images under th...

Страница 10: ...t end device should support SD card storage to enable this function 3 3 View Preview Image To review preview images under the C Program Files PREVIEW directory double click the file as shown in the fo...

Страница 11: ...3 4 View Images in File Management To view files in file management under the C Program Files FILE directory double click it Note the front end device should support SD card storage to enable this fu...

Страница 12: ...11 To view and edit basic information of the device 4 1 2 RS232 To set RS232 parameters 4 1 3 Decoder To set RS485 parameters combined with PTZ 4 1 4 DST Setting...

Страница 13: ...et parameters to other channels 4 2 2 Video Settings 1 Channel No to change a channel number the webcam has only one channel 2 Encoding type normal record network record or event record 3 Stream type...

Страница 14: ...nd high Medium is used by default The higher the auto gain is the higher the sensitivity in low illumination level is but noise is more significant 5 White balance auto indoor outdoor Auto is used by...

Страница 15: ...o trigger event record 8 Post record set the post record time to trigger event record 9 Copy to copy set parameters to other channels Note the front end device should support SD card storage to enable...

Страница 16: ...nformation on the monitor Audio warning the device gives warning sound Upload to center view alarm information in the control center Email linkage after an alarm is triggered it will send an email to...

Страница 17: ...eck Drawing to set the area giving mask alarm and adjust the sensitivity as shown in the following figure Linkage Choose a linkage mode if an alarm is triggered as shown in the following figure 4 2 7...

Страница 18: ...the router 4 Device port input the device port number 5 Subnet mask input the subnet mask corresponding to this IP address 6 Default gateway input the related gateway address 7 MAC display the physic...

Страница 19: ...It requires a PC with fixed IP address on the Internet on which the dynamic domain resolution server runs 1 Select DDNS server type Ipserver Dyndns PeanutHull and 3322 currently only 3322 is supported...

Страница 20: ...ails at most Sending server settings Sending interval set the interval time to send an email SMTP server set the address of the smtp server for the sending email POP3 server set the address of the pop...

Страница 21: ...cally search the wireless network Input related parameters and click Save as shown in the following figure 4 4 Alarm Exception 4 4 1 Alarm Input 1 Select the alarm No for alarm input 2 Select alarm st...

Страница 22: ...the delayed time 3 Alarm schedule 4 Copy set parameters to the related week day 4 4 3 Exception Setting Including HDD full HDD fault network broken IP address conflict illegal access and video signal...

Страница 23: ...zed to default users default Click Add to add a user as shown in the following figure Click RightsPermission to assign permission to the new user as shown in the following figure Click Delete to delet...

Страница 24: ...uto Reboot Selecting maintenance mode and maintenance time the device will reboot according to the designated mode 4 6 3 Stream Info To view information about main stream and sub stream of current cha...

Страница 25: ...hecked sub stream is connected for small screen and main stream is connected for large screen Window mode to set the aspect ratio of the preview window filling 4 3 16 9 Preview capture to modify the p...

Отзывы: