


The
202 and antenna are not included and
be purchased separately.
optional
XL
MUST
Refer to the Passive Keyless Entry (
) Installation Guide (N2102T) for detailed wiring information.
PKE
4
4
XL202
Antenna
XOVER
SmartStart is
and not included. It
be purchased separately.
optional
MUST
SmartStart is
and not included. It
be purchased separately.
optional
MUST
Th
solution offers three (3) configuration options to control your system 3x
Lock
e
Remote Start Ready (
)
:
DBALL
RSR
OEM
s
This section provides specific installation information for
Remote Start Activation,
Kit or SmartStart (all sold separately).
RF
SmartStart and
202.
XL
Configuration Wires (Gray & White)
Connect Gray wire to (-) Ground
5 pins
D2D (4 pins, white)
4 pins
2 pins,
not used
CABLE
CABLE
The modules must be connected in a specific order. Refer to the
section for more information.
Module Programming
1. Use the D2D Crossover (
) cable that is provided with
202, and
the one in the
package.
XOVER
XL
NOT
DBALL
2. The modules must be connected in a specific order. Refer to the
section for more information.
Module Programming
The modules must be connected in a specific order. Refer to the
section for more information.
Module Programming
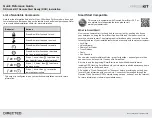
SmartStart/
202 Installation Notes
XL
SmartStart Revision B
RF Kit
RF
PKE
&
Combination
Kit
Refer to the Passive Keyless Entry (
) Installation Guide (N2102T) for detailed wiring information.
PKE
RF
PKE
BT
,
& SmartStart
Combination
Kit
SmartStart Revision A
2
DBALL
2
DBALL
2
DBALL
LED
Prog.
Button
D2D (4 pins, white)
4 pins
2 pins,
not used
OR
SmartStart
Configuration Wires (White & Brown or Blue)
Cut Brown or Blue Loop
LED
THIS SIDE UP
LED
Page 7
Rev.: 20 70622
1
Platform: DBALL2
Firmware:
HK7 Remote Start Ready
Installation
(RSR)
© 201 Directed.
7
All rights reserved.


