background image

19

User Options 

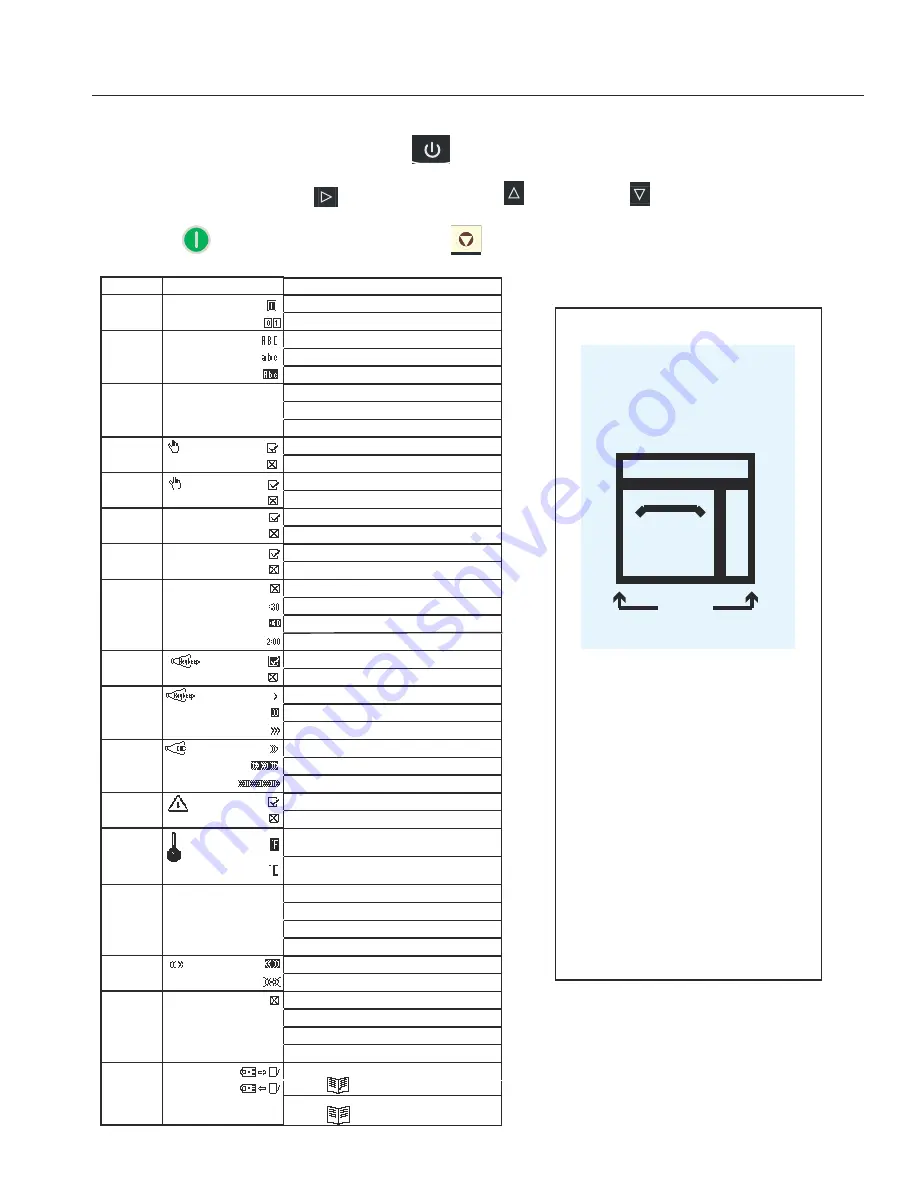
There are several options you can change to customize the operation of the oven for your business. The table below shows 
these options; the factory setting is shown in bold type.

1.  Oven must be off. To turn oven off, press ON/OFF 

 keypad.

2.  Press and hold “2” keypad until option screen appears. 

3.  Choose option by pressing Enter  

 keypad then use Scroll Up 

 and Scroll Down 

 keypad to select option to highlight 

desired option. 

4.  Press Start 

 keypad to save and press Stop / Reset 

 to exit options mode.

5.  Option 6, if “Password Needed” is highlighted press Program keypad to view or edit password.

 *+,-$./*0+1

When this message displays, clean the 
 !"#$%&'"#&()")*+(%,-#

Cleaning the air 

 !"#$%&'!!%()"%*+,"%)--%"+#%.#**/0#1


The message will automatically stop 
displaying after 24 hours. 

Depending on microwave use and 
'./!").0'.& %#1).2!&!).34#&('#$%&'"#
may need to be cleaned more or 
less frequently. Once the frequency 
is determined, set the option for the 
appropriate time frame.

5!"#$%&'"# .2#/'.&3#0*3&#6'#1%' .'2#
regularly to prevent overheating of the 
oven. Refer to Owner’s Manual for 
complete cleaning instructions.

Air Filters
On Sides

CLEAN 

FILTERS

Note:

 Refer to page 3 for Data Transfer 

instructions (Option 17)

Options#

Setting Name

Options

01

Digit Entry

Single digit entry

Double digit entry

02

Text Case

Caps

Lower case

Mixed

03

Menu Setting

01=10 Items

02 =100 Items

03 = 360 items

04

(Manual) Cook

Manual cooking allowed

Manual cooking not allowed

05

(Manual) Save

Save after manual cook

Do not save after manual cook

06

Program Password

Password needed

Changes to programs allowed

07

Door Reset

Opening door resets timer

Opening door pauses cook cycle

08

Keyboard Activation

Off

30 Seconds

60 Seconds

120 Seconds

09

Keybeep

On

Off 

10

Keybeep Volume

Low

Medium

High

11

End Of Cycle Beep

Three beeps once

Three beeps repeating

Continuous until door is opened

12

Preheat Warning

Warn if oven not at temp

Off

13

Temperature Scale

Temperatures are displayed in °F for 60Hz 
models

Temperatures are displayed in °C for 50Hz 
models

14

Clean Filter Reminder

Off

Displays every 7 days

Displays every 30 days

Displays every 90 days

15

        (Microwave) Only 

Allow microwave only mode

No microwave only mode

16

Auto Off

Disable

2 Hours

4 Hours

8 Hours

17

Data Transfer

Begin Transfer: Card to Oven.  Press Program 
Keypad 

Begin Transfer: Oven to Card. Press Program
Keypad

Содержание MXP522

Страница 1: ...ence If the equipment changes ownership be sure this manual accompanies equipment Please refer to the SAFETY INSTRUCTIONS for important safety information prior to using this oven Owner s Manual HIGH...

Страница 2: ...ust not be altered 012 3 0 4 4 Oven MUST be grounded Grounding reduces risk of electric shock by providing an escape wire for the electric current if an electrical short occurs This oven is equipped w...

Страница 3: ...Oven must be in Off mode Preheat must be OFF 1 Remove protective cover from bottom of keypad A 7 8 8 0 8 9 8 B 54 3 From Off press and hold the 2 pad to go to User Options 4 Go to Option 17 by pressin...

Страница 4: ...back of oven and back wall C Allow at least 5 1 cm of clearance around sides of oven D Install combination oven so oven bottom is at least 91 5 cm above STEP 4 Oven Operation Preheating the Oven This...

Страница 5: ...Ceramic Dish Great for foods that need to be contained such as ready to serve foods cut vegetables or soups f Pizza Stone ST10X Aids in crisping and browning breads and pizzas g Panini Grill Accessory...

Страница 6: ...er Pads Stop Start ON OFF Keypad E Press to preheat oven or turn oven off Fan will continue to run if temperature is over 95 C TEMPERATURE Keypad E Press to check set temperature E Press to change tem...

Страница 7: ...wxyz Oven Cooling Mode Icon The oven fan will continue to run to cool the oven The oven Cooling Mode Icon appears and stays on until the oven temperature is below 95 C To avoid damage to the convecti...

Страница 8: ...See user options for more details The ITEM MENU breaks the item group menu down further allowing you to input quantities different food types etc 1 Sandwich 2 Meat 3 Vegetarian 4 Seafood 5 Pasta Pizza...

Страница 9: ...er to start cooking process 6 At end of cooking cycle oven beeps and displays animation at right 1 2 3 1 3 2 4 6 5 7 8 0 9 abc def jkl ghi mno tuv pqrs wxyz 1 Sandwich 2 Meat 3 Vegetarian 4 Seafood 5...

Страница 10: ...he display 2 3 4 5 67 Program to the Menu 5 40 6 204 4 0 1 5 4 achieved from manual cooking you can save the manual cook item 1 To save press Enter keypad Note Option 5 must be set to save after manua...

Страница 11: ...hen select the food category food item to be programed using the Scroll Up or Scroll Down keypad Oven Programming PROGRAM MENU OVERVIEW EDITING OR ADDING MENU PROGRAM SETTINGS 1 Sandwich 2 Meat 3 Vege...

Страница 12: ...Bake Dess 7 8 9 0 A Highlight desired Menu Category B Press Enter C Highlight desired Food Category 1 Sandwich 2 Meat 3 Vegetarian 4 Seafood 5 Pasta Pizza 6 Bake Dess 7 8 9 0 III Editing Adding Name...

Страница 13: ...ypad 2 three times for letter c When the correct letter is displayed wait until cursor moves to the next space If a correction is necessary press back to erase one character at a time See user option...

Страница 14: ...eypad 4 Using the Scroll Up or Scroll Down keypad to highlight Menu Category and or Food Category to delete Press Program keypad after selecting menu or food category to delete 5 Press the Enter 0 1 2...

Страница 15: ...ers and symbols For example Press Keypad 2 three times for letter c When the correct letter is displayed wait until cursor moves to the next space If a correction is necessary press back to erase one...

Страница 16: ...r optimum results heat oven to a maximum temp of 94 C turn oven OFF wait until fan stops 2 Remove rack pizza stone and other accessories from the cavity when it s cooled 3 Lift Bottom Element If eleme...

Страница 17: ...n pizza stone by using a plastic scraper to remove baked on particles DO NOT DO NOT use caustic cleaning products or those containing ammonia phosphates chlorine sodium or potassium hydroxide lye DO N...

Страница 18: ...recommend using it together with KAY QSR Heavy Duty Degreaser From OBTAIN WISE info obtainwise com For Medium to Heavy Soil 1 Oven Cleaner 2 Oven Protector Use them together The use of caustic cleanin...

Страница 19: ...n Sides CLEAN FILTERS Note Refer to page 3 for Data Transfer instructions Option 17 Options Setting Name Options 01 Digit Entry Single digit entry Double digit entry 02 Text Case Caps Lower case Mixed...

Страница 20: ...Oven operates intermittently Check air filters and discharge air vents If oven does not accept entries when pad is pressed Make sure oven is preheated Open and close door press pad again Oven fan turn...

Отзывы: