background image

Video

25

Mute recording

X5 Evo allows you to record with or without
external sound in Record mode.

1. Turn 

Mute recording

 switch to 

ON

 to

record your video without sound. 

2. Turn 

Mute recording

 switch to 

OFF

 to

record your video with sound.
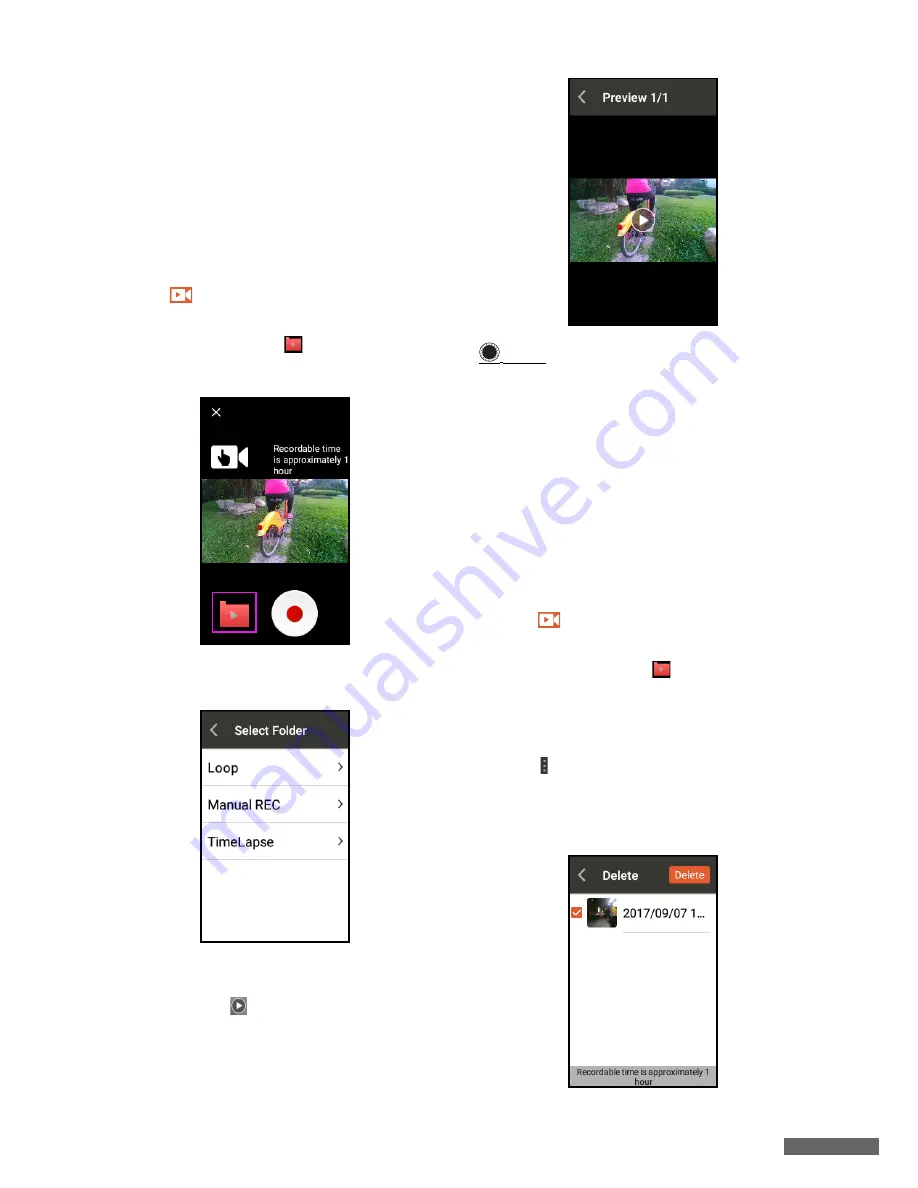
View video

1. Tap 

 on the Home screen to open the

video preview screen. 

2. Tap the folder icon 

 at the bottom left

of the screen.

3. Select the folder which you want to view

the recorded videos.

4. Each recorded video is given a name

based on YYYY-MM-DD format. Select
one and tap 

 to play. 


NOTE

There is a message displaying at the
bottom of the screen to show you the
remaining recordable time for video
recording.

The videos recorded in the Time-Lapse
mode cannot be played on X5 Evo.
Please watch/edit the Time-Lapse
mode videos using Xplova Video app.
(See 

Xplova Video on page 36

.)

Delete video

1. Tap 

 on the Home screen to open the

video preview screen. 

2. Tap the folder icon 

 at the bottom left

of the screen.

3. Select the folder which you want to

delete the recorded videos.

4. Tap   at the upper-right corner of the

screen and select 

Edit

5. Check the box next to any video clip and

tap 

Delete

.

!

Содержание X5 Evo

Страница 1: ...Smart Video Cycling Computer User Manual...

Страница 2: ...rd mode 23 Setup record mode 23 Mute recording 25 View video 25 Delete video 25 Record preview mode 26 Upload video 26 Training 27 Start a training plan 27 Stop a training plan 28 Delete a training pl...

Страница 3: ...are unsure of the policies that apply to a particular organization or environment such as airport ask for authorization before you turn on your wireless network Limited Warranty Warranty 1 This produ...

Страница 4: ...om the serial number inquiry This may result in the situation of outside the warranty period and need to pay for repair therefore please be sure to safe keep the proof of purchase Declarations Please...

Страница 5: ...y special tool Other types of devices may use a replaceable coin battery Make sure to follow the original manufacturer instructions to replace the battery to ensure safety For long term storage please...

Страница 6: ...e extension cord ampere rating Also make sure that the total rating of all products plugged into the wall outlet does not exceed the fuse rating Do not overload a power outlet strip or receptacle by p...

Страница 7: ...t safety buffer Before radio devices can be put in circulation their agreement with European laws or limits must be confirmed only then may the CE symbol be applied The unit of measurement for the Eur...

Страница 8: ...ended that you install our two apps on your smartphone The Xplova Connect is a handy cycling app which helps you View store activities from X5 Evo Download routes from websites Create and send routes...

Страница 9: ...ptional accessories Heart Rate Monitor Speed Cadence Combo Sensor NOTE Only use approved accessories Accessories may vary by country or region Please contact Xplova retailers if you need to purchase a...

Страница 10: ...d Short press start stop video recording Long press switch to Record mode Short press start stop riding Long press switch to Bike mode START STOP BACK LAP BACK press to return to previous page when no...

Страница 11: ...To attach X5 Evo on your bike is quick and easy Please follow the steps as below 1 Attach the Extended out front Bike Mount on the bike handlebar Align it with the bike stem and tighten the screw Ensu...

Страница 12: ...SEARCH FOR WI FI NETWORK Choose a safe network and enter the password using the on screen keyboard Then select CONNECT After reading and understanding the Warning message on the screen select OK to f...

Страница 13: ...bike modes for selection Road default Off Road Leisure ride and Indoor Status bar icon NOTE Only the active icons are displayed on the status bar A Routes E Status bar B Training F Activities C Settin...

Страница 14: ...weak GPS signal may cause your route and other activity data to be inaccurate About GPS The number on the screen indicates the satellite number and the color indicates signal strength Grey Weak Orange...

Страница 15: ...ges depending on the riding status When not in the riding mode the RIDE button is green When in the riding mode and the timer is running the RIDE button is red When the timer is paused the RIDE button...

Страница 16: ...timer Or tap on the touchscreen to select CON TINUE SAVE or DISCARD Select CONTINUE to resume timer Select SAVE to save the riding data into Activities See Activities on page 21 Select DISCARD a pop u...

Страница 17: ...fferent pages including distance speed time and more NOTE You can press UP DOWN button to increase or decrease the number of data fields A Toggle between lock map and unlock map B Fit your current loc...

Страница 18: ...ride or on mid ride to get important data and numbers To change the data fields on Map page 1 From Settings Bike mode select one of Bike modes for example Road 2 Select what data you would like to se...

Страница 19: ...ired data to see on Chart page 2 Repeat the steps above for other data fields To change the data fields during riding Tap on the touchscreen then two icons appear at the top of the screen Home and Set...

Страница 20: ...mind you every 10 minutes repeatedly Setting advanced alerts If you have optional ANT sensors you can set up advanced alerts 1 Go to Settings Device Alert Settings 2 In Alerts page select HR Speed Pow...

Страница 21: ...Set tings 2 Turn Auto Pause switch to ON 3 Set a speed for the automatic pause using the on screen keyboard Map download The local map is preloaded on your X5 Evo What makes it even better is the free...

Страница 22: ...e offline maps are downloaded on your X5 Evo internal storage If the storage is insufficient a failure message will appear on the screen It is recommended to delete the map files that are temporarily...

Страница 23: ...the upper right corner in Activity list page and select Edit Check the box next to any activity name and tap DELETE NOTE Make sure Xplova Connect app is launched and connected to X5 Evo Learn more on...

Страница 24: ...an unfinished activity after reboot A dialog box will pop up asking you for further action Select CONTINUE to continue the activity Select SAVE to end and save the activity Select DISCARD to cancel t...

Страница 25: ...l Mode While riding you can manually short press REC button to start recording videos at any time Short press REC button again to stop recording Live video preview Go to Settings Record Settings Recor...

Страница 26: ...ected X5 Evo will activate the looping record while you start riding mode simultaneously It allows a maximum of 10 videos looped recording By default the recording time for a single video file is 2 mi...

Страница 27: ...name based on YYYY MM DD format Select one and tap to play NOTE There is a message displaying at the bottom of the screen to show you the remaining recordable time for video recording The videos recor...

Страница 28: ...hrough mode options Manual Loop and Time Lapse 3 Tap icon to start recording Tap icon to stop and save recording NOTE There is a message displaying at the bottom of the screen to show you the remainin...

Страница 29: ...ays each training step with the goals Follow the training plan to complete the tasks step by step If you failed a step the Target not Achieved message displays to remind you of the failure NOTE Press...

Страница 30: ...u can 2 Tap on the touchscreen and select STOP TIMER and tap again to select SAVE or DISCARD the training plan 3 If you select DISCARD a pop up dialog box will appear on the screen to confirm the disc...

Страница 31: ...o end and save the route into Activities Or select DISCARD to cancel the route Alternatively you can 2 Tap on the touchscreen and select STOP TIMER and tap again to select SAVE or DISCARD the route 3...

Страница 32: ...you would like to disconnect with the device long press the sensor ID of the current paired device and the call to action window will pop up Select REMAIN to stay connected or DELETE to disconnect wi...

Страница 33: ...size first The wheel size is set as 2096 mm by default Select Settings Bike Wheel Size to set the wheel size Shimano Di2 1 From X5 Evo tap Settings ANT sen sors Shimano Di2 tap Search Again 2 Tap the...

Страница 34: ...steps below to pair X5 Evo with your smartphone 1 Launch the Xplova Connect app on your smartphone 2 Either tap icon at the upper left cor ner on My Connect screen or swipe right from the left edge of...

Страница 35: ...e Plan ning or tap icon on My Connect screen 2 On the Route planning screen tap on the Search box to enter the name or address of the location where you d like to create your route Or Tap on the map d...

Страница 36: ...d feature in Settings Extended Function See Extended Function Activity Once your smartphone and X5 Evo have been paired all recorded activities from X5 Evo will be uploaded to Xplova Connect app on yo...

Страница 37: ...es screen select one plan to view its description 3 Tap icon to download it to Training 4 Go to Training screen and tap icon of the selected plan to send it to your X5 Evo for step by step guidance Se...

Страница 38: ...Video With the easy to use intuitive interface you would be able to edit your videos in seconds and share them with the world easily via Xplova Video How to pair devices Follow the steps below to pai...

Страница 39: ...he timeline The video information displays in the lower part of the screen 3 Tap the scissors icon to crop the selected video 4 The cropped video will be saved in All Videos screen as a single clip NO...

Страница 40: ...are such as via Facebook or YouTube Delete a video 1 Long press a video thumbnail to select it and tap the trash icon 2 A dialog box will pop up asking you to confirm the deletion 3 Select Confirm to...

Страница 41: ...elect Personal setting from the Side menu 2 Tap Edit to select a photo 3 Tap text field to compose your own texts or slogans 4 Tap Done Now you can overlay your own unique logo onto videos Background...

Страница 42: ...information on Bike mode Bike Adjust for wheel size and gear ratio changes Please go to page 12 for more information on Bike settings Device Please go to Page 18 for more information on Alert Setting...

Страница 43: ...de is activated when you stop recording Sounds Sounds are emitted when controlling and operating X5 Evo Go to Settings System Sounds Keyboard Clicks Whether to emit sound when pressing the physical bu...

Страница 44: ...tings System Clear User Data Clear User Activities Clear the activities and videos saved on X5 Evo Restore Default Settings Restore all settings to the default values Factory Reset Reset all settings...

Страница 45: ...e Altitude Current attitude Max altitude Max altitude in this record Max Grade Max grade in this record Vert speeed Speed of ascent or descent over time Total Ascent Accumulated total ascent altitude...

Страница 46: ...er of the current lap in this record Lap NP Normalized power of the current lap in this record L Lap Power Average power of the last lap in this record L L Max Power Maximum power of the last lap in t...

Страница 47: ...L Lap Spd Average speed of the last lap distance of the last lap time of the last lap L L Max Spd Maximum speed of the last lap Category Cadence Cadence Current number of cadence rotation per minute r...

Страница 48: ...Current Training Step Name of training step executed currently Category General Date Current date Clock Time Current time Sunrise Time of the sun rises above the horizon in current GPS positioning Su...

Страница 49: ...y and is subject to change without notice For the latest specification please visit our official website Display 3 inch Transflective type with 240x400 pixels Water Rating IPX7 Max 1 m under water for...

Страница 50: ...r relevant standards have been applied EMCD Directive 2014 30 EU R TTE Directive 2014 53 EU LVD Directive 2014 35 EU RoHS Directive 2011 65 EU This device contains the radio equipment and should opera...

Отзывы: