background image

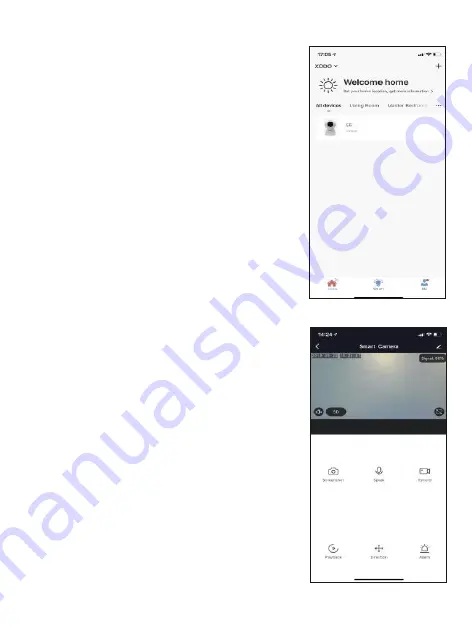
The home screen will show the live camera feed 

along with camera controls. 

1.Press the “Screenshot” bu�on to take a 

    snapshot.

2.Press the “Speak” bu�on to communicate with 

    people next to the smart camera.

3.Press the “Record” bu�on to record video.

4.“Playback” will access stored video from the 

    memory card.

5.Press the “Direc�on” bu�on to adjust the angle 

    of the camera.

6.Press the “Alarm” bu�on to switch on/off the 

    Mo�on detec�on alarm func�on.

7."Cloud Storage" allows you to view files in cloud 

    storage. This feature requires an addi�onal 

    account.

8. Press the “Photo album” bu�on to view photos 

    and videos.

9. Press HD/SD bu�on to switch image quality.

Camera Home Screen

Now that your device has been added, it will 

show on the home screen along with all other 

paired Xodo Smart Products. Now you are all set.

Home Screen Updated

10

Содержание E6

Страница 1: ...Smart WiFi Camera E6 User Manual ...

Страница 2: ... smart phone with the free app Table of Contents Welcome Always make sure to follow safety instruc ons General No ce 1 Installa on of Smart WiFi Camera Configure The Camera Se ngs Welcome 1 Package Contents 2 3 Specifica ons 5 Xodo Smart App 4 11 12 Customer Service and Tech Support Do not use products if they have become damaged Follow instruc ons and only operate products in a safe environment Do ...

Страница 3: ...sembly USB Cable Wall Charger Moun ng Bracket What s included in the box 2 Your E6 Smart home camera has the following features High resolu on camera Night Vision Mo on detec on Two Way Audio Noise cancella on Micro SD Card slot 128GB Remote Wake up Remote Monitoring WiFi Connec on Required Product Features ...

Страница 4: ... detec on remote wake up Power Source USB Connec on No internal ba ery IR LED Measures ambient light to brighten playback brightness playback brightness Light Sensor Determines when to turn on IR sensor MIC Capture input audio Lens Capture video image Reset Bu on Setup and configura on bu on Micro USB Port Power supply SD Card Port Memory storage of saved photo and video clips Light sensor Lens IR ...

Страница 5: ...to account and follow app instruc ons 2 The moun ng bracket can be installed with included screws to mount the camera 3 Align the camera to the mount and ghten to secure camera 4 Connect USB power supply Installa on of Smart WiFi Camera 4 ...

Страница 6: ...e for IOS or Google Play Store for Android The welcome screen will appear and then you will be asked to login or register a profile Register an account by entering your email address and se ng up a profile or logging in with an exis ng account Download and Install the Xodo Smart APP Open the APP Xodo Smart 5 ...

Страница 7: ... the device and hold the reset bu on un l you hear the confirma on sound Once you confirm the smart device is ready press the nest step bu on then click the Next bu on Con nue on to the next step Pressing the Rese ng Devices bu on will offer some troubleshoo ng guidelines to follow Adding Devices Detec ng Device 6 ...

Страница 8: ... bu on to see a list of available networks Your router may broadcast both 2 4Ghz and 5 0Ghz broadband frequency Make sure to select the 2 4Ghz Wifi Enter your Internet Password and connect to the network This step is crea ng the login creden als for your camera to find and access the local network and will store the info in the QR code in the next step ...

Страница 9: ... scan a QR barcode on the screen The QR barcode will appear on the screen Hold camera in front of the QR barcode un l you hear a prompt Press the I Heard a Prompt bu on to con nue Pressing the No Prompts will provide some trouble shoo ng steps to help get camera to scan the QR barcode ...

Страница 10: ...pencil icon You can specify the loca on Press the Done bu on at the bo om of screen to con nue to next step Confirma on Screen 9 A er you hear the prompt and con nue on the Connec ng screen will appear It will usually register within by approximately 30 seconds A er connec ng process completes it will con nue on toward the next screen ...

Страница 11: ... the Direc on bu on to adjust the angle of the camera 6 Press the Alarm bu on to switch on off the Mo on detec on alarm func on 7 Cloud Storage allows you to view files in cloud storage This feature requires an addi onal account 8 Press the Photo album bu on to view photos and videos 9 Press HD SD bu on to switch image quality Camera Home Screen Now that your device has been added it will show on th...

Страница 12: ...alk Two Way Talk 5 Detec on Alarm Se ngs allows to switch the Mo on Detec on on off Having the mo on sensor on will alert the smart device each me there is movement 6 Purchase VAS allows to purchase cloud storage 7 Offline reminder allows remind you when the device is offline 8 FAQ Feedback allows users to report issues and get help 9 Share Device allows share the device with others 10 Add to Home Scre...

Страница 13: ...er and product descrip on See our website for more products www con xo com We enjoy your feedback Xodo is a subdivision of the Con xo Inc group and the respec ve logos are registered trademarks of Con xo Inc and may not be used reproduced or altered without wri en Permission Customer Service and Tech Support 12 ...

Отзывы: