


xCORE-200 Clock Frequency Control
7
Example System Clock Divider Configurations
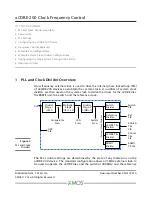
7.1
133MHz Reference Clock
To adjust the Reference Clock to 133MHz with a 400MHz System Clock, set
REFDIV
to
2
using the following code:
w r i t e _ n o d e _ c o n f i g _ r e g ( t i l e [0] , X S 1 _ S S W I T C H _ R E F _ C L K _ D I V I D E R _ N U M , 0 x02 ) ;
This will adjust all timers and clock-blocks to run at 133.3MHz, and allow ports to
be configured at 66MHz, 33MHz and so on.
7.2
Slow Switch Clock
For applications where only a single xCORE-200 device is used, the SSwitch is only
used for configuration purposes. Once the system is configured, the SSwitch clock
can be substantially reduced to save on dynamic power. 1MHz is a good option for
a low power SSwitch clock because the SSwitch power is dominated by the static
power at this frequency.
To reduce the SSwitch clock to 1MHz with a system clock of 400MHz, set
SSDIV
to
399
using the following code:
w r i t e _ n o d e _ c o n f i g _ r e g ( t i l e [0] , X S 1 _ S S W I T C H _ C L K _ D I V I D E R _ N U M , 3 9 9 ) ;
7.3
xCORE Tile Clock 200MHz
If your application does not need to run the xCORE tile at full speed to work,
dynamic power can be saved by running the tile at a slower rate. For this to work,
each tile has its own clock divider that is enabled by setting a bit in the Processor
Status Configuration
To run a tile at 200MHz from a system frequency of 400MHz, set
XCDIV
to
1
and
enable the clock divider for this processor by writing
0x10
to
XCORE_CTRL0
:
w r i t e _ t i l e _ c o n f i g _ r e g ( t i l e [0] , X S 1 _ P S W I T C H _ P L L _ C L K _ D I V I D E R _ N U M , 1) ;
s e t p s ( X S 1 _ P S _ X C O R E _ C T R L 0 ,0 x10 ) ;
8
Configuring the Clock System Through the XN File
The PLL and the reference clock frequency can be programmed automatically for an
application by using the xTIMEcomposer tools. The application’s input oscillator
frequency, system frequency and reference frequency can be specified in the XN
file. When the application code is written to a flash device with XFLASH, the code to
reprogram the PLL to the desired system and reference frequencies will be added.
When run with XRUN or XGDB the PLL is reprogrammed via JTAG.
The frequency control attributes should be added to the Node node within the
XN file. Frequencies should be specified with their unit of MHz, kHz or Hz, (for
XM010761A


