


Assembly
4
5
6
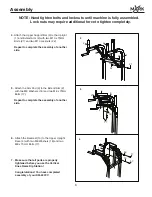
NOTE: Hand tighten bolts and locknuts until machine is fully assembled.
Lock nuts may require additional force to tighten completely.
4.
5.
6.
7.
Repeat to complete the assembly of another
side.
Repeat to complete the assembly of another
side.
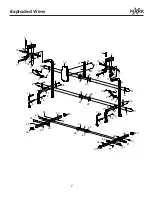
22
3
3
22
21
21
1
2
2
18
17
2
2
9
9
4
18
18
17
17
10
Attach the Upper Support Bar (3) to the Upright
(1) and Extend Arm (2) with two M10 x 70mm
Bolts (21) and two M10 Locknuts (22).
Attach the Arm Pad (9) to the Extend Arm (2)
with two M8 Washers (18) and two M8 x 70mm
Bolts (17).
Attach the Backrest (10) to the Upper Upright
Bace (4) with two M8 Washers (18) and two
M8 x 70mm Bolts (17).
Make sure that all parts are properly
tightened before you use the Vertical
Knee Raise Dip Station !
Congratulations! You have completed
assembly of your XM-4437.1!
6
Содержание XM-4437.1
Страница 9: ...Customer Service 1 800 719 4605...


