XK065 XKchrome Cube Light Series
Mounting Instructions
1.
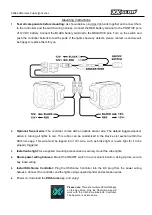
Test all components before mounting:
As shown below, plug ALL light units together and connect them
to the controllers and the switch wiring harness. Connect the RED battery terminal to the POSITIVE pole
of 12V DC battery. Connect the BLACK battery terminal to the NEGATIVE pole. Turn on the switch and
push the controller buttons to test the pods. If the lights show any defects, please contact us and we will
be happy to replace them for you.
2.
Optional- Sensor wire:
The controller comes with an options sensor wire. The default triggered sensor
action is turning all lights to red. This action can be customized in the Device List section within the
XKchrome app. This wire must be tapped into 12V+ wire, such as brake light or revers light for it to be
properly triggered.
3.
Install cube light:
Use supplied mounting accessories to securely mount the cube lights.
4.
Route power wiring harness:
Mount the ON/OFF switch in a convenient location. Using zip ties, secure
any loose wiring.
5.
Install XKchrome Controller:
Plug the XKchrome Controller into the DC plug from the power wiring
harness. Connect the controller and the lights using supplied splitter and extension wires.
6.
Power on, download the
XKchrome
App, and enjoy!
Please note:
There are multiple XKGLOW apps
on the App Store. Only the XKchrome App will
work with the XKchrome Bluetooth Controller.
The App icon is pictured here.


