


XK045004 – XKchrome RGB LED Headlight Kit
Mounting Instructions
1.
Test all components before mounting:
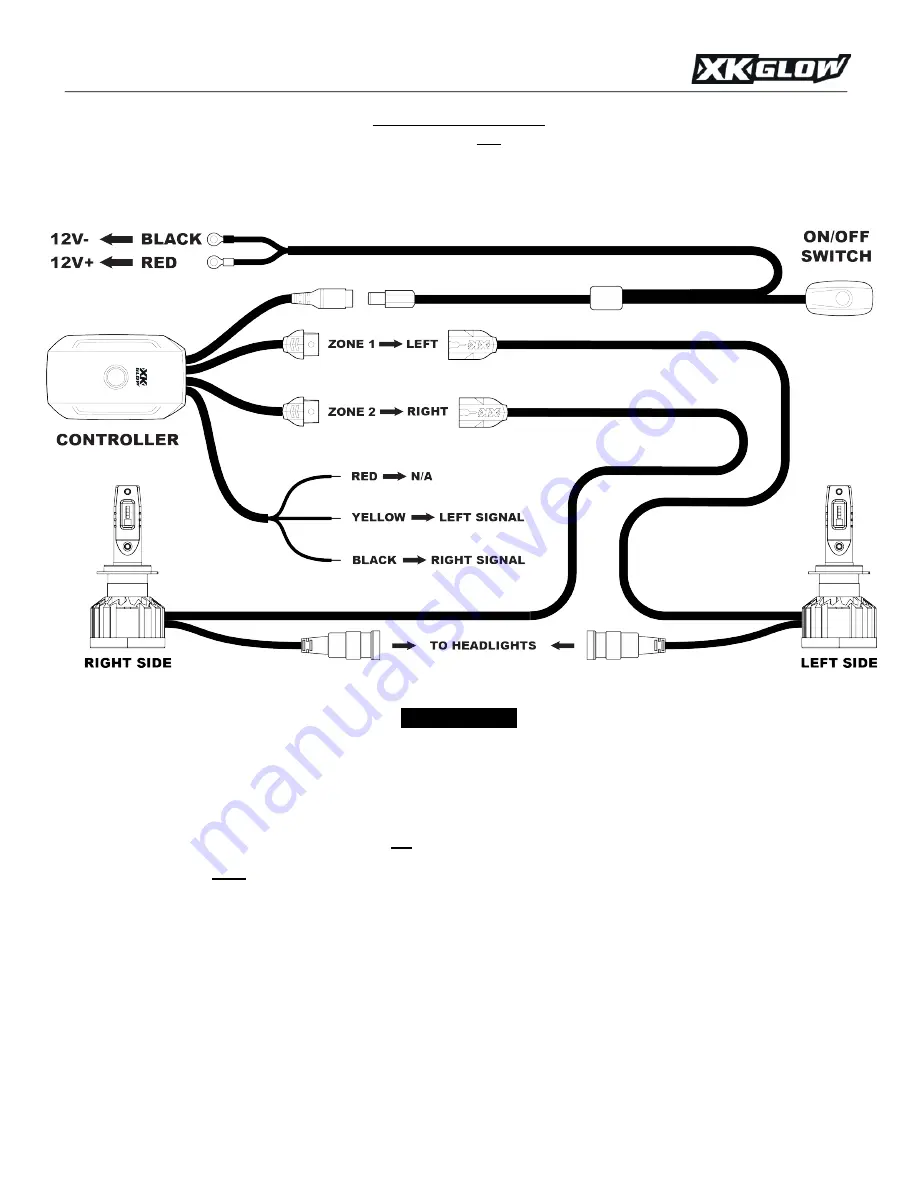
As shown below, plug ALL light units together and connect them to the controllers and
the switch wiring harness. Connect the RED battery terminal to the POSITIVE pole of 12V DC battery. Connect the BLACK
battery terminal to the NEGATIVE pole. Turn on the switch and push the controller buttons to test the LED Bulbs. If the lights
show any defects, please contact us and we will be happy to replace them for you.
Power Options
Option A. Wire Direct to Battery:
To independently control the RGB Devil’s Eyes without your vehicle being powered on, you must
wire the power wire harness directly to the battery. With this setup, the RGB LEDs must be turned on via the ON/OFF
switch or the XKchrome App. Firmly connect the wire terminals on the harness to the positive and negative terminals on
the battery.
Option B. Wire to Ignition Source:
Wiring the power wire harness to an ignition source will make the RGB Devil’s Eyes turn on
automatically when the vehicle is powered on. Note- you will not be able to control the RGB LEDs independently of the
vehicles power. To do this, simply wire the
red
wire on the power wire harness to an ignition wire source utilizing an add-
a-fuse (not included). Ensure that the fuse is capable of handling the extra current load from the added accessories.
Connect the
black
wire on the power wire harness to a nearby ground.
2.
Install the bulbs:
Remove the existing bulbs from the headlights. Using the supplied collars, install the XKGLOW bulbs into the
headlights. Following the diagram below, plug the bulbs into the XKGLOW drivers and the drivers into the stock headlight plugs.
Power headlights on to ensure proper install. Connect the other plug on each bulb to the XKchrome Bluetooth controller.
WARNING:
Do not force the plugs together! If they don’t snap together, verify that all the pins line up. If a pin is out of place, it
must be straightened in order for the plugs to snap together.
3.
Route power wiring harness:
Mount the ON/OFF switch in a convenient location. Route the two DC plugs toward each side of
your vehicle. Using zip ties, secure any loose wiring.
4.
Install XKchrome Controller:
Plug the XKchrome controller into the DC plug from the power wiring harness. Then plug the
LED bulbs into the XKchrome controller. Zone 1 from the controller goes to the left side headlight and Zone 2 goes to the right
side.


