background image


Main Menu 

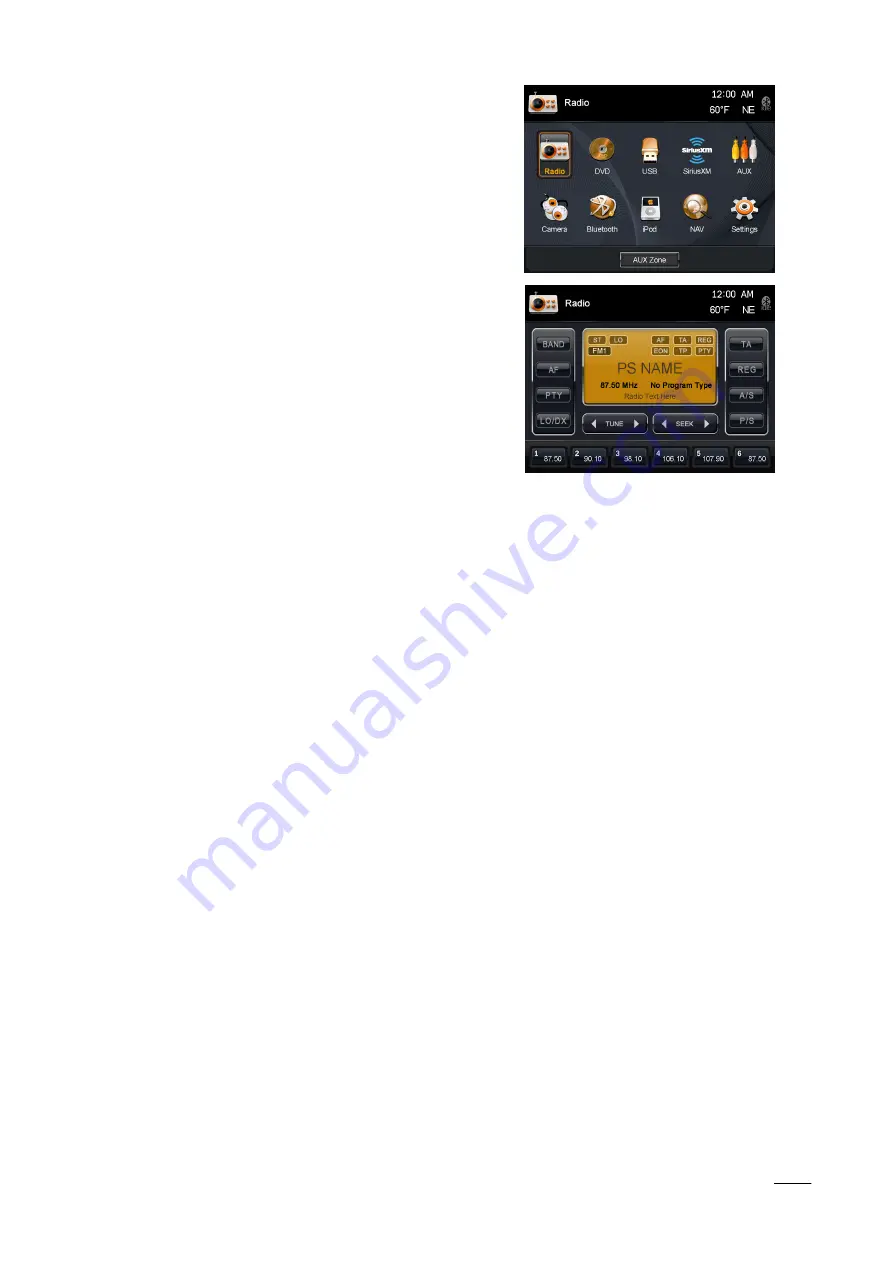
The  Infotainment  Center  is  designed  for  simple  maneuvering 
throughout.  The  screen  shown  on  the  right  is  the 

MAIN  MENU 

screen.  From  here  you  can  choose  which  function  to  access  by 
touching the appropriate icon on the LCD display. To return back 
to the Main Menu or change the active source touch the icon in 
the top left corner of any screen. 
If  the  device  is  left  idle  on  the  Main  Menu  or  on  any  system 
settings  screen  the  video  will  revert  back  to  the  active  source 
(radio, etc.) after 15 seconds.  
 

Information Bar 

The top area of the screen is the audio information bar. 
This  area  will  display  the  current  audio  source,  time,  Bluetooth 
connection status and optional TEMP/Compass information. 
To return back to the main menu touch the audio source icon.  
To  view  the  information  bar  during  video  playback  or  manual 
camera  view,  touch  the  screen  once  to  display.  Touch the  audio 
icon to return to the main menu. 
 

Содержание XSG2NA-X1DM

Страница 1: ...INFOTAINMENT CENTER Owner s Manual Before using this product please read this manual fully to ensure correct operation Keep the manual at hand for future reference XSG2NA X1DM XSG2NA X1L ...

Страница 2: ...minimize or prevent such distraction Learn how to use this system before placing the vehicle in operation Minimize the amount of time spent viewing the screen of the unit while driving and use voice prompts whenever possible Do not attempt to adjust settings of the system or resolve any malfunction with it while driving Instead pull off the road in a safe and legal manner and then adjust its setti...

Страница 3: ...mal state has foreign objects in it is exposed to water is smoking or smells turn it off immediately and consult your dealer Refer installation to qualified personnel USA Federal Communications Commission FCC This device complies with part 15 of the FCC Rules Operation is subject to the following two conditions 1 this device may not cause harmful interference and 2 this device must accept any inte...

Страница 4: ...iquid crystal panel keep it out of direct sunlight while the unit is not in use Sudden changes in the temperature inside the vehicle such as those which occur immediately after the vehicle s air conditioner or heater has been turned on may cause condensation droplets of water to form and as a result the panel may not work properly Do not use the unit while these symptoms are in evidence but leave ...

Страница 5: ...cialists and give us your comments You can find our contact information at the bottom of this page Product Registration Please take a moment to fill out your Infotainment Center Registration Card and mail it to the address provided on it or contact us by phone or email at the address below By registering your product you will be kept up to date on any enhancements to the Infotainment Center It wil...

Страница 6: ...1 Subscribing to SiriusXM Satellite Radio 20 9 2 Operating SiriusXM Satellite Radio 20 9 3 Tuning to a channel 21 9 4 Parental Control Channel Locking and Channel Skipping 21 9 4 1 Lock Code 21 9 4 2 Lock Mode Unlock Mode 21 9 4 3 Mature Channel Locking 22 9 4 4 Channel Locking 22 9 4 5 Channel Skip 22 9 5 Artist Song Alerts 22 9 5 1 Setting Alerts 22 9 5 2 Viewing Managing Alerts 22 9 5 3 My Arti...

Страница 7: ...nd Streaming Audio Player A2DP 2 Rearview Camera Connectivity3 Auxiliary Monitor Support4 USB Input ESP Electronic Shock Protection for DVD MP3 CD High Power MOSFET Speaker Output 4 X 50W Steering Wheel Control Compatible Premium Remote Control Optional Accessory Temperature Sensor OS Display Optional Accessory Compass Heading Display Optional 1 iPod iPhone device not included 2 Compatible mobile ...

Страница 8: ... the function icon Touch the icon to return to the Main Menu DIM 1 Press to manually adjust the brightness of the LCD VOLUME CONTROL 1 The volume level can be adjusted on the front of the Infotainment Center display by using the volume up and volume down buttons or by the steering wheel control buttons optional 2 The volume level can be muted completely by briefly pressing the MUTE button on the f...

Страница 9: ... the device is left idle on the Main Menu or on any system settings screen the video will revert back to the active source radio etc after 15 seconds Information Bar The top area of the screen is the audio information bar This area will display the current audio source time Bluetooth connection status and optional TEMP Compass information To return back to the main menu touch the audio source icon...

Страница 10: ...cedures to ensure proper driving to avoid damage and or injury Standby Screen Selecting ON the Infotainment Center will display your clock when the unit is powered off by press and hold the PWR button while the vehicle remains on Language Here the language of the User Interface can be selected English Spanish French Auto Dim Set to Auto LCD will dim with your vehicle lighting if equipped Set to se...

Страница 11: ...2 Treble Sets the treble level 10 10 Mid Sets the mid level 10 10 Bass Sets the bass level 10 10 Equalizer Here a selection can be made for the equalizer to fit a music style The following options are available ROCK CLASSIC POP LIVE JAZZ FLAT normal level Fader Sets the fader level between front and rear F10 R10 0 is the center level Center Woofer Volume Sets the volume level for an optional cente...

Страница 12: ...toring a station by holding it for 2 seconds AF means Alternative Frequencies When this function is activated the radio will search for other frequencies on which the same station is present to offer the best reception The AF button will blink when activated PTY means Program Type Some radio stations broadcast their program type When the PTY button is pressed use the TUNE and SEEK buttons to selec...

Страница 13: ...d again and press twice to stop completely Press once to skip to previous track Press and hold to reverse within a track Press once to skip to next track Press and hold to fast forward within a track This button can be used to set how the CD player should play back the available tracks The available options are RPT ALL normal playback RPT 1 repeat one track or RPT OFF This is the random option tha...

Страница 14: ...ble to browse through the data This is the icon for a folder When a folder is selected the track list will show the content of the selected folder In the top of the track list the folder icon can be used to leave the current folder and return to the root This is the icon for a JPEG image The Infotainment Center also has the ability to show JPEG images please see safety instructions When a JPEG is ...

Страница 15: ... audio will be available Some DVD s support multiple angle views Pressing this icon will switch between each available angle DVD s will allow several subtitles to be blended into the video file Press this icon to select subtitle Press to go to the DVD Main Menu Press for Chapter Search A keypad will be visible on the left side of the LCD screen Enter the chapter number to jump to Note The options ...

Страница 16: ...connecting both HF HS and AV Auto Connect This enables the Infotainment Center to search and connect with any paired mobile phones after power up You will see the icon flashing in the top right hand corner while searching for devices when enabled Auto Reception This sets the automatic incoming call answering Bluetooth Gain Setting the volume level of Bluetooth operation 10 10 MIC Gain Setting the ...

Страница 17: ...nection can be made automatically from that moment on 6 If there are more mobile phones paired to the Infotainment Center and within range the connecting priority is given to the last paired mobile phone 7 In case that pairing fails after each attempt please turn off both your mobile phone and the Infotainment Center Turn both on again and repeat the procedure as above Notes on Phonebook Feature 1...

Страница 18: ...emain active 8 4 Outgoing Calls Direct Dialing To place an outgoing call the screen will show a numeric pad where the phone number can be entered manually Press the Backspace button if you have made a dialing error Press the Redial button to redial the last number called with the mobile phone Voice Dialing When the mobile phone also supports voice dialing a Voice Dial button will also be available...

Страница 19: ...kers Some phones will also support the audio playback of certain apps like internet radio through the XSG2NA Press AV in the standard Bluetooth screen The screen will change to a normal playback screen with the standard functionality play or pause stop previous track next track Note The A2DP functionality is highly dependent on the mobile phone used For information on this protocol and its functio...

Страница 20: ...channel make sure your tuner is installed correctly as described in the tuner Installation Guide 2 After you can hear the Preview channel tune to Channel 0 to find the Radio ID of your tuner You will need this number to activate your subscription Write the number down for reference Note that the SiriusXM Radio ID does not include the letters I O S or F 3 With the radio still turned on the next ste...

Страница 21: ...st 9 4 Parental Control Channel Locking and Channel Skipping The SiriusXM Parental Control feature allows you to control access to channels that you consider inappropriate for some listeners When enabled the Parental Control feature requires you to enter a lock code to tune to the locked channels Information on setting up the lock code setting up the channels to be locked and the method to access ...

Страница 22: ...kipped channel can only be accessed by direct tuning selecting it by touching the LCD display or as a saved preset To remove a skip command from a channel 1 Tune to the skipped channel 2 Press SKIP 3 Channel is now returned to all channel lists and the S is now removed 9 5 Artist Song Alerts While listening to SiriusXM Satellite Radio you can be alerted when your favorite songs or artists are play...

Страница 23: ...ward or skip past the beginning of the buffer or once reaching live playback 9 7 SiriusXM Settings Menu There are many features that can be changed to customize your SiriusXM Radio experience To enter the SiriusXM settings menu you must currently have SiriusXM selected From there press the SiriusXM icon top left corner of display Select Settings Icon From the Settings page there is a SiriusXM opti...

Страница 24: ...tenna if the cable is damaged Consult the SiriusXM Connect Vehicle tuner installation manual for more information on antenna installation Subscription Updated The radio has detected a change in your SiriusXM subscription status Press FUNC to clear the message No further action is required Visit www siriusxm com or call SiriusXM at 1 877 438 9677 if you have questions about your subscription Channe...

Страница 25: ...Artist Audio Book Album Podcast and Genre Go to previous track Press and hold to fast rewind current track Go to next track Press and hold to fast forward current track Off Single Track All Track repeat functions Off Track Album random playback order Access to all stored iPod video Note iPod video playback requires optional iPod video cable Please contact your dealer to inquire When a Podcaster or...

Страница 26: ... see page 11 Video Settings for more details Automatic Viewing The Infotainment Center can support automatic triggers to display cameras to assist you with reverse driving and side blind spot viewing While driving if a turn signal or reverse gear signal is seen by the system the display will change to full screen camera view even from PIP function If your rear camera is equipped with audio you can...

Страница 27: ...essing the audio source icon in the top left corner of the screen will return you to your current audio source full screen Accessing Your Navigation Program To access the navigation please select the NAV icon from the Main Menu or press the NAV button on the front bezel To exit navigation press the NAV button again or touch the Audio source icon on the top left of your LCD display Both these actio...

Страница 28: ...de 4 Numeric 1 Preset 1 5 Numeric 2 Preset 2 6 Numeric 3 Preset 3 7 Numeric 4 Preset 4 8 Numeric 5 Preset 5 9 Numeric 6 Preset 6 10 Numeric 7 11 Numeric 8 12 Numeric 9 13 Directory 14 Numeric 0 15 Menu 16 Play Pause 17 Reverse 18 Stop 19 Forward 20 Directional UP 21 Directional LEFT 22 Directional DOWN 23 Directional RIGHT 24 Confirmation 25 Seek up and down 26 Volume up and down 27 Picture In Pic...

Страница 29: ...4 9 Numeric Preset Tune to saved Channel Preset 1 6 15 MENU Press to see SIRIUS INFO 13 DIR Press to Direct Tune to a channel Use Numeric keys to enter channel the press OK iPod Key Function Description 20 24 Directional UP DOWN Search Track list Up Down LEFT RIGHT Track list page UP DOWN OK to select 25 Next hold for fast forward Go to next Track Previous hold for rewind Go to previous Track 16 P...

Страница 30: ...14 Numeric Enter chapter number 15 MENU Access DVD Menu 13 DIR Open chapter search keypad Navigation Key Function Description 20 24 Directional Pan Map 15 MENU Main Menu 13 DIR Address search Control of DVD Playback on the Auxiliary LCD Display is possible with the Premium Remote Please change the switch position on the left side of the remote from Main to Aux This will now control DVD features wh...

Страница 31: ...31 ...

Страница 32: ...ly prohibited Information in this document is subject to change without notice The Manufacturer reserves the right to change the content herein without the obligation to notify any person or organization of such changes All trademarks used herein remain the exclusive property of their respective owners Nothing contained in this manual should be construed as granting by implication or otherwise any...

Отзывы: