background image

XD Series High Density Access Points

4

back of the AP. (See photo for Step 4 on page 5. If you ever need to reinstall the slug, push it in with the small 
protruding bump facing towards the nearer mounting slot.)

2.

Mark the locations for the two mounting screws on the ceiling—the centers are 3.5” (8.9 cm) apart. You may 
use the “Direct Mounting Template” on page 7.

3.

Cut an access hole for the cable(s) in the ceiling and draw enough cable through to attach to the AP after it is 
installed.

4.

Install two screws in the ceiling so that they protrude 1/8” (.3 cm) between the mounting surface and the head 
of the screw.

5.

Proceed to “Connect Cables and Install AP” on page 5.

3C—Ceiling Grid Mount with Mounting Plate
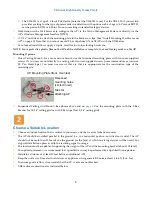
1.

If using the T-Bar bracket for a standard 15/16” ceiling grid, just twist its built-in clips onto the grid with the 
bracket’s bolts facing down. For a slotted grid, slide the heads of the T-bolts into the grid's slot (easiest to do at 
an intersection), position them for the two holes in the T-Bar Bracket, and twist bolts till snug in the slot. Secure 
bracket with nuts, with the bracket’s bolts pointing down. 


Skip to Step 3 below.
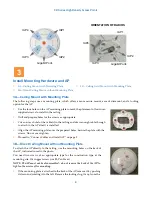
2.

If using T-Bar clips, use the four holes on the AP mounting plate to mark the placement of the four T-bar clips 
on the metal ceiling support grid. 

NOTE: You MUST use the mounting studs furnished with the T-BAR clips. You cannot use old T-bar clips from XN or XS 
APs with the XR or XD Series. Old clips and studs will damage the AP case.

Twist the four T-bar clips onto the metal ceiling grid at the marked locations and tighten the screw posts to 10-
12 lbf.ft (1.38-1.66 kgf.m). Do not over- tighten the screw posts. 

3.

Cut an access hole in the ceiling tile and draw the cable(s) through. 
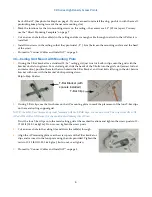
4.

Align the AP mounting plate over the screw posts of the T-Bar bracket or 
clips and secure it to the four posts using the nuts provided. Tighten the 
nuts to 10-12 lbf.ft (1.38-1.66 kgf.m), but do not over tighten.

5.

Proceed to “Connect Cables and Install AP” on page 5.

T-Bar Bracket (with 
spacers installed)

T-Bar Clips

Содержание XD4 Series

Страница 1: ...Wireless Access Point XD4 Series Quick Installation Guide XD4 Series June 15 2016 ...

Страница 2: ...ease see Legal Notices Warnings Compliance Statements and Warranty and License Agreements in the Wireless Access Point User s Guide All rights reserved This document may not be reproduced or disclosed in whole or in part by any means without the written consent of Xirrus Inc Part Number 812 0085 010 Rev E June 15 2016 ...

Страница 3: ... GIG2 Connection to this second data only one gigabit port provides additional bandwidth Use Cat 5E or Cat 6 cable AP must be connected to PoE networks without routing cabling to the outside plant This ensures that cabling is not exposed to lightning strikes or possible crossover from high voltage lines AP PoE Injectors or Switches must be installed and used indoors The total Cat 5e or Cat 6 cable...

Страница 4: ...8 Pan Head type You must use screws that are that are appropriate for the construction type of the mounting site Suspended Ceiling Grid Mount See photos above and on page 4 Use the mounting plate with the T Bar Bracket for 15 16 ceiling grid or with T Bar clips for 15 16 ceiling grid Choose a Suitable Location Choose an indoor location that is central to your users and that is away from heat sourc...

Страница 5: ... the mounting plate is attached to the back of the AP remove it by pushing it down and rotating it to the left Remove the locking slug if any from the 3A Ceiling Mount with Mounting Plate 3B Direct Ceiling Mount without Mounting Plate 3C Ceiling Grid Mount with Mounting Plate 1 Use the four holes on the AP mounting plate to mark the placement of four user supplied screws to install in the ceiling ...

Страница 6: ...s slot easiest to do at an intersection position them for the two holes in the T Bar Bracket and twist bolts till snug in the slot Secure bracket with nuts with the bracket s bolts pointing down Skip to Step 3 below 2 If using T Bar clips use the four holes on the AP mounting plate to mark the placement of the four T bar clips on the metal ceiling support grid NOTE You MUST use the mounting studs ...

Страница 7: ...ns new Xirrus devices deployed in your network Create and configure a default profile for newly added APs then set up discovery for the APs subnetwork New devices will automatically receive the configuration defined in the default profile If you are not using XMS please see the Xirrus Wireless AP User s Guide to configure the AP manually via the Express Setup menu The User Guide is available from ...

Страница 8: ... Press the reset button all the way there should be a faint click and hold it Plug the cable back in and continue to keep the button pressed for 10 seconds This triggers the factory default reset during the boot process Specifications and Drawings Physical Environmental Specifications Dimensions WxDxH 10 x 10 x 2 5 in 25 4 x 25 4 x 6 4 cm Weight 2 lb 0 9 kg Operating Temperature 0 55 C 32 131 F 0 ...

Страница 9: ...Oaks CA 91320 USA To learn more visit xirrus com or email info xirrus com 201 Xirrus Inc All Rights Reserved The Xirrus logo is a registered trademark of Xirrus Inc All other trademarks are the property of their respective owners Content subject to change without notice 812 0085 010 Rev E Direct Mounting Template ...

Отзывы: