XINDAK D1 Скачать руководство пользователя страница 10

Chapter 4

Operation Instruction

4.2 System Settings

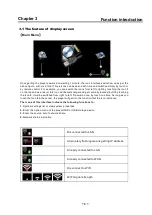
Select the icon in the main menu to enter into the System Settings, which includes the
other six setting as follows except the Network Settings(Page 10):

1.Backlight Brightness

2.Language Selection

3.Backlight Duration

4.Firmware Update

5.Touch Screen Calibration

6.System Properties

There are 4 levels of LCD brightness and select the suitable level by touch or by the remote
control, with the forth level as the brightest.

The simplified Chinese, traditional Chinese, English and Germany are optional for different
countries and regions.

The Backlight Duration is the time to adjust the LCD brightness:5,10,30 seconds or constant light
are optional.

The system can get updated through Firmware Update. You just need to save the update
firmware in USB flash disk and then insert the USB flash disk into USB HOST port. Then select
Firm Update by touch or pressing the remote control to start updating. Do not pull out the USB
flash disk during the updating until the screen displays” The update is done”. The update is
completed before the system automatically restarts.

To ensure the touch screen sensitive, please select Touch Screen Calibration prior to initial use
or when the wrong touch sensitive is found out. The screen will display one “+” in the calibration
interface and touch the middle of it, the “+” will jump to another corner and then one after another
corner and finally get back to the center.

8

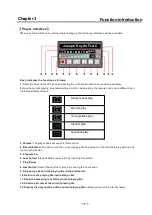
You should turn on the power switch on

, then wait for the display shows

after processing finished ,system into main page. whole starting

procedure may spend about 30 seconds

When the device working normally , press the remote control of the

key for 2 seconds , the

device enter to standby.But you must stop playing and quit when you play movable storage
device to enter standby, otherwise the movable storage device may be damaged. When the
device standby , you just need to press

for once ,the system will be started .

.

“PLEASE

WAIT SYSTEM STARTING”

front panel

4.1Power On/Off

Содержание D1

Страница 1: ...Digital Stream Music Server D1 INSTRUCTIONS...

Страница 2: ...uct you will help ensure that waste undergoes the necessary treatment recovery and recycling and thus prevent potential negative effects on the environment and human health which could otherwise arise...

Страница 3: ...t the power cord from being walked on or pinched particularly at plugs convenience receptacles and the point where they exit from the apparatus 10 Unplug this apparatus during lightning storms or when...

Страница 4: ...1 The remote control range is approximately 5 meters 2 Pointing the remote control on an angle to the receiver will shorten the useful distance of the remote control with correct 3 with correct Using...

Страница 5: ...rnet radio Next Press this key to play the nextfileor internetradio OK Serves as an enter key for system settings operation or file selection Stop Press this key to stop playing and pop up the playing...

Страница 6: ...t Jack 5 AES EBU output jack 6 Mains input 7 USB ports It external storage device is USB Host port to connect with By connecting this jack with BNC signal cable to output the signal to the DAC or rece...

Страница 7: ...ing the Icon it will be switched from right to left Do switch once by touch one time As long as you touch the Icon in the center the player will get into the function that the icon indicates System se...

Страница 8: ...list of the USB storage device USB flash disk or disk other USB removable 6 Chapter 3 Function introduction These three functional icons are designed to 5 6 7 Enter the menu for selecting any availabl...

Страница 9: ...t this function Play back the previous file by touching this button How the current playing programme status which can be set by the remote control and different icon indicates different status You ca...

Страница 10: ...sing the remote control to start updating Do not pull out the USB flash disk during the updating until the screen displays The update is done The update is completed before the system automatically re...

Страница 11: ...itioned storage device such us USB flash disk please enter the file list in a direct way Kbps KHz 0 0 0 2 1 8 9612 192 Joseph Haydn FLAC 9 4 4 WI FI Module and LAN connection WI FI Module Connect to U...

Страница 12: ...to the center location touch it by hand or press the Ok key of the remote control to enter into the item list settings There are totally three items Network Selection Backlight Brightness Language Sel...

Страница 13: ...y Cut Paste Delete menu The selection of Copy or Cut will result in one file icon on the top of the list Then get into the path of the file to paste and repeat the above operation and choose Paste and...

Страница 14: ...er consumption Power specifications Dimensions W H D Supplied accessories Support cable network Ethernet cable network 10 100Mbps RJ 45 interface Support wireless network IEEE 802 11 b g with a maximu...

Страница 15: ...No 126 Section 2 East 1 Round Chengdu Sichuan China P C 610051 You can find your nearest authorized distributor and more product information on our website www xindak com...

Отзывы: