•
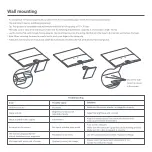
For installation methods and precautions, please refer to the installation guide of the wall mount you purchased.
•
The wall mount must be purchased separately.
•
Tip: This product is compatible with wall mounts that have a hole spacing of 75 × 75 mm.
•
The bolts used to secure the wall mount must meet the following requirements: Quantity: 4; Thread: M4; Length: 10 mm.
•
Lay the monitor flat, with its back facing upwards. Use your finger to press the spring clip that joins the base to the monitor and remove the base.
•
Note: When removing the base, be careful not to pinch your finger in the spring clip.
•
Follow the wall mount user manual and install the wall mount onto the bolts that are built into the housing back.
Wall mounting
Secure the wall
mount as shown
in the picture.
Troubleshooting
Issue
Image is dark.
Unable to turn on.
Image is jittery or has ripples.
No image on the screen.
No power.
Brightness/Contrast not
adjusted properly.
Interference.
No signal, entering sleep mode.
Adjust the brightness and contrast.
Keep the monitor away from electronic devices that
may cause electrical interference.
Possible Cause
Solutions
System to correct the image.
VGA input with screen out of center.
Resolution is incorrect.
Use the specified recommended resolution settings.
Please select VGA automatic adjustment in the
system to correct the image.
Make sure the power adapter is plugged in properly.
The monitor displays that the
current resolution is not supported.
Turn on the computer.
Make sure the computer’s graphics card is working properly.
Make sure the cable is plugged in properly.
Содержание A22i
Страница 1: ...Monitor A22i User Manual...
Страница 2: ...1 2 4 3...
Страница 6: ...Importer Beryko s r o Pod Vinicemi 931 2 301 00 Plze www beryko cz...

