06
Dolphin Generation 2 Maintenance Manual V1.0
DOLPHIN XP-005L
2.8 Replace or inspect the cutter wires
2.8.1 The cutter non-conductive
Poor contact or broken circuit caused by worn probe wires, refer
chapter 2.7.1
to replace the probe and
cutting wires. Insert the mainboard port according to the wire harness label.
2.8.2 The cutter remains conductive
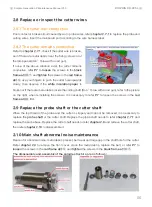
Refer to
chapter 2.7.1
, check if the cutter wire is broken,
and if there are metal debris near the fixing screws or at
the lamp panel (don’t blow with an air gun).
If none of the above situation exist, the cutter remains
conductive, refer
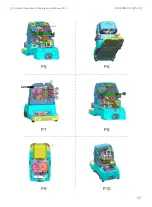
P7
to
loosen
the screws in the
black
frame at⑤⑥⑦
, and
tighten
the screws in the
red frame
at⑧⑨
, use your fingers to push the cutter hole upwards
slowly, then observe if the
white insulation paper
is
broken or if there are metal debris inside the cutting shaft (Don’t blow with an air gun), refer to the picture
on the right. when reinstalling the screws, it is necessary to refer
P7
to loosen the screws in the
red
frame at⑧⑨
first.
2.9 Replace the probe shaft or the cutter shaft
When the top thread of the probe and the cutter is slippery and cannot be removed, it is necessary to
replace the
probe shaft
or the cutter shaft. Replace the probe shaft needs to refer
chapter 2.7.1
and
replace the probe base. Replace the cutter shaft needs to refer
chapter 2.8
and remove the cutter shaft,
then refer
chapter 2.10
to disassemble it.
2.10 Main shaft abnormal noise maintenance
Reason for abnormal noise: metal debris present, belt wear and large gap in the shaft hole for the cutter.
Refer
chapter 2.3
to remove the front cover, clean the metal debris, replace the belt, or refer
P7
to
loosen
the screws in the
red frame at⑧⑨
, and
tighten
the screws in the
black frame at⑤⑥⑦.
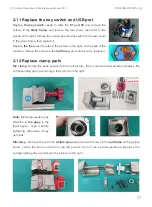
The disassembly and assembly of the spindle structure are as follows:


