

8
3
Installation
Unpacking the Board
You should place the XSV Board on a non-conducting surface.
Configuring the Jumpers
Place shunts on jumpers J23 and J24.
Applying Power
You can supply the XSV Board with power in two ways:
1. Attach an ATX PC power supply to connector J11.
2. Attach a 9 VDC power supply with a 2.1mm, center-positive plug to jack J12. The
power supply must be able to source at least 1A.
LED D2 will glow when the power is on.
Connecting to a PC
One DB25 connector on the 6-foot cable should be attached to connector J10 on the XSV
Board and the other end should plug into the parallel port connector of a PC.
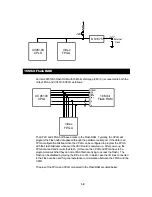
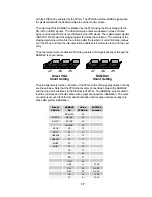
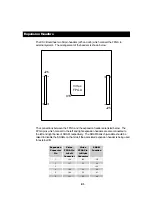
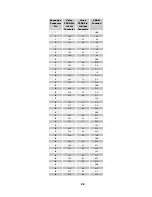
Setting the Oscillator Frequency
The XSV Board has a programmable oscillator which provides a clock signal to the FPGA
and CPLD. The oscillator has an internal 100 MHZ frequency source that is scaled by a
divisor between 1 and 2048 to generate the clock signal for the rest of the XSV Board.
The divisor is stored in non-volatile memory in the oscillator chip so it will be restored each
time power is applied to the XSV Board.
The divisor is set as follows:
q
Remove power from the XSV Board.
Содержание XSV
Страница 8: ...7...
Страница 34: ...33 B XSV Schematics The following pages show the detailed schematics for the XSV Board...
Страница 35: ......
Страница 36: ......
Страница 37: ......
Страница 38: ......
Страница 39: ......
Страница 40: ......
Страница 41: ......
Страница 42: ......
Страница 43: ......
Страница 44: ......
Страница 45: ......
Страница 46: ......
Страница 47: ......
Страница 48: ......
Страница 49: ......
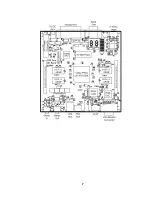
Страница 50: ...XSV Board V0 1 Layout...