background image

U s e r   G u i d e

I-

6

I N D E X

       storing ............................... [e-UG]

stand-alone fax machine
without a PC ............................ [e-UG]
standby operation ................... [e-UG]
       canceling .......................... [e-UG]
start Pagis Pro ......................... [e-UG]
storing speed dial numbers for
group dialing ........................... [e-UG]
system data options ......[UG]1-9,1-11
answer on rings ................ [UG], 1-12

auto journal ................ [UG], 1-11
clock mode.................. [UG], 1-13
continuous poll report [UG], 1-12
dial mode .................... [UG], 1-11
discard size ................. [UG], 1-12
DRPD (Distinctive Ring 
Pattern Detection) ...... [UG], 1-13
ECM (Error Correction) 
mode............................ [UG], 1-11
fax print quality .......... [UG], 1-13
local ID ........................ [UG], 1-12
message confirm ........ [UG], 1-11
paper size .................... [UG], 1-11
redial interval ............. [UG], 1-12
redials.......................... [UG], 1-12
remote RCV code........ [UG], 1-11
RX reduction ............... [UG], 1-11
send from memory..... [UG], 1-12

system ID, setting ............. [UG], 1-14
system options
       setting date and time . [UG], 1-15

default printer 
settings ........................ [UG], 1-20
language...................... [UG], 1-18
ringer volume ............. [UG], 1-18
sound control.............. [UG], 1-18
speaker volume .......... [UG], 1-19
system ID .................... [UG], 1-14

system requirements.............. [e-UG]

T

tel receive mode.................. [UG], 4-2
telephone connectivity 
guidelines ................................ [e-UG]
The WorkCentre 
Control Program ..................... [e-UG]
The WorkCentre TWAIN 
Scanner Program .................... [e-UG]
time, setting date and ........ [IG],   1-5
time,setting date and ......... [UG],1-15
tone switching ......................... [e-UG]
transmission polling ............... [e-UG]
troubleshooting ....................... [e-UG]
TWAIN ..................................... [e-UG]
types of paper .................... [UG], 1-28

U

user options, setting ......... [IG],  1-12

W

Windows 2000 ......................... [e-UG]
Windows 95/98........................ [e-UG]
Windows NT 4.0 ...................... [e-UG]
WorkCentre Control 
Program, The .......................... [e-UG]
WorkCentre TWAIN 
Scanner program, The ........... [e-UG]

Содержание WorkCentre XK50cx

Страница 1: ...W o r k C e n t r e X K 5 0 c x User Guide 700N00032...

Страница 2: ...s all forms and matters of copyrightable materiasl and information now allowed by statutory or judicial law or hereinafter granted including without limitation material generated from the software pro...

Страница 3: ...Component Location 1 2 Control Panel Functions 1 4 Using the Number Keypad 1 6 Editing Numbers or Names 1 7 Inserting a Pause 1 7 Using the XK50cx Menu 1 8 Menu Options 1 9 Reviewing System Data Opti...

Страница 4: ...Special Copy Features 2 3 Collating 2 4 Printing 2 5 Printer Settings 2 6 Control Program 2 6 3 SENDING A FAX 3 1 Preparing Documents for Faxing 3 2 How to Send a Fax 3 3 Canceling a Fax 3 4 Setting R...

Страница 5: ...6 MAINTAINING YOUR XK50cx 6 1 Cleaning the XK50cx 6 2 Maintaining Ink Cartridges 6 3 Cartridge Alignment 6 10 7 TROUBLESHOOTING 7 1 Document Jams 7 2 Paper Jams While Printing 7 3 Tips for Avoiding P...

Страница 6: ...terials only as directed Keep all supplies and materials out of reach of children Do not use the WorkCentre XK50cx near water in wet locations or outdoors Do not place the WorkCentre XK50cx on an unst...

Страница 7: ...ntre XK50cx Never remove covers or guards that require a tool for removal There are no casual operator serviceable areas within the covers of the WorkCentre XK50cx Never defeat interlock switches This...

Страница 8: ...tion Install Guide Getting Started Basic Functions CD Installation Program Scanning and Printer Drivers Pagis Pro 3 0 Textbridge Pro Electronic User Guide which covers Advanced Fax Procedures Printer...

Страница 9: ...WorkCentre you can Send and receive faxes Print high resolution color or black and white documents Scan photographs paper documents book pages and virtually any object which can be placed on the flatb...

Страница 10: ...C A T I O N 1 Component Location Take a moment to familiarize yourself with the XK50cx components and their location Paper Exit Tray Document Input Tray Document Guide Control Panel Automatic Document...

Страница 11: ...3 U s e r G u i d e C O M P O N E N T L O C A T I O N 1 Parallel Connector USB Connector AC Power Cord Connector Automatic Paper Feeder with Extension Document Glass Cover EXT LINE Telephone Connectio...

Страница 12: ...XK50cx and guides the user through various tasks using a menu system for each operation Use to choose special functions Use to select color or mono for copy fax or scan mode Use to start PC scanning L...

Страница 13: ...originating on a PC should be stopped on the PC Use to dial to enter a letter or to choose special functions in combination with the Menu button Use to display current job status Use to redial last p...

Страница 14: ...ess labeled MNO Each time you press the display shows a different letter first M then N and O and finally 6 You can enter special characters space plus sign etc See Keypad Character Assignments To ent...

Страница 15: ...to delete the character Inserting a Pause With some telephone systems you must dial an access code 9 for example and listen for a second dial tone In such cases you must insert a pause in the telepho...

Страница 16: ...re set features you can change using the Menu This section covers System Data Options System ID Date and Time Clock Mode System Setup Options Ringer Volume Speaker Volume Default Settings Menu Clear M...

Страница 17: ...ion describes all XK50cx menu options except for Faxing which is described in later chapters and in the Electronic User Guide Reviewing System Data Options You can review the current System Data Optio...

Страница 18: ...change a System Data option Press Menu Select Scroll through the options by pressing Down or Up repeatedly When the option you want appears in the display enter the number for the desired setting Pre...

Страница 19: ...nes enter the Remote Code and press Start The Remote Code is preset to 9 at the factory Settings range from 0 to 9 DIAL MODE The type of telephone dial system on your telephone either tone Touch Tone...

Страница 20: ...to 15 minutes can be entered REDIALS Specifies the number of redial attempts from 0 to 9 the XK50cx will attempt ANSWER ON RINGS Specifies the number of times the XK50cx rings 1 7 before answering an...

Страница 21: ...ing pattern you designate to be answered as a fax Useful when a single telephone line is used to answer several different telephone numbers with different ringing patterns Turn ON or OFF Not available...

Страница 22: ...will be printed at the top of each page sent from your machine Press Fax Press Menu Select Enter your fax telephone number and press Select Enter your name or company name by pressing the numeric keyp...

Страница 23: ...me SET DATE AND TIME and PRESS START will appear on the LCD display Press Menu Select A flashing cursor prompts you to enter the date Use the keypad to enter the current date and time using either a M...

Страница 24: ...e Clock Mode You can configure your machine to display time using either a 12 hour or 24 hour format Press Menu Select Press Up 3 times CLOCK MODE appears in the LCD display Press Right until either 1...

Страница 25: ...rge 101 400 You can also select Autofit automatically fits the image to the paper size or Clone fits multiple copies on one sheet Color B W sets default printing mode to either Color or B W black and...

Страница 26: ...and Language To set the Ringer Volume Sound Control or Language perform the following steps Press Menu Select Press Up or Down until the desired option appears Press Select Press Right or Left to dis...

Страница 27: ...Adjusting Speaker Volume Press On Hook Dial to adjust the speaker volume If you cannot hear a dial tone check the phone connection Press Up or Down until the desired volume level 1 4 is displayed Pres...

Страница 28: ...own to scroll through the options To display or change any current setting for any of the five menu options choose a feature the selected item number will blink and press Select The default setting fo...

Страница 29: ...System Data Phonebook and Schedule Job Transmit and Receive Journal Fax Menu Options Menus 6 through 11 are used to set various fax options and are described in Chapter Three Delay Send Memory Send Pr...

Страница 30: ...an print reports or lists containing useful information such as System Data or Scheduled Jobs To Print Reports Lists Press Menu Select Press Right until the desired report appears in the LCD Press Sta...

Страница 31: ...ontaining the current settings of all user selectable options SCHEDULE JOB Provides information about documents stored for Delayed Send Priority Send Memory Send TX Polling and Continuous Polling HELP...

Страница 32: ...epare the print material for loading by flexing paper or fanning envelopes Do not fold or crease the paper For transparencies be sure to use transparency stock approved for use with inkjet printers Re...

Страница 33: ...e face up The top edge of the sheet with the logo should enter the printer first While squeezing the tab on the Paper Guide move the guide to the right Slide the paper guide until it lightly touches t...

Страница 34: ...touches the envelope Using the Automatic Document Feeder Use the Automatic Document Feeder ADF to feed up to 30 documents face up into the XK50cx at any one time Adjust the document guide on the ADF...

Страница 35: ...g performance of your machine is to select the correct paper Your machine produces letter quality print on most plain bond papers including cotton bond and photocopying papers it does not require spec...

Страница 36: ...otograph Use this paper to produce photo realistic prints from your printer Transparencies Your transparencies should be products designed for use in Ink Jet products with excellent contrast sharpness...

Страница 37: ...Place cartons on pallets or shelves not on the floor Do not place heavy objects on top of the paper whether it is packaged or unpackaged Keep it away from moisture or other conditions that can cause i...

Страница 38: ...Let the printed sheets dry completely before storing them When a printed sheet has dried completely cover the printed side with a sheet of plain not coated paper before storing it this is recommended...

Страница 39: ...should be between 10 and 70 If the print density of your page is very high light paper stock may curl slightly due to the large amount of ink If you need to print dense graphics try printing on heavi...

Страница 40: ...1 32 U s e r G u i d e...

Страница 41: ...U s e r G u i d e 2 1 2 2 C h a p t e r T w o THE BASICS P R I N T I N G A N D C O P Y I N G This chapter provides basic instructions for printing and copying documents...

Страница 42: ...make a copy you can use the Control Panel buttons to change these settings Feed the document to be copied face up into the Automatic Document Feeder using light forward pressure until DOCUMENT READY...

Страница 43: ...LONE appears in the LCD This prints multiple image copies on a single page The number of images is determined by the original image size Press Reduce Enlarge until AUTO FIT appears in the LCD This aut...

Страница 44: ...machine sorts the copy job For example 2 copies of a 3 page job will print one complete document followed by the second complete document eg 1 2 3 then 1 2 3 To set collating Press Menu Select Press...

Страница 45: ...the XK50cx software See the Install Guide for details From your Windows software program choose Print or Print Setup from the File menu Make sure the WorkCentre XK50cx is the selected printer Click on...

Страница 46: ...necessary changes to the printing parameters click on OK to start the print job Printer Settings For information about Windows 95 98 and NT4 0 2000 Printer Settings see the Electronic User Guide Contr...

Страница 47: ...cribed in the Electronic User Guide You can fax a document by placing it in the Automatic Document Feeder ADF or directly on the document glass pressing Fax and entering the remote fax number using th...

Страница 48: ...eeder carbon paper or carbon backed paper coated paper onion skin or thin paper wrinkled or creased paper curled or rolled paper torn paper Remove all staples and paper clips before feeding the docume...

Страница 49: ...ng the Automatic Document Feeder ADF Adjust the document guide on the ADF to match the width of the document Slide the document face up into the ADF until DOCUMENT READY appears in the LCD display Pre...

Страница 50: ...ument glass and lower the top Press Fax Use the keypad to dial the number of the remote fax machine Press Start The document scans into memory The display asks if you want to send another page Press o...

Страница 51: ...olution mode is not available if the Send From Memory feature is set to ON If Send From Memory is set to ON all documents will be stored to memory in Normal mode If the XK50cx is set to Best Resolutio...

Страница 52: ...t resolution and contrast The default mode will be in effect when a document is sent or copied unless you change the setting for an individual operation The machine will automatically revert to defaul...

Страница 53: ...t the remote site When finished talking instruct the person at the remote location to start their fax machine and hang up The remote fax machine will send the initial fax tones Press Fax Wait until yo...

Страница 54: ...Transmission You can verify that a fax was sent correctly by printing a Message Confirmation Report Press Menu Select MSG CONFIRM appears in the LCD display Press Start to print the report Advanced F...

Страница 55: ...e 4 1 4 4 C h a p t e r F o u r R E C E I V I N G A F A X Your WorkCentre XK50cx can automatically answer receive and print all incoming faxes See the Electronic User Guide for advanced fax features...

Страница 56: ...immediately goes into fax receive mode TEL In TEL mode automatic fax answering and reception is turned off To receive a fax manually pick up the external phone handset or press OHD to accept the call...

Страница 57: ...up the external phone If you hear a fax tone or if the person calling asks you to receive a fax press Start You may also press the characters on the telehone to initiate reception Replace the externa...

Страница 58: ...can adjust the ringer volume to LOW MED HIGH or OFF Press Menu Select RINGER VOLUME displays Use Up or Down to set the ringer volume Press Clear Stop to accept and exit 1 2 3 Note To change the number...

Страница 59: ...4 5 U s e r G u i d e A D V A N C E D F A X F E A T U R E S 4 Advanced Fax Features See the Electronic User Guide for advanced fax features and procedures...

Страница 60: ...4 6 U s e r G u i d e...

Страница 61: ...tographs graphics or printed text These images can be copied or scanned directly into your PC workstation using the WorkCentre TWAIN Scanner Program and edited with the Pagis Pro software included wit...

Страница 62: ...s Help Easy Scanning To use the XK50cx Scan Button on the Control Panel Load the document face up into the Automatic Document Feeder DOCUMENT READY appears in the LCD or place the document face down...

Страница 63: ...Double click the Scan to PC icon in the Windows Taskbar typically in the lower right hand corner of your screen Click the Add Application button and specify the desired application Click OK when done...

Страница 64: ...er tab The Scanner Setup Wizard opens automatically Follow the onscreen instructions to select Xerox WorkCentre XK50cx as the Scanning Source Click Finished when done to redisplay the Pagis Scan Tool...

Страница 65: ...e r G u i d e 6 1 6 6m C h a p t e r S i x MAINTAINING YOUR XK50cx This section describes maintenance procedures for Cleaning the Automatic Document Feeder and document glass Maintaining Ink Cartridg...

Страница 66: ...sent to another fax machine may not be clear Power off the WorkCentre XK50cx by unplugging it from the wall outlet Lift the Automatic Document Feeder gently on the Panel Cover assembly The Automatic...

Страница 67: ...l it Do not refill the ink cartridge The warranty will not cover damage caused by using refilled cartridges Store the ink cartridge in the same environment as the printer Do not remove an ink cartridg...

Страница 68: ...ng of the print nozzles Print Cartridge Clean Head Process You should test the print cartridge when the print is not clear or image information is missing The problem may be caused by blocked nozzles...

Страница 69: ...Select The LCD display indicates SELF TEST Press Up CLEAN HEAD appears in the LCD display Press Start PRINTING appears on the LCD display The WorkCentre XK50cx prints a head cleaning test pattern Not...

Страница 70: ...his section Use a clean lint free cloth dampened with water only to gently clean the entire copper colored area including the nozzles and contacts To dissolve any dried ink hold the damp cloth against...

Страница 71: ...isplay replace the apporopriate cartridge s The Ink Cartridge includes the ink supply and the print head Each time you replace the ink cartridge you are replacing the print head as well To install Ink...

Страница 72: ...Slowly pull straight out on the tab located at the end of the Ink Cartridge Slide the new Ink Cartridge down into the holder and push it forward until it clicks into place Lower the Scanner Module su...

Страница 73: ...to the Carrier press Right and Select The machine returns to READY TO COPY mode without printing an Alignment Test Pattern If you installed a new cartridge the machine prints a Cartridge Alignment Tes...

Страница 74: ...nu Select Press Down ARRANGE ALIGNMENT appears in the the display Press Select A Cartridge Alignment pattern sheet prints and the Cartridge Maintenance setup menu appears on the LCD display The letter...

Страница 75: ...ne which appears the straightest from pattern A example for the second line enter 02 Press Down to confirm your selection The setup screen for the Alignment B test pattern is displayed Repeat step 4 f...

Страница 76: ...6 12 U s e r G u i d e...

Страница 77: ...is section describes Troubleshooting procedures for Document Jams Paper Jams While Printing Tips for Avoiding paper Jams LCD Display Error Messages For help diagnosing common printer print quality pap...

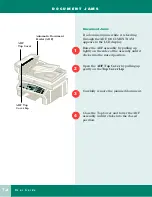
Страница 78: ...ADF assembly by pulling up lightly on the sides of the assemby until it clicks into the raised position Open the ADF Top Cover by pulling up gently on the Top Cover Lip Carefully remove the jammed do...

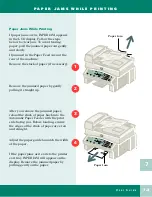
Страница 79: ...ght up After you remove the jammed paper reload the stack of paper back into the Automatic Paper Feeder with the print side facing you Before loading ensure the edges of the stack of paper are even an...

Страница 80: ...ng paper properly See Chapter 1 and that the adjustable paper guide is positioned correctly Do not overload the paper Never exceed the maximum capacity of 100 sheets of paper in the Automatic Paper Fe...

Страница 81: ...Install a new ink cartridge DUPLICATED WITH _ _ The number entered is already stored in another speed dial location The two dashes refer to the speed dial number you enter Check the number and enter...

Страница 82: ...y changed to give the best results No action required MEMORY FULL The machine s memory is full Delete unnecessary documents Retransmit after more memory becomes available Split the transmission into m...

Страница 83: ...the machine off and on Keep in mind that any documents in memory may be lost NO ANSWER Did not detect a fax tone after all retry attempts Check with the remote operator to ensure the remote machine is...

Страница 84: ...7 8 U s e r G u i d e L C D D I S P L A Y E R R O R M E S S A G E S...

Страница 85: ...Guide The following abbreviations are used in this index to reference these documents IG Install guide UG User Guide e UG electronic User Guide Located on your CD A adding a document to a scheduled f...

Страница 86: ...ion UG 1 2 front view UG 1 2 rear and side view UG 1 5 connect to a telephone and PC with a fax data modem eUG to a telephone and a PC with a modem e UG to a telephone and an answering machine e UG to...

Страница 87: ...ialing storing speed dial numbers for e UG group number e UG I Industry Canada e UG information getting more IG 2 8 ink cartridges UG 6 3 6 4 6 5 aligning e UG alignment UG 6 10 installing UG 6 7 part...

Страница 88: ...UG O on hook dial button using e UG options setting user IG 1 12 overview UG 5 2 P Pagis Pro e UG start e UG panel control IG 1 4 paper feeding problems e UG guidelines UG 1 29 special media guideline...

Страница 89: ...lume UG 4 4 ringer volume setting UG 1 18 RX reduction UG 1 11 S safety and legal requirements for Xerox Europe e UG safety and regulatory information e UG safety notes UG vi symbols used UG vi safety...

Страница 90: ...emote RCV code UG 1 11 RX reduction UG 1 11 send from memory UG 1 12 system ID setting UG 1 14 system options setting date and time UG 1 15 default printer settings UG 1 20 language UG 1 18 ringer vol...

Отзывы: