background image

24

Inside the WorkCentre

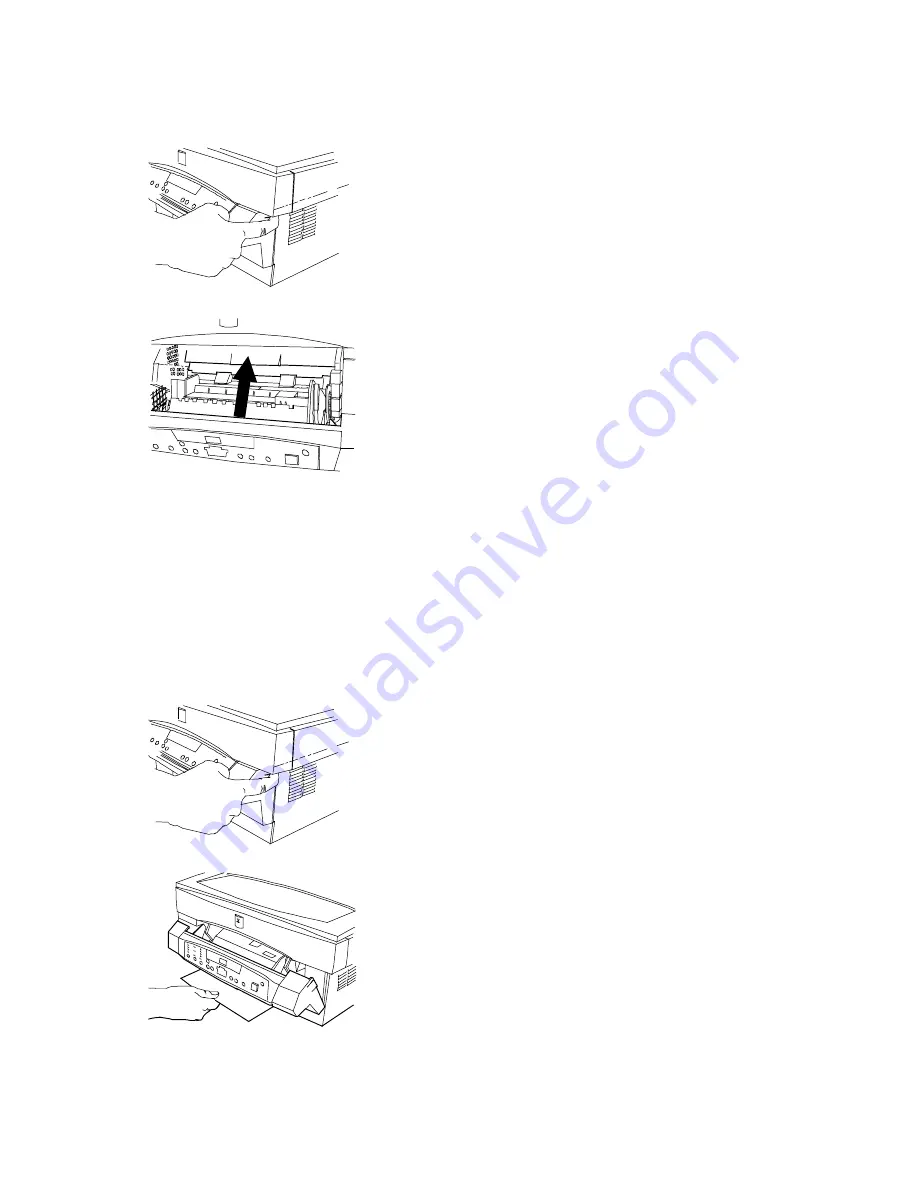
E2 Jam

1. 

Open the front door by pushing in on
the front door latches on each side of
the front door.

2. 

Lift the toner cartridge handle.

3. 

Remove the toner cartridge.

4. 

Remove any paper that may be inside the WorkCentre.

5. 

Install the toner cartridge.

6. 

Close the front door.

Paper Exit Area

E3 Jam

1. 

To reduce the pressure on the paper,
open the front door by pushing in on
the front door latches.

2. 

With the front door partially open,
remove any paper that may be in the
paper exit area.

Содержание WorkCentre XE80

Страница 1: ...WorkCentre XE Series XE60 62 80 82 701P98848 9 98...

Страница 2: ...of the following measures Reorient or relocate the receiving antenna Increase the separation between the equipment and the receiver Connect the equipment into an outlet on a different circuit than the...

Страница 3: ...vision of the copyright law Copying of other items may be prohibited If you have any questions seek legal advice 1998 Xerox Corporation Xerox The Document Company the stylized X and the identifying pr...

Страница 4: ...Paper from the Drum Cartridge 7 Installing the Toner Cartridge 8 Getting To Know Your WorkCentre 8 Installation 9 Requirements 9 Connecting the Parallel Cable XE80 XE82 10 Connecting the Power Cord 10...

Страница 5: ...from the Start Menu 34 Displaying the Properties dialog from the Xerox Printer Services Program Status Monitor 34 Properties Tabs 35 On Line Help 35 Printer Driver Help Windows 95 98 and NT 35 Creatin...

Страница 6: ...ister your warranty by phone or for assistance with the installation of your WorkCentre you may call 1 800 TEAM XRX 1 800 832 6979 Service A Customer Service Support Representative will assist you in...

Страница 7: ...tablished environmental standards Please read the following instructions carefully before operating the WorkCentre and refer to them as needed to ensure the continued safe operation of your WorkCentre...

Страница 8: ...el If you are not sure of the type of power available consult your local power company Do not allow anything to rest on the power cord Do not locate the copier where persons will step on the cord Slot...

Страница 9: ...rator serviceable areas within these covers Never defeat interlock switches Machines are designed to restrict operator access to unsafe areas Covers guards and interlock switches are provided to ensur...

Страница 10: ...Series Digital WorkCentre XE60 XE62 is 6 copies per minute The maximum print speed for the Document WorkCentre XE80 XE82 Series Digital WorkCentre is 8 prints per minute The WorkCentre features a high...

Страница 11: ...l 7 Paper tray 8 Starter Toner cartridge Do not remove the toner cartridge from the foil bag until you are ready to install it in the WorkCentre Keep the WorkCentre box packing materials and shipping...

Страница 12: ...ment cover so that the left hinge separates Remove the restraining strip and reconnect the document cover to the WorkCentre 3 Open the front door by pushing in on the front door latches on each side o...

Страница 13: ...er tray so that the paper tray guide is facing front 2 Insert the paper tray into the paper tray slots at the rear of the WorkCentre 3 Ensure that the Paper Tray snaps into place The Paper Output Supp...

Страница 14: ...n the front door by pushing in on the front door latches on each side of the front door 2 With the sheet of black protective paper attached carefully remove the cardboard from the drum cartridge Make...

Страница 15: ...distribute the toner evenly inside the reservoir 3 Hold the handle of the toner cartridge which locks in place so that the stamped markings are facing upward In the future when the toner cartridge ha...

Страница 16: ...7 4 Gently insert the toner cartridge inside the WorkCentre 5 Push firmly until the toner cartridge is fully seated and the handle springs slightly back 6 Close the front door...

Страница 17: ...panel 3 Paper output support 4 Front door 5 Front door latch 2 6 Paper release lever 7 Parallel Cable Port XE80 and XE82 only Use only cables labeled IEEE 1284 8 Power cord socket 9 Power switch on si...

Страница 18: ...entilated In direct sunlight Subject to other extreme conditions 3 Place the WorkCentre on a stable level surface 4 Leave enough space around the ventilation outlets for heat from the fan to dissipate...

Страница 19: ...er than the country where the WorkCentre was purchased you will need to make sure that your local power supply is compatible with your model If you plug the WorkCentre into an incompatible power suppl...

Страница 20: ...e Specifications Chart below gives you information about the types of paper that can be used at the paper input area Paper Input Paper Tray Paper Sizes 3 7 8 x 5 7 8 to 8 x 14 98 to 216 x 315 330 mm P...

Страница 21: ...es have clasps strings snaps cellophane windows peel off adhesive strips are heavily textured coated or embossed are cotton paper composed of more than 25 of recycled paper Do not insert paper with me...

Страница 22: ...right when looking from the front of the printer Leave a gap of approximately 1 32 1 mm between the paper guide and the left edge of the envelope When copying envelopes labels and transparencies it is...

Страница 23: ...ailable Use Text to copy documents containing mostly text Use Photo when the originals are photographs Toner Saver mode lowers the cost of copying by decreasing overall copy density on each page This...

Страница 24: ...per tray is out of paper or a misfeed is located at the paper tray The indicator light is green The jam indicator blinks when a jam occurs and a fault code will appear refer to WorkCentre Fault Codes...

Страница 25: ...n the light is on printing is in progress When the light is off there is no communication to or from the PC When the light is blinking data is being received from the PC Ready Indicator light Start Pr...

Страница 26: ...ogram will flash 5 Press the 1 button until the option number you want is displayed 6 Press Start to store the selection NOTE To continue making other changes press the Clear button and repeat steps 3...

Страница 27: ...4 120 seconds 2 Time out to Power Save Part of Power Saver 0 Off 1 45 seconds 2 90 seconds 3 2 minutes 4 5 minutes 3 Time out to Power Shut off Part of Power Saver 0 2 minutes 1 5 minutes 2 15 minutes...

Страница 28: ...m edge When Off another 4 mm will copy however the image quality may deteriorate as it gets closer to the bottom edge 0 On 1 Off 10 Zoom R E Preset 50 200 in 1 increments default 50 14 Return to Print...

Страница 29: ...t cover by reversing the above step Two Sided Copying 1 Place side 1 original face down on the Document Glass with the TOP toward the LEFT Lower the document cover NOTE 16 lb 60 g m copy paper is not...

Страница 30: ...o communication to or from the PC When the light is blinking data is being received from the PC Power Saving For assistance in changing the preset values refer to Programmable Features Power Reduction...

Страница 31: ...d the Normal Copy settings are as follows Copy Quality Auto Copy lighter darker Normal Priority Magnification 100 Quantity Selected 1 NOTE Time periods for the Power Shut Off Power Save and Auto Clear...

Страница 32: ...luding the jammed paper from the paper tray If the jammed paper will not come out easily do not pull too hard as you may tear or damage the copying printing mechanism In such cases go to the Inside th...

Страница 33: ...handle 3 Remove the toner cartridge 4 Remove any paper that may be inside the WorkCentre 5 Install the toner cartridge 6 Close the front door Paper Exit Area E3 Jam 1 To reduce the pressure on the pap...

Страница 34: ...rtridge Toner indicator light When the toner cartridge replacement indicator appears the toner cartridge will need to be replaced soon Be sure to have a replacement cartridge in stock You may extend t...

Страница 35: ...ars lines marks or spots on copies If defects are on the original press the copy contrast button to lighten the background of your copies If the defects are in the same place on every page clean the d...

Страница 36: ...pier after a paper jam has been cleared If copying onto envelopes insert the envelopes so that the flap is closed and there is a small 1 32 1mm gap between the left edge of the envelope and the paper...

Страница 37: ...settings in the Windows Control Panel to make sure that the print job is being sent to the correct port For Example LPT1 Uninstall then reinstall the WorkCentre printing software Half of the page is...

Страница 38: ...4 parallel cable To ensure reliability use the IEEE 1284 compliant parallel cable that is supplied with the machine Only cables labeled IEEE 1284 can be used with your WorkCentre If your PC does not h...

Страница 39: ...llation of 3 1x Choose File from the menu bar in Program Manager and then choose the Run command For Installation for Windows NT 4 0 95 or 98 Click on the Start button and then choose the Run menu opt...

Страница 40: ...trol the print queue to gain access to the Printer Driver Properties Printer Services Program Options and the on line Help system To use the Status Monitor 1 Click on Start 2 Select Programs 3 Select...

Страница 41: ...Printer Services Program Options and the on line Help system To use the Status Monitor 1 Open Program Manager 2 Double click Xerox WorkCentre XE program group 3 Double click Status Monitor To use Stat...

Страница 42: ...to display the Printer Driver dialog including Displaying the Driver Properties dialog from an application Displaying the Properties dialog from the Start Menu Displaying the Properties dialog from t...

Страница 43: ...entre XE printer icon and click Properties or click Properties from the File menu Windows 3 1 1 Double click Main Program Group 2 Double click Control Panel Program Group 3 Double click Printers Progr...

Страница 44: ...On Line Help The WorkCentre XE Series Printer Driver includes a comprehensive on line help system designed to answer all your questions about using the Xerox WorkCentre XE Properties dialog The help...

Страница 45: ...am Manager and then choose the Run command 3 Type D MAKEDISK MAKEDISK EXE or the appropriate drive letter depending on your CD ROM Drive in the command line box Click on the OK button to proceed 4 Fol...

Страница 46: ...dampen the cloth slightly with water but be careful not to let any water drip onto the WorkCentre or inside it Cleaning the Document Glass and Cover Keeping the document glass clean helps ensure the...

Страница 47: ...gerprints water alcohol or other solvents that will damage the drum surface Do not touch the drum surface with the edges of the rolled up paper Follow the procedure below to clean the drum surface 1 U...

Страница 48: ...Cartridge 4 Close the front door 5 Insert the shipping screw stored in the plastic insert in the right hand side of the front door 6 Push in the paper tray extension if in use remove any paper from t...

Страница 49: ...tain period of use these parts will need to be replaced The part numbers for these parts are as follows Toner cartridge Drum cartridge Part Number 6R916 Part Number 13R553 Copy Print Count For Copy Pr...

Страница 50: ...open The number of times the WorkCentre is switched on and off Double sided copying will use more toner per ream of paper High humidity To get the most from your toner cartridge Always copy with the d...

Страница 51: ...ing the Toner Cartridge If you notice that the print quality is becoming more and more faint remove the toner cartridge and shake it gently from side to side to distribute the toner evenly through the...

Страница 52: ...rum end of life The order number for the drum cartridge is 13R553 Replacing the Drum Cartridge Ensure that you follow steps 1 through 14 it is essential that you complete all 14 steps in order for the...

Страница 53: ...et it down on a clean uncluttered and level surface The new drum cartridge is sealed with a sheet of black protective paper to shield the drum from light To prevent damage to the drum surface do not r...

Страница 54: ...the toner cartridge inside the WorkCentre 13 Push where indicated in the illustration until the toner cartridge is fully inside the WorkCentre and the handle springs back 14 Ensure that the WorkCentre...

Страница 55: ...or 60Hz Power consumption Max power 6 kW Resolution 600 dpi Copy speed Print Speed 6 copies per minute 8 prints per minute Noise Level Less than 66 dBA during operation Operating temperature 50 F to...

Страница 56: ...AND YOU MAY ALSO HAVE OTHER RIGHTS THAT VARY FROM STATE TO STATE OR PROVINCE TO PROVINCE Proof of Purchase Within 10 days of purchase complete and mail the enclosed registration card to Xerox Corporat...

Страница 57: ...ing materials to facilitate shipment Repair service is available during all three years of the warranty period What must you do Your unit is designed to perform with a minimum amount of user maintenan...

Страница 58: ...CONSEQUENTIAL DAMAGES EVEN IF XEROX KNOWS OR IS INFORMED THAT SUCH DAMAGES ARE POSSIBLE IMPORTANT SOME STATES DO NOT ALLOW THE EXCLUSION OR LIMITATION OF INCIDENTAL OR CONSEQUENTIAL DAMAGES SO THE AB...

Отзывы: