manualshive.com logo in svg
background image

WorkCentre

5632/5638/5645/5655/5665/567

5/5687

Î

Î

Î

Î

Î

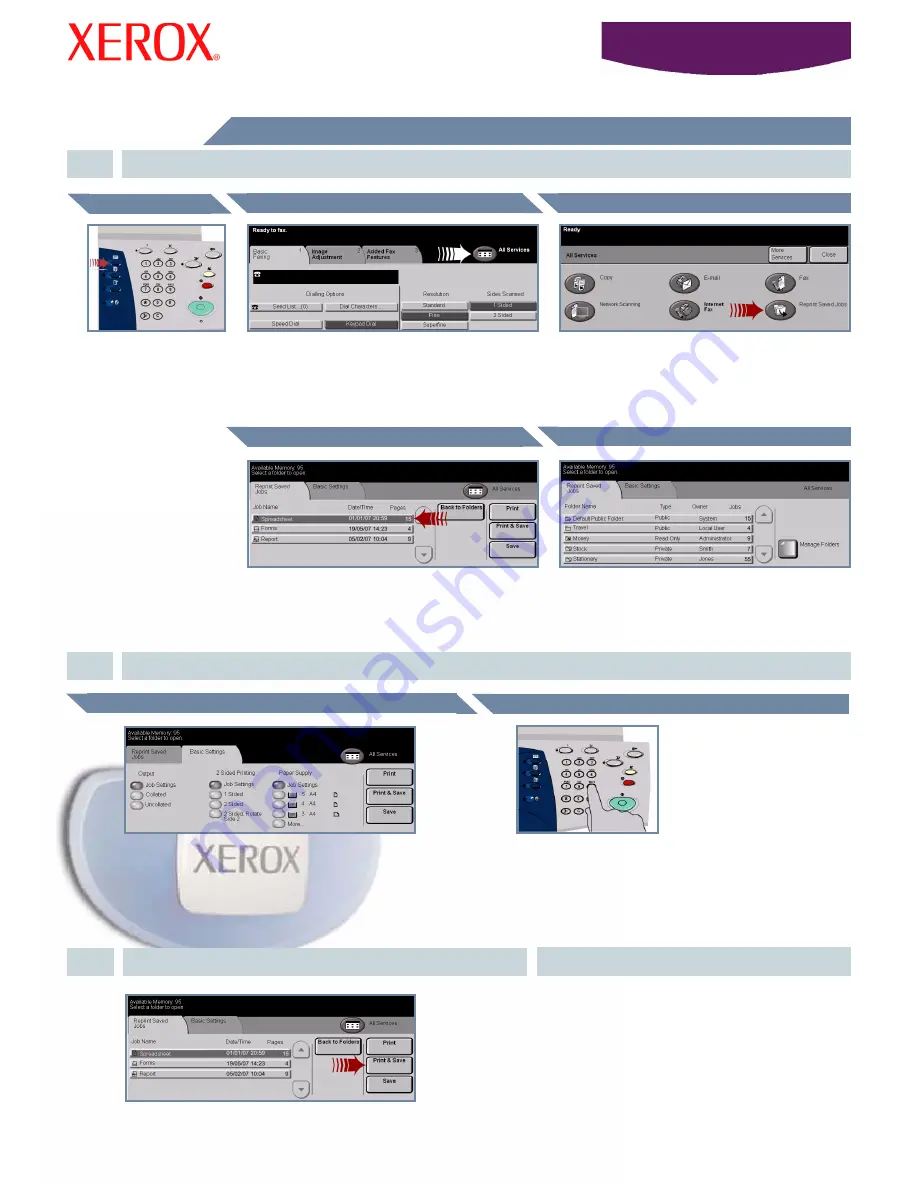
How to Reprint a saved job

1.

RETRIEVE THE SAVED JOB

2.

From the Job Name list, select


the job to be reprinted

From the Folder Name list, select the folder that 
contains the job you want to reprint.

Use the

 numeric keypad


to enter the quantity of 
reprints to be made.

3.

START THE JOB

MORE INFORMATION

For more information, please refer to:

-

Interactive User Guide CD 2

-

Quick Use Guide

-

http://www.xerox.com/support

Basic Settings

Reprint Saved Job Button

All Services Button

Features Button

AMEND SETTINGS AND PRINT QUANTITY

Quantity of Prints

Select the 

Print

 or 

Print and Save

 button to start your 

job. That completes the procedure.

If required, change the basic setting of the saved job 
from the 

Basic Settings

 tab.

Press the 

Features


button to display the 
features selection 
screen.

Select


the 

All Services

 button 

OR

 the 

Reprint 

Saved Jobs 

tab.

Select the 

Reprint


Saved Job 

button. If you cannot 

see the Reprint Saved Job button, select the 

More 

Services

 button first.

Select the Folder

Select the Job

Содержание WorkCentre 5638

Страница 1: ...tray except the Bypass Tray Confirm the paper size type settings on the user interface QUICK FAX Load the original face up in the document handler Touch the FAX or INTERNET FAX tab Touch the screen bu...

Страница 2: ...on screen Select the All Services button OR the Save Job for Reprint tab Select the Save Job for Reprint button If you cannot see the Save Job for Reprint button select the More Service button first U...

Страница 3: ...ass and register it to the rear right corner Press the Features button to display the features selection screen Select the All Services button OR the Internet Fax tab Select the Internet Fax button If...

Страница 4: ...the Document Glass and register it to the rear right corner Press the Features button to display the features selection screen Select the All Services button OR the E mail tab Select the E mail button...

Страница 5: ...own on the Document Glass and register it to the rear right corner Press the Features button to display the features selection screen Select the All Services button OR the Basic Faxing tab Select the...

Страница 6: ...eatures button to display the features selection screen Select the All Services button OR the Network Scanning tab Select the Network Scanning button If you cannot see the Network Scanning button sele...

Страница 7: ...down on the Document Glass and register it to the rear right corner Press the Features button to display the features selection screen Select the All Services button OR the Basic Faxing tab Select the...

Страница 8: ...document face down on the Document Glass and register it to the rear right corner Press the Features button to display the features selection screen Select the All Services button OR the Basic Copyin...

Страница 9: ...and Colour buttons to reprogramme the tray if the paper size type or 4 MORE INFORMATION Do Not load paper above the Maximum Fill line For the Bypass Tray and Paper Trays 1 and 2 adjust the guides to...

Страница 10: ...Guide http www xerox com support Basic Settings Reprint Saved Job Button All Services Button Features Button AMEND SETTINGS AND PRINT QUANTITY Quantity of Prints Select the Print or Print and Save bu...

Отзывы: