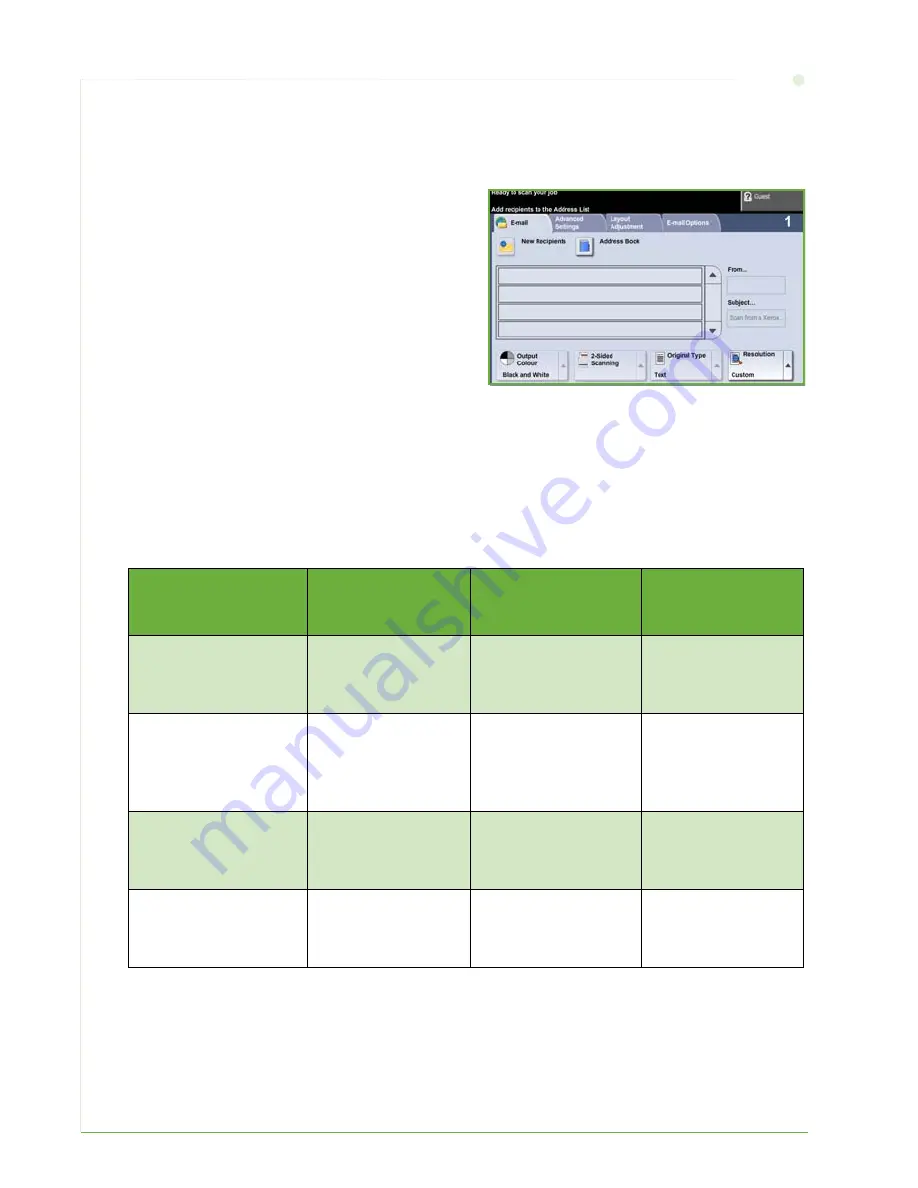
background image

28

quick use guide

Sending an E-mail

1

Load the documents to be E-mailed either face down on the Document Glass or face 
up into the Document Feeder.

2

Press the 

Services Home

 button on the 

Control Panel.

3

Select 

E-mail

.

4

Select 

From

 and enter the address you 

want to appear in the 

From 

field of the 

E-mail.

NOTE: 

This field may have been preset 

by the Administrator and may not be 
editable.

5

Select 

New Recipient

 and enter the E-mail address of the recipient. If an address 

book has been set up, select 

Address Book

 and enter the name of the recipient. The 

address book will be searched and the recipient can be selected from the resulting 
list of names. Multiple recipients can be added to the 

Address List

 in this way.

6

Select any setting appropriate for your document from either the 

E-mail, Advanced 

Settings, Layout Adjustment

 or the 

E-mail Options 

tabs.

7

Press 

Start

 to scan your document and send it as an attachment to an E-mail.

NOTE: 

To confirm the job, press the 

Job Status

 button on the Control Panel. The job 

will be displayed in the job queue. 

E-mail

Advanced 

Settings

Layout 

Adjustment

E-mail Options

Output Color

Black and White, 
Grey Scale or Color 

Lighten/Darken

Lighten or darken 
the image

Original Size

Set size of original

File format

PDF, TIF or JPEG

2-Sided Scanning

Original can be 1 or 
2 sided 

Background 
Suppression

Suppress dark 
backgrounds

Scan to Edge

Scan the complete 
page

Reply To

Set E-mail address

Original Type

Text, Photo or Photo 
and Text.

Quality/File Size


Optimum quality 
versus file size

Message

Enter message 
contents

Resolution

From 72x72 to 
600x600 dpi

Resolution

From 72x72 to 
600x600 dpi

Содержание WorkCentre 4260C

Страница 1: ...WorkCentre 4260 Series Quick Use Guide Version 0 3 29 07 08...

Страница 2: ......

Страница 3: ...WorkCentre 4260 Series Quick Use Guide...

Страница 4: ......

Страница 5: ...Printer Install optional features Operate the WorkCentre 4260 Series Printer Contents Install the WorkCentre 4260 Series 3 Switch On the Machine 5 Your WorkCentre 4260 7 Connecting to the Network 10...

Страница 6: ...8 by Xerox Corporation All rights reserved Copyright protection claimed includes all forms and matters of copyrighted material and information now allowed by statutory or judicial law or hereinafter g...

Страница 7: ...ard Standard Standard Scan Standard Standard Standard E mail Standard Standard Standard Fax Optional Optional Standard Standard Paper Tray 1 Bypass Standard Standard Standard Standard Paper Tray 2 Opt...

Страница 8: ...ave Power Cord User Documentation CD System Administration CD Print Driver CD Quick Use Guide this book Print Cartridge Control Panel Labels Product Enablement Key Telephone Cable WorkCentre4260 Serie...

Страница 9: ...er cord to the machine and a suitable power supply outlet 3 Switch on the machine 4 Install the Product Enablement Key into the Card Reader Slot at the back of the machine 5 The Language Default scree...

Страница 10: ...nd select Next on each screen 12 The Congratulations screen will be displayed This indicates that you have successfully completed the System Settings portion of the Xerox Installation Wizard Select Fi...

Страница 11: ...ver 5 2 3 1 Control Panel Touch Screen and Numeric Keypad 4 Paper Trays Tray 2 3 4 and HCF are standard on the WorkCentre 4260XF and are optional on the WorkCentre 4260C S X Output Tray Collects outpu...

Страница 12: ...machine status and screens to select machine features Help Displays help messages for features and error messages Language Used to select the language shown on the display Power Use to reactivate the...

Страница 13: ...d documents to be copied face up in the input tray of the Document Feeder with the top of the document to the left or rear of the tray 2 Move the Document Guide to just touch both sides of the documen...

Страница 14: ...factory default setting Static IP address Use this method to manually assign an IP address provided by the network administrator When the machine is powered on it automatically uses DHCP to obtain its...

Страница 15: ...er the Administrator s Password 1111 and select Enter 2 Press the Machine Status button then select Tools Connectivity and Network Setup Advanced Network Setting Network Setup TCP IP Options 3 Select...

Страница 16: ...and click OK Click OK to start the installation procedure 3 Select the language for the installation and click Continue The driver screen is displayed NOTE The selections are Install Print and Scan Dr...

Страница 17: ...mail account by sending an E mail to the Xerox machine account This task should be completed at a mail client on your network that supports SMTP Simple Mail Transfer Protocol and POP3 Post Office Prot...

Страница 18: ...menu click Services E mail Settings Default 12 To amend the settings on the E mail Setup screen click Edit for each options group 13 When you have made your selections click Apply NOTE For more infor...

Страница 19: ...Fax Install Screen will appear 6 Select the required or nearest country location by selecting the entry in the Country Setup list and select Next 7 Select the required dialing method For a tone line...

Страница 20: ...e is configured and ask you to remove the Feature Enablement Key Network Accounting Network accounting provides the ability to manage usage of the machine with detailed cost analysis capabilities Prin...

Страница 21: ...ax 2 Press the Log In Out button on the Control Panel enter the Administrator s Password 1111 and select Enter 3 Press the Machine Status button then select Tools User Interface Service Enablements Se...

Страница 22: ...justment Output Format Reduce Enlarge Reduce or enlarge the image 25 to 400 Original Type Define the original document as text text and photo or photo to optimise resolution settings Original Size Set...

Страница 23: ...ng coloured paper or newspaper originals Creating booklets A sequential set of either 1 sided or 2 sided originals can be copied to create handy booklets The machine produces 2 sided prints automatica...

Страница 24: ...ver has various tabs that contain options and properties Use the Paper Output tab to choose the type of media size and color and output choices such as 2 Sided Prints The Layout Watermark tab has vari...

Страница 25: ...ngs down arrow Select Save As to save current settings or select a previously saved setting Toner Saver If you are printing draft documents you can reduce the toner dry ink used by using the Toner Sav...

Страница 26: ...t speed dial number Add add several recipients to the Send List to send a fax to several recipients This button provides access to the dial directory for individuals and groups Select the required fea...

Страница 27: ...quick use guide 23 NOTE To confirm the Fax job press the Job Status button on the Control Panel to display the Job Status screen The queued job will be displayed...

Страница 28: ...up an Address Book Use this feature to store destination names and fax numbers in your device Entries stored here will be available for selection within the Send List feature on the Fax options tab Se...

Страница 29: ...k Scanning Advanced Settings Layout Adjustment Filing Options Output Color Black and white or color scan Lighten Darken Lighten or darken the output Original Size Set size of original File Name If fil...

Страница 30: ...Job Status button on the Control Panel to display the Job Status screen The queued job will be displayed Update Templates Use a recently created or updated template before the system automatically ad...

Страница 31: ...pear in the Templates list on the left hand side Name Format 4 To select the name and the format of the scanned document click Edit Enter a name for the scanned document and choose the format from TIF...

Страница 32: ...s way 6 Select any setting appropriate for your document from either the E mail Advanced Settings Layout Adjustment or the E mail Options tabs 7 Press Start to scan your document and send it as an att...

Страница 33: ...ll also be able to attach a full color image to your email in a JPEG format This format is a better compression format for color bitmaps To enable Color scan to E mail select the E mail tab and choose...

Страница 34: ...ries is a powerful multi function device with many digital functions integrated into one sleek system It is designed to support large workgroups in different production environments You can do more wi...

Страница 35: ...Book with recipients details like E mail address or fax numbers Address Numbers registered for the Address Book can also be used as speed dial codes If configured your machine is able to support both...

Страница 36: ...h as paper staples and customer replaceable units Units like the Print Cartridge and Staple Cartridge are customer replaceable meaning you can replace the consumable without having to call out a Xerox...

Страница 37: ...Documents will not feed through the Document Feeder Ensure that all staples or paper clips have been removed from the originals Ensure the document feeder is not overloaded Max 100 documents Ensure t...

Страница 38: ...document jam has occurred Follow the instructions on the display and remove all the documents from the document feeder and document glass as instructed The illustration below shows the document feede...

Страница 39: ...tions will be provided by the documentation that is supplied on CDs with the WorkCentre 4260 Series Alternatively you can access the documents from www xerox com support User Guide contains instructio...

Страница 40: ...36 quick use guide On CentreWare Internet Services Click Index to view the contents of the Internet Services site Click Help to take you to the Xerox on line support web site...

Страница 41: ...y 2 0 Jakarta 7 0 Quito 5 0 Bulgaria 2 0 Krasnoyarsk 7 0 Eastern Time US Canada 5 0 Egypt 2 0 Beijing 8 0 Atlantic Time Canada 4 0 Isreal 2 0 Chongqing 8 0 Caracas 4 0 South Africa 2 0 Hong Kong 8 0 L...

Страница 42: ...38 quick use guide...

Отзывы: