manualshive.com logo in svg
background image

Appendix Xerox FreeFlow Quick Print 


Print Provider Guide 


5


 Adding a Printer 


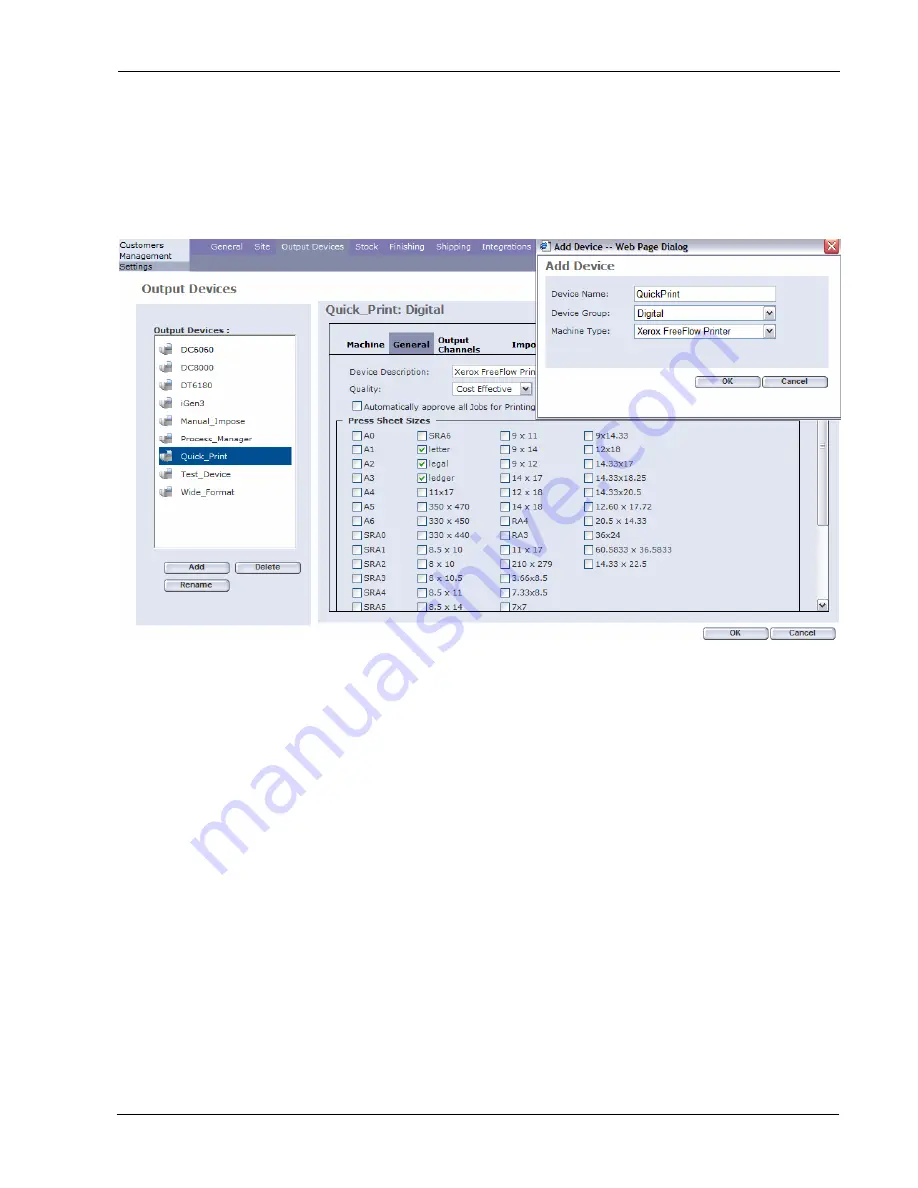
Figure 1: Adding a Xerox Free Flow Printer  


Add an Output Device 

In


order


to


create


a


Xerox


FreeFlow


Printer


carries


out


the


following


steps


10


Select


Settings,


then


Output


Devices


tab


11


Select


Add


in


Output


Devices:


pane


12


In


the


Add


Device


dialog


Enter


Device


Name

,


Device


Group


select


Digital


and


Machine


Type


select


Xerox


FreeFlow


Printer


13


Select


OK


14


Optional


change


the


Device


Description


and


add


appropriate


Press


Sheet


Sizes


NOTE: 

 It is best to enter a description for the printer because of the various displays of the 

printing device among the dialog boxes such as Pricing, Edit Properties, and Print Properties.

Содержание FreeFlow 701P45570

Страница 1: ...Quick Print Integration for FreeFlow Web Services Version 5 0 July 2006 701P45570...

Страница 2: ...LTD all rights reserved Hummingbird NFS Solo is a registered trademark of Hummingbird Communications Ltd Imaging Technology provided under license by Accusoft Corporation ImageGear 1996 2005 by AccuSo...

Страница 3: ...Printer in FreeFlow Printer Administration 1 Refer to the Xerox FreeFlow Printer Operator and Administrator Guide to carry out these steps Before you start create the Printer s in Printer Administrato...

Страница 4: ...name will appear 6 Press Permissions button and make sure that everyone has Full Control 7 Press OK to save changes The Folder properties window regains the focus 8 Press OK to save changes 9 Open My...

Страница 5: ...evices tab 11 Select Add in Output Devices pane 12 In the Add Device dialog Enter Device Name Device Group select Digital and Machine Type select Xerox FreeFlow Printer 13 Select OK 14 Optional change...

Страница 6: ...e supports multi queue system checkbox 4 Select Folder Type Network 5 Select Application Xerox FreeFlow Printer this could be the only selection 6 Type the shared Cold Folder directory name in Folder...

Страница 7: ...reeFlow Printer Administration to carry out the following steps 1 Select Device supports multi queue system link 2 Select Get Printers button The printers previously set up will display 3 Select Selec...

Страница 8: ...ess this folder to complete the production print 5 The approval is successful when the icon appears in the Status column 6 A message will be shown to the user saying that the files are stored in the p...

Страница 9: ...ory or catalog ready job 1 Select Tasks Production menu Choose Job in Approval queue 2 Press on Approve button 3 The approval is successful when the icon appears in the Status column Jobs that fail in...

Страница 10: ...2 Select the Add Row button select Per Copy for Pricing Model and enter appropriate prices 3 Select the Xerox FreeFlow Printer from the Output Device drop down menu This was the output device previous...

Страница 11: ...roduction job ticket produced by an order from the FreeFlow Web Services the device settings alert message will occur This can be corrected at the QuickPrint interface Select OK and attend to this at...

Страница 12: ......

Отзывы: