6.6 Error Messages and Error Codes
185
6.6
Error Messages and Error Codes
Error Messages (in Alphabetical Order)
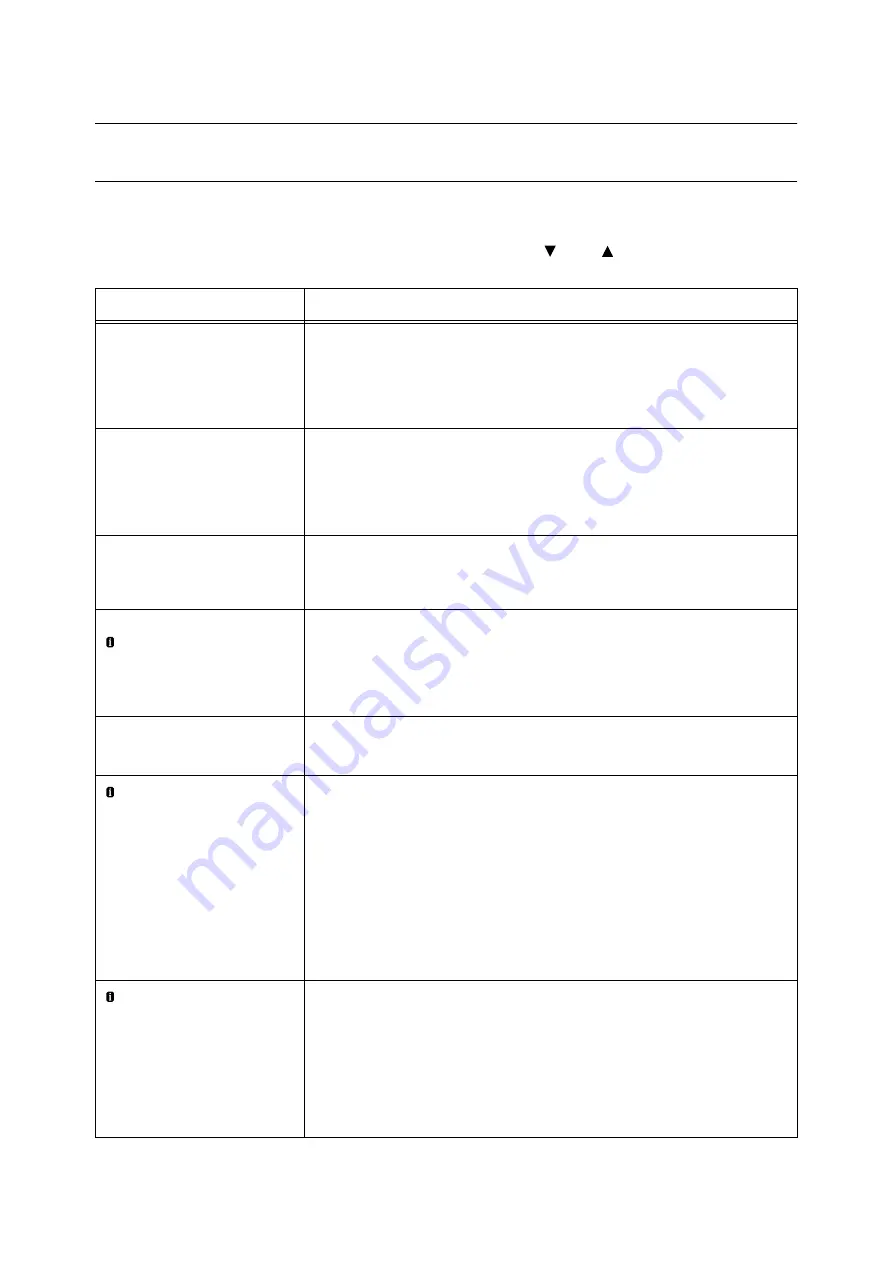
The following table lists the error messages that appear on the control panel.
Note
• If the message text cannot fit on a single screen, use the <
> and <
> buttons to change screens.
Message
Symptom/Cause/Remedy
Add paper to Bypass
<size and orientation> <type>
The bypass tray is out of paper.
Load paper of the size, orientation, and type indicated by the message, into the
bypass tray.
Refer to
• “Loading Paper in the Bypass Tray” (P. 95)
Add paper to Tray N
<size and orientation> <type>
(N: Whichever from 1 to 4)
Paper tray N is out of paper.
Load paper of the size, orientation, and type indicated by the message, into paper
tray N.
Refer to
• “Loading paper into Trays 1 through 4” (P. 98)
Automatically select
available paper type
Press OK to print
Or, use Delete Job
The type of paper specified in the print driver is not loaded in the paper tray. Press
the <OK> button on the control panel to print on a different type of paper, or press the
<Delete Job> button to cancel printing.
Can print in Black
Replace Toner: X
Or, use Delete Job
(X: C, M, or Y)
Only monochrome printing can be performed.
To perform color printing, replace the displayed X toner cartridge with a new one.
Note
• Pressing the <Information> button will display detailed information on the control
panel.
Check or adjust
Tray N Paper Guides
(N: Whichever from 1 to 4)
Paper tray N is pulled out.
After confirming that paper is loaded, push tray N into the printer.
Check Bypass
<size and orientation> <type>
• The paper size or
orientation loaded
is different from
the selected size.
Reload paper.
• Paper type loaded
is different from
the selected type.
Reload paper.
The correct type of paper is not loaded in the bypass tray.
Load paper of the size, orientation, and type indicated by the message, into the
bypass tray.
Note
• Pressing the <Information> button will display detailed information on the control
panel.
Refer to
• “Loading Paper in the Bypass Tray” (P. 95)
Check Bypass
<size and orientation> <type>
• Return to the
previous screen,
check if Tray 5
(Bypass) has been
loaded with the
indicated size.
Then press OK.
The correct type of paper is not loaded in the bypass tray.
Load the type of paper indicated by the message into the bypass tray and then press
the <OK> button.
Note
• Pressing the <Information> button will display detailed information on the control
panel.
Содержание DocuPrint C2255
Страница 1: ...DocuPrint C2255 User Guide ...
Страница 176: ...176 6 Troubleshooting 2 Remove the jammed paper 3 Gently close cover C ...
Страница 210: ...210 7 Maintenance 12 Close the front cover ...
Страница 266: ...266 7 Maintenance 7 Rotate the lever to the right to lock it 8 Close the front cover ...
Страница 313: ...Index 313 WSD 26 129 X XeroxStdAccounting 147 XPS 113 XPS file 309 ...
Страница 322: ...DocuPrint C2255 User Guide Fuji Xerox Co Ltd ME4197E2 1 Edition1 March 2008 Copyright 2008 by Fuji Xerox Co Ltd ...


